Showing posts with label Freemotionquilting Practice. Show all posts

Wednesday, 16 April 2025

Practising the Flutterby Motif

First of all...thanks to everyone that responded to my last post. I received each comment via email! Yah!

Now to some serious quilty talk...practice, practice practice!

I have the last charity quilt to complete
...a full on 'Garden Quilt'. For some time now I have been thinking about doing a butterfly design on it. So, I did some practice of a motif that I had seen on the internet...I think by Adria (sorry can't remember her last name but she comes up on my FB with classes that she offers). As the charity quilt is a large lap size quilt I made myself a quilt sandwich out of calico and tried this out.
Not too bad but somehow did not like the shape of my butterflys. Then I remembered the Handiquilter Flutterbys Minute Motifs and gave that a whirl on a small piece of fabric.
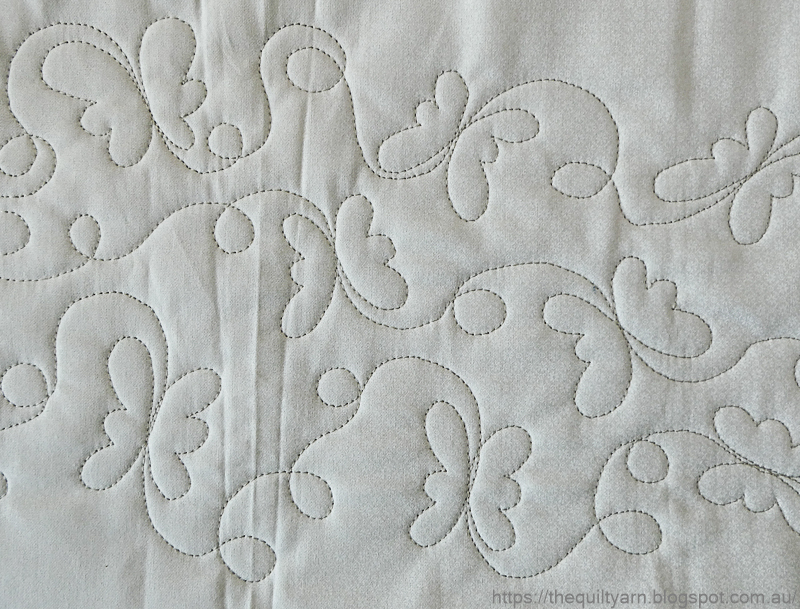
Not that great but I liked the shape much better. Definitely needed more practice on a bigger piece. Then I remembered my UFO quilt. I have had that quilt for several years. It is basted (just goes to show how long a good baste will last) and I have used it in my workshops for beginning freemotion quilters to have a trial on their domestic machines with a 'real' quilt. The purpose is to demonstrate how disorientating it is to have a scrappy (and very colourful) quilt under the throat of your machine and how to plan and structure your edge to edge design, i.e. know the path you are going to take and how you change direction when quilting. This has been very difficult for most people as the pure riot of colours and bulk of the quilt usually leads to a fair amount of confusion. It's been a great teaching tool but after the last class I thought that I would retire this quilt.

Spent some time taking the quilting attempts of various classes out, steamed it up and off we went. I am not sure what this quilt is going to become...maybe another quilt for the cats or a floor rug for the soon to be new addition to the family. Not sure yet. The quilt has some amazing blocks in there, all a bit wonky (that's why they became UFOs) but never mind...I even found the first fabric that I ever bought in there.

Here is the path of the design


So I started with the Flutterbys on the quilt. Was not sure exactly how big I wanted to go but thought it would become evident once I started on the quilt. I think I ended up doing the Flutterbys about 1.5in - 2in. As you need some speed as you are quilting it it did get a bit wonky here and there...it was particularly challenging to keep each side approximately the same. Could at times not see where I had been before.
Soon realised that it did not matter that much because you cannot actually see the design that well on a colourful quilt like this. I am still quilting with the light green Mettler Silky Finish 50 on the machine. Have several cones of that and it's about time that I make a bit of an in-road into my thread stash.
Overall the butterflys looked alright, every now and then a bit wonky, initially too skinny but I soon got in the swing of things. Looking at the Handiquilter Minute Motif now I can see that I have done the design a bit different to what they have, i.e. my top wings are a bit longer but that was a way for me to be sure of where I was going thinking 'top wing, then down to the bottom wing and up again'.

Finished it today but you be hard pressed to see the design unless you hold the quilt in your hands.

However, after having done this I feel a bit reassured that I can execute this design on the charity quilt. Had no problem travelling along, maybe need to make my loops slightly smaller but even when you get yoursef stuck on top of a butterfly you can always reverse out and start looping again from the bottom of the motif. My only other issue was to swing out far enough to actually make the motif. Every now and then I had to give them a smallish bottom wing as I was getting too close to a neighbouring loop. But apart from that this design works very well as an overall design.

Will bind this with my leftover scraps of binding...bit excited about that because I almost used them all up by now.

Karin

Friday, 22 September 2023

Practice, Practice, Practice...

I am sure you heard that before. What makes good practice when it comes to freemotionquilting.

I have been thinking about this when I sat down to practice a little bit the other day after a few weeks of not quilting.

This is what my practice piece looked like
Looks random but it actually is not. In order to get the most out of freemotionquilting practice it is important to:
1. Decide what you want to get out of your practice, i.e.
- preparation for a particular design you might want to use on a quilt, i.e. an allover design or a particular motif
- trialing a new design that you have seen and would like to try out
- improving your muscle memory concentrating on the quilting path of designs that you already know
- improving your stitch quality
- trialing a new thread combination
- concentrating on a particular machine function like for example the use of the stitch regulator or a particular speed or even ruler quilting.

In the above example I started with a particular design, i.e. the swirls. Had seen a little video on IG and thought I give that a whirl. As I am not looking to quilt this on a quilt any time soon, I then continued with my usual practice which has the purpose of strengthening muscle memory.
2. Working on muscle memory
This can involve working on a design where you might feel that you need to get better at or just going through your repertoire of designs to reinforce the quilting paths. As you can see I did a lot of feathers in all sorts of direction because I have got a workshop coming up where I will have to demonstrate some feathers. In going around the perimeter I practiced different shapes and sizes and different ways of stitching the plumes. Sometimes I used a continuous feather and other times I used the heirloom feather. Some sizes were too big or too long, I then practiced building groups of feather plumes to manage not getting too big and also did the dragon fin feather for a bit of fun. In doing this I stitched very deliberately, not necessarily nicely but really thinking about the shape and sizes I was stitching and making a mental note of when the plume just got too big and started to look wonky.  Started echoing around some of the shapes and moved onto backfillers.
3. Working on auditioning different backfillers, looking at density and transitioning
Once I get going there are usually areas that are empty and lend themselves to filling. I usually do some pebbling or stacked swirls, just moving around and concentrating on the speed that I am quilting the pebbles with. I quilt them in manual mode and often need to start a bit slower until I can into the swing of it. As I am pebbling along I start incorporating other fillers into my arrangement which is a good way to manage transitioning from one design to another and finding out where you might struggle.
Moving on from the pebbles, I did little swirls, some flower arrangements, little swirls and a fern which completely went under and clearly did not fit that arangement.  

Preparing for quilting an allover design onto a quilt, I usually do the following:
- practice the design on a smaller scale by drawing on my Ipad until I feel that I got a quilting path worked out
- draw the design on paper and have it sitting next to my machine so I can glance at it from time to time to remind myself which way I am going
- prepare a large practice sandwich so that I can practice the design to the scale that it needs to be for the quilt that I am about to quilt
- quilt the design out following my drawn design
- repeat the process, sometimes a few times depending on the difficulty level of the allover design.
- once I feel comfortable with the scale and the path, go on the quilt...
Sometimes I practice particular motifs that I might want to use in a quilt like the Amish feathers in the picture below. For some reason I could not get that together in drawing it and found it easier to stitch it out. This clarified the way I had to draw them into a wholecloth design.
Similarly when I want to quilt with a ruler, I usually practice on a scrap piece first to familiarize myself with how the ruler sits in my hand, whether it slips and where it might need a sticky grip thingy on the back. 
This is the piece I quilted when I got Bethanne Nemesh' heart ruler
So, all in all, I guess what I am saying is to practice with purpose rather than doodling, although at times I also just doodle for the fun of it. But I think if you want to get better at FMQ practicing with a distinct purpose is more beneficila.

Karin


Karin

Popular Posts