Showing posts with label Bernina Q20. Show all posts

Tuesday, 8 July 2025

More Charity Quilts

I am running behind in the the quilting of the charity quilts. Have four more to go before I pick up new quilt tops, so I am really knuckling down trying to get this done (hopefully by mid - August). Very much in the mood for ruler quilting and the next quilt top presented the perfect opportunity to do some Baptist fans again.
I am using templates from Michael's Quilts. Purchased those a couple of years ago now and still think they are fantastic and the best on the market. Remembered that I looked at other ones at the time, i.e. Amanda Murphy had just brought out her Baptist fan rulers but they were too narrow for me. I was looking at a 1in space between the curves in order to use it as an allover design. That's how I eventually came across the templates from Michael Quilts. 
First issue was that my charity quilt was not exactly straight around the edges. As I can't mark the charity quilts my trusted masking tape came in really handy (using a lot of that lately). In order to start my fans I needed a straight edge, so I used a large right angle and marked the 5-1/2in height of the fans with masking tape straight across. Had not thought that through though as I needed to get my beginning fans straight! The first little circle is 1-1/2in high so I had another straight tape line at 2in and from there I chalked in the 1-1/2in line.
Bit clumsy, but worked fine. As I was stitching along I removed the tape
Took me a moment to get comfortable again with the templates. The largest template is based on an 11in circle, hence it is quite big to use on a sitdown longarm. Takes up my whole hand.
As you can see I have lots of little grippy disks on the back and also use the sticky drawliner pieces to hold the ruler in place. Similarly, the smallest fan is based on a 3in circle and is somewhat awkward to hold, so a slow pace was the go. Initially I was dreadful at backtracking over previously stitched lines, but improved as I went along. The trick is to use the top of the templates to help you stitch along 1in to get to the next fan.
Now, I am not going to say this is super easy...it's not. Being on the sitdown means everything moves and you are surrounded by your fabric sandwich which may not always cooperate in terms of push and pull. Nevertheless I was impressed how consistent this looked after a few rows. I forgot how heavy this is on the shoulders, so given my shoulder issues I had to really take it easy. So I took my time doing about 2- 3 rows per sitting.
Looking good

I finished the last few rows today but could not take a photo...just too grey and rainy over here. Turned out lovely and fits this quilt really well. I think it was originally a memory quilt top as there are lots of old shirt fabrics in there. Really interesting to stitch over. Will take a photo tomorrow of the finished quilt. The Bapist fans came out great...funny though there is always one row in doing this where you think 'oh, I lost the plot' as nothing seems to align properly and you feel as if you are really trailling off. Then the next row...everything seems back to normal and I had several fans that aligned a 100%. Too weird. So, not for the faint-hearted, but I am used to it and just keep blindly going and hope for the best. The surprise is always on the top where you can see exactly how much or how little you have been out with your alignment. Given that the edges of this quilt were not totally straight, my top row came out great. Not a 100%, but good enough. Once the binding is on, this will hardly be visible. 

So jsut have the binding to go and then it is on to the next one!

Karin

Monday, 23 June 2025

Gridwork on a Charity Quilt

Have not completely finished my baby quilt, however the binding is on and it just needs to be handstitched to the back.

Was itching to stitch so I made a start on the pile of charity quilts I have sitting here. First one I picked up is a cute ballerina panel quilt in pastel pink tones. Decided to try a new thread on this that I purchased at the last quilt show. It is 50wt Konfetti from Wonderfil threads. 

Now when trialling new thread I go by what experience has taught me over the years. This thread is different to Aurifil 50/2 thread in that it is thicker and feels more cottony, so I assumed it was 50/3 thread. In fact it felt very much like the Mettler thread cone I used for the last few charity quilts. So I decided to use the Mettler setting (i.e. tension and speed) that I kept on my machine for this thread and no surprise, it was just about right. Also used this thread on the bobbin which turned out to be a bit of a hassle in terms of the tie offs. On my machine which is a Bernina Q20, I have a programmable tie off function.

It is set to something like 4 or 5 stitches before you start off. With Aurifil 50/2 that gives me a very neat tie off. With this thread it was more like a horrendous knot...very unsightly and hard to digest. Absolutely a nightmare to bury in your quilt. Tried different ways to counter-act this, i.e. starting off carefully in Manual, making a few stitches on the spot and then taking off in Regulated mode but still, the thread kept making these unsightly knots. This slowed me down there for a while...in the end I used the Manual mode to start off with some very small stitches and then moving over to the Regulated mode. I think if this was my own quilt I was quilting I would put something like Decobob in the bobbin which is an 80 wt thread...I think the knotting issue would be far less. Anyway, I have a whole cone of this so I continued with it, as the stitching looked fine otherwise and one big plus...this thread has absolutely no lint!
For the ballerina quilt I initially decided to do the center panel in a meander and then do some ruler work in the borders, however I did not really like that idea. The problem with the charity quilts is that I cannot really mark them a lot other than using a bit of chalk. The fabric is likely not pre-washed and getting rid of the blue marker with water could lead to disasters (think colour run). Maybe not so relevant in this pink quilt but it is also winter over here, so I would have problems getting that dried in a hurry.

Looking at it I thought a grid would look nice over the ballerinas. Have not done this on the sitdown machine before over an entire quilt, so that was going to be a good challenge. Now, if this was my own quilt, I would definitely pre-mark this before basting and then just follow my lines but that was not an option here. So I needed to come up with something different. In the end I used masking tape.
Found the center of the panel first. I did not trust the straightness of the panel, so that is why I did not start in the corners. Maybe it would have been fine, but I don't know...could not think that through. Started in the center and did my 45 degree angle from there. Put two lines in for good maesure to see how accurate I would end up after the first line because I did this after the quilt sandwich was all put together and this has a puffy wool batting, so I was not quite confident that this would work out. Did the first two lines and it did look alright, so I continued without the tape basing every subsequent line on the previous one, going very slowly with carefully aligning my ruler. I used the Handiquilter straight line ruler for this which is about 9 in long, so it was bit by bit, moving the ruler along, following the previous line. I made the lines 2 in apart to match the pieced second border. Was not that confident that it would turn out accurately when I started the crosshatch as I had to move a fair amount of quilt around on the diagonal with a fair amount of puff from the wool batting. Aligned my straight ruler on the previous lines but also used some additional 45 degree lines to keep the angle as consistent as I could. But wow...to my surprise, it turned out brilliantly


Even measured the squares...yep, more or less 2in, looking nice and square. Not that it matters that much if it was out a bit but I was expecting much more inaccuracy. Now to that checkerboard border. Will put some curves in there and finish off the outer border with a bit of a scallop. Still undecided whether I will quilt the smaller 1-1/2in borders down or leave them unquilted.

This, of course, is all taking a bit longer than anticipated, but I felt a bit like experimenting. For a kid's quilt this is quite long and larger than usual. Given that this worked out well, a simple grid is a really good option for a smallish baby quilt. Definitely will do this again.

Karin

Thursday, 5 June 2025

Update on Baby Quilt

Before I get into the baby quilt, here are some photos from the Garden Charity Quilt I talked about in previous posts. Noticed the other day that I actually had not put up any photos of the finished thing...and that after I did all that practice to be sure that I actually could execute thatt design. For readers who have not read about it as yet, I decided to do the Hndiquilter Flutterby Design over this charity quilt. Had to practice a bit to be able to do this though over a larger area.

This is what that looked like
Bit hard to see as I used a lightgreen blend in thread, here is the back

I was so sure that I had talked about his, but maybe I just posted it on IG or Instagram.

Anyway, for this baby quilt I decided to do my favourite edge-to-edge design called Daisy Dotz #2 available through Urban Elementz. I have done this design numerous times but still enjoy doing it, so I made a start today. I am using Golden Threads paper to get the rows onto the quilt 
Labour intensive...yes, but the result is always stunning and given that this is a bit of a special quilt, I do not mind the extra time. In the picture above you see the first two rows stitched out already. I secure the paper with removable glue dots but also use pins as you can see in the picture above. I am quilting with Aurifil 50/2 cotton thread in regulated mode at 10 SPI. I am going not too slow but also not too fast in terms of speed just moving along those lines. I do use a blue erasable marker for drawing out my lines, basically becuse I am used to that blue colour and it also ensures that I do not inadvertently transfer any pencil marks or similar onto the quilt. After I finish the first two rows, I take the top and the first row out, i.e. remove the paper. Firstly to see how my stitching went, but also to free up the quilt (as you go along some compaction happens and I feel it is easier to free everything up for the laignment of subsequent rows. Aside from that I also enjoy just sitting there quietly taking out the paper after each of the rows. i don't think I would want to do that in one hit for an entire quilt...that would take ages!! With the second row still there and a partial row drawn in I align the next two rows and continue...so relaxing to stitch out.

What about mistakes? Yes, they do happen...sometimes you deviate from your lines a bit but I reckon as long as you keep them nice and round and in line with the design, that does not really matter. I do put more effort in on the second row to stay exactly on my lines as this is where I will have to align the next two rows, but I must say, I do not stress over it as you really cannot notice it if you are a bit out. What if you thread breaks or some other small disaster happens and you need to take something out and redo a section? Absolutely possible...the paper is wafer thin and delicate, so any unpicking will have to be done from the back. I unpick my section stitch by stitch in order to keep the paper on top intact. As you can see the holes where the needle went really well, you just start again in one of those holes, secure your thread and continue on. Must say that I have never messed up an entire row but if you do, you will just have to re-do it, i.e. draw out more rows and start again.

Had a new mishap today though...my mind must have temporarily wandered off
Did not stitch out one of those leaves...noticed it, but continued and then when I finished the rows went back and stitched that one leave in there (with the paper still intact).

This is how far I got today...


Managed four rows (the thread running through is my basting)...not that much,but it is a start and I am taking my time with this as I do enjoy this process. Tomorrow I will draw out another few rows and continue slowly but steadily. Love this design! 

Will keep you posted...

Karin

Wednesday, 16 April 2025

Practising the Flutterby Motif

First of all...thanks to everyone that responded to my last post. I received each comment via email! Yah!

Now to some serious quilty talk...practice, practice practice!

I have the last charity quilt to complete
...a full on 'Garden Quilt'. For some time now I have been thinking about doing a butterfly design on it. So, I did some practice of a motif that I had seen on the internet...I think by Adria (sorry can't remember her last name but she comes up on my FB with classes that she offers). As the charity quilt is a large lap size quilt I made myself a quilt sandwich out of calico and tried this out.
Not too bad but somehow did not like the shape of my butterflys. Then I remembered the Handiquilter Flutterbys Minute Motifs and gave that a whirl on a small piece of fabric.
Not that great but I liked the shape much better. Definitely needed more practice on a bigger piece. Then I remembered my UFO quilt. I have had that quilt for several years. It is basted (just goes to show how long a good baste will last) and I have used it in my workshops for beginning freemotion quilters to have a trial on their domestic machines with a 'real' quilt. The purpose is to demonstrate how disorientating it is to have a scrappy (and very colourful) quilt under the throat of your machine and how to plan and structure your edge to edge design, i.e. know the path you are going to take and how you change direction when quilting. This has been very difficult for most people as the pure riot of colours and bulk of the quilt usually leads to a fair amount of confusion. It's been a great teaching tool but after the last class I thought that I would retire this quilt.

Spent some time taking the quilting attempts of various classes out, steamed it up and off we went. I am not sure what this quilt is going to become...maybe another quilt for the cats or a floor rug for the soon to be new addition to the family. Not sure yet. The quilt has some amazing blocks in there, all a bit wonky (that's why they became UFOs) but never mind...I even found the first fabric that I ever bought in there.

Here is the path of the design


So I started with the Flutterbys on the quilt. Was not sure exactly how big I wanted to go but thought it would become evident once I started on the quilt. I think I ended up doing the Flutterbys about 1.5in - 2in. As you need some speed as you are quilting it it did get a bit wonky here and there...it was particularly challenging to keep each side approximately the same. Could at times not see where I had been before.
Soon realised that it did not matter that much because you cannot actually see the design that well on a colourful quilt like this. I am still quilting with the light green Mettler Silky Finish 50 on the machine. Have several cones of that and it's about time that I make a bit of an in-road into my thread stash.
Overall the butterflys looked alright, every now and then a bit wonky, initially too skinny but I soon got in the swing of things. Looking at the Handiquilter Minute Motif now I can see that I have done the design a bit different to what they have, i.e. my top wings are a bit longer but that was a way for me to be sure of where I was going thinking 'top wing, then down to the bottom wing and up again'.

Finished it today but you be hard pressed to see the design unless you hold the quilt in your hands.

However, after having done this I feel a bit reassured that I can execute this design on the charity quilt. Had no problem travelling along, maybe need to make my loops slightly smaller but even when you get yoursef stuck on top of a butterfly you can always reverse out and start looping again from the bottom of the motif. My only other issue was to swing out far enough to actually make the motif. Every now and then I had to give them a smallish bottom wing as I was getting too close to a neighbouring loop. But apart from that this design works very well as an overall design.

Will bind this with my leftover scraps of binding...bit excited about that because I almost used them all up by now.

Karin

Thursday, 10 April 2025

Progress Report

Well, the AMQF has come and gone. Four days of all things quilting. I went every single day...not exactly how I had it all planned out but with having to drop off my quilt and picking it up, retail hall and one class it just turned out that way.

My quilt looked nice on the black background. It won third place and got a beautiful yellow ribbon. Loved it!
Got to do one class with Bethanne Nemesh 'From A to Zen' which was very good (as usual) and a group of us got talking to her after the class. Was able to have a very close look at some of the quilts she had brought over, including some class samples of the classes that I had done previously online. This was a bit special, I must say.

I did allocate a whole morning to exploring longarm frames and machines...have been thinking about this for a while by now and before I went to the show I did a fair amount of research into the topic in order to be a bit prepared. As so often happens when consulting the internet, I got quite confused with all the different choices (and we don't have that much choice in Australia!). Anyway, I was wondering how difficult it would be to get used to quilting on a frame versus on the sitdown machine...in previous quilt shows I have had a few moments here and there on various machines, but nothing ever quite seriously. So this time I really had a very good look and try on some machines to see how difficult it would be for me to maybe make that switch.

Must say that I got a bit side tracked in my research, lured by the cost of various set ups. As I really would want to do edge-to-edge quilting I started looking at computerized set ups which is insanely expensive. I would absolutely love to have a set up like this but am reluctant to give up my sit down machine. So I started looking at cheaper set ups and was able to test these at the show. Not to mention the brands but what I thought was a great deal (longarm, frame plus computer) felt absolutely horrendous to stitch on. Tried a higher model of the same brand which was better but that would mean that I would again hit over $20000 if I wanted a computerized set up. In the end I went to the Bernina stand. One try on the Bernina Q20 on the frame and I was sold...it was like day and night. I know my machine and I obviously think it is a good machine but the difference in operation on the frame compared to others was astounding. The machine was extremely light and easy to manoeuvre and I was able to stitch basic meandering patterns in about 5 minutes. Obviously I would need more practice to do the fine detailed quilting that I am used to but at least I was able to ascertain that I would be able to make that transition after a bit of practice. I had a really great time with the sales person...she even let me try some rulers which was also quite easy going. Talked through all the options, different frames, accessories needed etc., marvelled at the quality of the frames and this helped me greatly to get my thinking straight. I have got the machine and now that I know that I could make that transition with a bit of practice, this really opened it up for some decision-making in the future. All I would need is a frame and the space for it...the computer that comes with the Bernina is out...just too costly. Unfortunately I cannot justify that expense ($24000 for the computer system alone) as I am not intending to set up a business. However went away really quite happy after having done all the research and reassured myself that indeed this would be an option for me, now it is just a matter of time and space. Will have to wait a while...we are planning some renovations over the latter part of the year and various other things are happening. But there is no hurry, I love my sitdown Bernina and when the time is right I just plonk my machine on a frame rather than looking at getting an additional machine of a different brand. 

After this little adventure I have started back on the charity quilts. Managed to pin and baste two quilts in one hit

Really felt like some ruler quilting and started today after having spent a day stitching -in-the-ditch.
As this is a charity quilt I only ditched the major seams otherwise I would have had to spent another day just ditching. The intersections of this quilt were horrendous...at times like little hard pebbles. Also think that the fabrics used in this quilt are quite old or maybe the quilt top is quite old. Everything felt a bit more movable. In order to secure all this I decided to quilt a simple line design, semi-continuous depending on whether I remembered where to go next. Would have liked to do an individual motif in the white squares, however that would have taken forever. This way I literally zoomed along finishing half of the quilt in one go today. I stitched the curves with the Pro Echo curve no 6 which made a nice deep curve in the coloured squares and was also the right size for the white squares. Looks quite nice and will hold this all together. Also tried a different thread today...Mettler Silk Finish 50wt...no problem at all, stitched very nicely, but then again my machine stitches nicely with any thread, just a matter of getting the tension adjustment right.

So, that's where I am at...next on the agenda is some piecing of a sweet little baby quilt.

Karin

Friday, 18 October 2024

Invisafil Thread on the Bernina Q20

I have been a big fan of 100wt Invisafil Thread from Wonderfil Threads ever since I did Bethanne Nemesh' online workshops. Up to then I had been using Invisafil mainly for stitch-in-the-ditch but was encouraged through those workshops to give it a go for background quilting.

Usually I have no tension issues with the thread having understood that it needs a lower tension on top and maybe a little bit of an adjustment on the bobbin tension. I recently started another background filler project using the same orange thread that I had previously used on an earlier wall hanging. I had a vague idea that I had some issues with the thread but once the project was finished I obviously put that out of my mind.
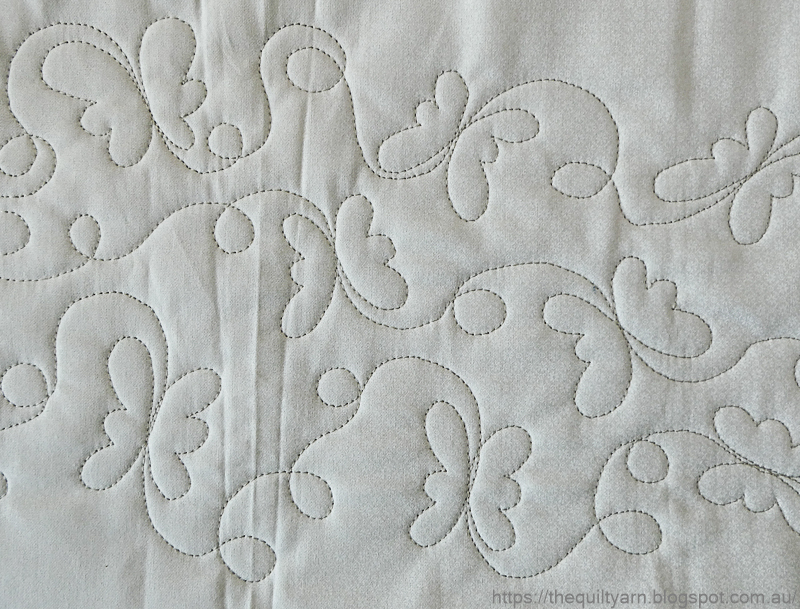
Started last week
Nice, but not good enough. I struggled through the quilting as my tension just was not right. It was somewhat too high pulling up the white Decobob 80wt bobbin thread to the top, leaving some ugly little knots. Remembered that I struggled with this previously and undertook to really look into this. Do not have that issue with a white Invisafil on the top so was aware that the colouring also may play into this. So spent hours last week to take all this out and rejuvenate the fabric (steaming it, spraying it again with water and letting it all dry in the wind)

First thing I did was ordering a cone of thread as I was still using a small spool that I had used on the previous project which drove me crazy as it kept catching on the rim. So, set that up
The thread is so fine you can hardly see it. Put a new needle in (80/12 Microtex) and gave it a whirl with the preset that I had entered previously on the machine (tension sitting at 2.25, bobbin tension at about 180). This is what I found:
- no more issues with the thread snagging on the rim ✅
- tension way too high, i.e. could see the white bobbin thread looking up through the holes and the stitch looked not that nice and did not feel right to stitch suggesting that it was being stretched.
- lowered my tension down, initially all very structured, going all the way down to 1.5; found that the thread was definitely too loose at that setting as I could see it wobbling as it was laid down
- strangely enough, was also getting orange pokies on the back.

This is were my more structured approach left me and I started to play with the bobbin tension. Normally bobbin tension for the Bernina Q20 is set at 220 however I have found that this needs to be adjusted at times for different threads (and different colours of threads). I had read somewhere on the net that people dial down their bobbin tension for Invisafil so I started lowering my bobbin tension. This is when it all got a bit messy. Must say one should be really relaxed going through an intense tension exploration...it can really drive you crazy when you loose sight of what you are adjusting in what order. When I had the bobbin tension quite low ( approx. 160) my tension was completely out of whack. My upper thread was still too tight while at the same time producing orange pokies at the back. Spelled complete mismatch to me on both fronts (top and bobbin thread) and after I had gathered my thoughts, I went back to the top thread...this time going by feeling more than anything else. My thread felt good to stitch at 1.75. Anything lower than that and the machine arced up, i.e. stopping and giving me a tutorial about threading! So decided to run with that and adjust my bobbin tension to tackle the pokies in the back. This took a while as just minute changes on the bobbin tension can change how the top appears. 

Also should say that I tried different needles while I was at it, first a 70/10 and then even a 60/8 needle. Must say I did not observe all that much of a difference in how the thread behaved, so this was definitely an adjustment issue. Eventually arrived at a bobbin tension of 180 -190, top tension at 1.75 with a 70/10 Microtex needle:
- top thread felt good to stitch, i.e. was not stretched and buried into the fabric; while I could see the white dots coming up while stitching, this disappeared instantly as I went along; had no ugly little white knots coming up every 5 seconds when hesitating in my stitching
- the back looked half decent; every now and then the orange would show slightly but I decided that this was negligible and possibly had to do with my speed or movement.
This is what this looked like
Hard to believe but this took well over 2 hours of needle changes, bobbin and top thread adjustments, so definitely something you only want to do when you are in a bit of a Zen mood.

Went on to stitch out the section of the quilt that I had taken out
Tension was fine, i.e. felt good to go along which meant that I could solely concentrate on the stitching. May have one spot were I hesitated for way too long so the white shows a tiny bit, but that was ok as I knew that the tension was otherwise alright.
The back
Bit hard to see but almost no pokies except for the odd spot here and there. Now that can probably be attributed to how I stitched the shape but could also point to the quality of the fabric. While nice, the backing fabric is just that little bit more loosely woven than the solid front. 

So what am I taking away from this little tension exploration today...STICK WITH THE PLAN and systematically go through the variables. Even better still...take notes as you do it.
But seriously, with a bit of patience and thinking through of what is happening you can fine tune just about any thread.

Karin

Wednesday, 16 October 2024

Progress on Colourwash Quilt

My list from last week included:

-make a start on my background filler project from way back
-continue on my scrap quilt blocks (have made 15 so far)
-continue on the new 'colourwash project

Worked consistently over the week which was a good feeling. Started my background filler project
Nice, but won't do...had all sorts of problems with Invisafil 100wt thread which was not totally new (the adjustment can get fiddly at times) but somewhat unexpected as I had used the same thread before on an earlier project. My tension was somewhat variable and I just could not get the fine tuning right. I was stitching with a little spool which on top of everything else got the thread stuck in a particular spot at the rim from time to time. When this happened my tension went sideways. Not sure about everyone else but when the tension is not a 100% I find it very difficult to stitch properly. It distracts and then leads to very wonky stitching. You can't see it in the photo well but my bobbin thread (prewound deco bob in Antique White) came up from time to time leaving very ugly white knotty dots all over the place. Went through the usual problem solving exercises...changed my needle and had thread breaks, adjusted the bobbin tension plus the top, tried the spool on the side spool, put the spool higher up on the mast etc. As I was mucking around also noticed that my screw which tightens the needle was either stripped or my screw driver was getting faulty and slipping when tightening...
As this is a bigger quilt I decided to take out my stitching and start again. I ordered the same colour of thread, but on a bigger spool which came today. My thinking here is that the thread will come off easier from the bigger spool and definitely won't get caught!
I am hoping that this will be easier stitching. Also went down to the shop to address my screwdriver. We tried it out on their machine and no, nothing wrong with my screwdriver, so it must be the screw that holds the needle itself. Luckily I have got a spare screw, so I will attend to that in the next few days. Got myself some 80/12 Microtex needles while there to see whether that will make a bit of a difference to the normal 80/12 needles that I used. Will start this week to tackle the tension problem...I do know where I want my tension to sit for comfortable sewing, just will need to get the bobbin and thread to play nicely with that. As there are a lot of orange spaces I do want this to be stress-free sewing otherwise the whole project just becomes a bummer.

While waiting for the thread I made some headway on my colourwash quilt. Managed to get to row 9 of 15 with my tiny blocks
Still labelling each row as it is super easy to get very confused with the colouring. Even while labelled I had to look at a photo I took earlier of all the blocks laid out a couple of times because it is so easy to turn the blocks while picking them up or sew the second one as the first. Particularly in the darker part they all look a bit the same.

While doing this I also continued on an earlier scrap project and made another 15 blocks while sitting on the machine sewing those tiny blocks together. This made the sewing less boring...did some tiny blocks, then stopped and just sewed strips together for a while, then went back to the tiny blocks and so forth. Quite relaxing
This will be a strippy quilt where the strips are placed vertically like in a Chinese Coin arrangement. Have not completely thought this through but already know exactly how to quilt it. Planning to put some mustard yellow sashing in between the columns of strips...another spot for lots of FMQ. Looking forward to that.

So my list for the remainder of the week includes:
- work out the tension for that blasted orange thread so that I can start for real on the background filler project. Interesting to note that the white Invisafil thread does not usually give me such a headache.
- finish the colourwash quilt top...another 6 rows to go and then putting all the rows together. Still undecided as to whether I will put a border on this quilt. Will have to see the completed quilt top...
- continue on my strip quilt, i.e. make another stack of blocks (I think I need something like 56 blocks)
- look at the newly picked up charity quilts and make a start on basting one (very hopeful here)

Linking up to To Do Tuesday #95 over at Quilt Schmilt.

Karin

Tuesday, 8 October 2024

The Great Illusion

I have been hard at work finishing the last charity quilt out of the pile that I had. With this particular quilt I was just not feeling it and decided to do a minimum of quilting-in-the-ditch on it just to get it done.

So I went around all the blocks only to realise in the end that this just would not do. The blocks were way too large to just leave them at 8in unquilted. As much as I did not want to do any further work on it, minimally quilted like this would make the quilt literally unusable. One wash and the pieced blocks would have puffed out like there is no tomorrow.

This is actually why I like quilting the charity quilts...there is a lot of problem-solving that one has to do. As with some of the other charity quilts the mere mortals who pieced this together did a fairly haphazard job...not bad, but literally none of the intersections met, some of the seams were changing direction half way through a row and the measurements were a little bit out here and there. Nothing too bad, but definitely something to consider when quilting it. I could already see that some of my ditched lines were a bit crinkly because of non-matching seams. First at all I had to stitch down every single alternate block. To make it more interesting for myself I decided to practice securing my thread when starting and stopping in order to just cut it off. I do struggle with that as I am used to burying my threads, however for this piece this would have taken ages to complete, so I bit the bullet and decided to cut off my threads. 

The Q20 has an automatic tie off which works really well in the beginning of a line but not so reliably at the end of a line. Thought about Amanda Murphy's method of beginning and ending a line...she uses the stitch regulator to set it to about 22 or more stitches as she starts off and then switches back to normal stitch length. Must say that that has never worked really well for me...the machine races to produce the tiny stitches over a tiny length and it just feels really unnatural. So in the end I decided to go back and forth with tiny, tiny stitches in manual mode to start off, then switched to stitch regulation to sew my line and do the ending in the reverse, i.e. tiny stitches towards the end back and forth in manual. Then I cut the threads off and lo and behold, the world did not come to an end! My stitches appeared secured. Maybe not quite as clean as I normally like it but it saved a lot of time.

Then came the thinking about what to actually quilt in the alternate block. This is what I went with
The area around the tiny square should have measured 2-1/2in but rarely did and the surrounding intersections did more often than not not match. I decided to put the lines at 3/4in apart starting from the outside in and leaving the tiny square unquilted, so it would pop out. There was method to my thinking, i.e. the x- blocks were not aligned properly hence my 3/4in was always a bit out, however going inwards and trying to meet each line as I went around it looked fairly consistent due to the 3/4in space. This left an approximate 1in space unquilted, big enough to hide any inconsistencies that occurred in the tiny triangles. Had I gone one more line I think it would have emphasized the inaccuracies. If you go with a ruler you would of course see that there was hardly any consistency, however the overall look signaled consistency. Was fairly curious of how this would turn out.

To my surprise I quite liked the look of it in the end


Glad this is done and very surprised on how neat this turned out. Added bonus...I was finally forced to get a hang of cutting my threads off! (otherwise this would have taken ages!)

Getting back to To Do Tuesdays: I am weeks behind as we went on holidays in between, then I had to quickly write up my Etsy pattern and then I got going on the charity quilts. So I achieved a fair bit but just not in the order that was on my previous list. And who would have guessed, I did start something else, i.e. new project since I have come back from holidays.

So my list of things to do looks something like this now
-make a start on my background filler project from way back
-continue on my scrap quilt blocks (have made 15 so far)
-continue on the new 'colourwash project
That leaves several UFOs unaccounted for but I just need to get back to some structure first before I can add more things.

PS: When I came back from holidays I noticed that I had several comments on my blog going back several weeks. I do not always get an email notification now (no idea why) but also had forgotten that I had switched on comment moderation, hence those comments were just sitting there. My sincere apologies...I do love comments and try to respond to each and every one either by email or here on the blog. Definitely not ignoring you...must have been one of those senior moments!

Linking up to To Do Tuesdays #94 over at Quiltschmilt.

Karin


Friday, 9 August 2024

Bernina Q20 Cover

Well, it's been 2 weeks since I started my cover for the machine. It has only taken me 3.5yrs and a bit to tackle this, so this was it. It had to be done.
I have come to the conclusion that I am definitely not a sewist. I might be a good quilter but I am sadly lacking some of the skills for straight sewing.
I followed two patterns (by Beverly Guhl and Terry Burns) that can be found in the Bernina FB group. I used the two as I also needed a slot for my side thread spool which one of the patterns had, so I just combined them. I made my panels, quilted them in a grid...time consuming but no problem!

Then came the zipper which had to run over the front of the machine and down the side in a curve. Beverly Guhl also suggested that it could run down the middle but I did not want my zipper to go over the front screen (at that stage I was still unsure how the sizing would work out for the cover). I bought some zippers and gave it a go. Total fail as I did cut into the zipper on the curve and it became an almighty mess of unravelling zipper. Then I discovered that the size for the zipper in one pattern was wrong...I needed a smaller one. So off I went again and bought two more zippers. While there I also bought some bias tape and fabric glue, but more on that later.

I managed to put the zipper in
Not easily but it was in! The zipper extends slightly over the size of the cover on the bottom. Not sure what to do about that, so I just left it dangling. Might bent it back and sew to the inside. I am definitely not cutting it!

After that I needed to sew the individual panels together. Had not thought about this before, but they all needed to be sewn to the top and then at a 90 degree angle to the side. Now, this pattern uses double batting which I did use and the bulk became rather challenging in terms of bending it around and the bigger the cover got, the harder it became to maneuver this through the sewing machine.  My little sewing station is set up for piecing blocks and lightweight quilt tops, not this monster of a contraption. This took several days. After that I attached the binding to the bottom. God knows why, but I thought I might try to sew the binding to the back and then stitch in the ditch catching the back. Never tried this so this was a good opportunity, so I thought. I glued the binding to the back with my new fabric glue...fabulous! Then I stitched in the ditch with Invisafil thread and hit the back seam sometimes but not all the time, so in the end I had to go around and stitch it all by hand anyway. Did not take the ditch stitching out but just went over it again by hand. This binding is never coming off.

Then came the open slot for the threadmast. Had never done binding to an inner angle before and spent hours googling this. Tried to use the bias tape I bought. Again, total fail on the corners. I followed a very intricate method where you have to be very precise in the corner with measuring your 1/4in seam precisely and hitting the right spot as you turn. At the thickness of the batting and the unruliness of the cover that just did not work at all. In the end, I used 'normal' binding and followed a method where you snip into the corner, then pull the 90 degree angle into a straight line and hope for the best. That worked mostly in terms of the mitering. Not that pretty, but it is a corner.
So here is the finished cover
The slot for the thread spool could have been a bit smaller, but the pattern stated 4in from the seam line so that is what I went with. I measured the threadmast contraption and also made my cut out a bit wider than both patterns stated. Looking at it now, it probably could have been the 4in it stated.


Looks very slender but the size is perfect. While it looks as if it fits like a glove, there is ample space all around. It does not sit on the screen directly and also covers the plug in the back. The double batting and grid quilting made the panels very stiff, so it does stand up really nicely. If I had to do it again I think I would explore using a bag stiffening product to reduce the bulk.

All in all, not a bad effort. 

Karin

Saturday, 27 July 2024

Playing with Rulers

I like to push the boundaries a bit with my sitdown longarm, i.e. see what else I can do on there and how difficult (or not) is it to push my quilt through the machine with the latest ideas I have. Given that I have a draw full of rulers I am always looking for new ideas to use my rulers to complete allover designs.

I recently picked up a panel quilt from the charity group I am involved in. The panel is "Elsa" from Frozen. The quilt is a little bit bigger than the usual baby quilt and measures approx. 47in x 55in. In the past I have often finished those types of quilts with clamshells using the HQ Clamshell ruler. Fun to do and relatively quick. For this one though that would have been too small and I needed another idea. Looked through my draw and decided to use one of Amanda Murphy's circle rulers to do a big Orange Peel design over the quilt.

I picked the 7in circle and started...literally regretted my choice straight away. The 7in ruler fits my whole hand. Thinking I would just go around and around I thought that this would be quick and easy. Wrong! The ruler shifted of course with the movement of the quilt. As you have to backtrack over one part of the circle as you move along that became quite difficult, particularly starting off with the batting making everything more wobbly and moveable. I struggled big time...

Solution: those little rubbery draw liners. Cut myself two pieces off and placed them under the ruler for every circle I did.
So much for quickly quilting this out, but at least my backtracking worked out nicely. The size of the ruler made it challenging to move along, but as I now was committed to finishing this off, I had to think this through a bit better. An added challenge was the wool batting. It does give you a fair amount of loft, so I had to concentrate and go slowly to ensure my hopping foot stayed on the side of the ruler. The way I quilted around the ruler involved shifting my hands constantly to hold the ruler next to the foot steady while at the same time adjusting the quilt a number of times as it was always shifting sideways as I went around the ruler. All this while holding the ruler in exactly the same place to get the backtracking right.

Must say I was not confident that this would work. A few rows in I measured where I was up to in relation to the bottom edge. I was pretty sure that my circles were not straight across and that I had lost my way. To my surprise I was spot on...same distance on both sides. This was encouraging!
Gave it a bit of a visual...not too bad. Not perfect by any means but overall looked quite good. Every now and then the shape in the middle of the circle looked a bit off center but that had to do with me not always hitting the exact point where the circles meet. I let go of worrying about that because there was just too much going on in terms of stitching, holding the quilt, avoiding drag and keeping the ruler steady.
Stitching along...

As per usual half way through I turned the quilt around and quilted the circles towards me. Struggled with the drag of the quilt at that point and also thought that my circles were really going out of alignment. Turning the quilt at that point is always good as you now pushing it in the opposite direction and those inaccuracies are starting to disappear.

Was very curious how I would go approaching the top of the quilt and prepared myself for an uneven finish. But, lo and behold...more or less finished evenly across the top. That was a bit surprising seeing the pushing and shoving I had to do... 
Took the basting out and had a close look but cannot take a photo at the moment as it is evening over here and the shots would come out too dark. Will post a shot of the finished quilt in another post. 

Overall happy with my efforts...looks fairly consistent even though my circles shifted slightly to the left but I don't think that that is noticeable once the binding is on as it is only by about a quarter inch.

Might try this again on a smaller quilt using the smaller 5in circle.
 
Karin

Popular Posts