Wednesday 26 October 2022

To Do Tuesday - 25/10/22

I only set one task last week, i.e.

πŸ“ŒBaste another charity quilt ready to be quilted.

Well, maybe I should do this more often. Actually basted and finished one charity quilt and am almost through the second one as well!

This is the first quilt
Must admit, did not like this quilt at all. The center is a panel with the most overwhelming colour arrangement...it has got those tiny flowers on white as a background. Most odd, it just feels too much. Really struggled to quilt this so I just outlined the star and ditched all the seams. I did a bit of ruler work in the Flying Geese but that was it, did not feel like doing any more on this. Really odd quilt, but hopefully somebody will like it.

Basted the second one and am almost through with the stitching in the ditch.
What a difference the colours make for me...love the combination of purple and green. Very tasteful, gentle quilt. I am in two minds whether to do a bit of ruler work on this, but we shall see. Will have to drop off the charity quilts on Friday, so really want to have this done.

My goals for next week include:
πŸ“Œprepare another Mini Wholecloth using a dusty pink fabric with a slightly stronger thread that will hopefully show up a bit more; this is for the workshop next year...I might change the fillers a bit from the original one to see what that looks like.
πŸ“Œstart work on a new pattern; this pattern was supposed to be for Christmas and I will get it done...it's just a bit on the late side, but so be it. Need to get this out of my system so I can start on something else.
πŸ“ŒIf time allows, continue on my cat blocks.

Linking up to To Do Tuesday over at Texas Quilt Gal.


 Karin

Thursday 20 October 2022

To Do Tuesday - 18/10/22

Belated link up for To Do Tuesday over at Texas Quilt Gal...

Well, this time I have got an excuse though...our cat ended up in vet hospital last week, which was very traumatic for all involved. She suddenly fell very ill last Sunday...it looked like a stroke actually, but when we took her to the vet they said that was uncommon for cats. Nevertheless they suspected a neurological problem, so she had to stay for a while. As the evening approached though, we had to go and transfer her to a 24/7 vet hospital. She was then put on a drip for the next 3 days and drugged to the eye ball. Initially it did not look good at all, so we were expecting the worst, however by Monday she made a surprising recovery...most of her neurological symptoms had disappeared and she responded well to the heavy pain relief they had given her. As it turned out this was a muscular issue somewhere around the neck which they likened to being hit by a car. The weird thing was though that nothing untowards had happened in the hours before she fell sick...everything was as per normal. So it has remained a mystery how she actually injured herself. All a bit weird...she was sent home having to have strict bed rest! Needless to say the cat was quite messed up from this ordeal and it took most of the week for her to get back to her normal self. She had a follow up the other day and all seems well. It's funny though...when she was so sick you tend to do a lot of reflecting. We have had her for 12 years by now and she is approximately 14 yrs old, so quite an old lady by now but the thought of  potentially losing her so soon had not crossed our minds up to then. Was all a bit of an emotional roller coaster.


But anyway, I did link up about two weeks ago and will just continue from there. My goals were as follows:
πŸ“ŒMake a sleeve for the show quilt ✔
πŸ“ŒFinish the feather quilting in the rose quilt above  ✔
πŸ“ŒBaste another charity quilt
πŸ“ŒDesign a Mini Wholecloth for another workshop or at the very least have started that process (have about 3 weeks to do this).  ✔

I am finishing the last bits for the show quilt to hand it over next week. This will be a relief. I am always happy when the quilt is gone and I do not have to think about it again until I see it at the show. This should be interesting. Our quilt show will be held as part of the Australian Machine Quilting Festival in November. Looking forward to this as I am also booked into a couple of classes.

Finished the Rose Charity quilt but did not get around basting another one. Too much going on.
In between I spent some time designing and quilting out a Mini Wholecloth in preparation for another workshop next year. Of course things did not go as planned. I was rushing and trying to cut some corners to finish this quickly which did not work. Messed up my border and had to unstitch the whole border...this took the longest time! Finished it yesterday and it looks a treat
It is basic but I had to think about what was achievable in a workshop setting and the varied skill level of participants. Was really thrilled with the design and how I managed to print that out on the home printer ready to be used. Actually quite like what I have come up with and would not mind making this bigger for myself with more frames and feathers around the outer edge. I found the small scale a bit limiting, definitely not used to that. I probably will stitch this out again over the Christmas period using maybe different fillers and a different border treatment just so people can choose what suits them better. Still a bit of work involved in thinking this through, doing a bit of a handout, but plenty of time for that still.

For next week, I will not put much on my list (given it is already Thursday) ...feel I need a bit of a break.
πŸ“ŒBaste another charity quilt ready to be quilted

Linking up to To Do Tuesday over at Texas Quilt Gal.

Karin

Monday 10 October 2022

Designing

Radio silence from me again for a few days. I have been designing which always takes me some time to do. I have been asked to do another class next year doing a Mini Wholecloth class.

Initially I had no idea what to do, so several days were spent just thinking about how to approach this. I needed to come up with something that was achievable for the ladies without being too difficult to stitch out but also not to difficult to get down on fabric.  Up to now I have been designing using pen and paper which would take me ages as I would change things as I went along, then start over and over again until I got it right. When thinking about this class I realised that I needed a printed copy of my design and started to think about how to get my drawing into a digitized format. While I have drawing programs on my desktop I have never attempted to do a full blown design using a mouse, so the Ipad came to mind.

In the past I have used a very good App 'Graphics for Ipad' to do drawings on the Ipad, however I recently discovered that this App has stopped working properly possibly due to the many updates for the Ipad that have happened over time. I really liked this App as it allowed me to smooth out curves, add measurements etc. However, the layer tap does not work anymore and without that, it is useless.

When I had Covid earlier in the year I spent a lot of time just sitting around. In order to keep myself semi occupied I started to look at the Procreate program. I had purchased that App some time ago but never really got the hang of it, so I set out to learn it properly. Discovered that it is extremely useful to quickly draw out a draft of something, e.g. like this

Not that pretty and not what I am going for, but I was just playing around with ideas and to familiarise myself with the program again. Spent a lot of time searching for a way to make a shape to scale and finally figured it out. When you highlight a particular shape in the Procreate program it will show you the measurement in Pixels. Took me a while but with the help of Google I found a formula to convert pixels into inches. I wanted my heart shape to be about 2-1/4in, so that meant that I had to multiply this with the dpi which was 300 which made that 675 pixels and...voila...I was on my way (Actually just found a pixels converter on Google which does the calculation for you). Once I had this, I also discovered that I could set the grid behind my picture in inches, so I made my grid 1/4in small so I could see how I would fill in the space that I had given myself for this Mini Wholecloth.

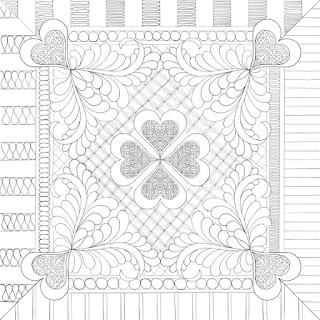
The drawing itself was actually not too difficult, just had to adjust the brushes to make my strokes as even as possible. Good thing is that you only need to do one shape and then of course can copy and paste as your heart desires. Here is my frame
Does not look like much but that took a while. Spend some time getting that first stroke right. Once I had that, I just copied, flipped and pasted it into place, tidying up some pixels as I went. Reduced that shape then by 1/4in to make the distinct frame which comes out to 9in. Once I had that, I worked out the size of the heart motif and put that in the middle and I was on my way.

Still working on this so I can't show you the full picture but the printing of this comes out 100% to scale which I am extremely happy about as this means I can just print it out at the end of it and trace from there. 

If you have an Ipad it is well worth your while to invest some time into something like Procreate. Even if you don't design full blown wholecloth quilts, it does allow you to quickly and effectively just jot down a draft which I always find very helpful. Like that first picture above felt like a good idea and would have taken me ages to draw out on paper...on the I pad it maybe took an hour to get the base shapes on there and then copying and pasting, a bit of rough filling to get an idea of whether I liked it which in this case I did not (would need more work around the angle of my feathers somehow).

Karin

Sunday 2 October 2022

The Rose Charity Quilt

I made a concentrated effort to get that Rose Charity quilt finished, again focussing in on minimal marking and keeping the quilt nice and soft. For this quilt I literally just wanted some embellishment as the fabric itself is quite striking and very patterned. So I mainly quilted in the black parts and just did a few line designs in the other parts to stabilise the quilt. This is what I like about these charity quilts. Not only are they a real surprise every time I open the packets from the Orange Tree Quilters group, they are also a real challenge in terms of thinking through how to quilt them, i.e. what are they likely going to be used for. For this quilt I could imagine that some older person might appreciate the quilt as a knee rug, hence it had to be soft and still with a fair bit of puff.

As you may have seen in a previous post, I quilted some feathers in the main dark grey areas of the centre of the quilt. Now I only had the black sashing left. The sashing was only 2in which presented a bit of a challenge as I did want some feathers in there as well. My initial thought was to go around with just a single row of feathers, however that proved too messy as I would have had my 'imagined spine' on the high side of the ditch and with grey thread that was not going to look any good.

Came up with this other idea...an older, more playful design which I had done some years ago involving a wavy line on which you travel putting in some feathers as you go.

Something like this
Hard to see but I decided to use the Handiquilter Wiggly Wave ruler to put the wavy line in. Well, that took a bit longer as I had to work out the corners, i.e. first what sort of shaping did I want in there and how was I going to achieve that with the ruler. Good exercise in really getting to know your ruler. In the end I started drawing from the middle out, stopping 1-3/4in from each corner, shifting the ruler slightly over to achieve the same look on all four corners
I first stitched out my wavy line with the ruler all around the quilt and then started my feathering...
Why did I stitch out my wavy line first? I made a little diagram to show you the difference in stitching path doing a continuous feather.
I stitched according to the first picture moving over my stitched wavy path. The areas where I had to overstitch (backtrack) are highlighted in purple. In one wave I only have two spots were I need to go over a previously stitched line. While you may have some wobbles here and there, the overall impression is one of consistency as the wavy line, of course, is stitched out neatly with a ruler.

Comparing this to the picture No 2 where you would stitch the wavy line as you go. As you can see there is an enormous amount of going backwards and forwards...you start off doing your first plume, then need to backtrack over that to do the second plume, then stitch backwards to make the wavy line and backtrack back over it to continue the wave. While this absolutely can be done this way, I felt that this was way too intensive with the backtracking. Even if I had used a 'bump back' feather there still would have been a fair amount of backtracking.

Happy with how this turned out.
I stitched one side at a time, breaking thread before each corner. While I could have stitched on over my corner to the next side, I decided not to do that as my corners looked surprisingly pristine, so I did not want to mess that up.

Well, here is the finished quilt

Finished the binding and label today and now it's on to the next one.

Karin

Popular Posts