Showing posts with label WIP Wednesday at Freshly Pieced. Show all posts

Thursday, 4 February 2016

WIP: Baby Quilt

Quick update on the Tumbling Block baby quilt...finally finished the tedious SID and got on to the fun part...the actual quilting of the quilt.

Did some simple straight line quilting over the cubes. Used Cindy Needham's Ultimate Stencils (the 3/4in grid to mark my lines...so quick and easy! Then I quilted a simple loopy design over the hippos to de-emphasize the formality of the lines.
All in all, very nice, but a lot of work...forgot how much work it is to quilt an entire quilt just having done mostly pillows last year for the FMQ Challenge. This took forever!

I then decided to quilt a loopy heart design in the inner border. This is a design I am not that comfortable with and the best way to overcome this is to do an entire border
That turned out really nice and if you let go of perfectionism is an uncomplicated, fast design to use in a border.

The whole thing turned out a bit crinkly due to the quilting but I am hoping that this will ease a bit once it is all done. I like baby quilts to be quilted fairly heavily due to them having to be washed on a regular basis.

Linking up to WIP Wednesday at Freshly Pieced...just read that Amy will take a 2 months break and is thinking of finishing off her weekly linky. Fair enough too as she has run it for 5 years and the work that goes into a linky is just enormous. So, 'thank you' Amy for all the work that you put in in running this weekly linky.

Also linking up belatedly to Let's Bee Social #110...was quilting for most of the day yesterday and did not want to loose momentum...

Karin

Thursday, 16 April 2015

WIP: A Field Guide

Feeling productive. Stitched the Field Guide Quilt together after I had put it away as I really did not like my colour choices.

Who would have thought... put it together and quite liked it again. Not my favourite quilt in terms of colours but not quite as bad as I had thought either.

Not quite sure how to quilt it...overall design could be good but I am also thinking that I could stitch down the beige coloured cross shape at each intersection to make the charm squares stand out more...hmm, so many choices, always very difficult.

Linking up to WIP Wednesday over at Freshly Pieced

Karin

Wednesday, 21 January 2015

WIP: A Field Guide

Not very exciting...spent some hours chain piecing the squares of my Charm square quilt the other day


Then today rushed a few blocks through


Yep, that never works...noticed that the little square in the 3 bottom blocks is not straight. So obviously need to be a bit more careful and will have 3 blocks to re-do. What a hassle!

Still not sure whether I like this or not...may well turn out to be the biggest flop, however, the fabric is cut and the units are ready to be pieced...too late to change my mind.

Linking up to Let's Bee Social over at Lorna's and also to WIP Wednesday at Freshly Pieced.

Until next time

Karin

Wednesday, 5 November 2014

WIP: 99 hexagons

As soon as I started it I realized that this was going to take a long time. I decided to mark the curves...while I can stitch curves down a seam I cannot keep that consistent or near enough and if you suffer my perfectionism it does matter. So, yes, I am marking them lightly, going down one side and coming back up the other side, stitching the flower as I come across the black hexagons. This is quite a bit of fun but not quite as fast I had hoped for. Well, never mind...it is a small quilt and should be done within the week.

This is quite a busy little quilt and the only thing that is really noticeable is going to be those flowers in the black hexagons.


Until next time...hopefully with the quilting of the hexagons completed.

Karin

Wednesday, 8 October 2014

Plus Quilt Finished

Decided on an overall meander


I have read some interesting points about the meander design lately. Many people find it quite boring and I have been a bit amazed to read that some people think it is difficult to achieve on a DSM. I reckon almost any design can be done on a DSM, depending how much practice and determination you want to put in. I agree that meandering or stippling is not a beginner design...far from it. You need to be able to speed up and slow down while at the same time concentrating on where you are going to produce a consistently visually pleasing design. Not a simple feat by any means, however with practice it can be done.

I like my overall meander at about 1/2" scale which requires some concentration as you have to keep your hands a little bit farther apart when quilting. As I have been FMQ for a while, I have no problems with the design...even if I loose concentration I usually can wiggle my way out of spots. Boring...yes, but I like the texture the stipple produces over an entire quilt. The quilt top, while quilted allover, still has that soft fluffy feel to it. And bonus...it is a really fast design...I manage a good quarter of the quilt in one sitting, so when I just want to finish off a quilt this is my go to design.

The other point is that you have to look at the quilt top itself. I saw a Plus quilt at the Machine Quilting Festival the other day that had feathers quilted allover...while it looked nice and soft (as the feathers were big) you could not actually see the great feather work done due to the scrappy nature of the quilt. Similarly, I thought initially that I might do swirls allover, but again this would not really be seen due to the design, hence I opted for the meander which was ultimately faster to do.

Maybe if I do another one, I might try the swirl to see the difference in texture.

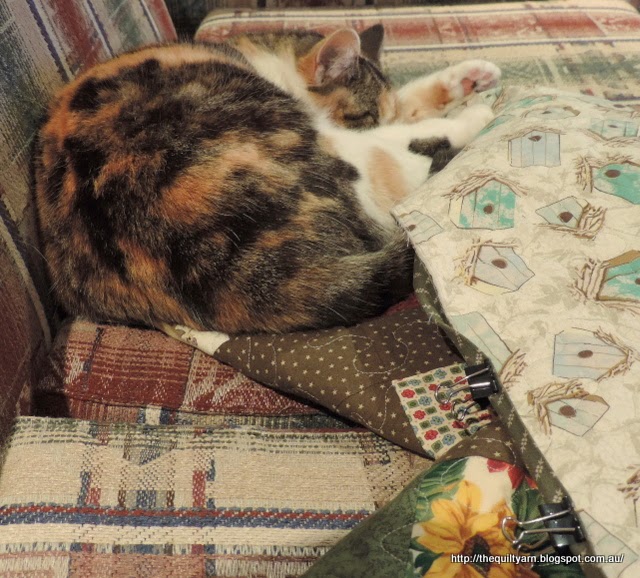
Anyway, here is a cute picture of the resident cat while I was trying to slip stitch the binding in place:

Fast asleep, so my binding had to wait...


Karin

Wednesday, 26 March 2014

Dresden Plate Table Runner

Working steadily on my projects and finished the Dresden plate quilt top (almost!).  There is method to my madness. I am trying to finish a number of things to get ready for a FMQ marathon. Would be great if I had two machines where I could swap between piecing and FMQ without having to switch over the machine all the time.

Anyway, as so often with these spontaneous type of projects, I ran out of border fabric just on the last top part of the outer border. Obviously did not plan this through very well, so I had to get some more of the red fabric the other day.  Good thing too as I had no binding fabric for this piece whatsoever.


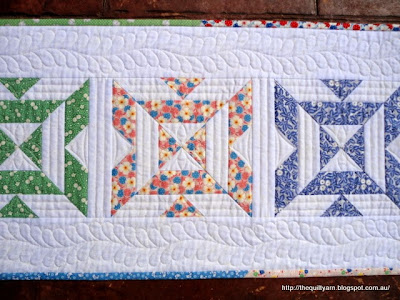
 So here is part of the table runner


This looks great even though it is a bit plain. For a moment I thought that I might add another little border  or do something else a bit more decorative but in the end I decided to just put the plain red border around it. I reckon it is enough...

PS. Got the last  70cm off the bolt when I went to the shop...lucky I went when I did.

Linking up to WIP Wednesday at Freshly Pieced and Let's Bee Social at Sew Fresh Quilts.

Karin

Wednesday, 19 March 2014

Quilt top finished

Just a quick update on that Windmill quilt. I managed to finish the quilt top this weekend and am really pleased with the way it looks...vision accomplished! This is exactly how I had visualized this quilt.

The colours are fresh and bright...


...and the border fabric really sets it off nicely


Attaching the border fabric took a little while. Don't know about you, but I find that directional border fabric can be a real hassle. This looked all nice and straight but when it came to the cutting I saw how the print veered off on both sides. Initially then I had a look at whether it would be better to cut lengthwise...sometimes the print will run straighter on the lengthwise grain. However, no such luck! As I had a limited amount of the fabric, I did the best I could and given its busy nature it is hardly noticeable. The next hurdle was the joining of two pieces to make up the length using a diagonal seam. Ha, ha...I spare you the detail, but needless to say that took me ages and given the veering off of the pattern, it does not always join in line with the pattern. But again, when finished you would really have to search for this (and we are not going to do that).

Unfortunately I did not have time to take a photo, but I bought this great fabric for the backing...looks like it consists entirely of selvage pieces and matches the colours of the quilt.

Anyway, I am linking up to WIP Wednesday at Freshly Pieced and Let's Bee Social at Sew Fresh Quilts.

Until next time

Karin

Wednesday, 26 February 2014

Quick Update On Dresden Plate

Slow progress with my Dresden Plate, but what a beauty. For readers who missed the previous post about this Dresden Plate, I am using up some leftovers from a Moda Jelly Roll (French General).


Have the other two plates finished as well, but have not got around to sew them into place or do the center. This is a bit finicky so I don't want to rush the process. So much for my idea of a 'quick fix' project!

Not sure yet how I am going to quilt it...this looks quite busy. Probably will just emphasize the circles and go around the spokes with 1/4in outline.

Linking up to Lorna's Let's Bee Social Linky Party and WIP Wednesday at Freshly Pieced

Karin

Wednesday, 12 February 2014

Going Off On A Tangent...again

Have a look what I have been up to

Yep, I still have not started on that Windmill baby quilt that I am planning as I was too curious of how this would work.

I have all those leftover fabric strip from a Moda Jelly Roll (Chateau Rouge/French General). It has been sitting in the shelf and was collecting dust. The fabric is just lovely and I do not want to let it go to waste. On the other hand I did not feel like making a quilt out of it, as I very likely would not have enough (and I am not going to buy more fabric!).

These pieces, while a bit fiddly, come together very quickly. I did all those in one evening...just need to press them now and probably make a few more.


Well, you would have guessed it by now, I am making a Dresden Plate. Always wanted to do that and so far just had not got around to it. This will be a nice little Quick fix project (here is hoping!)


I like it...just need to fix up the wedge on the right as I did not pay attention to the light/dark theme.

So, Let's Bee Social and head over to Lorna's Sew Fresh Quilt blog to have a look what other people have been up to...and also linking up to WIP Wednesday at Freshly Pieced

Until next time

Karin

Wednesday, 29 January 2014

TV project

Done some planning and decided to do a hexagon paper piecing project again. This is a bit funny as I do not like hexagons that much, however I do find the process of making them and stitching them together by hand so relaxing...ideal to do when watching a bit of TV or just for quiet time out.

I had these 2 packets of charm squares that I picked up in a sale last year together with coordinating border fabric. Have not really planned anything around size, will just do them all up and see what comes out of it. So, bought a packet of 100 hexagon paper pieces with an edge length of 2 inches size of hexagon is 4 inches). Went ahead the other day and made myself a template to cut out the material.

Carefully drew around the template that I had cut out on template plastic on my material, cut it out and continued to make a hexagon. Then it occurred to me...duh!! I did not need the plastic template at all.
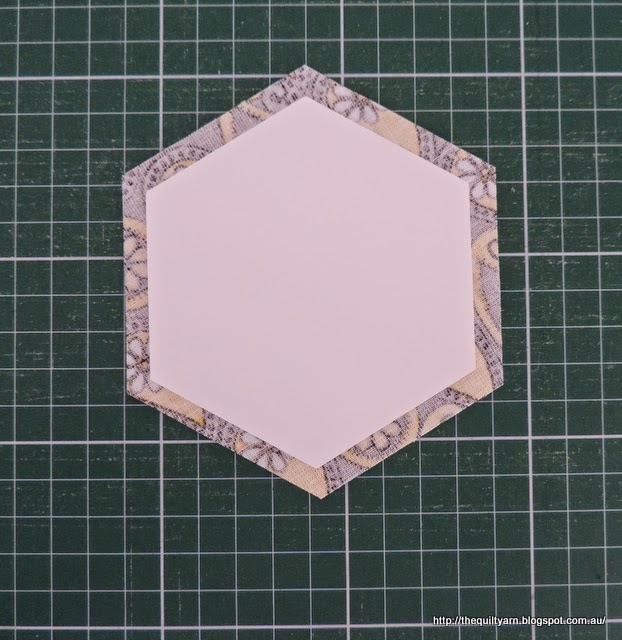
All I had to do was use my trusted fabric glue pen (to hold the hexagon in place on the fabric), whack it on the square and cut around it with a generous 1/4in seam allowance.Why did this not occur to me earlier? On my last project I had this tiny hexagon template (came with those tiny hexagon shapes that I bought for that project) and painstakingly cut out all those tiny hexagons. In retrospect not really necessary. As I said before, I have very little experience with this.

This is a great time saver and makes this even more enjoyable.

Use a little fabric glue to hold the hexagon in place
Line up your ruler allowing for a generous 1/4in seam allowance
Cut around all sides

Sides ready to be folded over
I use a fabric glue pen when folding over the seam allowance rather than securing it with thread. This works well and the glue will come out in the wash. I think the only thing to watch out for is not to use excess glue closer to the edges where you are going to slip stitch  the pieces together.

The finished paper hexagon ready to be sewn together
Two hexagons slip stitched together
This is fun...made about 10 of them yesterday watching some TV...highly recommended. I wonder what this will become...


Linking up to Lorna's Let's Bee Social Linky Party over at Sew Fresh Quilts, WIP Wednesday at Freshly Pieced 
and  also...Fabric Frenzy Friday

Until next time


Karin

Wednesday, 30 October 2013

Done!

This is probably getting boring as I have been showing the same thing at slightly different stages over and over again, but I am finally done with the quilt top!..(and what a bugger this was to piece together). Turned out a bit on the bigger side, i.e. approx. 62"x 70". It sort of evolved as I went along as most quilts do.


Now I only have to get some backing and I am on my way...looking forward to the quilting of this top. Still thinking that a general meandering design would look good as it is quite busy.

Linking up to WIP Wednesday at Freshly Pieced

Karin

Tuesday, 24 September 2013

A Finish and WIPs in progress

Is this you?

I have several WIPs in progress. When I walk into my sewing room I am bombarded with WIPs.

On my work table I have:

- Cheryl's quilt: neatly folded up and ready to baste
- Kaleidoscope quilt blocks: stalled due to lack of motivation
- Disappearing Four Patch blocks and material cut out ready to go: very keen, but got side tracked with another project, i.e. the 'Playing with Colours' project that is currently adorning the lounge room floor.

So I am left with a limited space to work on the table. Very irritating.  Under the table is an assortment of scrap material - really have to stop just dropping them there...

Behind the sewing machine, on the extension table, I have the white table runner rolled up, but ultimately in the way...under the extension table I have my stash in one of those big plastic containers. Currently I cannot see the lid as it is littered with material and bits and pieces of wadding...hence getting to any fabric is a hassle.

Then there is the floor...unfortunately I am one of those people who uses the floor. There we have my Colour Adventure quilt ready for attaching a hanging sleeve. On top of it I have my Feather Wholecloth waiting to be continued (need to buy some thread). And then there is the FMQ Sampler from last year...rolled up and waiting for the binding (actually did have some binding for this but used it up for another project recently). I could go on to lead you through the other rooms as there are another few finished quilts adorning the floors, sofas and every other conceivable surface.

I walked into my sewing room the other day and thought...right, this is it!

I took the white table runner and had another look at it. I stopped working on it a while ago  because I was not happy with the quilting. While I love the feather border, the lack of quilting over the blocks looked somewhat unfinished and under quilted. The problem was that I was so focussed on the feathers that I really did not give all that much thought to anything else. In retrospect I realise that I should have constructed this a bit differently...I am thinking that these blocks maybe should not have had any sashing in between or if I wanted sashing, then I should have also put a frame around it.

Also, the blocks themselves may have looked a bit better if I had alternated their direction.

Anyway, I decided to not stress about it and just finish it. The piece itself is very pretty and it was a pity to just let it waste away. So I quilted 1/2in lines in all the white spaces to just finish it off. Still think that it needed something different but I was lacking in brain waves and determined to make a start on finishing some of those WIPs...also used the last lot of jelly roll strips from that range to construct the binding and really like how that turned out. Gives the whole piece a bit of a lift.


The finished product...while not exactly the way I imagined this to turn out when I started it, I am pleased with this and bonus, it's a finish and off my hands (and off the table). 


I like the lines in the block but am thinking that this may not necessarily go with the flowing feather border. Will the less obsessed person realise?...probably not.

Well, here it is...An Arrangement Of Small Pieces", named after the block.


Let's hope my productivity lasts for a while

Linking up to WIP Wednesday over at Freshly Pieced

WIP Wednesday at Freshly Pieced
 
Karin

Monday, 26 August 2013

Playing with Colours WIP

Made great progress on my latest WIP 'Playing with Colours'. Blocks came together very quickly and "ate" up most of the fabric.

Made a real silly mistake with my setting triangles though...as they had to be pieced I cut out squares of the blue fabric and cut half square triangles to attach to the white square...ha, ha...only to realise that this places the outer edge on the bias. Of course, I had cut up a whole lot of squares in preparation for this! I am really a bit out of practice with all my piecing at the moment.

After waking up to this and thinking this through in a bit more detail, I remembered my Companion Angle. Yah!...that allowed me to cut strips of fabric and then cut out the  triangles to the required size placing the outer edge on grain. Much better...can't believe I just overlooked this in the first place. However, this also meant that I was running dangerously short of the blue fabric.

This goes to show there is a good reason why one should always buy meters of fabric!


A few tips:

- think before cutting into any fabric!
- measure twice before cutting anything!
- pay attention to the seams when placing your blocks!

Yes, I did make a few more mistakes along the way like cutting an entire strip of blue fabric too short...in the end I had to do some very creative piecing to make this fabric go all the way.

To top it all of, when I had sewn all the blocks together and was about to sew the rows together, I realised that I had turned some of my blue four patch units the wrong way so that the seams did not face the right way for sewing the rows together! Can you believe it...I did undo lots of the blue blocks and one by one fixed them up...that took almost an entire day!

Finally yesterday it was time to square off this quilt top. Well, I can tell you that this took me several hours, as I took it especially serious. With hardly any blue fabric left, I could not afford to make any more mistakes, so I measured everything super carefully and squared it off bit by bit, taking my time with every step. This quilt will not have an additional border so it was important to get that right if I want a reasonably square quilt.

Turned out great! What a relief.

When I went through my stash the other day to look for suitable backing fabric I found this long forgotten heart fabric sitting right at the bottom of my container. I have got about 4 meters  of this...I could not believe it!  This is actually part of a range of  heart-themed fabric that I bought when it was on special. Not having any particular project in mind, this has just been sitting around. This is perfect as a backing for this quilt. Very cute.


This fabric is crisp and feels super smooth...so, would you wash this?  I did... in fact, I wash all my fabrics, even whites. This is because fabric contains certain chemicals as well as sizing,  apart from the fact that there is usually excess dye left in the fabric (and as I suspected there was a fair amount of red dye that came out in the wash...I use Colour Catchers when I wash fabric, so most of the dye is caught by that and anything left over will be rinsed out).

Quilting- wise not sure what I will do with this...for this project I was more focussed on the design and have not thought too much about the quilting. I don't think I will do an overall design as I think this could be too much. At the moment I am more looking at emphasizing the rows through the empty white spaces. We'll see. first I need to piece my backing together and then baste this baby.

Linking up to Anything Goes Linky Party at Stitch by Stitch. Check it out:


stitch by stitch

and WIP Wednesday over at Freshly Pieced


Karin

Wednesday, 7 August 2013

A new WIP: Scrappy Country Quilt

As you may know I decided to make another scrappy Country quilt using the Disappearing Four Patch block

 Love the look of this block and think that it lends itself particularly well for a scrappy type of quilt.


Going through my stash the other day, I finally decided to use my 'special country fabric'.  This is fabric I won (21 Fat Quarters) in a competition run by the Australian Patchwork & Quilting Magazine in 2011 (Vol 20, No 7) to celebrate Leutenegger's 120th birthday. The fabric was an assortment of prints from Windham Fabrics, Andover Fabrics, Henry Glass, Robert Kaufman, Blue Hill Fabrics and SPX Fabrics....just beautiful. This is a start...not sure what else I will throw in.

My selection so far


Have not progressed that far, but made a start. The blocks come together easily and accurately and finish up at 8 1/2in square. Bit out of practice with piecing though...took me a while to figure out which way to press my seams. Got all confused.

My progress so far


This is exciting!

Linking up to WIP Wednesday at Freshly Pieced with guest blogger Liz from Shush - I'm Quilting

Karin

Wednesday, 1 May 2013

WIP: Colour Adventure Project

It's been a while that I linked up to WIP Wednesday over at Freshly Pieced. So here is how far I got along on the quilt that I called 'The Colour Adventure'...a hugely bright and bold quilt that was a bit of an experiment in colour placement. Got a bit very bright for my liking and is a bit out of my comfort range but I am in the process of finishing it off (I think I started this some time in January...ended up getting side tracked a fair bit starting several other WIPs).


Linking up to WIP Wednesday at Freshly Pieced.

Karin

Wednesday, 3 April 2013

WIP: Pack N' Go Tote - Progress Report

Did I describe this bag as "simple" before??

Well, all went well...I followed the pattern (taken from Fresh Fabric Treats with your favourite Moda Bakeshop designers) one section at a time and thought I was making very good progress. I did use fusible batting rather than the Warm and Natural batting that was used in the book but thought that this would not make too much of a difference.

My machine struggled with the thickness a bit, so if I was to do this again I probably stick to the Warm and Natural batting, but otherwise all good, until I got to the Assembly section. WHAT!!...inset seams??...how did I not see that before? I could not believe it. In my eagerness I obviously did not pay too much attention to the assembly side of things otherwise I might have backed out of this one. Well, I have pieced inset seams before...so, how hard could this be. With that I set out to assemble the bag...what a struggle! With the double layer of panels and batting this was like taming the beast...my first attempt was less than satisfactory with the corners not meeting properly at all and the seam itself somewhat crooked.

So, I undid all the stitching (yes, this took ages and was very frustrating) and started again, working deliberately slow and concentrated a bit better, with the occasional swear words accompanying the process. The corners came out better, not sure whether all the seams are totally straight, but this is brilliant compared to the first attempt. Then I discovered I had ripped into two of my quilting lines...(don't you love it)...so had to do some repair work.

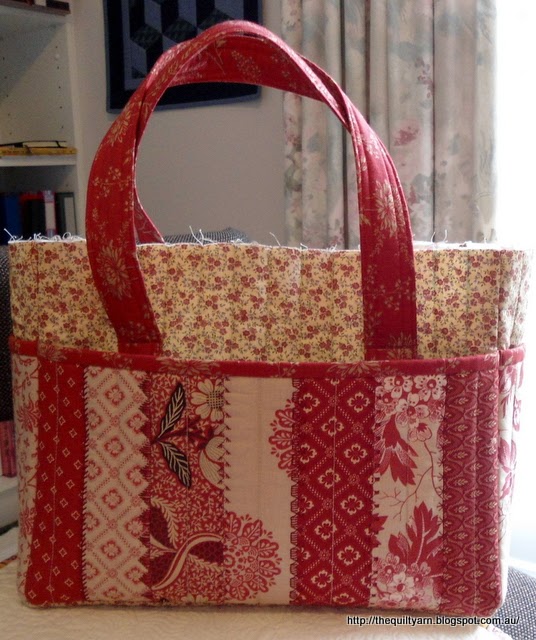
So, tada...here it the body of the bag done


So far, so good. I am pleased with this...the panels which are pockets are all around and will be secured with a pocket closure and a button in the middle...(to be continued).

I did the lining yesterday and must say that after the struggle with the bulk of the bag the inset seams of the lining were an absolute breeze. Now my measurements were all more or less exact but when I put the lining in, it seemed to be too big. I measured everything again because I thought that I might have to re-do this as well, but my measurements were correct on both lining and bag...not quite sure what to do because even if I wanted to make it smaller, I have absolutely no idea how much smaller it should be, as it should fit as it is. Then why does this look miles too big? Maybe I should iron the bag gently to make everything a bit flatter?

Any bag-makers out there who could comment on linings and what that should look like? My lining is literally throwing folds in there, but when I pin it around the top of the bag it definitely fits as it should.

Anyway, that's been my challenge for the week and no matter what, this will actually be finished and at least from the outside, it will look great.

Linking up to WIP Wednesday at Freshly Pieced guest hosted by Natalie from Greenleaf Goods

Karin

Thursday, 21 March 2013

WIP #3: Baby Quilt finished

Finally...the baby quilt is finished. Bound, washed and blocked...all done


Came out very crinkly, but I like the feel of it. What a saga. Felt compelled to redo it as the zebra fabric was the wrong way around...while a bit of a hassle, I am glad I have done it, because I would have cringed every time I looked at it if I did not correct this.

Karin

Wednesday, 6 March 2013

WIP Wednesday: Progress

Made some progress this week. Here is my table runner

Will post more detailed FMQ shots about this one on Friday. While nice, it lacks a bit of planning, i.e. I should have thought more about the quilting of the actual blocks. Border is beautiful but I was left wondering what to do with the blocks (which ultimately produced some unevenness in the quilting...hmm, maybe I should have used a filler design over the blocks...


And here is me hard at work on my baby quilt. Have decided on a loopy - loop design . In order to keep me focussed I had to have my drawing of the design next to me the whole time just to refer to the scale of the design and also to check every now and then in which direction I was going.  Loops are easy to stitch, however I don't find it that easy to fill up an area with any level of consistency. I am aiming for a scale of about an inch over a 3 - 4in area, so have to have a fair bit of speed to make those more sweeping kinds of movements. Very easy to then get lost in it all and end up too close or between some loops. So far, so good...half way through


Linking up to  WIP Wednesday over at Freshly Pieced. (guest hosted by Claire from Sewing Over Pins)

Karin

Wednesday, 27 February 2013

WIP Wednesday

Have been busy...

WIP #3: Baby Quilt top finished and basted read to be quilted. Thinking of a loopy kind of FMQ design


WIP Table runner

 
Finished the stitching-in-the ditch. Forgot how tricky this can be. I am using white thread rather than Monofilament, so I need to be a bit more exact. While necessary at times, I actually do not like Monofilament thread that much and try to avoid it wherever I can

The blocks are beautiful (looks rather wrinkled here because it was folded up) and this should turn out nice. Still planning on a feather border and found a nice motif to put in the sashing. Looking forward to this.

This white top on the cream batting is a bugger to photograph...looks much better in real life


Apart from this I still have to baste (and continue on) my Colour Adventure quilt and continue on my FMQ piece....I cannot believe how many projects I started this year! 

Linking up to WIP Wednesday at Freshly Pieced.


Karin

Wednesday, 30 January 2013

WIP #3 - Baby Quilt

WIP #3:
Well...finally made a start on my baby quilt.  I am really excited about this as I have been wanting to do this quilt since last year. even bought the fabric last year. I have done this quilt before but wanted to make it again in different fabric and a little bit bigger as well (cot size)

Bit of a hold up as I realized  that the blue fabric had "for home use only". This annoyed me to no end. As I am thinking of putting this pattern on Craftsy I thought I better not use it so bought a very similar blue dotty fabric which does not carry that restriction.

Felt very productive, as I managed to do all the cutting and write down a basic outline of how I want to write up the pattern. This will be a very easy and quick-to-do quilt, involving basic strip piecing.


Bit of a peek at the blocks...so cute, the zebras will be hopping all over the place.


Managed to chain piece a fair number of blocks already. This is super easy to do and should come together quickly.

Linking up to WIP at Freshly Pieced.

Until next time

Karin

Popular Posts