Friday, 25 August 2023

Baptist Fan Quilting on a Sitdown Longarm

I thought I do a little post on how I go about quilting the Baptist Fan over a lap sized quilt (54 x 60in) using my new rulers from Michael Quilts. Hopefully someone will find this useful and take the plunge in terms of trying this out on one of their quilts.

Here are the templates (except for the smallest one)
Nice green fluorescent, so cannot be overlooked on your quilt. Nevertheless, I do set myself up with a chair on my right side where I park each template following its use. Having a quilt all scrunched up around you makes it too easy to loose sight of where your rulers are. Except for the biggest one which oftentimes travelled along on the quilt, but I'll get back to that.

Beginning the Baptist Fan design at the bottom of the quilt from left to right is an absolute pleasure. Looks great and you always feel like...yah, I got this!
Having done this now a number of times on larger quilts I do know better though and was expecting things to go out of alignment a bit higher up.
Interestingly though that did not seem to happen for the first few rows, in fact the templates aligned really beautifully.
See the dotted line of the left fan and the line from the underneath fan...almost perfectly aligned to the stitched fan. Too good to be true...I continued.
As I went up I did notice that my line of fans finished slightly differently on the right side. In fact it seemed as if the fans had moved over to the left by about a 1/4in. Did this made sense to me? I thought that I had experienced some drag from the bulk of the quilt as I went along and my alignment went out a couple of times across the quilt. When this happens I do pay a lot of attention to the next row, i.e. are my alignments of the templates at a right angle and are the distances of the individual fans accurate? While the dotted lines then do not align totally with the ones already stitched, I disregard that. To keep it straight and consistent is more important to me as all the next rows are build upon each other. I do not mark the rows on my quilts before I stitch hence rely entirely on the correct placement of the template to keep it straight. So while I am quilting the fans I also look at where each fan finishes in relation to the quilt blocks...that gives me a good idea of whether I am keeping them straight or not.
I think I said it before in an earlier post that stitching these fans on a sitdown machine will never be as accurate as doing it on a longarm machine on a frame simply because you have everything movable, i.e., the bulk of your quilt shifts around, maybe even creating drag and on top of that you have the templates that can easily shift ever so slightly. 
I have the Handiquilter sticky (and grippy) tape on the back of my templates (I also had just a rubber type sticky thing on the back initially, however found this too slippery). As you go up in template size, they are big. The 11in fan is as big as my hand, so it is important to stop several times during the stitching of that curve to reposition your hands as repeated shifting will make your entire row shift to the left. A little bit of shifting over is not too bad, however if you are not careful this could go out of hand. My 1/4in shift over was ok and I doubt that it will be noticeable to the recipient of this quilt. Funny enough, once I had discovered the slight shift and paid attention to the drag of the fabric, it did not occur again, i.e. my finishing fan on the right side remained in the exact same position which made me think that I struggled with the drag of the quilt when I started off.
In order to counteract this I folded my quilt in an accordion style manner so that the area to be quilted could move freely. That seemed to fix that issue.


Another thing that I use are these white rectangles out of rubbery material. The material is what you might put in your draws or under carpet runners so that things don't move around. I have got a roll of this and cut out some rectangles which I use to stabilize the template. Once I got my alignment right I usually put it right under the middle of the template so that it does not shift. This works really well and is very helpful.

I stitched the Baptist Fan with Omni thread (about 40wt; TEX 30) on my Bernina Q20. Had not stitched with a thicker thread for some time, so this felt a bit like stitching with a rope. (Had no problem with it, the tension sat on 5 using the same thread in the bobbin; needle 100/16) Forgot that there is a fair amount of backtracking involved and at times I struggled to get that to look really neat. However that is where these templates shine. The larger template has got these 1in markings that you can use to travel on your previously stitched line.
So, I used the biggest fan to backtrack over my previously stitched lines keeping it always on the side of the quilt travelling along as I stitched with the other templates. Worked great most of the time except that I was stitching in BSR1 mode for a while which is the one where the needle keeps going even when you stop. That led to some unsightly stitch build up in some areas when I was hesitating. Switched over to BSR2 which is the mode that stops when you stop and that made it easier. Mind you, I was also a bit out of practice and stitching with an unfamiliar thread threw me a bit at first, but I got there in the end.

Another stress point in quilting this on a sitdown machine is when you have to turn your quilt over as you approach the middle of your quilt and there is just too much fabric in front of you. Switching it around means you are now quilting from right to left  towards you rather than away from you. I always find this a bit harder however have found that it often fixes slight mis-alignments as you now quilting in the other direction. Another point to watch for is fatigue, that feeling of …oh, this will do, I just need to finish this row etc. and disregarding the mis-alignments. If you are tired, stop and do something else and come back to it with a fresh mind honing in on the alignment to get that back on track as you can fudge this here and there to get back to an almost perfect alignment.

So, did I stay straight? That is always a bit nerve wrecking when approaching the end as it will show you how well you executed your design over the quilt. Mine was not too bad at all. All fans finished approximately at the same point (except for one side which was a bit higher). Little indiscretions will not matter here as this will be covered by the binding, so overall I was really happy with it.

The finished quilt
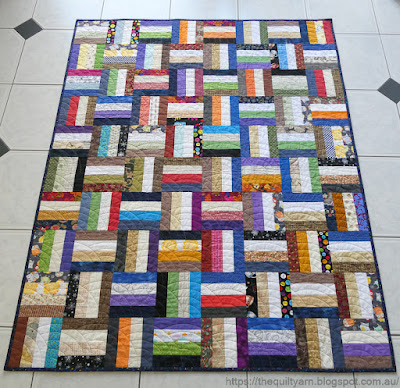
and the back

Currently debating whether to do this on my next scrap quilt which is bigger than this one. Just really like the look of the Baptist Fan for scrappy quilts in particular.

Karin

Thursday, 24 August 2023

To Do Tuesday #34

My list from last week:
- baste one of the scrap quilts on the machine and start the quilting. Will do a Baptist Fan design over it, so that will take a bit of time but I am really looking forward to it.✅
- clean up the sewing room a bit. Following the last few weeks with working on several projects, it is rather messy and I do need uncluttered space around me when quilting.✅
- construct another hanging sleeve for a wall hanging that has been sitting behind my sewing machine for the last two years at least (can you believe it?).✅
- finish off my beanie!✅

Wow, a first...done everything on my list!

I actually finished my scrap quilt ready to be gifted this weekend.
Did a Baptist Fan design over it with my new Baptist Fan Rulers from Michael Quilts. Absolute pleasure to do. Will do another post in the next few days on how I went about it in case people are interested in how to do this with a bigger sized quilt on a sitdown longarm machine. Took photos this time of the whole process as I went through.
Back to the quilt...entirely made out of scraps and if you are following along the first to be completed. Have another bigger one that needs to be finished off. I used my last piece of batting from a roll I had purchased a couple of years ago...just fit, which was very lucky.

Pieced the backing together using some bigger pieces from my stash.
Particularly like this...shows of the quilting really nicely and is such a great colour. Finished it off with a dark blue binding with little stars on it which suits the overall look of this quilt. So, an entirely 'free' quilt!

Close up of the quilting
Also finished my hanging sleeve for a wall hanging which has sat around for the last 2 years at least.
That took a grand total of about an hour and a half...can't believe I left it for so long! For the time being I hung it behind the sewing machine as I am struggling to find a free wall to display it properly.

And last, not least, finished my latest beanie (gifted to my daughter).
Great beanie pattern from Nimble Needles. Also felt like a freebie as this wool was purchased years ago. Don't even know what the idea behind it was.
 
Also sewed on the binding to my table runner, so overall felt very productive this last week.

For the remainder of the week, I am planning to 
- handstitch the binding to the table runner to finish that off.
- pin and baste my other scrap quilt ready to be quilted, and
- probably just relax a bit (strained one of my shoulders a bit and will need to go a bit easy on the quilting for a moment)

Linking up to To Do Tuesday #34 over at Quilt Schmilt and Midweek Makers at Quilt Fabrication.

Karin

Wednesday, 16 August 2023

To Do Tuesday #33

So this was my list from last week:

For the remainder of the week I need to
- start my handout for the class in earnest to see how much work is involved in that✅
- if time allows, baste one of the scrap quilts✅
- sew the binding to that little growth chart wall hanging and construct a hanging sleeve. ✅

Nothing better than a bit of pressure. Finished my handout...finally! When I talked to the lady from the sewing shop, she said she needed it by the end of the month. Well, that got me going. Finished instructions and diagrams in record time.

I did pin one of my scrap quilts but did not take a photo, so you have to take my word for it. Thought that I would get around to basting it today but am mucking around on the computer too long. It is already late afternoon, so I think I will start this tomorrow.

Did finish my little wall hanging and the listing is up in my Etsy shop

Glad that's done...always takes a while to get that right. Spent a few days on taking photos. I recently bought some lights and had not tried them out as yet. Lost about a day when photographing with the lights as I basically have no idea, so I had all sorts of issues with where to put the light, how much light etc. Very challenging indeed. Spent another day taking the photos in more natural light as the mornings were quite sunny and then had to go through some editing. Got enough good photos out of that to put up in my listing. Definitely need to practice more with the lights.

It's quite a cute little wall hanging, measuring 14.5in x 42.5in. As usual I chose a clamshell design to go over it. I just love that for baby quilts. Had just enough fabric for the binding, so I made it a definite 1/4in binding. Looks very nice with its rainbow colours.

Have another one of those panels that I purchased on impulse at a recent quilt show. Always sounds like a great idea, but when you are doing it, it always takes twice as long. With this panel I had to spent quite some time straightening it up to get it into an exact rectangle shape. Then the binding which came with the panel was just enough, only had a slither left after cutting it. And then, of course, I had to do a hanging sleeve. Did not consider that at all when I bought it! Probably will leave the other panel for another few months.

For next week I am planning to
- baste one of the scrap quilts on the machine and start the quilting. Will do a Baptist Fan design over it, so that will take a bit of time but I am really looking forward to it.
- clean up the sewing room a bit. Following the last few weeks with working on several projects, it is rather messy and I do need uncluttered space around me when quilting.
- construct another hanging sleeve for a wall hanging that has been sitting behind my sewing machine for the last two years at least (can you believe it?).
- finish off my beanie!

Linking up to To Do Tuesday #33 over at Quilt Schmilt 

Karin

Tuesday, 8 August 2023

To Do Tuesday #32

Short week for me today as my last entry was on a Thursday. Anyway, here is my list from last week:
- finish the FMQ on my table runner✅
- sew the second scrap quilt together✅
- if time allows, maybe get one of the scrap quilts basted❌
- make a start on my table runner workshop handout - not sure yet how much work this will involve, hopefully I can at least look at it and work out what I need to do, i.e structure, diagrams etc.❌

Yes, OMG I finished that table runner (except for the binding). Certainly was dragging my feet with that one. Just did not feel like it as I had done another one earlier in the year.
...and a close up
I re-did my feather spray after all. Just annoyed me looking at it as I was not happy with the shaping. For this piece I chose a blend in thread colour. Not what I usually do and I must say I do not like it that much. I think I prefer a more contrasting thread, but just as a second class sample it will do. Will have to get started on the handout for this class, something I am also dragging my feet with.

On the positive side, I finished the sewing together of the second scrap quilt.
Did correct my initial layout mistakes, so this took a couple of days of undoing some blocks that were the wrong way around, but it got done. Very striking little quilt. Have my backing and wadding all sorted, so it is just a matter of putting it all together. Looking forward to quilting the scrap quilts.

Then I finished the FMQ of a little wall-hanging, i.e. a children's growth chart panel. Got two of these panels at the last quilt show and thought that they make nice and quick little projects to be included in my Etsy shop. Had the piece already basted and ready to go and quilted this in a couple of hours this afternoon. Even got the binding done. Will still need to make a small hanging sleeve but that should not take that long.

So, very productive last few days.

For the remainder of the week I need to
- start my handout for the class in earnest to see how much work is involved in that
- if time allows, baste one of the scrap quilts
- sew the binding to that little growth chart wall hanging and construct a hanging sleeve. 

Linking up to To Do Tuesday #32 over at Quilt Schmilt

Karin

Thursday, 3 August 2023

To Do Tuesday #31 (on a Thursday)

My list from last week was as follos:
- make a start on a new sock pattern❌
- make a start on the second scrap quilt just sewing the blocks together✅
- continue on the table runner, i.e. filling in the background...there will be a bit of a grid, a rainbow pebble filler and a more boxy filler, then some pebbling and lines around the feather structure✅
- start on the handout for the workshop (wishful thinking??)❌

Not a bad effort!

I made a start on the other scrap quilt that I had ready to go and managed to put all the blocks together
Layout got slightly messed up but I am leaving that. Also discovered that a few blocks are turned upside down when looking at the photo now. Will maybe fix this when I sew this together. Quite like this layout. Nice array of colours.

I said that I would start a new sock...well, instead I knitted another beanie hat and have since started another one (with wool that was purchased years ago). I really seem to be into using up what I got at the moment. Even pieced together a wadding the other day!

My beanie is cute. Really enjoy the knitting in the evenings.

After this I tackled putting some backings together for the scrap quilts. We have got this nice nook in the kitchen/dining area that is just great for auditioning large fabric pieces. As the whole floor is tiled you can just slide pieces all over the place as if you were working on a huge puzzle.
In terms of putting a backing together, I do not fuss over that too much...
...I just lay out my pieces, move them around, sometimes cut them in half to vary the arrangement a bit and sew them together. The only measurements I do take is that of the length and width that I need to cover.

Made this one first which is a bit smaller. I will use this for the quilt above. Needed a bigger backing for the other scrap quilt that I made and selected some very old pieces I had sitting around.


Checking here where the seams will sit and hopefully cut my backing to a size where I avoid putting the seams exactly where the seams of the blocks on the front are.

Nice big size. As mentioned above, then I pieced some wadding together for this larger piece, so I am basically ready to baste that together.

Also worked on my table runner. Actually re-did my whole feather arrangement as I just did not like it and it annoyed me looking at it. Re- stitched the feather spray just following the gentle divisions which looks a lot better and have started to fill the remaining area. Should be finished by the end of the week.
Well, that has been my week. Quite happy with my efforts.

For the remainder of the week I will
- finish the FMQ on my table runner
- sew the second scrap quilt together
- if time allows, maybe get one of the scrap quilts basted
- make a start on my table runner workshop handout - not sure yet how much work this will involve, hopefully I can at least look at it and work out what I need to do, i.e structure, diagrams etc.

Linking up to To Do Tuesday #31 over at Quilt Schmilt

Karin

Wednesday, 26 July 2023

To Do Tuesday #30

Missed a week...seems to always go so fast and I felt that I needed to finish something before linking up again.

My list was as follows:
- finish off my sock
- write another blog post on my new pattern which I did not get around to this week
- make a start on the wholecloth table runner as I do need to start preparing for a workshop in September; maybe just get the basting done at the very least.
- continue sewing my scrap blocks together.

Well, I did finish my socks and they are looking rather good
Could say that I planned the orange colouring this way, but no...that just happened by coincidence. Did wear them in the week and washed them since then. All good, still fit! Did a whole lot more research into sock knitting and sizing and am planning another pair.

On the quilting front, I did manage to finish one of my scrap tops. Took a bit longer because my initial layout needed to be extended by one row. I had 9 blocks by 10 rows which looked somewhat odd to me so I did need to construct another row which I finished today. This has taken much longer than anticipated due to the matching of the seams and general lack of motivation, but its done.

Absolutely crazy amount of scrap fabric! The quilt will come out at 54in x 66in, so quite a good size for a throw for the sofa. I am now going to piece a backing together. Again, this took a while to decide what exactly to use but in the end I decided to use up one particular green blender, complemented by another greenish print. Will have to wash the fabric as I cannot remember whether I have done this before or not.
Planning to use my Baptist Fan rulers on this one which should be good fun. We shall see how long it will take me to get this done. Struggling a bit with motivation to do anything at the moment and am always surprised how much quicker things get done when I am actually doing it! Might be the weather over here...it's been miserable, cold and very rainy. On top of that we have been doing a fair amount of running around, going to different appointments, taking our cat to the vet due to a thyroid issue, looking after my daughter's cats while she was away, car shopping with my other daughter etc.

My second scrap quilt should be quicker as I am not going to match seam for seam, so I am hoping to bang this together a bit more quickly.

Also made a start on my table runner
Not really happy with how I did the feather in the middle, something went wrong with my guidelines on the side. Should have chosen a more uniform guide that follows the divisions, I think. Live and learn. However, this is just for show and tell in the workshop, so I am not going to worry too much about it. As the surrounds will be filled in it might just all blend together and it might be a good example of how not to do your guidelines for the feather spray. Still a fair amount of filling in to do...hopefully I will get this done over the next couple of weeks.

Apart from that I did baste together a small Growth Chart quilt for my Etsy shop, however did not take a photo. But basically that it also ready to be quilted.

So, plenty of stuff to do, might just have to work on my motivation a bit. Hopefully the household will calm down a bit and we can get back to our normal routine.

So, what am I planning? Maybe for the next week I will
- make a start on a new sock pattern
- make a start on the second scrap quilt just sewing the blocks together
- continue on the table runner, i.e. filling in the background...there will be a bit of a grid, a rainbow pebble filler and a more boxy filler, then some pebbling and lines around the feather structure
- start on the handout for the workshop (wishful thinking??)

Linking up to To Do Tuesday #30 over at Quilt Schmilt.


Karin

Tuesday, 11 July 2023

To Do Tuesday #28 - Continuing Scrap Quilting Adventure

The last two weeks were unbelievably busy with errands, household chores and adult kids coming and going. In addition, our local quilt show was on last weekend which was an extra outing on top of everything else.

So I did not get as much done as I had hoped. My list from 2 weeks ago was:
- continue to sew those strips together until I have got enough to make a quilt top. I am approximately half way through on both stacks of blocks, so this should be do-able✅
- start on quilting another of my table runner wholecloth quilts
- start writing up my new pattern (this will take a few weeks but I have to have this on here, because I am definitely procrastinating)✅
- continue knitting my second sock - struggled through the beginning again but am on my way now).✅

My scrap project went completely bananas! As explained earlier I decided to use up the bulk of my strips to make some scrap quilts...and then I found a stack of  Charm Squares. So all told I am working on three different quilts. Made some progress on the first one, but let me tell you how much I got out of my scraps first. I am embarrassed to say that out of the strips that I already had and another stack that I cut to size for this project I made two stacks of strip blocks. I had
- 92, 3 strip blocks (each strip at 2-1/2in) and 
- 72, 4 strip blocks (each strip at 2in).

… and I still have strips left over! It is absolutely insane how much I have accumulated over time. I only stopped as I was running out of certain tones, as I sewed my strips into dark, medium and light arrangements. Interestingly, I ran out of 2-1/2in strips in the light range as opposed to the dark tones in the 2in strips. Also discovered that I obviously like orange...I had so many orange strips which was a bit of a surprise.

I am working on the bigger quilt now and have started to put the blocks together
This quilt will be 9 blocks x 10 rows, so 54in x 60 in. Not that interesting in terms of layout but if nothing else it will just be very colourful.

The other quilt will be 8 blocks x 9 rows, so 48in x 54in. 
In this arrangement I sewed dark, light, medium and dark together and will probably have one block facing horizontal and the next block vertical. 

Both quilts will be gifted away to be used as throws, in the car or whatever. My Charm Square quilt will be challenging. I started to work on that as well, sewing together light and dark squares but struggle with nothing going together as the fabrics has been collected over many years. I've got children's print, reproduction fabric, solids …all sorts and it is hard to overlook this and go for an uncoordinated look. We'll see.

I did manage to write up my pattern for my Etsy Shop
The alternate block is the Fancy Foot block which I really like, particularly in bright, near solid fabric. Very eye catching. As this blocks involves making half rectangle triangles the write up was a bit more involved and I included some photographs as well as lots of diagrams on how to do this. The PDF pattern includes two sizes, one square baby quilt and one crib size baby quilt ( will need to do another blog post as I ran out of time to post about the new listing).

And then there was the quilt show. Happy to say I did not buy that much. Just bought one new panel and then also 2 growth chart fabric panels. These are good little projects for listings in my Etsy shop when I am running out of juice in terms of coming up with new exciting patterns 😆 

Also continued on my second sock. It has been just as hair raising as the first sock. I thought that I would retain the information a bit better but again had to watch my instructional video several times as I could not remember how I did knit sections in the first sock. Also did a fair bit of research into the sizing of socks and how to go about adjusting the sizing to your particular foot. I am a bit hooked, I must say and I do intend to knit another pair after this lot. Very addictive! 

So, for the remainder of the week I will try to do the following
- finish off my sock
- write another blog post on my new pattern which I did not get around to this week
- make a start on the wholecloth table runner as I do need to start preparing for a workshop in September; maybe just get the basting done at the very least.
- continue sewing my scrap blocks together ... no hurry, as this will take a while I think

Linking up to To Do Tuesday #28 over at Quilt Schmilt and 
Oh Scrap! at Quilting is more fun than Housework

Karin

Popular Posts