Showing posts with label Freemotionquilting. Show all posts

Tuesday, 8 July 2025

More Charity Quilts

I am running behind in the the quilting of the charity quilts. Have four more to go before I pick up new quilt tops, so I am really knuckling down trying to get this done (hopefully by mid - August). Very much in the mood for ruler quilting and the next quilt top presented the perfect opportunity to do some Baptist fans again.
I am using templates from Michael's Quilts. Purchased those a couple of years ago now and still think they are fantastic and the best on the market. Remembered that I looked at other ones at the time, i.e. Amanda Murphy had just brought out her Baptist fan rulers but they were too narrow for me. I was looking at a 1in space between the curves in order to use it as an allover design. That's how I eventually came across the templates from Michael Quilts. 
First issue was that my charity quilt was not exactly straight around the edges. As I can't mark the charity quilts my trusted masking tape came in really handy (using a lot of that lately). In order to start my fans I needed a straight edge, so I used a large right angle and marked the 5-1/2in height of the fans with masking tape straight across. Had not thought that through though as I needed to get my beginning fans straight! The first little circle is 1-1/2in high so I had another straight tape line at 2in and from there I chalked in the 1-1/2in line.
Bit clumsy, but worked fine. As I was stitching along I removed the tape
Took me a moment to get comfortable again with the templates. The largest template is based on an 11in circle, hence it is quite big to use on a sitdown longarm. Takes up my whole hand.
As you can see I have lots of little grippy disks on the back and also use the sticky drawliner pieces to hold the ruler in place. Similarly, the smallest fan is based on a 3in circle and is somewhat awkward to hold, so a slow pace was the go. Initially I was dreadful at backtracking over previously stitched lines, but improved as I went along. The trick is to use the top of the templates to help you stitch along 1in to get to the next fan.
Now, I am not going to say this is super easy...it's not. Being on the sitdown means everything moves and you are surrounded by your fabric sandwich which may not always cooperate in terms of push and pull. Nevertheless I was impressed how consistent this looked after a few rows. I forgot how heavy this is on the shoulders, so given my shoulder issues I had to really take it easy. So I took my time doing about 2- 3 rows per sitting.
Looking good

I finished the last few rows today but could not take a photo...just too grey and rainy over here. Turned out lovely and fits this quilt really well. I think it was originally a memory quilt top as there are lots of old shirt fabrics in there. Really interesting to stitch over. Will take a photo tomorrow of the finished quilt. The Bapist fans came out great...funny though there is always one row in doing this where you think 'oh, I lost the plot' as nothing seems to align properly and you feel as if you are really trailling off. Then the next row...everything seems back to normal and I had several fans that aligned a 100%. Too weird. So, not for the faint-hearted, but I am used to it and just keep blindly going and hope for the best. The surprise is always on the top where you can see exactly how much or how little you have been out with your alignment. Given that the edges of this quilt were not totally straight, my top row came out great. Not a 100%, but good enough. Once the binding is on, this will hardly be visible. 

So jsut have the binding to go and then it is on to the next one!

Karin

Friday, 25 August 2023

Baptist Fan Quilting on a Sitdown Longarm

I thought I do a little post on how I go about quilting the Baptist Fan over a lap sized quilt (54 x 60in) using my new rulers from Michael Quilts. Hopefully someone will find this useful and take the plunge in terms of trying this out on one of their quilts.

Here are the templates (except for the smallest one)
Nice green fluorescent, so cannot be overlooked on your quilt. Nevertheless, I do set myself up with a chair on my right side where I park each template following its use. Having a quilt all scrunched up around you makes it too easy to loose sight of where your rulers are. Except for the biggest one which oftentimes travelled along on the quilt, but I'll get back to that.

Beginning the Baptist Fan design at the bottom of the quilt from left to right is an absolute pleasure. Looks great and you always feel like...yah, I got this!
Having done this now a number of times on larger quilts I do know better though and was expecting things to go out of alignment a bit higher up.
Interestingly though that did not seem to happen for the first few rows, in fact the templates aligned really beautifully.
See the dotted line of the left fan and the line from the underneath fan...almost perfectly aligned to the stitched fan. Too good to be true...I continued.
As I went up I did notice that my line of fans finished slightly differently on the right side. In fact it seemed as if the fans had moved over to the left by about a 1/4in. Did this made sense to me? I thought that I had experienced some drag from the bulk of the quilt as I went along and my alignment went out a couple of times across the quilt. When this happens I do pay a lot of attention to the next row, i.e. are my alignments of the templates at a right angle and are the distances of the individual fans accurate? While the dotted lines then do not align totally with the ones already stitched, I disregard that. To keep it straight and consistent is more important to me as all the next rows are build upon each other. I do not mark the rows on my quilts before I stitch hence rely entirely on the correct placement of the template to keep it straight. So while I am quilting the fans I also look at where each fan finishes in relation to the quilt blocks...that gives me a good idea of whether I am keeping them straight or not.
I think I said it before in an earlier post that stitching these fans on a sitdown machine will never be as accurate as doing it on a longarm machine on a frame simply because you have everything movable, i.e., the bulk of your quilt shifts around, maybe even creating drag and on top of that you have the templates that can easily shift ever so slightly. 
I have the Handiquilter sticky (and grippy) tape on the back of my templates (I also had just a rubber type sticky thing on the back initially, however found this too slippery). As you go up in template size, they are big. The 11in fan is as big as my hand, so it is important to stop several times during the stitching of that curve to reposition your hands as repeated shifting will make your entire row shift to the left. A little bit of shifting over is not too bad, however if you are not careful this could go out of hand. My 1/4in shift over was ok and I doubt that it will be noticeable to the recipient of this quilt. Funny enough, once I had discovered the slight shift and paid attention to the drag of the fabric, it did not occur again, i.e. my finishing fan on the right side remained in the exact same position which made me think that I struggled with the drag of the quilt when I started off.
In order to counteract this I folded my quilt in an accordion style manner so that the area to be quilted could move freely. That seemed to fix that issue.


Another thing that I use are these white rectangles out of rubbery material. The material is what you might put in your draws or under carpet runners so that things don't move around. I have got a roll of this and cut out some rectangles which I use to stabilize the template. Once I got my alignment right I usually put it right under the middle of the template so that it does not shift. This works really well and is very helpful.

I stitched the Baptist Fan with Omni thread (about 40wt; TEX 30) on my Bernina Q20. Had not stitched with a thicker thread for some time, so this felt a bit like stitching with a rope. (Had no problem with it, the tension sat on 5 using the same thread in the bobbin; needle 100/16) Forgot that there is a fair amount of backtracking involved and at times I struggled to get that to look really neat. However that is where these templates shine. The larger template has got these 1in markings that you can use to travel on your previously stitched line.
So, I used the biggest fan to backtrack over my previously stitched lines keeping it always on the side of the quilt travelling along as I stitched with the other templates. Worked great most of the time except that I was stitching in BSR1 mode for a while which is the one where the needle keeps going even when you stop. That led to some unsightly stitch build up in some areas when I was hesitating. Switched over to BSR2 which is the mode that stops when you stop and that made it easier. Mind you, I was also a bit out of practice and stitching with an unfamiliar thread threw me a bit at first, but I got there in the end.

Another stress point in quilting this on a sitdown machine is when you have to turn your quilt over as you approach the middle of your quilt and there is just too much fabric in front of you. Switching it around means you are now quilting from right to left  towards you rather than away from you. I always find this a bit harder however have found that it often fixes slight mis-alignments as you now quilting in the other direction. Another point to watch for is fatigue, that feeling of …oh, this will do, I just need to finish this row etc. and disregarding the mis-alignments. If you are tired, stop and do something else and come back to it with a fresh mind honing in on the alignment to get that back on track as you can fudge this here and there to get back to an almost perfect alignment.

So, did I stay straight? That is always a bit nerve wrecking when approaching the end as it will show you how well you executed your design over the quilt. Mine was not too bad at all. All fans finished approximately at the same point (except for one side which was a bit higher). Little indiscretions will not matter here as this will be covered by the binding, so overall I was really happy with it.

The finished quilt
and the back

Currently debating whether to do this on my next scrap quilt which is bigger than this one. Just really like the look of the Baptist Fan for scrappy quilts in particular.

Karin

Thursday, 24 August 2023

To Do Tuesday #34

My list from last week:
- baste one of the scrap quilts on the machine and start the quilting. Will do a Baptist Fan design over it, so that will take a bit of time but I am really looking forward to it.✅
- clean up the sewing room a bit. Following the last few weeks with working on several projects, it is rather messy and I do need uncluttered space around me when quilting.✅
- construct another hanging sleeve for a wall hanging that has been sitting behind my sewing machine for the last two years at least (can you believe it?).✅
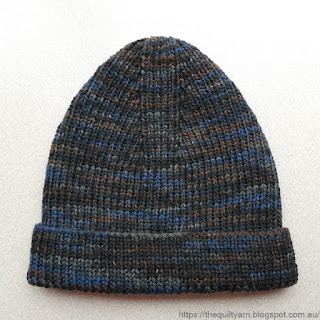
- finish off my beanie!✅

Wow, a first...done everything on my list!

I actually finished my scrap quilt ready to be gifted this weekend.
Did a Baptist Fan design over it with my new Baptist Fan Rulers from Michael Quilts. Absolute pleasure to do. Will do another post in the next few days on how I went about it in case people are interested in how to do this with a bigger sized quilt on a sitdown longarm machine. Took photos this time of the whole process as I went through.
Back to the quilt...entirely made out of scraps and if you are following along the first to be completed. Have another bigger one that needs to be finished off. I used my last piece of batting from a roll I had purchased a couple of years ago...just fit, which was very lucky.

Pieced the backing together using some bigger pieces from my stash.
Particularly like this...shows of the quilting really nicely and is such a great colour. Finished it off with a dark blue binding with little stars on it which suits the overall look of this quilt. So, an entirely 'free' quilt!

Close up of the quilting
Also finished my hanging sleeve for a wall hanging which has sat around for the last 2 years at least.
That took a grand total of about an hour and a half...can't believe I left it for so long! For the time being I hung it behind the sewing machine as I am struggling to find a free wall to display it properly.

And last, not least, finished my latest beanie (gifted to my daughter).
Great beanie pattern from Nimble Needles. Also felt like a freebie as this wool was purchased years ago. Don't even know what the idea behind it was.
 
Also sewed on the binding to my table runner, so overall felt very productive this last week.

For the remainder of the week, I am planning to 
- handstitch the binding to the table runner to finish that off.
- pin and baste my other scrap quilt ready to be quilted, and
- probably just relax a bit (strained one of my shoulders a bit and will need to go a bit easy on the quilting for a moment)

Linking up to To Do Tuesday #34 over at Quilt Schmilt and Midweek Makers at Quilt Fabrication.

Karin

Monday, 8 May 2023

Win Some, Lose Some

Well, I had an interesting two weeks. I have been working steadily away on my 'formal' table runner. It took ages to do the grid on there and I decided to take out the markings closer to the end as I found the blue lines were starting to be very distracting in terms of deciding whether to fill more or leave it.


It looked great so far. So I took the markings out by rinsing it in cold water as I always do. This time though I noticed that I had some brownish lines left, particularly on the center lines 😒. What happened?

This has never happened to me before in all the years of quilting using the blue water erasable markers. Tried to get this out with a bit of stain remover soap...bad mistake, as it also whitened the fabric a touch.

Can you believe it? I tried to think whether I did anything differently this time, but can't really come up with anything. I washed my fabric before quilting as I always do, I used the same old markers...too weird. The only thing I could come up with was that I usually go through my draws and get a handful of markers out and then see which one has the most colour left rather than take a brand-new marker out of a packet. I remember I did mark the center lines in parts with one of the older markers which also happened to be a different brand. As it turned out too weak I then used my normal, newer marker to finish off the lines. Could it be that these markers have a shelf life and somehow chemically change after a while? I certainly have heard people talking about having brown lines left but this was usually in the context of having left the marker on the fabric for some time. This certainly was not the case for my project. The marking and quilting happened in the last two weeks.

Well, so it is spoilt...I was going to sell it but this is obviously not going to happen now. On the positive side, it freed me up to start the next table runner as I am not going to fill in any other areas on this one now. Bit of a pity but what can you do. Just glad that I did not start my larger wholecloth and have this happen...that would have been terrible and I would have been beside myself. Definitely will buy all new markers when I am ready to quilt that one! 

My new table runner should be interesting...less formal with a lot of fun elements which does not require any tracing.
Something similar to this...again, designed in Affinity Designer 2 this should be a bit more versatile than my 'formal' table runner was and should be a lot more fun to do. Thinking of quilting this out on a grey fabric with a light-green thread. 

Never boring over here!

Karin

Sunday, 5 March 2023

Choosing a Quilting Design

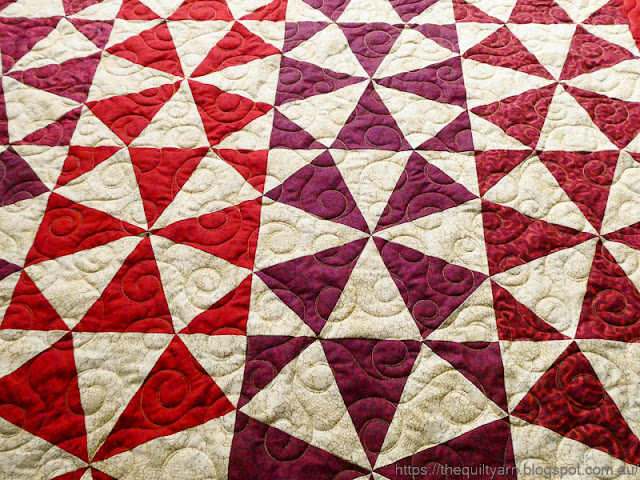
I finished one of the quilt tops from the Orange Tree Quilters group. Another beautiful little quilt!
It is a Kaleidoscope quilt...I had forgotten how effective they can look and remembered that I actually have got the template for this. Did buy the template set very early on in my quilting journey but never got around to actually make one of these, in fact forgot that I had this!

Like the colours...very tastefully put together.
Its a smallish sort of quilt...from memory about 52in square. In looking at it I was unsure how to quilt this. Did not really feel like stitching-in-the-ditch, even more so as every block had the centre seam pressed open. Don't like to stitch over open seams and so decided to do some sort of overall design. The quickest, of course, is meandering but also did not feel like that.

Consulted one of my favourite books...Machine Quilting Solutions by Christine Maraccini. Its an older book from 2007 but has a lot of easy-to-do designs for everyday quilting in there. Chose a swirling  design which I had not done before. In her introduction to the design Christine says:
'This edge to edge design is one of the quickest ways to get a quilt finished. It will add visual movement and has a texture and feel that beg the owner to cuddle up in it.' The only difficulty, as I could see it and Christine pointed out, was to get the design a bit bigger to maintain the softness of the fabric and batting when you touch it. However, the swirl design was perfect as one of the red fabrics had a dainty swirl design on there and it was unobtrusive enough for the secondary pattern to still shine through.

Did one practice run on a piece of scrap and started wondering whether I could execute this consistently over a large area. In the end I decided to just go for it...if you never try, you never know! Was a tad nervous to start off with as I can  get incredibly confused with swirls and their direction, but to my surprise this went incredibly easy. I quilt loosely in rows as a sitdown longarm quilter, just having 1/4 of the quilt under the the machine at a time. Had absolutely no problem moving along swirling my way from one end to the other. Going back then and down, I could see my empty spaces and could reach out with a swirl to fill that in. My swirls ended up maybe 1-1/2 to 2in across, sometimes smaller, but that did not feature too much. Given that the swirls are a bit more dainty it felt very open and soft.

This is why I like to quilt these quilts for the charity group. I get some pretty quilts, an overload of inspiration and I get to try different quilting designs that I may not otherwise use. This quilting design is a definite keeper...I think it took me about 2 hours to complete. I used the stitch regulator on my Bernina Q20, so did not have to worry about my stitches looking fine and went over it with a medium speed which ensured that I could get the swirls a bit bigger (think bigger, more sweeping movement). It was incredibly easy to fill and in the end I was actually quite amazed at the consistency with which I had quilted this across the quilt top. The quilt looks amazing with it and feels nice and soft. This is definitely a design that I will use again. 

Karin

Monday, 27 February 2023

Putting a Quilt Design into Digital Format

Hello everybody...I have re-surfaced from the wedding week! My daughter got married last week and hence no quilting was done obviously. It's been busy but we did have a wonderful day. Everything came miraculously together, the weather was great, we had great food and everybody had a lot of fun. 
Currently looking after my daughter's cats as they have gone on a little honey moon.

While I did not quilt anything, I was not idle. In the evenings I finally spent some time fixing up my wholecloth design. This coincided with me getting a new app for the Ipad called Affinity Designer 2. If you followed my blog for a while you would know that I love to play around with designing in general. I just recently did my Mini Wholecloth design on the Ipad using 'Procreate'. 

It took me some time but I was able to work out how to get the drawing to scale so that I could print it off at the right size. This was no easy undertaking as I had to convert pixels to inches, set my grid behind it up in the proper way and be very precise in my drawing. I do like the program and feel quite comfortable with it and it has a lot of very useful features for quilters. I often do little drawings for some of my workshops on there.

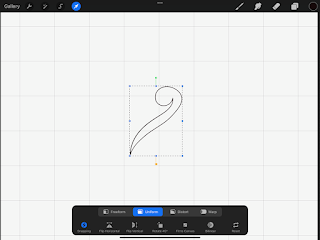
The main difference between the two programs is that Procreate is not a vector program. Procreate is great for the Ipad if you want to do some basic drawing, sketching and painting. It is easy to learn and has a lot of features that I really like and find useful for designing.


However what I do miss is the ability to clean up my strokes, e.g. like in this little picture
I can draw a shape quite easily with the Apple pencil, select it, make it bigger or smaller and as I found out put this little drawing into inches. What is missing though is the adjustment nodes to clean up your strokes. While I can set my brush up to work as streamlined as possible, I do find it annoying when I do make a wobble in just the last part which means I have to do it again if I want to use it for a diagram in one of the workshops. It is possible, of course, to be super careful and deliberate but I find that a bit of a hassle. For wholecloth design there is no way I can draw all my feathers the same in terms of angle and width/length etc. While that is ok for a smaller piece like the Mini Wholecloth I did above, this would be impossible to achieve on a bigger scale consistently. For the Mini Wholecloth above, I drew sections of the design on paper, then took a photo of it and imported it into the Procreate program. Then, very carefully, I traced the drawing. This was quite work intensive and at times frustrating (particularly after several cups of coffee), however worked out well in the end for this little piece. I traced 1 heart, 1 frame and 1 feather spray, so not too much at all. Once I had all that in the program I basically used copy and paste to make up the design. What though if I wanted to do a bigger design? I certainly could not imagine tracing an entire feather border...

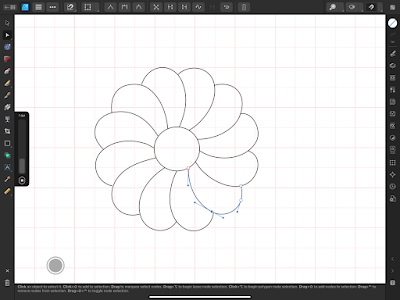
So, I bought the Affinity Designer 2 App for the Ipad. This is a vector based program, very much like the the way Adobe Illustrator works. So, now I have some nodes that can be adjusted
If I wobble or do not end up exactly where I want to be I can adjust the shape after I have drawn it. I used to use Ipad Graphics, an older program in the past for this but with the new updates this has stopped to work properly. So, I set out to test out the ease of the new App. Don't know about you but I am not one for reading manuals for hours...to me a program has to be intuitive and easy to learn. Affinity is definitely more complex than Procreate...there are things in there I do not even understand the English words that they are using. For a couple of days, I could not find the eraser, so in the end I did need to look at the manual. Their layer system also is somewhat way more complex and I struggled a bit with that. Still need to find something where you can name your layers as I had problems finding where I was at at times. If I could label the layers that might make that easier. Mind you, my test project was a wholecloth that I had drawn some years ago which needed sorting out in terms of size and also changes in design choices,
The settings were easy to change to inches and I was able to put a half inch grid behind it, so I could orient myself in terms of size when drawing individual shapes. I might have aimed a bit high as the wholecloth design came out to 36in. 
I went frame by frame, deciding on the space available, changed it a couple of times, added bitses I might use and worked out the middle section (minor alterations may need to be done...this is by no means finished). Found that the ability to work in inches and seeing what this looked like in terms of spacing extremely helpful. My feather arrangement in the centre was relatively easy to execute. I did one drawing, cleaned it up via the nodes until I was happy with it and then copied and pasted it around the centre motif. That worked really well. Then decided on the Amish feathers...now that became a bit of a nightmare. Made several mistakes in there in terms of how to quilt them...it's been over a year since I practiced this, however, my spacing is spot on, sort of. I should have lowered this a bit towards the frame in the middle, but lost the plot a bit in terms of sizing altogether at that stage. Funny enough with these Amish feathers, I can quilt them better than I can draw them.
The next day I practised sewing those feathers and realised that I need to follow how I normally quilt my feathers in terms of size and shape, so there would have to be an adjustment made on this image. This outer border was not easy. I drew two circles of feathers freehand, cleaned it up, then copied this to make a row. The corners were a bit of a hit and miss as they were slightly different. So, my copying and pasting created a lot of inaccuracies, however after a days of drawing, I just wanted to see what that looked like. If I wanted to produce a copy I could print from, I would have had to be more careful with every single circle using a combination of freehand drawing and copying to make this into a printable copy. However, patience had left me by then and I struggled to find the layers of individual shapes. The whole thing had just gotten too big.

All in all though, not a bad effort...it did clarify the dimensions perfectly for me, just need to do a few adjustments and get my head around the Amish feathers a bit more and we are ready to draw this out.

Incidentally today, I came across another feature...the slice
Only exported an exact quarter of the picture. If my Amish feathers were better, this would be perfect for printing. I might actually be able use the inner feathers and frames though as they were spot on. So, in summary, Procreate is great to get a draft of your design, try out different design ideas and as I found out you definitely can do some smaller, less involved drawings with some accuracy. However Affinity 2 is the program I would use if I wanted to create a precise wholecloth drawing that I could use to trace directly onto the fabric. 

Great exercise and lots to learn.

Karin

Friday, 13 January 2023

Progress on Peter Rabbit Quilt

Well, here we go again...missed my To Do Tuesday Link up. Not a good start to the year.

I got totally involved in the Peter Rabbit quilt. I am doing this for a friend's mum and once I started, time just got away from me. Severely underestimated the time it would take to quilt this thing. It is a rather large quilt with half the blocks applique and half of them pieced. The amount of seams and outlining required is really quite insane. The quilt is a year long subscription to a patchwork magazine by Hatchette Partworks LTD. In their suggestions on how to quilt this, was one quilt where only the pieced blocks were quilted with a 1in grid and something in the border and then they got a version that has been done with an allover grid. While I liked the allover grid I realized that I could not do that on a sitdown longarm...too cumbersome with a quilt that size, so I started outlining everything. 
I think I spent about 30 hours over the last week or so doing just that...I used the ruler for the blocks to stitch in the ditch and varied this with just freehand outlining of the applique shapes. Insane is not even a word to describe the amount of seams and little pieces to outline.

But it's done and I am very happy with the result. I used 100wt Invisafil for this task and it gave me a really great finish. While the blocks have a number of imperfections, this quilt lies incredibly flat...really nice.

I was going to do some additional ruler work in the blocks however yesterday I did about four blocks only to realize that it does not add anything to this quilt, in fact, it looked slightly odd as the patterned fabric made the quilting disappear altogether, so I only had certain sections stand out. Initially I thought I could counteract this by restraining the quilting to the more solid looking fabric pieces but realized fairly soon that that was not going to work well. So I spent the rest of the day taking this out again! Another option, of course, would be to freemotion-quilt in the Peter Rabbit blocks and stitch down the off white background, however I am not sure it really needs that, as there is enough applique in the characters, so the blocks are stitched down nicely as they are. Also thinking that background quilting would make this very stiff and compact the whole thing too much (which would be an issue as the border already has a little bit too much fabric in there). So I am just going to work on the border now, probably doing some wavy feather spray in there.

Hopefully I will complete this by next week...always takes me a long time to work out how to fit my waves neatly in a border.

Watch this space!
 
Karin

Tuesday, 13 December 2022

Last Mini Wholecloth Finished - To Do Tuesday 13/12/22

Well, I lost the plot again for a few weeks in terms of my weekly goals, however did manage to finish at least one thing from my list a few weeks ago.

Finished the last of the little wholecloth quilts for a workshop next year.

Have three examples of the same design now and plenty to talk about. The last one, the yellow wholecloth was a bit of an exploration of thread. I used Magnifico 40/3 wt thread from Superior for that for the main elements and 100 wt Invisafil for the background.

It looks lovely in that gold colour and the feathers in particular stand out more than in my other samples. Stitching the feathers with this weight though required a slightly different approach in stitching them. Rather than doing heirloom or bump-back feathers I had to stitch them as continuous feathers to make that look nice and tidy (meaning that all the backtracking was along the length of the feather rather than on top). Had not done this for a while and really enjoyed the slow stitching of that. So therapeutic.

For the background I used 100wt Invisafil in a tan colour. Would have been great if I had a more gold colour but that's what was on hand and I really wanted to try to see the effect. I stitched swirls in the outer surrounds, again to have a bit of a look at what that looked like. Very happy with how this turned out. I kept my swirls smaller...definitely something I learned from doing these Mini Wholecloth quilts, i.e. everything has to be a bit smaller to keep with the smallness of the project. I think the swirls would have been over-powering with a higher weight but with Invisafil they just blend in. Also used what Cindy Needham described as a scribble rather than a micro stipple in some areas which is a super small micro stipple with little regard to whether you go over some lines or not...really enjoyed that and it looks insanely dense and flat...just what I wanted for those areas. 
Overall great little exercise, but that is it now for this design. I am now working on some notes for the workshop and will have to do a few more drawings for my handout.

My goals for the coming week

- stitch a simple charm square quilt together from fabric that has been sitting in my stash for many years. Just needs to be gone
- make a start on a new pattern, i.e. get the cutting of the fabric done
- prepare for Christmas which of course we left to the last minute again!

Linking up to Linda's To Do Tuesday over at Texas Quilt Gal


Karin

Monday, 10 October 2022

Designing

Radio silence from me again for a few days. I have been designing which always takes me some time to do. I have been asked to do another class next year doing a Mini Wholecloth class.

Initially I had no idea what to do, so several days were spent just thinking about how to approach this. I needed to come up with something that was achievable for the ladies without being too difficult to stitch out but also not to difficult to get down on fabric.  Up to now I have been designing using pen and paper which would take me ages as I would change things as I went along, then start over and over again until I got it right. When thinking about this class I realised that I needed a printed copy of my design and started to think about how to get my drawing into a digitized format. While I have drawing programs on my desktop I have never attempted to do a full blown design using a mouse, so the Ipad came to mind.

In the past I have used a very good App 'Graphics for Ipad' to do drawings on the Ipad, however I recently discovered that this App has stopped working properly possibly due to the many updates for the Ipad that have happened over time. I really liked this App as it allowed me to smooth out curves, add measurements etc. However, the layer tap does not work anymore and without that, it is useless.

When I had Covid earlier in the year I spent a lot of time just sitting around. In order to keep myself semi occupied I started to look at the Procreate program. I had purchased that App some time ago but never really got the hang of it, so I set out to learn it properly. Discovered that it is extremely useful to quickly draw out a draft of something, e.g. like this

Not that pretty and not what I am going for, but I was just playing around with ideas and to familiarise myself with the program again. Spent a lot of time searching for a way to make a shape to scale and finally figured it out. When you highlight a particular shape in the Procreate program it will show you the measurement in Pixels. Took me a while but with the help of Google I found a formula to convert pixels into inches. I wanted my heart shape to be about 2-1/4in, so that meant that I had to multiply this with the dpi which was 300 which made that 675 pixels and...voila...I was on my way (Actually just found a pixels converter on Google which does the calculation for you). Once I had this, I also discovered that I could set the grid behind my picture in inches, so I made my grid 1/4in small so I could see how I would fill in the space that I had given myself for this Mini Wholecloth.

The drawing itself was actually not too difficult, just had to adjust the brushes to make my strokes as even as possible. Good thing is that you only need to do one shape and then of course can copy and paste as your heart desires. Here is my frame
Does not look like much but that took a while. Spend some time getting that first stroke right. Once I had that, I just copied, flipped and pasted it into place, tidying up some pixels as I went. Reduced that shape then by 1/4in to make the distinct frame which comes out to 9in. Once I had that, I worked out the size of the heart motif and put that in the middle and I was on my way.

Still working on this so I can't show you the full picture but the printing of this comes out 100% to scale which I am extremely happy about as this means I can just print it out at the end of it and trace from there. 

If you have an Ipad it is well worth your while to invest some time into something like Procreate. Even if you don't design full blown wholecloth quilts, it does allow you to quickly and effectively just jot down a draft which I always find very helpful. Like that first picture above felt like a good idea and would have taken me ages to draw out on paper...on the I pad it maybe took an hour to get the base shapes on there and then copying and pasting, a bit of rough filling to get an idea of whether I liked it which in this case I did not (would need more work around the angle of my feathers somehow).

Karin

Sunday, 2 October 2022

The Rose Charity Quilt

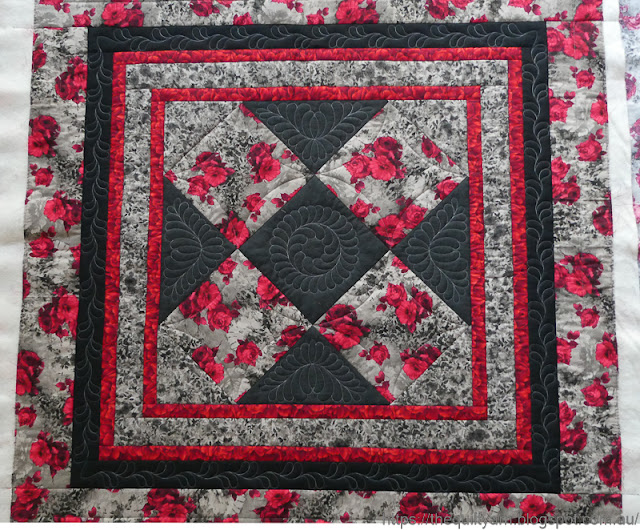
I made a concentrated effort to get that Rose Charity quilt finished, again focussing in on minimal marking and keeping the quilt nice and soft. For this quilt I literally just wanted some embellishment as the fabric itself is quite striking and very patterned. So I mainly quilted in the black parts and just did a few line designs in the other parts to stabilise the quilt. This is what I like about these charity quilts. Not only are they a real surprise every time I open the packets from the Orange Tree Quilters group, they are also a real challenge in terms of thinking through how to quilt them, i.e. what are they likely going to be used for. For this quilt I could imagine that some older person might appreciate the quilt as a knee rug, hence it had to be soft and still with a fair bit of puff.

As you may have seen in a previous post, I quilted some feathers in the main dark grey areas of the centre of the quilt. Now I only had the black sashing left. The sashing was only 2in which presented a bit of a challenge as I did want some feathers in there as well. My initial thought was to go around with just a single row of feathers, however that proved too messy as I would have had my 'imagined spine' on the high side of the ditch and with grey thread that was not going to look any good.

Came up with this other idea...an older, more playful design which I had done some years ago involving a wavy line on which you travel putting in some feathers as you go.

Something like this
Hard to see but I decided to use the Handiquilter Wiggly Wave ruler to put the wavy line in. Well, that took a bit longer as I had to work out the corners, i.e. first what sort of shaping did I want in there and how was I going to achieve that with the ruler. Good exercise in really getting to know your ruler. In the end I started drawing from the middle out, stopping 1-3/4in from each corner, shifting the ruler slightly over to achieve the same look on all four corners
I first stitched out my wavy line with the ruler all around the quilt and then started my feathering...
Why did I stitch out my wavy line first? I made a little diagram to show you the difference in stitching path doing a continuous feather.
I stitched according to the first picture moving over my stitched wavy path. The areas where I had to overstitch (backtrack) are highlighted in purple. In one wave I only have two spots were I need to go over a previously stitched line. While you may have some wobbles here and there, the overall impression is one of consistency as the wavy line, of course, is stitched out neatly with a ruler.

Comparing this to the picture No 2 where you would stitch the wavy line as you go. As you can see there is an enormous amount of going backwards and forwards...you start off doing your first plume, then need to backtrack over that to do the second plume, then stitch backwards to make the wavy line and backtrack back over it to continue the wave. While this absolutely can be done this way, I felt that this was way too intensive with the backtracking. Even if I had used a 'bump back' feather there still would have been a fair amount of backtracking.

Happy with how this turned out.
I stitched one side at a time, breaking thread before each corner. While I could have stitched on over my corner to the next side, I decided not to do that as my corners looked surprisingly pristine, so I did not want to mess that up.

Well, here is the finished quilt

Finished the binding and label today and now it's on to the next one.

Karin

Wednesday, 28 September 2022

To DoTuesday - 27/9/22: Minimal Marking - Feather Wreath

Here we are again...another week has gone!

My goals from last week were:
📌Make a sleeve for the show quilt ✖
📌Finish the feather quilting in the rose quilt above ✔
📌Baste another charity quilt 
📌Design a Mini Wholecloth for another workshop or at the very least have started that process (have about 3 weeks to do this). 

This past week I worked on just one thing on and off, i.e. finishing the Rose charity quilt. The busyness really has not slowed down at all, so I am fitting the quilting in where I can.
When I first saw it, I thought that this would be perfect to practice quilting a feather wreath or similar freehand. I did an online feather class with Bethanne Nemesh earlier in the year and that was one of the first things we did. While I could do it, the beginning and ending of the wreath were always a bit of a hit and miss situation freehand, so I undertook to look a bit closer at how I could build in some sort of scaffolding to make that appear more consistent as the wreath on this quilt would be centre stage.

So I starting practising a bit...amazing what I found in my sewing room. I once bought a Westalee Design kit at a quilt show many years ago consisting of a wad of design grids out of paper and an acrylic square with the crosshair lines marked in. Have looked at this over the years and actually almost threw it out some time ago. Well, this became incredibly handy for this task.

Placed the acrylic square over the grid paper, lining up the crosshair lines with the paper underneath and just started drawing with a whiteboard marker on the acrylic square.


First one: did not like the inside and decided to make that circle guideline larger
...another one: better, but odd shapes on the inside

...and another one (and several others after that)

Tried to achieve some sort of consistency where I could use some of the lines as guidelines when quilting. This one above was actually not too bad and I could have oriented myself on the red lines, i.e. drawn those lines in in addition to the crosshairs and aimed for 4 plumes per section. However, comparing this to how I actually quilt my feathers showed a marked difference. I have quilted feathers for quite a long time and like with everything you develop your particular way of stitching feathers, i.e. I will stitch them at a particular angle and height/width in a mostly consistent manner. When I placed the picture above over a practice wreath I had stitched out earlier you could see the difference, i.e. my plumes were a little bit smaller in width, hence my nicely worked out picture above would likely not be replicated on the quilt. I likely would start quilting and not be able to keep to the guidelines set and end up with the last feather being weirdly squished in. If I was doing a quilt with several wreaths or where they were maybe not as prominent (i.e. matching thread) I would not have worried about it as much. In this quilt however, with the one wreath in contrasting thread, that is really the first thing you see, so it had to be somewhat consistent.
So, I needed to think of some additional scaffolding that I needed to build in. Had a look at my feathers again and saw that the rounded top corresponded to an approximate 5 cent piece, so put that into my drawing and that seemed to do the trick in terms of avoiding that awkward odd shape that you get at the end when closing your wreath. So I tried that with just the normal crosshair lines and the rounded tops marked in (a little bit of fudging here and there to fit them neatly in the space was needed but nothing too drastic). Marked my starting point which was on the 45 degree line on the right and off I went...
Tada...that worked well

Now it was time to go onto the quilt...fearless and confident! It's amazing how nervous one gets even after all those years. But I really did not want to do this several times, so one go it was!

Happy with that...maybe ever so slightly longer on one side (I swear I kept to my outside guideline!). Could also be the photo or maybe my angle in the plumes was slightly different as I went around.... but in any case I am not a computer and it is looking consistent enough.

Then came the setting triangles. Again, did not want to fuss too long around this and chose a very simple design which needed a curve (did this with one of Bethanne Nemesh' Lily Line rulers) and the eight shape marked in. For the markings on this quilt I used a Bohin pencil...I find that the chalk comes out easiest...you just brush it off and it's gone.
This is how that turned out
And finally, the center of the quilt all done
None of this is exact or absolutely consistent for that matter, but overall it reads consistent which is what I was aiming for. Very simple, clean look about it. In terms of time, this took me one afternoon to complete. Once I had my scaffolding worked out, it was rather easy going, just following my markings on the wreath and in the triangles I was aiming for the same amount of feathers on the curve which was not that difficult as I quilt them the same over and over again. Overall really happy with my efforts and keen to try other things that we learned in that online class.

So what's on my goal list for next week...pretty much everything that was on my list the week before😄

📌Make a sleeve for the show quilt
📌Finish the charity rose quilt above (thinking of just putting some small feather border in the black space, attach the binding and it's done)
📌Baste another charity quilt
📌Do some work on designing a Mini Wholecloth for another workshop  (have about 3 weeks to do this).


Karin

Popular Posts