Showing posts with label Orange Tree Quilter's Charity Quilts. Show all posts

Wednesday, 16 July 2025

Some Ruler Work

Here is the finished Ballerina quilt from a few weeks ago. Again forgot to post the finish here as I had posted it on my facebook page and IG and then moved straight on.
The outer border is done with the HQ 4" Swag set...finally used it! The 4" swags fitted nicely around the long edge of the border, however I had to problem solve a bit for the top and bottom because I needed to elongate my swags by 1/4in to make it fit. Found that I had an oval corner shape that just fitted that width (and height) and which was only ever so slightly different (tiny bit slimmer on the top). I used this as sliding the HQ 4" swag along to make it a bit wider produced some wonky shapes. Worked really well.

Really enjoying the ruler work at the moment so I moved straight on to the next charity quilt. A striking little number

Used my favoutite curve set for this...the Lisa Calle Pro Echo rulers and chose the 7" curve. By the way, Lisa Calle is doing little workshops on ruler quilting on FB every Monday and I think you can get a bit of a discount on her rulers this month. Watched the first one last week on using straight rulers. Very enjoyable.

The ditching was a bit of a hassle and to save time I just ditched in a grid around the blocks and left the diagonal untouched.

Really liked how this turned out as the unditched areas tended to puff out a bit more and really made the curves stand out. Mind you, my stitch regulator was a bit unhappy at times...the backing was very thin and in the white areas I had some racing at times. Not quite sure why...maybe the thinner fabric both from the backing but also in the top or the puffiness. Definitely something noticable as I approached the seams at times. Experimented on some scraps that I had and had no problem at all, so hopefully it had to do with the fabrics in this quilt.

Well, I am already on to the next quilt which I will just meander over as I have got another one to go after that. You probably wonder at my sudden surge of activity...we are expecting our first grandchild in August and I do want these charity quilts to be delivered before this. While I will take a few additional ones after this there no doubt will be a few months of very limited quilting activity. Somehow it seemed quite far away and all of a sudden it is so very close. My daughter is huge by now and I would not be surprised if this baby makes her entrance a little bit earlier. We shall see. Still need to handstitch the binding of that special baby down. Also need to prepare for a workshop which has now moved to November, write up a pattern etc...all before the end of August! As always in life lots of other things going on...

But, hey, we work best under pressure!

Karin

Friday, 23 June 2023

Clamshell Quilting

I thought it might be useful for me to do a post on clamshell quilting. I do use this overall design quite often on my baby quilts as it is a fun way to quilt and always looks great on those little quilts. Babies and clamshell just go together for some reason.

I recently finished a charity quilt with clamshells and while I was quilting along I thought that some may look at this and think that it is too hard to do over an entire quilt.
I use the Handiquilter Multi Clamshell ruler to do the quilting however there are other rulers you can use, i.e. the Handiquilter Versa tool or a circle. A circle, of course, is a little bit harder as you do not have those nodges that stop your foot from going over the line when you place one clamshell over the other.
For most baby quilts I use the 4in size of the Multi Clamshell ruler. I do not mark lines onto the quilts to keep me straight basically because that would involve a lot of precise work to get that right and I don't think it's necessary.

Starting from the bottom up, I first inspect my edge. It is very important that the edge is straight. If it is not you will need to establish a straight line on the bottom as all your other clamshells (and their straightness) will be based on that. Maybe for the first row of clamshells, also make yourself a mark every 4in so you get the first row down perfectly.

And this is basically where perfection ends (coming from a perfectionist). As you quilt, there will be a slight amount of compaction. The above charity quilt had a puffy wool batting, so the compaction started to happen literally straight away meaning that the center line of your clamshell ruler will not necessarily align with the valley of the clamshell underneath. That is incredibly distracting and can throw you a bit. I have found that I can largely ignore this. Instead I focus in on keeping my clams straight and in line by marking the center of each clamshell as I go along. So I will quilt a row, then stop, mark the center of each clamshell just quilted and continue with the next row placing the clamshells exactly where they should be. 

Next issue will be that your clamshells will not necessarily end up exactly on those points because as you are quilting you have put too much pressure on your ruler and things have moved over ever so slightly. Also very normal and happens every time. The good thing with my center marks is that I can see how I am doing, i.e. where I am definitely not on point. This is where the fudging begins. Usually this happens in the middle of a row. So as I am quilting I now have one or two clamshells that are slightly out of alignment. In this instance I might shorten my clamshell a bit by starting to quilt the clam, stopping in the middle and shifting the ruler over a bit to hit the next clamshell at the marked point. Other times I might carry that shift over to the next clamshell a bit to see how the shifting carried on over the row and adjust it then a bit. As I am now on high alert I will check my row, making sure that I end up on the side in the same position. Also when marking the next row in the center I will usually check the alignment underneath to ensure that the clamshell is in the center and straight. 

Over the next few rows, particularly as you are nearing the center slight mis-alignments will occur...sometimes in the middle and other times towards the edge and I will keep fudging to get them back into their right position. If it is a pieced quilt I will also check the height of my clamshells as I pass over a horizontal seam which will give me a pretty good idea on whether I am dead straight or not. Again, there are adjustments you can make. If one clamshell is taller than the other you can adjust this in the next row by just shifting your clamshell ruler up a bit when you come to the offending spot. 

Once you reach the middle of your quilt, you will likely have to turn the quilt and start quilting your clamshells towards you. Often my clamshells shift a fair bit in that row just because of the change in positioning the ruler. In the little quilt above I was mis-aligned towards the edge quite obviously. In this scenario I will look the other way and have a mis-aligned clamshell but ensure that I mark the next row perfectly using a longer ruler to align to the valleys of the clamshells underneath to get back to the alignment as it should be.
The point I am trying to make is that you cannot see this once it is all done as your eyes only see the very consistent and repeating clamshells. The real test comes in the last row when you hit the edge as this will show how straight and consistent you have kept your clamshells. In my example, I was pretty consistent, maybe out by about 1/16in in terms of the height going towards one side, so it was not dead straight. However, the way the clamshells miraculously lined up with the top edge meant that I just made the clams on one side ever so slightly higher to hit the edge and the issue was solved. As you apply the binding on the edge, no one is going to measure that and definitely no one will see that.
  
Let me know if you have any questions. Happy to talk more on this

Karin

Sunday, 2 October 2022

The Rose Charity Quilt

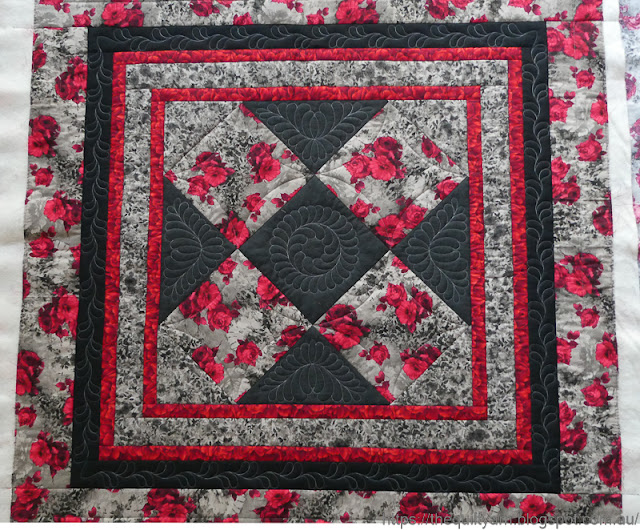
I made a concentrated effort to get that Rose Charity quilt finished, again focussing in on minimal marking and keeping the quilt nice and soft. For this quilt I literally just wanted some embellishment as the fabric itself is quite striking and very patterned. So I mainly quilted in the black parts and just did a few line designs in the other parts to stabilise the quilt. This is what I like about these charity quilts. Not only are they a real surprise every time I open the packets from the Orange Tree Quilters group, they are also a real challenge in terms of thinking through how to quilt them, i.e. what are they likely going to be used for. For this quilt I could imagine that some older person might appreciate the quilt as a knee rug, hence it had to be soft and still with a fair bit of puff.

As you may have seen in a previous post, I quilted some feathers in the main dark grey areas of the centre of the quilt. Now I only had the black sashing left. The sashing was only 2in which presented a bit of a challenge as I did want some feathers in there as well. My initial thought was to go around with just a single row of feathers, however that proved too messy as I would have had my 'imagined spine' on the high side of the ditch and with grey thread that was not going to look any good.

Came up with this other idea...an older, more playful design which I had done some years ago involving a wavy line on which you travel putting in some feathers as you go.

Something like this
Hard to see but I decided to use the Handiquilter Wiggly Wave ruler to put the wavy line in. Well, that took a bit longer as I had to work out the corners, i.e. first what sort of shaping did I want in there and how was I going to achieve that with the ruler. Good exercise in really getting to know your ruler. In the end I started drawing from the middle out, stopping 1-3/4in from each corner, shifting the ruler slightly over to achieve the same look on all four corners
I first stitched out my wavy line with the ruler all around the quilt and then started my feathering...
Why did I stitch out my wavy line first? I made a little diagram to show you the difference in stitching path doing a continuous feather.
I stitched according to the first picture moving over my stitched wavy path. The areas where I had to overstitch (backtrack) are highlighted in purple. In one wave I only have two spots were I need to go over a previously stitched line. While you may have some wobbles here and there, the overall impression is one of consistency as the wavy line, of course, is stitched out neatly with a ruler.

Comparing this to the picture No 2 where you would stitch the wavy line as you go. As you can see there is an enormous amount of going backwards and forwards...you start off doing your first plume, then need to backtrack over that to do the second plume, then stitch backwards to make the wavy line and backtrack back over it to continue the wave. While this absolutely can be done this way, I felt that this was way too intensive with the backtracking. Even if I had used a 'bump back' feather there still would have been a fair amount of backtracking.

Happy with how this turned out.
I stitched one side at a time, breaking thread before each corner. While I could have stitched on over my corner to the next side, I decided not to do that as my corners looked surprisingly pristine, so I did not want to mess that up.

Well, here is the finished quilt

Finished the binding and label today and now it's on to the next one.

Karin

Popular Posts