Showing posts with label Ruler work. Show all posts

Wednesday, 16 July 2025

Some Ruler Work

Here is the finished Ballerina quilt from a few weeks ago. Again forgot to post the finish here as I had posted it on my facebook page and IG and then moved straight on.
The outer border is done with the HQ 4" Swag set...finally used it! The 4" swags fitted nicely around the long edge of the border, however I had to problem solve a bit for the top and bottom because I needed to elongate my swags by 1/4in to make it fit. Found that I had an oval corner shape that just fitted that width (and height) and which was only ever so slightly different (tiny bit slimmer on the top). I used this as sliding the HQ 4" swag along to make it a bit wider produced some wonky shapes. Worked really well.

Really enjoying the ruler work at the moment so I moved straight on to the next charity quilt. A striking little number

Used my favoutite curve set for this...the Lisa Calle Pro Echo rulers and chose the 7" curve. By the way, Lisa Calle is doing little workshops on ruler quilting on FB every Monday and I think you can get a bit of a discount on her rulers this month. Watched the first one last week on using straight rulers. Very enjoyable.

The ditching was a bit of a hassle and to save time I just ditched in a grid around the blocks and left the diagonal untouched.

Really liked how this turned out as the unditched areas tended to puff out a bit more and really made the curves stand out. Mind you, my stitch regulator was a bit unhappy at times...the backing was very thin and in the white areas I had some racing at times. Not quite sure why...maybe the thinner fabric both from the backing but also in the top or the puffiness. Definitely something noticable as I approached the seams at times. Experimented on some scraps that I had and had no problem at all, so hopefully it had to do with the fabrics in this quilt.

Well, I am already on to the next quilt which I will just meander over as I have got another one to go after that. You probably wonder at my sudden surge of activity...we are expecting our first grandchild in August and I do want these charity quilts to be delivered before this. While I will take a few additional ones after this there no doubt will be a few months of very limited quilting activity. Somehow it seemed quite far away and all of a sudden it is so very close. My daughter is huge by now and I would not be surprised if this baby makes her entrance a little bit earlier. We shall see. Still need to handstitch the binding of that special baby down. Also need to prepare for a workshop which has now moved to November, write up a pattern etc...all before the end of August! As always in life lots of other things going on...

But, hey, we work best under pressure!

Karin

Sunday, 2 October 2022

The Rose Charity Quilt

I made a concentrated effort to get that Rose Charity quilt finished, again focussing in on minimal marking and keeping the quilt nice and soft. For this quilt I literally just wanted some embellishment as the fabric itself is quite striking and very patterned. So I mainly quilted in the black parts and just did a few line designs in the other parts to stabilise the quilt. This is what I like about these charity quilts. Not only are they a real surprise every time I open the packets from the Orange Tree Quilters group, they are also a real challenge in terms of thinking through how to quilt them, i.e. what are they likely going to be used for. For this quilt I could imagine that some older person might appreciate the quilt as a knee rug, hence it had to be soft and still with a fair bit of puff.

As you may have seen in a previous post, I quilted some feathers in the main dark grey areas of the centre of the quilt. Now I only had the black sashing left. The sashing was only 2in which presented a bit of a challenge as I did want some feathers in there as well. My initial thought was to go around with just a single row of feathers, however that proved too messy as I would have had my 'imagined spine' on the high side of the ditch and with grey thread that was not going to look any good.

Came up with this other idea...an older, more playful design which I had done some years ago involving a wavy line on which you travel putting in some feathers as you go.

Something like this
Hard to see but I decided to use the Handiquilter Wiggly Wave ruler to put the wavy line in. Well, that took a bit longer as I had to work out the corners, i.e. first what sort of shaping did I want in there and how was I going to achieve that with the ruler. Good exercise in really getting to know your ruler. In the end I started drawing from the middle out, stopping 1-3/4in from each corner, shifting the ruler slightly over to achieve the same look on all four corners
I first stitched out my wavy line with the ruler all around the quilt and then started my feathering...
Why did I stitch out my wavy line first? I made a little diagram to show you the difference in stitching path doing a continuous feather.
I stitched according to the first picture moving over my stitched wavy path. The areas where I had to overstitch (backtrack) are highlighted in purple. In one wave I only have two spots were I need to go over a previously stitched line. While you may have some wobbles here and there, the overall impression is one of consistency as the wavy line, of course, is stitched out neatly with a ruler.

Comparing this to the picture No 2 where you would stitch the wavy line as you go. As you can see there is an enormous amount of going backwards and forwards...you start off doing your first plume, then need to backtrack over that to do the second plume, then stitch backwards to make the wavy line and backtrack back over it to continue the wave. While this absolutely can be done this way, I felt that this was way too intensive with the backtracking. Even if I had used a 'bump back' feather there still would have been a fair amount of backtracking.

Happy with how this turned out.
I stitched one side at a time, breaking thread before each corner. While I could have stitched on over my corner to the next side, I decided not to do that as my corners looked surprisingly pristine, so I did not want to mess that up.

Well, here is the finished quilt

Finished the binding and label today and now it's on to the next one.

Karin

Sunday, 12 December 2021

A Year of Stars with Natalia Bonner - The Wandering Star

Here is the last star for the year


...and finally, the whole quilt. Posted this already on Instagram and FB but for the sake of having the whole year on here, I am repeating it.

A photo outside to highlight the quilting...and yep, there is a lot of quilting on that one. I am not a 100% sure which sashing or border design we were supposed to be doing...in the end I just chose the ones that appealed to me from the many YouTube videos that Natalia has put up on the net. The stacked curl design and pebbles in the sashing made the quilt a bit stiff, but it goes with the density in the blocks. I am sure it will soften with time.


And another photo inside

It is an absolutely lovely quilt and while I finished this a long time ago because I could not wait month by month for the designs, I am really glad that I did participate in it. Natalia has so many ideas about block designs which was really nice to explore. I am sure you have heard by now that she will be running 'A Year of Blocks' in 2022. Highly recommended...you can learn so much from her.

I still need to finish off the binding on my 9 Patchalong quilt as well. Hoping to do this in the next week or so. Will be great to have these quilts around to look at when thinking about block designs.

Karin

Wednesday, 24 November 2021

The Heart Quilt

Finished another one of the charity quilts from the Orange Tree Quilters group. On this quilt I tried the new Amanda Murphy heart rulers. The rulers come in a pack of three, offering two size options. I went for the smaller set which has a 2.5in, 3.5in and 4.5in heart. Was determined to get all 3 sizes of hearts on the quilt.

Love the shape of these hearts and was keen to try this out.

First quilted some hearts in the middle with the 3.5in heart

Very easy to stitch out with just marking the center lines of the square. Beautifully shaped.

I then quilted a bit of a scallop around the center of the quilt and put a little heart in each corner. As I still had two borders left, I decided to quilt the biggest, 4.5in heart across the two borders placing them not in a column but next to each other. This was a bit more involved, but easy to do with these rulers...quilted one side first, then up the other side and backtracking across the top of the hearts. Like other rulers from the Amanda Murphy range, she has got lines on there where you can align your previous, just stitched shape on. This made backtracking over the lines a breeze and also ensured that you hit the right point on the bottom of the heart. This was truly an effortless stitch out and once I had worked out how many hearts I wanted in the border and looked at my available space the actual stitching of the hearts was very fast.

Design-wise one could have done much more with this of course, but I always have to be mindful not to over-quilt these charity quilts, so that they remain nice and soft. The corner did work out nicely by linking the corner heart with the heart on each side (more or less, had a bit of a gap, but on that patterned fabric that was negligible) 

Really enjoyed doing this little quilt which gave me a good workout on those heart rulers. The accuracy you can achieve with these is truly outstanding. I don't think think I once missed a backtrack or did not arrive at the point of the heart.

Karin

Saturday, 6 November 2021

A Year of Stars with Natalia Bonner

I cannot believe how fast this year has gone.

This is the 11th block in Natalia Bonner's 'Let's Stitch a Year of Stars' Quiltalong - Brian's Star


To tell you the truth, I cannot remember doing this block, but looking at it now I quite like it, although I would probably never quilt  that heavily in a pieced quilt.

Only one block left and then I really need to do the binding on this quilt. While I enjoyed doing the quiltalong, I don't think I will do another year long quiltalong. I do get impatient and as it was in this case just continue on my own to finish things off which really defeats the purpose of a quiltalong. I reckon I did finish this quilt way before we even approached the half way mark. A year is just too long for me. However, having said that, these quiltalongs are brilliant if you are a bit slower and make use of the many videos that Natalia puts up for guidance and I do appreciate the many ideas you get for quilting a block.

I need to make sure that I put up a photo of the finished quilt...it does look quite spectacular. Hopefully, next month...

Karin

Thursday, 7 October 2021

Natalia Bonner's 4n1 Ruler

I gave my new 4n1 Mini ruler (top ruler) another whirl the other day.
Really like this ruler...it is a bit chunky but I have found this to be quite an advantage. Lies really good in your hand feeling very solid and stable. If you are still looking for a good allrounder, this is a good ruler to go for as it has curves of different sizes plus the straight edge all on the same ruler. Lots of things you can do with that.

Stitched out some of the designs from Natalia's 9 Patch Quiltalong 2.0 that I have seen popping up over the last few weeks on the internet.
Very enjoyable little exercise. Particularly like the simple star design in the second row. Definitely something I will use in a quilt. Find this ruler particularly uncomplicated, as there are a lot of lines that you can align to your seams for reference and like how you can quickly flick this from the straight edge to the curved edges doing a block in just one go. The size of this ruler is a real advantage in that it carries you easily across a 4in block in all directions. Nothing worse than when you ruler falls short of the distance and you have to slide it over...that hardly ever works out neatly for me.

I think this ruler will become a favourite in no time at all.

Karin

Monday, 4 October 2021

A Year of Stars with Natalia Bonner

Here is the October 9 patch star block
Loved doing this one and was easy to fill in. My only issue was to do the swirl in the light purple triangles. It's a biggish space to fill freehand and I think I got one of my swirls the wrong way around. Natalia uses this swirl quite often to fill a space...I have to really think hard about that one...does not come naturally to me and promptly turned it in the right top corner. It's not really that obvious, so I just left it in there.

Can't believe it's already October...only two more stars to go. I better get my binding on to that quilt! I think Natalia is planning a Year of Blocks next...watch out for her announcements on FB and on her web site.

Karin

Thursday, 23 September 2021

Rulers!

This time I am innocent...I won a $50 gift voucher at the Great International Craft Show that was run here online from 16-19/9, so I had to spent it...

Had a choice where I wanted to spent it, so I chose Constantine Quilts, a local business that supplies a range of products for machine quilting. 

Bought two new rulers
On top, the Natalia Bonner 4n1 Mini ruler and underneath a 90 degree angle ruler made by Constantine Quilts. So, I gave them a whirl today...

Was really curious about the Natalia Bonner ruler as I have heard a lot of good things about it. It is quite large at a width of 4.75in and length of 7in which worried me a bit in terms of being able to hold it steady.

My efforts for today

Natalia's ruler was used for the top two rows. Must say, I like it...the squares are 4in and the size of the ruler makes going over it a breeze, even on the diagonal. I had a good grip on the ruler, initially a bit awkward due to its chunkiness, but I got used to it rather quickly and can see why Natalia developed this. It is so easy to quickly flick this in all directions working the straights and the curves all in one go. I particularly liked the lines with the measurements on it...saved me getting a ruler out to mark my dots of where I wanted to go. That was a bit handy in terms of quickly marking the center of a block.

The 90 degree ruler is Constantine Quilts' own ruler line. Good value at an affordable price. I have wanted to get a 90 degree ruler for a while for simple line work. Stitched out the chevron border with ease...the 'legs' of the ruler are 6in, so it is a good size to use for medium borders, quickly and simply putting in the zig-zag. Also tried it out for piano keys and really liked using it for that as I could just slide it along, aligning it at a right angle to the 'bottom' of the quilt. It was very accurate. Then I did some pretend echos you might do in a block...again, very easy as it stops you in the right spot. After all this I was just mucking around trying to finish off my bobbin...tried Natalia's smallest curves on the right side of the ruler. That actually did not work that well for me. Found the alignment tricky and hard to judge, probably not a part that I would be using a lot. Maybe for really small squares...

Good fun, happy with my purchase.
 
Karin

Tuesday, 21 September 2021

Quilting In The Ditch

I am a bit out of practice with my stitch-in-the-ditch quilting, however decided for the last charity quilt to just quilt it in the ditch.

This took me a moment
Was in two minds about this one as I could also have done some ruler work, however, I am a bit busy at the moment and the next meeting is coming up at the beginning of next month, so I thought I would just ditch away on this. 

My favourite ruler for ditching is the Handiquilter Ditch Ruler (on the right in the photo)...so I started with that. After a while and many missed ditches (I think I actually need to replace the grippy tape on the back...it does wear a bit with time), I switched over to a fairly new ruler from Bethanne Nemesh.
Bethanne's ruler is much thinner and I found it easier to massage the ruler into the right position as I went along. Some of the seams did not match up or were a little bit bowed, so I had to continually shift the ruler a little bit as I was stitching with a tan cotton which was quite visible in places. Bethanne's ruler was nice to hold and easy to manage...a good ruler if you need to concentrate on where you are going or doing some really detailed work. For this quilt, this was the better ruler to use. While it is a bit shorter this was handy as there was a fair amount of unevenness and I needed to stop and start frequently.

Onto the binding now...have two quilts to bind and about three quilts to hand sew the binding into place.

Karin

Sunday, 19 September 2021

Another Nursery Panel Done

This panel has been most interesting. I decided to again use my Handiquilter Multi Clamshell tool, however expanded on the clamshell design and made a 'cloud' pattern. 

For this little exercise I did mark a grid onto the panel though as I was not confident that I would be able to keep the design straight otherwise.

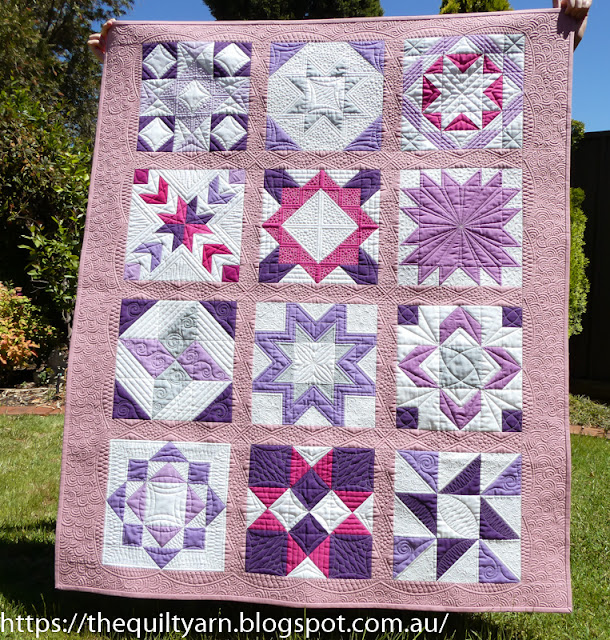
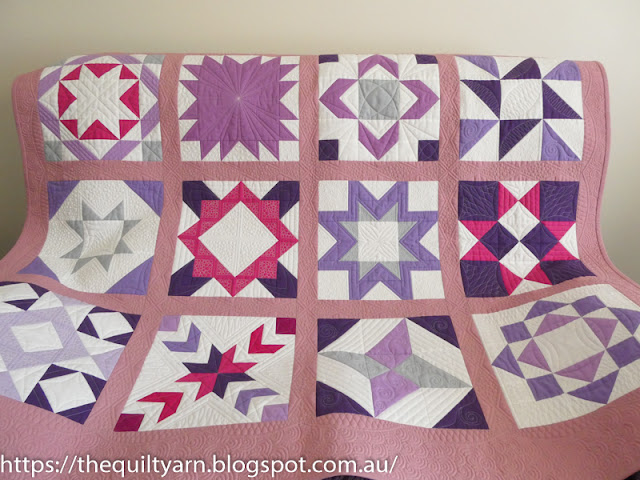
The finished product

So, how did I go about this...first I decided on the grid size, i.e. 2in x 4in and marked this with a blue water erasable marker onto the panel. As I am a very sloppy marker, I half expected that my lines may not be entirely straight all the way up. However, look at the top of the quilt...could not believe it but ended up dead straight. Was a bit impressed with that. I did notice during the quilting that my horizontal lines appeared to be straight, however my vertical lines left a bit to be desired in parts.

The quilting was straightforward
Start with half a clamshell, i.e. eyeballing to stop the needle at the half way mark of the ruler, then continue up with a 2in clamshell and down again with half a clamshell. I marked some alignment points in purple in the diagram. With the Multi Clamshell ruler I was able to align the ruler's lines with the points underneath. For example, point 1 of one row aligns with point 3 of the row underneath...it really pays to get to know your ruler and make as much use of all those alignment lines on it as you can see, in this case I used the vertical as well as the horizontal lines.
Having said this I should also mention though that you will get some compaction as you go along and some of the points do not appear to line up any more with the row underneath. As I have done this a few times by now I was aware of this and concentrated on filling my grid, still checking the alignment as I went along and having an eye on keeping my curves as straight (tilting the ruler ever so slightly can give you problems with the clamshells coming out at different heights) as I could as well as staying in my prescribed grid set up. What I often found was that some points aligned while others appeared somewhat off...it was a somewhat fluid arrangement, but as long as those deviations were approximately similar I did not worry about it as I already knew that this most likely had to do with the slight compaction that you get when quilting. Also, my last 5 - 6 rows of my grid were out by 1/8in...again, no hassle, I just made sure that my clamshells were straight, i.e. all 1/8in underneath that blue line.

For this design, I definitely needed the grid because as soon as you do the full clamshell on top of the half circle you tend to loose all orientation and the grid helps to keep you on track.

Some close ups


I like the look of the back. Looks absolutely precise which of course it is not, but again this is a very forgiving design as you can do a fair bit of fudging when quilting the half circles, i.e. lengthen or shorten them to hit the point on the grid exactly.

While the preparation for this little quilt took a bit longer, the quilting did not take that long and the only hassle was that I had to turn the quilt once I had quilted past the middle as I had too much quilt in front of me. Took a moment to get my brain used to doing the design upside down.

I wonder what I can come up with next.

Karin

Monday, 6 September 2021

A Year of Stars with Natalia Bonner

The star for this month was the Large Star.

I was really looking forward to this one...love the simplicity of just quilting an inside echo, although I do think it looks better on Natalia's quilt as she is using a panel so you don't have the piecing seams.

Need to actually dig out this quilt as I still got the binding to do. It's all cut out, I just have been preoccupied with other things.

Did you see that Natalia is running a second 9 Patchalong? I think it starts this month. While I will not participate this time, I can highly recommend it. Good fun and the 9 patch quilt comes together much easier than the 'Year of Stars' did, so it is quite easy to participate. You can access information about the quiltalong on Facebook

Karin

Tuesday, 24 August 2021

Baptist Fan Design on a Sitdown Longarm

Have a few new quilts to quilt from the Orange Tree Quilters group. The first one I tackled is a scrappy quilt made out of Patience Corner blocks.

Looking at it I thought an allover design would be best as I did not feel like stitching in the ditch around all those blocks. Against all better judgement decided to do a Baptist Fan design. Have done this once before on a scrappy quilt...must have forgotten how finicky that can be.

This time though I used a combination of rulers rather than all of the Handiquilter Ring templates for the whole lot. I used my new Amanda Murphy 3in, 5in and 7in circles and then the Handiquilter 9in and 11in. Must say that the circles are definitely easier to hold and manage. The large rings are not that easy to hold stable and alignment is somewhat tricky.

A ruler set that does only Baptist Fans would be probably very useful, however I do not do this design often enough to really justify this.

Made a start...The key to this is really letting go of any kind of perfectionism...you just cannot achieve this. Not sure how difficult this is on a longarm frame machine, but I imagine similarly tricky. On the sit down machine, it is difficult not to slide over a little bit particularly when using those large rings. To counteract this, I frequently stop and adjust my hands, however it is almost impossible to avoid a bit of drifting. As I have done this before, I am not too worried about this as long as my alignment to the to the row underneath is approximately right. The lines itself vary slightly in width, depending how well I aligned the whole thing and whether I drifted over a bit. Again I don't worry too much about it as long as it looks somewhat consistent over the distance.
Sounds all very sloppy, but this is a very forgiving design and when it is all done the eye does not notice those inconsistencies.

Looking good so far. Definitely the right design for this. Stayed mainly on track but I think two of my fans are slightly smaller than the rest by about 1/8in. I do stand back after each row and have a bit of a look whether I stayed on track measuring the height and looking whether the starting points for each fan are lining up with the rows underneath. Will try to fudge the missing 1/8in a bit in the next few rows, however as the piecing is slightly out here and there as well, it will not be noticeable I think. By the way, the wiggly lines you see across the fans is my basting...I do baste my quilts after pinning so that I can get rid of the pins and concentrate on the quilting. It is more work, but I find it easier to quilt undisturbed by pins.

As always really enjoying pushing myself out of my comfort zone a bit, particularly as I am such a perfectionist at heart. 

Karin

Saturday, 3 April 2021

A Year of Stars with Natalia Bonner

Have absolutely nothing to quilt at the moment so finished the Mosaic Star for the month of April...I have got Natalia's Companion Workbook which details one of the options for quilting out the stars. For further options you will have to join Natalia on Patreon which I did not do, but obviously there are many different ways of stitching this out.

Anyway, here is my Mosaic Star for April


Enjoyed this one but made a few mistakes, i.e. not stitching in the ditch around some shapes which you can see are puffing up a bit, but otherwise was relatively painless to stitch out...almost managed to stitch this out in one hit.

I then did the centre of next month's star
Love this! Really enjoy this motif with the added echo around it. Will keep going a bit and then continue on filling in the sashings.

Need to find something else to quilt in the meantime...maybe its time for another wholecloth! 

Karin

Tuesday, 2 March 2021

Block #3 of Natalia Bonner's 'A Year of Stars' Quiltalong

This is Block #3, the Union Star, all quilted out following Natalia Bonner's instructions on YouTube.


Not much to say about this block. Took my time with it and had lots of starts and stops as I did not want to travel in my ditch excessively. Found this quite easy to do but put in a few 'helper marks' to hit the right points and to keep my lines straight. 

Also made a start on the sashing...I think there are two designs that people are using. Well, I went for this diamond shape and quite like the looks of it. Have not filled it in yet, but that can wait...just want to avoid excessive compaction of the sashing as I go along and quilt the blocks, otherwise it is going to be too difficult to put the straight lines into the sashing. Have still got a fair amount of sashing to go, but quilted something else in between, so need to get back to it.

Good fun!

Karin

Thursday, 25 February 2021

Doodlemania

It's been a while since I just doodled away on my machine.

Really felt like just quilting today...got out some rulers and just kept going and as you can see it got very messy.
Started off very structured. The centre is done with the HQ Petal Pusher ruler which gives you that lovely floral motif. I then played with Bethanne Nemesh' Lily Line#3 ruler. Lots of nice curves and lots of possibilities to place them. I do need more practice with those rulers to be able to use them more comfortably and make the best use out of them.
Started off with an upside down heart shape which looked great, so I repeated that on each cross hair which meant that I 'lost' the shape somehow. Also became obvious that I was too sloppy, as the resulting shapes were not equal. All good practice. I knew exactly where I had gone wrong...did not mark how far I wanted my shape to extend, just winged it which obviously did not work that well. Filled all that in and then started on a border.

The feather border is part of Cindy Needham's Border Stencil pack. Am thinking of using this for an upcoming wholecloth and thought I might just stitch that out to see what that feels like. This was the middle size, I believe, and stitched out very nicely. Will just have to decide how long I want my feathers to extend to achieve a more even look. Also noticed that the corners were particularly tight...I think Cindy Needham places her feathers under each other...not sure whether I like that. The corner certainly needs more work.

After that I just doodled along as I could hear the bobbin was nearing its end, so I kept going until I ran out. Was interested to see whether my bobbin tension would hold...last week we had about 38 degrees over here and our air conditioner had broken down. It was just really hot in the house. Doing a bit of quilting I noticed that my tension was incredibly finicky and it looked like it was not holding for the entire bobbin. Thinking that it had to do with the winding of the bobbin I trialed different speeds of winding the bobbin but it remained rather fiddly. Today, no issue at all...the bobbin tension remained decent to the very last stitch. So maybe it was the heat after all, who knows...certainly did not do anything different  today. Still using the same top and bobbin thread.

Linking up to Freemotion Mavericks 'Quilting & Learning-What a Combo'
Karin

Thursday, 21 January 2021

A Year Of Stars Quiltalong with Natalia Bonner - January

I am participating in Natalia Bonner's 'A Year of Stars' quiltalong. If you are interested - it is not too late, as the actual quilting has just begun and it is going to be running for the entire year. Natalia is also running YouTube tutorials on how to put the blocks together. I have not watched these as I purchased the accompanying Workbook last year to get going on the blocks as I knew this would take me a long time to piece.

Most of the last week was stitching-in-the-ditch with invisible thread to stabilize the quilt. In case you wondered how I resolved the issue of whether or not to go around every single element - I did a partial stitch-in-the-ditch, i.e. stitched around all the major seams and some of the seams in the blocks where it mattered in terms of colour. As I am stitching along in an off white Aurifil thread I was mindful of stitching the seams of darker colours down with the invisible thread and leaving the seams where I can get away with white thread for  when we get to that block. That seems to be working.
While a bit out of practice, I got into the groove of it pretty quickly. Did not follow Natalia's video on how to stitch this out in one continuous go as I would have had to stop the video every 2 seconds. I made some mistakes and had several stops and starts when starting off but then 'got' it and moved purposefully around the block stitching those lines. The only issue I had was the deep purple colour and the white thread. In order not to break thread every few minutes I had to travel along the ditch to get to the next part and initially that was a bit of a nightmare. Learned something though...I have become so used to the Bernina's stitch regulator that I forgot I actual have the option of using the manual mode. So, whenever I hit the dark purple fabric in the ditch I switched over to the Manual mode, carefully stitching along. Found that I had much better control this way. In terms of rulers, I used my trusted Handiquilter Ditch Ruler for the straight lines and one of Lisa Calle's Pro Echo rulers for the curves.
Turned out really pretty, I particularly like the crossed lines in the white triangles...looks very effective.

In case you have not heard, Natalia is also running a Border and Sashing Online Class in March of this year. Looks great and no doubt there will be a lot of  inspiration and learning in that. This is my second quiltalong with Natalia and while I am tempted, I just have too many other things on the go this year and need to stay focussed.

On the home front, I finished testing my new pattern...now it is just a matter of putting the quilt together, quilting and binding it while at the same time writing the pattern up. This should take probably another 2 - 3 weeks and then its onto the next pattern.

Also, look what arrived today
Could not resist getting another E2E design from Urban Elementz. Undecided at the moment whether I use that for the new pattern...might be too distracting as the quilt features a few stars, so it would be more of the same and I usually like to pair lots of angular structures with more of a curvy and flowing design. We'll see...not there yet.

Karin

Tuesday, 15 September 2020

More 9 Patch Ruler Work

Block 3 and 4 of Natalia Bonner's 9 Patchalong
This one was a beauty...continuous line design, always looks great. Of course, mine was not entirely continuous as I got confused. I am certainly learning a lot in terms of thinking through your stitching path before you actually have a go. I made myself a little folder on the Ipad with these blocks and an accompanying stitching diagram, because no doubt, next time I look at it, I will have forgotten how it goes. 
My accuracy is definitely improving and I am finding the ruler work increasingly easier. The stitch regulator on the Capri is a big help as I can focus in on the stitching without having to worry about the stitch length. 

The next block was interesting
Lots of straight lines and again some concentration was needed to follow that stitching path to make it a continuous design. Easy to execute and looks also good when only stitched in one direction.

Today then I tackled the border. Followed Natalia's suggestion of stitching a loopy design above the scallops, however then encased this with a wiggly design (Natalia cut her border off past the loopy design which I did not want to do). I used the HQ Wiggle Wave ruler for this exercise
This ruler is fast becoming my favourite wave ruler. 

The ruler makes it very easy to fit your waves into the border. All I did was measure my border and determined how many repeats I will fit into the border. On the long side I was out by half the repeat. If you look on the ruler, half of the length would have ended me up on a high point in the corner which I did not want, as I started on a low point. In order to end on a low point and make the corners look the same, I then needed to reduce my waves by 3/4in across the length of the border. I normally struggle with this when drawing out a border, but with this ruler I find it is quite easy as long as you keep track of what you are doing. So, as I am stitching along the wave and stop in the valley or a  high point, I shift the ruler by about 1/4in to elongate the curve, 3 times before the center and 3 times after the center. Without fail this works a treat and I arrived smack bang at a low point in the corner, making my corners appear identical. The only marking I did was an approximate position of the repeats so I knew I was on track as I was stitching along. I could, of course, have chosen a different starting point for the corner, however I thought it was safer to start at the beginning of the repeat as I get easily confused with these things. Maybe next time I try a differently shaped corner by starting on a high point or somewhere in between.
 Anyway, more ruler work coming up in the border. I am thinking of going around it one more time with a piano key design...not sure yet what width though or maybe a pinstripe arrangement. We'll see.

Thoroughly enjoying this quilt along.

Karin

Friday, 4 September 2020

9 Patchalong with Natalia Bonner - Block 1 & 2

The 9 Patchalong with Natalia Bonner has started with two blocks this week.

Block 1

Simple curves, love the look and often use this for my baby quilts.  Quilted with the Pro Echo 7 ruler in one continuous pass.

Block 2

This block was hilarious. I was watching the video and following the stitch path, however 2 sec. later I forgotten which way to go. Had to watch and re-watch 2 squares at a time to follow that. Only got the logic of the stitch path for the last 3 squares using the Pro Echo 8 ruler (felt better as it is longer). I knew I was challenged by spatial things but I had no idea it was that bad. Anyway, again stitched in one path. Really like this, looks great on the solids. My focus on accuracy is working fine, spending a moment to get my alignment right and taking my time. Also trialling my new stitch regulator which is behaving very nicely...really like stitching with it, just need to develop a bit of a better rhythm for that.
Also made a start on filling in some of the sashing today. Great fun...with this I am practising shifting my straight ruler along as I am quilting out those straight lines. 
As you can see the vertical sashing is filled in only every alternate diamond, but in the horizontal sashing Natalia did every single shape. Followed this, although I like every single shape stitched out better as it gives that lovely texture. Will be a good visual when looking for designs.

I am really enjoying this and am currently playing with the idea of participating in Natalia’s ‘Let’s Stitch a Year of Stars’ which is to start in January 2021. Again she is using a panel which you can purchase, however that is not an option for me here given the enormous postage costs. So I would have to piece that sampler...not sure about that as I am not that much into piecing and the blocks look tedious. On the other hand, we are still months away and I am always up for a project that is a bit more involved. Will ponder on this for a while.
Linking up to Cheeky Cognoscenti for her Longarm Learning Party#6
Karin

Wednesday, 2 September 2020

9 Patchalong with Natalia Bonner

So I made a start on the quilting of the 9 patch quilt that we are going to use  for Natalia's 9 Patchalong.

As I am quilting on a sitdown machine I thought it best to put in the frame of the sashing design (this will still be filled in later) and the border scallop before we get to quilt the blocks. This is to avoid the compaction that occurs when quilting...I did not want my sashings to bulge out which would make ruler work more difficult. The design looked easy enough and I thought that I would get this done in no time at all. The aim of the game was to focus in on accuracy!

Well, let's just say I was challenged...I forgot how hard I find curves at times, particularly when dealing with an unruly quilt.
The scallops were an absolute breeze, the sashings not so much! I am participating along using my own rulers rather than Natalia's series of rulers.  I knew this quiltalong would be a great learning opportunity. I had to look at my curves and decide which ones to use. This was really quite interesting...I have the small set of Pro Echo rulers (plus the Pro Echo 8 and 12) from Lisa Calle. 

Really like these rulers and have used them on a quilt before. However, now I had to decide which one fits best into the spaces that I had and I found myself really inspecting them and thinking about which ruler would be most suitable for what, looking at the markings and how this would align. Ended up with the Pro Echo 6 and 4 for the scallops, the Pro Echo 7 for the blocks and the Pro Echo 8 (not part of the set) for the sashings. 

After I completed all of this I started on the bonus blocks at the bottom.

 Again, looks simple enough but some concentration was needed when travelling around the block in the ditch. I am using Rasant thread in a light gray colour. Discovered that I need the ditch in front of me or on the side if I wanted to keep the ditch quilting neat. Also, exploring my new stitch regulation on the Capri. I found that I need to increase my tension for the stitch regulator...don't really understand why that is but it definitely featured. If I leave the tension where I have it set in Manual and switch over to the regulator with the ruler, I would have a little bit of flat lining on the back. Not too bad, but enough to notice. So, I did a lot of tension testing throughout

Maybe my tension is not set correctly for either? Will have to ask about this in our local HQ group...thinking that it may have to do with the speed as I normally quilt quite slowly (in Manual) however when I use the regulator I do quilt a bit faster.

Popular Posts