Showing posts with label Charity Quilt. Show all posts

Wednesday, 16 July 2025

Some Ruler Work

Here is the finished Ballerina quilt from a few weeks ago. Again forgot to post the finish here as I had posted it on my facebook page and IG and then moved straight on.
The outer border is done with the HQ 4" Swag set...finally used it! The 4" swags fitted nicely around the long edge of the border, however I had to problem solve a bit for the top and bottom because I needed to elongate my swags by 1/4in to make it fit. Found that I had an oval corner shape that just fitted that width (and height) and which was only ever so slightly different (tiny bit slimmer on the top). I used this as sliding the HQ 4" swag along to make it a bit wider produced some wonky shapes. Worked really well.

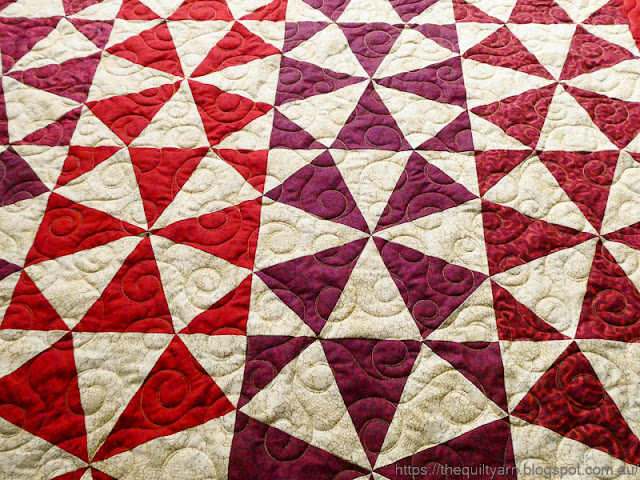
Really enjoying the ruler work at the moment so I moved straight on to the next charity quilt. A striking little number

Used my favoutite curve set for this...the Lisa Calle Pro Echo rulers and chose the 7" curve. By the way, Lisa Calle is doing little workshops on ruler quilting on FB every Monday and I think you can get a bit of a discount on her rulers this month. Watched the first one last week on using straight rulers. Very enjoyable.

The ditching was a bit of a hassle and to save time I just ditched in a grid around the blocks and left the diagonal untouched.

Really liked how this turned out as the unditched areas tended to puff out a bit more and really made the curves stand out. Mind you, my stitch regulator was a bit unhappy at times...the backing was very thin and in the white areas I had some racing at times. Not quite sure why...maybe the thinner fabric both from the backing but also in the top or the puffiness. Definitely something noticable as I approached the seams at times. Experimented on some scraps that I had and had no problem at all, so hopefully it had to do with the fabrics in this quilt.

Well, I am already on to the next quilt which I will just meander over as I have got another one to go after that. You probably wonder at my sudden surge of activity...we are expecting our first grandchild in August and I do want these charity quilts to be delivered before this. While I will take a few additional ones after this there no doubt will be a few months of very limited quilting activity. Somehow it seemed quite far away and all of a sudden it is so very close. My daughter is huge by now and I would not be surprised if this baby makes her entrance a little bit earlier. We shall see. Still need to handstitch the binding of that special baby down. Also need to prepare for a workshop which has now moved to November, write up a pattern etc...all before the end of August! As always in life lots of other things going on...

But, hey, we work best under pressure!

Karin

Tuesday, 8 October 2024

The Great Illusion

I have been hard at work finishing the last charity quilt out of the pile that I had. With this particular quilt I was just not feeling it and decided to do a minimum of quilting-in-the-ditch on it just to get it done.

So I went around all the blocks only to realise in the end that this just would not do. The blocks were way too large to just leave them at 8in unquilted. As much as I did not want to do any further work on it, minimally quilted like this would make the quilt literally unusable. One wash and the pieced blocks would have puffed out like there is no tomorrow.

This is actually why I like quilting the charity quilts...there is a lot of problem-solving that one has to do. As with some of the other charity quilts the mere mortals who pieced this together did a fairly haphazard job...not bad, but literally none of the intersections met, some of the seams were changing direction half way through a row and the measurements were a little bit out here and there. Nothing too bad, but definitely something to consider when quilting it. I could already see that some of my ditched lines were a bit crinkly because of non-matching seams. First at all I had to stitch down every single alternate block. To make it more interesting for myself I decided to practice securing my thread when starting and stopping in order to just cut it off. I do struggle with that as I am used to burying my threads, however for this piece this would have taken ages to complete, so I bit the bullet and decided to cut off my threads. 

The Q20 has an automatic tie off which works really well in the beginning of a line but not so reliably at the end of a line. Thought about Amanda Murphy's method of beginning and ending a line...she uses the stitch regulator to set it to about 22 or more stitches as she starts off and then switches back to normal stitch length. Must say that that has never worked really well for me...the machine races to produce the tiny stitches over a tiny length and it just feels really unnatural. So in the end I decided to go back and forth with tiny, tiny stitches in manual mode to start off, then switched to stitch regulation to sew my line and do the ending in the reverse, i.e. tiny stitches towards the end back and forth in manual. Then I cut the threads off and lo and behold, the world did not come to an end! My stitches appeared secured. Maybe not quite as clean as I normally like it but it saved a lot of time.

Then came the thinking about what to actually quilt in the alternate block. This is what I went with
The area around the tiny square should have measured 2-1/2in but rarely did and the surrounding intersections did more often than not not match. I decided to put the lines at 3/4in apart starting from the outside in and leaving the tiny square unquilted, so it would pop out. There was method to my thinking, i.e. the x- blocks were not aligned properly hence my 3/4in was always a bit out, however going inwards and trying to meet each line as I went around it looked fairly consistent due to the 3/4in space. This left an approximate 1in space unquilted, big enough to hide any inconsistencies that occurred in the tiny triangles. Had I gone one more line I think it would have emphasized the inaccuracies. If you go with a ruler you would of course see that there was hardly any consistency, however the overall look signaled consistency. Was fairly curious of how this would turn out.

To my surprise I quite liked the look of it in the end


Glad this is done and very surprised on how neat this turned out. Added bonus...I was finally forced to get a hang of cutting my threads off! (otherwise this would have taken ages!)

Getting back to To Do Tuesdays: I am weeks behind as we went on holidays in between, then I had to quickly write up my Etsy pattern and then I got going on the charity quilts. So I achieved a fair bit but just not in the order that was on my previous list. And who would have guessed, I did start something else, i.e. new project since I have come back from holidays.

So my list of things to do looks something like this now
-make a start on my background filler project from way back
-continue on my scrap quilt blocks (have made 15 so far)
-continue on the new 'colourwash project
That leaves several UFOs unaccounted for but I just need to get back to some structure first before I can add more things.

PS: When I came back from holidays I noticed that I had several comments on my blog going back several weeks. I do not always get an email notification now (no idea why) but also had forgotten that I had switched on comment moderation, hence those comments were just sitting there. My sincere apologies...I do love comments and try to respond to each and every one either by email or here on the blog. Definitely not ignoring you...must have been one of those senior moments!

Linking up to To Do Tuesdays #94 over at Quiltschmilt.

Karin


Saturday, 27 July 2024

Playing with Rulers

I like to push the boundaries a bit with my sitdown longarm, i.e. see what else I can do on there and how difficult (or not) is it to push my quilt through the machine with the latest ideas I have. Given that I have a draw full of rulers I am always looking for new ideas to use my rulers to complete allover designs.

I recently picked up a panel quilt from the charity group I am involved in. The panel is "Elsa" from Frozen. The quilt is a little bit bigger than the usual baby quilt and measures approx. 47in x 55in. In the past I have often finished those types of quilts with clamshells using the HQ Clamshell ruler. Fun to do and relatively quick. For this one though that would have been too small and I needed another idea. Looked through my draw and decided to use one of Amanda Murphy's circle rulers to do a big Orange Peel design over the quilt.

I picked the 7in circle and started...literally regretted my choice straight away. The 7in ruler fits my whole hand. Thinking I would just go around and around I thought that this would be quick and easy. Wrong! The ruler shifted of course with the movement of the quilt. As you have to backtrack over one part of the circle as you move along that became quite difficult, particularly starting off with the batting making everything more wobbly and moveable. I struggled big time...

Solution: those little rubbery draw liners. Cut myself two pieces off and placed them under the ruler for every circle I did.
So much for quickly quilting this out, but at least my backtracking worked out nicely. The size of the ruler made it challenging to move along, but as I now was committed to finishing this off, I had to think this through a bit better. An added challenge was the wool batting. It does give you a fair amount of loft, so I had to concentrate and go slowly to ensure my hopping foot stayed on the side of the ruler. The way I quilted around the ruler involved shifting my hands constantly to hold the ruler next to the foot steady while at the same time adjusting the quilt a number of times as it was always shifting sideways as I went around the ruler. All this while holding the ruler in exactly the same place to get the backtracking right.

Must say I was not confident that this would work. A few rows in I measured where I was up to in relation to the bottom edge. I was pretty sure that my circles were not straight across and that I had lost my way. To my surprise I was spot on...same distance on both sides. This was encouraging!
Gave it a bit of a visual...not too bad. Not perfect by any means but overall looked quite good. Every now and then the shape in the middle of the circle looked a bit off center but that had to do with me not always hitting the exact point where the circles meet. I let go of worrying about that because there was just too much going on in terms of stitching, holding the quilt, avoiding drag and keeping the ruler steady.
Stitching along...

As per usual half way through I turned the quilt around and quilted the circles towards me. Struggled with the drag of the quilt at that point and also thought that my circles were really going out of alignment. Turning the quilt at that point is always good as you now pushing it in the opposite direction and those inaccuracies are starting to disappear.

Was very curious how I would go approaching the top of the quilt and prepared myself for an uneven finish. But, lo and behold...more or less finished evenly across the top. That was a bit surprising seeing the pushing and shoving I had to do... 
Took the basting out and had a close look but cannot take a photo at the moment as it is evening over here and the shots would come out too dark. Will post a shot of the finished quilt in another post. 

Overall happy with my efforts...looks fairly consistent even though my circles shifted slightly to the left but I don't think that that is noticeable once the binding is on as it is only by about a quarter inch.

Might try this again on a smaller quilt using the smaller 5in circle.
 
Karin

Wednesday, 27 September 2023

To Do Tuesday #39

My goals from last week were modest
- finish the handstitching of the binding on the scrap quilt
- baste one of the little charity quilts ready to be quilted,  
- maybe continue on my cat quilt from ages ago, and 
- continue on my knitting projects in the evenings.

Finished my scrap quilt, i.e. handstitched the binding over a couple of days

As I did my shoulder in a couple of weeks ago, had to take it easy, however I did manage to baste one of the charity quilts. In order to go easy on the shoulders, I noodled all over it today, so it is now ready for binding

Looks cute and with the meander over it is very cuddly. This took no time at all, I reckon about half an hour as it is only a small little quilt. Two more to go!

Did not continue on my cat quilt, but had a look at it...
Have six completed blocks, so quite a while to go yet. 

Apart from this I did a lot of relaxing and also some planning in terms of quilting. It's funny how quickly projects become UFOs. I did a freemotion-quilting course with Bethanne Nemesh some time ago (maybe 1-1/2yrs ago). For this course we pieced together 5 improvisational pieces. Well, have not quilted any of them so also had a look at that. Decided to make a start on one of them, however that is how far that took me. Mind you, at least I am feeling clearer on what to do next...just have to follow my plans and eventually I will get there.
This quilt which is my own design will need some careful planning in terms of how to quilt that and what designs I will use. It will be dense and varied so I will need some time to figure out how many and what designs to choose. Took a photo of it and will play around a bit with that on the Ipad. The different bright colours seemed a good idea at the time but now I am also wondering about thread colours. Maybe I should do the class sample first to do a trial...
Actually, now that I said that, that is probably a good idea as that will definitely clarify the thread choice but also could be useful in design choice. Hmm...

So, as you can see a lot of planning going on over here with somewhat limited action. However, I am happy with my progress. At least I have got some clarity as to what to tackle next.

So, my list for next week is as follows
- bind the charity quilt
- baste the class sample from above and work out the quilting design, path and thread
- cut the pieces for a couple more cat blocks (no piecing at the moment as I am taking my machine to the workshop and leave it un-connected in between sessions)
- maybe baste another of the little charity quilts.

We'll see how far I get.

Linking up to Quilt Schmilt  for the To Do Tuesday #39

Karin

Sunday, 5 March 2023

Choosing a Quilting Design

I finished one of the quilt tops from the Orange Tree Quilters group. Another beautiful little quilt!
It is a Kaleidoscope quilt...I had forgotten how effective they can look and remembered that I actually have got the template for this. Did buy the template set very early on in my quilting journey but never got around to actually make one of these, in fact forgot that I had this!

Like the colours...very tastefully put together.
Its a smallish sort of quilt...from memory about 52in square. In looking at it I was unsure how to quilt this. Did not really feel like stitching-in-the-ditch, even more so as every block had the centre seam pressed open. Don't like to stitch over open seams and so decided to do some sort of overall design. The quickest, of course, is meandering but also did not feel like that.

Consulted one of my favourite books...Machine Quilting Solutions by Christine Maraccini. Its an older book from 2007 but has a lot of easy-to-do designs for everyday quilting in there. Chose a swirling  design which I had not done before. In her introduction to the design Christine says:
'This edge to edge design is one of the quickest ways to get a quilt finished. It will add visual movement and has a texture and feel that beg the owner to cuddle up in it.' The only difficulty, as I could see it and Christine pointed out, was to get the design a bit bigger to maintain the softness of the fabric and batting when you touch it. However, the swirl design was perfect as one of the red fabrics had a dainty swirl design on there and it was unobtrusive enough for the secondary pattern to still shine through.

Did one practice run on a piece of scrap and started wondering whether I could execute this consistently over a large area. In the end I decided to just go for it...if you never try, you never know! Was a tad nervous to start off with as I can  get incredibly confused with swirls and their direction, but to my surprise this went incredibly easy. I quilt loosely in rows as a sitdown longarm quilter, just having 1/4 of the quilt under the the machine at a time. Had absolutely no problem moving along swirling my way from one end to the other. Going back then and down, I could see my empty spaces and could reach out with a swirl to fill that in. My swirls ended up maybe 1-1/2 to 2in across, sometimes smaller, but that did not feature too much. Given that the swirls are a bit more dainty it felt very open and soft.

This is why I like to quilt these quilts for the charity group. I get some pretty quilts, an overload of inspiration and I get to try different quilting designs that I may not otherwise use. This quilting design is a definite keeper...I think it took me about 2 hours to complete. I used the stitch regulator on my Bernina Q20, so did not have to worry about my stitches looking fine and went over it with a medium speed which ensured that I could get the swirls a bit bigger (think bigger, more sweeping movement). It was incredibly easy to fill and in the end I was actually quite amazed at the consistency with which I had quilted this across the quilt top. The quilt looks amazing with it and feels nice and soft. This is definitely a design that I will use again. 

Karin

Monday, 19 September 2022

Current Charity Quilt

Missed out on the To Do Tuesday post, but we had people over for a few days so I did not get much done. Will link up again later this week.
Made a start however on one of the charity quilts from the Orange Tree Quilters. Always a surprise...I don't open the packets of quilt, backing and wadding until I am ready to quilt them...always a surprise! This one is a Disappearing Four Patch quilt in green and purple tones. The blocks seem very old, so I ditched every single seam of this.

Then I did some ruler work on this in trying to keep the quilting to a minimum to keep it nice and soft.

While I liked it, I was not happy with the purple sashing. The whole thing looked kind of ...bla...! I don't think the fabric was 100% cotton so it bulged out a bit, even with just the ditching and the ruler work. Kept looking at it for a few days trying to work out what it needed. In the end I followed my own advice (just finished teaching a Freemotion-quilting class) and kept it simple with a wishbone design in coordinating thread.

That looks fantastic


It's funny how simple designs like that can really lift the mood of a quilt. Finished the quilt off with just some lines in the border to stabilise that a bit and it's done.

Now onto the next one!

Karin

Friday, 15 September 2017

Charity Quilt

Since buying the new machine I am attending a monthly HQ group in the city. Last time a lady attended from the Orange Tree Quilters, an affiliated group of the Quilter's Guild of South Australia who donate quilts to children in need in the community.
She brought a whole stack of quilt tops that needed quilting...perfect opportunity to just practice as I have no quilt tops at the moment, so I took a small log cabin quilt.
This is where the HQ Sweet 16 shines...after some joining of the batting and basting I finished this little quilt top in a day.
Given that the log cabins were made out of colourful scraps, I chose the 'Ikea 'design that adorned the little white fleece blanket that we once purchased at Ikea...a bit of a mix between meandering and quilting loops
This worked really well and my tension issues seem to have largely disappeared. I used a soft yellow Aurifil 50/2 on the top and a beige Aurifil 50/2 thread on the bottom for the centre of the quilt and a pink Aurifil thread for the pink border.
...and here is the back
This was really useful as practice... as you can imagine none of those fabric pieces were of the same quality and gave me a really good idea of how my tension was performing. Happy to report that I had no major issues with the tension. Still some adjustment issues in terms of how to place my quilt and how to move it around...still find it confusing that I don't have to scrunch it up as I have done for years, so some of my stitching is more clumsy than usual. 
The border was a bit of an adventure. I don't think that was 100% cotton and my tension was ever so slightly out, i.e. had little pokies here and there on top, but I just did not worry about that and just quilted a loop design in there to finish it off.
Looks great and does the job.

Was again surprised by the efficiency of the machine. Did the meander first, then quilted in-the-ditch with one of the rulers around the pink border, then basted the slightly uneven border in place and finished it off with the loop design. This took me about 5 - 6 hours and it was done. Impressed with that.

Will continue on my ruler quilt next as I will be getting the next monthly ruler from the HQ Ruler of the Month club this weekend.

Karin

Popular Posts