Showing posts with label Edge to Edge design. Show all posts

Thursday, 8 June 2023

To Do Tuesday #23

My list from last week included the following:
- start on an edge-to-edge design for the baby quilt panel; this will take some time as I need to trace the design a number of times on to the Golden Threads paper. Also I am a bit undecided about which design to use...feel like something new and have been exploring designs over at Urban Elementz (always dangerous as I end up spending money!)
- if time allows, start quilting in the ditch around my other small baby quilt and maybe even working on the draft for the pattern. We shall see.
- start knitting another beanie...got the right needles now for the decrease of the top of the hat, so that should come together quickly.
- finish sewing on the binding on the table runner.

Let's see how we did.

Well, I did end up buying another edge-to-edge design from Urban Elementz. It is called 'Lorien's Festival by Hermione Agee. Caught my attention straight away on the first page as this was featured in the new design section.
The design is 6.5in wide, has lots of open spaces and flows really well which makes it very suitable to do on a sitdown longarm machine. If you are interested in the process, I wrote a little bit about how I do this in the previous blog post. It is not difficult, just demands a bit of patience and is a bit more work intensive, but so worth the effort. Looks really good. I then started on the binding...choose a fun stripey binding.
Made sure I joined the stripes properly, but was not so sure about the closure and then this happened
When coming to the end to join the binding I was able to align the stripes almost perfectly for the final join. This certainly does not happen usually to me. Could not believe it! The join is totally invisible when folded over. Looks great! I am now sitting in the evening stitching the binding to the back by hand. Taking my time a bit as this quilt will go into the Etsy shop but I need a bit of a sunny day to photograph this properly and at the moment the weather is just cold and rainy.

Started to stitch-in-the-ditch around my other little quilt which will become a new pattern for the Etsy shop
I get incredibly bored doing this task so yesterday I mucked around with making a little video for IG on this. Managed... that's all I can say. Takes me a long time to edit and cut to bitses and then try to figure out what IG wants. My daughter explained it again to me but I don't know...I don't find that easy at all and her explanation was that it is basically a piece of cake, just press here, do this and that and it's magically done. Took me a very long time...probably could have finished that little quilt instead!

Also still knitting...instead of another beanie I am now trying socks. How difficult can that be, said she. Oh boy, was I wrong! I had to re-familiarise myself with doublepointed needles. But that was not my only problem...as I am European I am used to knitting in the European way, hence I had to look for videos that show that way of knitting. I did find a very good video on sock knitting, however that person knitted the other way and no matter how I looked at it, I could not translate that to my way of knitting. So it took a few days and I found a very entertaining European knitter on You Tube who also runs a blog (Nimble Needles). His You Tube videos are in English which is useful as the patterns I am reading are in English and use English abbreviations. Wow, I can't tell you how challenging even the starting of the sock adventure was...I literally sat here a whole day unable to get all my stitches on those blasted tiny needles. A few times I managed but then kept losing stitches in between. I reckon I did about 8 - 10 attempts before I finally got going. At the moment I am approaching the heel...will take a photo when I get there and hopefully manage. So far it is looking good and I think I have understood from the videos how this is done.

I did finish the binding of my table runner in between, but forgot to take a photo. Still planning on doing another one of those, but not just yet.

So, for the remainder of this week I am planning to
- finish off the ditching around my little baby quilt pattern, then do a little bit of ruler work and hopefully make a start on the binding.
- finish off hand stitching the binding on my panel baby quilt and if weather allows to take some photos
- drop off all the charity quilts and pick up some new quilts to finish off
- continue plugging away at knitting the sock.

That's probably enough for the week

Linking up to To Do Tuesday #23 over at Quilt Schmilt

Karin

Sunday, 4 June 2023

Edge-to-Edge Quilting

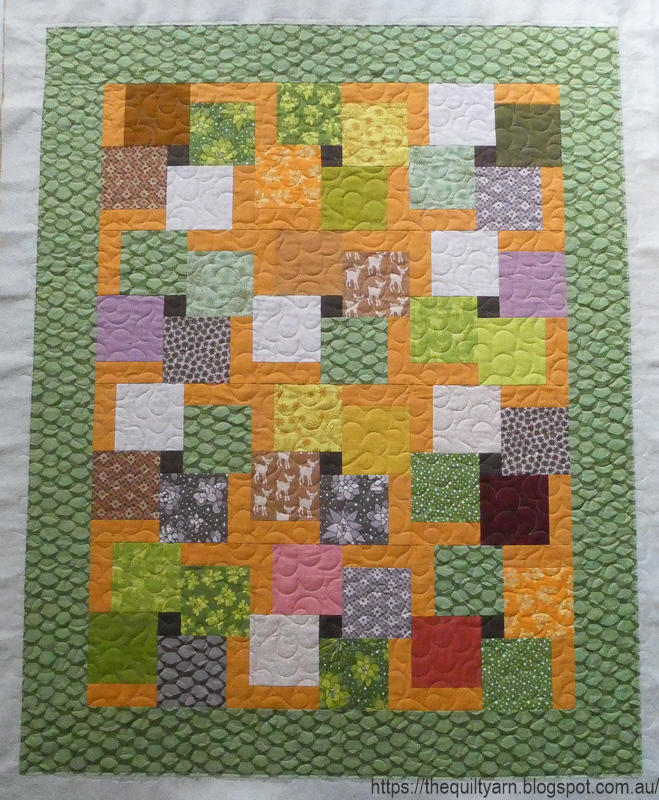
I finished my little panel quilt. 

It's busy enough, so I just put a sashing and border around it. Very cute! Felt like an allover design and started looking at edge-to-edge designs at Urban Elementz. Of course I found something straight away...could not resist.
A new design from Hermione Agee called Lorien's Festival. It is a 6.5in wide pattern which is a good size for doing it on the sitdown longarm. When looking for designs that I can do on the Bernina Q20 I do look for designs that are nice and open given that I am quilting it using Golden Threads paper which will have to come out when finished. While I do not mind taking the paper out it is obviously easier to have bigger shapes that come out readily and with relatively little effort. When you purchase the pattern you download this one page and then print as many as you require sticking them together with tape to make a row.

When quilting this it is definitely an advantage to have a lot of space
As you can see I can spread out my quilt over the entire surface quilting it going from left to right without having to crunch up anything. The paper is secured with 'sticky dots' and also some pins so that there is no shifting. Can you do this on a DSM? I think you can, however it would necessitate you having a flat surface and you would need to quilt it vertically because of the orientation of the DSM having the majority of your quilt in your lap as you start. Now I have to admit I have never tried this, however I would imagine that that is quite fiddly (mind you, not impossible). Having said that though I do think you can quilt smaller pieces like table runners and borders with this method without any problems.

The design was easy to stitch out
I do trace every row, however you can trace just one row and then put up to eight rows behind it and stitch through the paper without thread to get multiple rows stenciled. I have done this before and it works ok, however I prefer to trace every row. While tedious and by the eights or ninths row you are absolutely sick of it, it does prepare you well for the quilting as the design starts to commit to muscle memory which makes for better results. This design in particular flowed really well and it took no time at all to get the hang of it. In stitching this you follow the lines however you will never be totally spot on. My hands are about as big as the design, so when quilting within the span of your hand you swing out at times as you gather speed. The trick with this is in the alignment of the rows. I rarely align on the row that I stitched. While I do look how I stitched the row and align my points as best as I can, the alignment happens on the faint bottom row. When I get a new row, that bottom row has to align perfectly with the row to be stitched which will ensure that you keep your design nice and straight as you make your way down the quilt. 

Love doing this. While a bit more work intensive I find this very relaxing. Don't have to think much, just follow the lines, then I sit there quietly taking some of the paper out after each row, leaving the bottom row in place for the next row. Quilting the row literally takes only a few minutes. I use the stitch regulator of the Bernina Q20 for this task, so my stitches always look fabulous which makes for very relaxed stitching.

Finished this yesterday...I did spread this over two days mainly because of the tracing of the design. Usually I trace two or three rows, then quilt them, and then trace again.

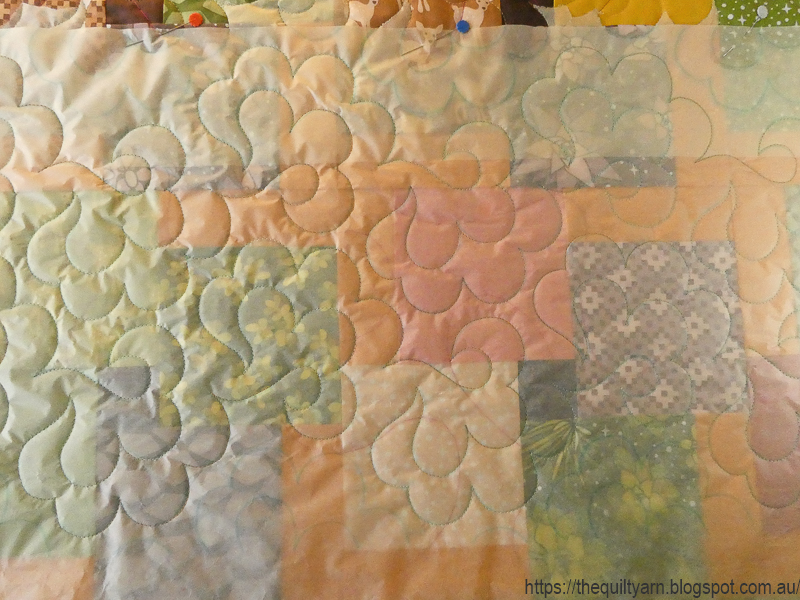
Turned out lovely...a busy little quilt for busy little people.

Always like looking at the back

Now I just have to do the binding...have a fun striped fabric that I might use and then this quilt will go into the Etsy shop.

On to the next project...

Karin

Saturday, 4 February 2023

Edge-to-Edge Design on a Sitdown Longarm

I finished my little charity quilt. Normally I would not do anything too involved on theses charity quilts...not because they are for charity but simply because I am volunteering my time and resources to quilt them. However I absolutely fell in love with the last charity quilt. Not sure what it is about this one, but I really like the very simple design and the colours of that quilt. The fabric reminds me of something but I cannot quite place it.

Such a pretty quilt and nicely straight. So I decided to do an edge to edge design over it. If you never looked into this check out the designs at Urban Elementz...so many choices and I am not sure whether I mentioned this before but there is also a whole section of some 50 plus designs that you can use for free. Really appreciate this.

For this design though I chose a panto that I had bought from Urban Elementz - the self print Cloud Nine Design from Patricia E. Ritter. I think that is the third design that I purchased from Patricia E. Ritter. Coincidence or maybe her design appeal to me because of their openness (for my purpose I do need the design to be a bit more open). 

I have mentioned in previous blog posts (e.g. HERE and HERE) how exactly I go about doing this on a sitdown longarm machine. I use Golden Threads paper to trace rows of the design. this time though I wanted this to go all a bit quicker and I used 8 sheets of Golden Threads paper and stitched the traced design through that rather than tracing off the design 8 times.
As you can see I trace with a blue erasable marker. This is because when you rip out the paper there are always little specks left in the stitching and I just want to be careful not to transfer any markings onto the quilt.
A brief look at what this looks like stitched through

I remove the paper as I go along, except for the last bit which I need for the alignment of the next row
I have done this design before so it went rather quickly. However, this time I did a bit of a stuff up in row 3...it was getting close to dinner time and I was hurrying along placing a row onto the quilt ready to go  for the next day. When I started it again the next day, my natural perfectionism was a life saver. I made a very sloppy petal about 2 swirls in and decided to take it out...only to realise when turning to the back that I had aligned my row on the previous already stitched one, so I had 2 swirls stitched twice! I was happy that I discovered it and proceeded to take my stitching out which is something you can absolutely do with the paper, however you have to be super careful. The paper is wafer thin and rips easily. Complicating whas the fact that I had stitched my design through the 8 layers with a very large needle which made the paper even more likely to just split. After I removed all the stiches, put my frazzled paper in place
You can see here how the paper is starting to split. I decided to ignore that bit and stitched as best as I can around those split papers. Worked fine as I was used to the movement of the design by that stage, but did make me somehow anxious, as it is very hard to see how it is turning out with all the paper on top.
In general I follow the lines as best as I can however this particular design is stitched with a little bit of speed...I can imagine that on a longarm on the frame you would really lean into that which also happens to a lesser extent on the sitdown, so lines are not always followed precisely. I have learned not to worry about that too much, however I do make sure that I hit the points correctly as when I align the next row, I can be assured that they are in the right place. In addition I check how my row aligns against the pieced seam lines...not measuring, however  having a bit of a look whether I am still straight and whether design elements hit the same spot as I go along. Works absolutely perfectly every single time.

The quilt looks just lovely

...and the back
Now I can say with some confidence that none of the swirls would be exactly the same, however it reads as consistent and looks absolutely spectacular. So happy with how this turned out.

Altogether I used 9 rows to quilt this. Had to trace one more design to finish off and must say I do prefer to stitch on the drawn line rather than those little dot lines, however it was much quicker of course, using the stitched through rows.

So satisfying. 

Karin

Wednesday, 25 May 2022

Scrappy Squares Quilt Up and Running

Finished the write up and listing for the Scrappy Squares quilt in my Etsy shop.

Must say I am struggling with titles at times and it often stays as what first comes to my mind. Not very original but if I think too long about the title I never get going.

A couple of photos


The quilt measures 40in x 50.5in and is finished with an allover edge-to-edge design in an orange variegated Aurifil 50/2 thread.

Next is the last of my Snowmen table runners...it is already put together, just have to sandwich and quilt it... 

Karin

Wednesday, 18 May 2022

Edge To Edge Quilting on the Sitdown Bernina Q20

I am finishing off my little side project and thought I do a post on how I put an edge to edge design on a quilt using a sitdown longarm machine. I did do an earlier post some weeks back but thought it might be interesting to people to see a more detailed description of the process.

As I am in a bit of a hurry I again used the Cloud Nine design by Patricia E. Ritter that I purchased as a self print design from Urban Elementz a few weeks earlier. I printed several pages of the design and then stuck it together to form one row to fit my quilt.
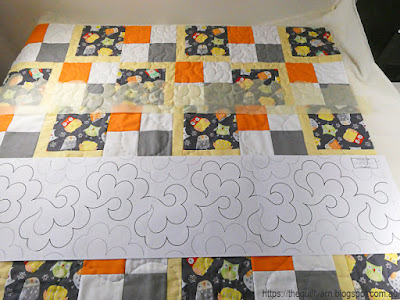
As you can see the design to be stitched is printed in black whereas the previous and next row is in a lighter grey colour. Starting off I traced the design (all of it) on Golden Threads paper. In order to cover an entire quilt you need many of those rows (some 10 rows for my small baby quilt). That of course becomes incredibly tedious to trace, so this time I tried something different, i.e. I stitched through several layers of Golden Threads paper from my first traced design to produce multiple copies in one hit. So, started off with the first row which was traced and stitched through.
I trace with a blue water soluble marker which is fairly faint however you can see that under the machine light. The reason for this is that I do not inadvertently want to transfer pencil marks or similar onto the quilt top. In terms of attaching the paper I use both, pins and removable glue dots. The pins are always at the top where I can see them because as you go down in rows you overlap the rows and if you have pins on the bottom it is easy to forget that and like I have done before, run over a pin. The glue dots are great...they stick to the fabric and paper but when you take them off, they come off with the paper. They do not leave any residue behind and the only danger is that you might stitch through one. While that is a bit of a hassle, it is way better than running into a needle.

Here is the first row stitched out. I am quilting this on the sitdown Bernina Q20, using the stitch regulator (BSR1) set at 9 stitches per inch. The BSR1 is the mode where the machine keeps stitching at a pre-determined speed even if you do not move the fabric anymore which means that when you stitch along in stitch regulation and come to a point where you momentarily stop to change direction it will take one or two stitches before you take off again which gives you a very crisp point. For the thread I used my trusted Aurifil 50/2 weight in a variegated orange colour, this time teamed with a prewound (Decobob). Quilting out the rows is incredibly quick...the design is a bit over 7in so you do quilt this in bigger sweeping movements which is easy to do with the stitch regulator (and a lot of fun!).

Once finished with the row, I start taking the paper out. In the photo you can see my little glue dot coming off with the paper.
I suppose you could leave the paper in, but I got used to taking it out row by row, so that I can see what I am doing. In terms of taking the paper out though, I do leave the part where the next row is (in light grey on the design which I also traced on) on the quilt because that serves for the alignment of the next row where the first and next row overlap. While I do check how my stitched row aligns, there will always be differences because once you get going you may not always stitch directly on the line, hence the traced beginning of the next row is the more important one for the next alignment.

So this is what this looks like...most of it taken out with just the bottom part left for alignment. The paper comes out easily (you can take it out bit by bit or tuck on it gently) and I find it quite relaxing sitting there taking out the paper. My points looked it a bit sloppy in parts on this first row, so I had to make a tension adjustment at this point to ensure that my points were nice and crisp.


Now for the big experiment...the stitched through rows. Wondered how that would go. 
This did not fill me with a lot of confidence as I am used to the traced design, but gave it a go and to my surprise that worked quite well. Next time though I might stitch that through with a bigger eye needle as I had problems seeing the row underneath once I overlapped the next row. However I managed and stitched my way down the quilt.

As you would have noticed I only stitch one row at a time, however as I came to the bottom this time I did try stitching two traced rows in one hit.
Yes, that worked, however I don't think I would do this all the time...by this stage I was quilting towards me and I just had a lot of paper in front of me which was a bit difficult to negotiate. Also was a bit overwhelmed taking out two rows of paper.

Anyway, finished this today and am quite happy with how this turned out. A few little inaccuracies did creep in here and there, but that is to be expected with this method. The paper can shift a bit, you start to loose it a bit in terms of following your lines...mind you, some of that you can see as you stitch in the overlapped region and you can even that out a bit as you go along, particularly if you know the design well. I also check on my alignment as I quilt over the seams making a note where a particular element sits in relation to the seam. That lets me know how straight my row is. Again, it will not be a hundred percent but it should be similar as you move across your quilt.

The finished product


I quilted this over 2 days and I would say, all in all it took me about 6 hours. A bit more effort however I do like the look of edge to edge designs. The only limitation is that I have to choose simpler, more open  designs being mindful that I have to take the paper out. While it comes out easily it does get stuck in points and tight spaces, so you want to choose a design that has bigger distinct shapes to make your life easier.

Now, the binding and then I am back to my Background Filler project.

Karin

Thursday, 24 March 2022

Finished Owl Quilt

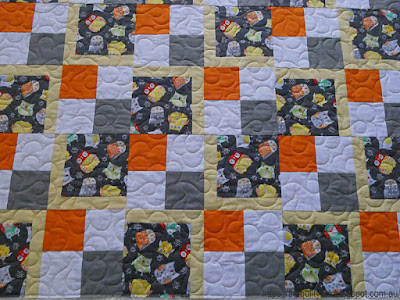
Finished my little owl quilt. 


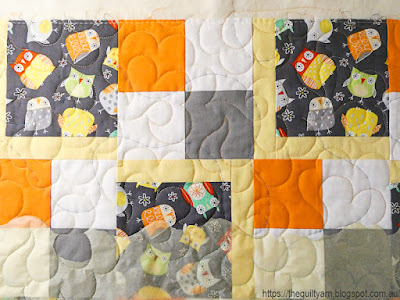
The quilt comes to 36.5in x 48.5in and is quilted with an edge-to-edge allover design from Urban Elementz (see also last blog post). 


Very happy with how this turned out...it's vibrant, cheerful and interesting to look at, despite its simplicity. Lots of fun to put together and I am happy to report that the owl fabric is finally all used up (not that that made any dent in the ever growing stash).
The quilt will shortly go into my Etsy shop for sale, just need to work on some photos and details for the listing.

For now, I am linking up with Quilt Fabrication for the Midweek Makers Linky Party #324
Karin

Tuesday, 15 March 2022

Edge To Edge Quilting On a Sit Down Longarm

Finished putting my little owl quilt together and was wondering about how to quilt it. Did not feel like stitching-in-the-ditch (never really feel like that ), but was also bored with my range of allover meandering designs. Thought about just stippling over it, but felt that this was too boring. While I can do other allover designs, did not feel like concentrating that hard to do one of those more complex designs.

Well, after a lot of to and fro, decided to do an edge to edge design over it. You have to wonder though because that meant a lot more work, but somehow that is exactly what I felt like. Something more interesting that would keep me amused for a few days.

I love edge to edge designs and if I had a longarm on a frame I would probably do this all the time. The range and variety of designs that you can get is just amazing and they do look really good. For this little quilt I bought a new design from Urban Elementz called Cloud Nine -Petite by Patricia E. Ritter...easy peasy, just pay up and then you can download the design to print on your home printer. The only thing you really have to worry about doing it on a sitdown machine is to choose a fairly simple design, so that removing the paper does not become too much of a hassle.

I have done edge to edge designs on a sitdown longarm before...fairly work intensive as you have to trace the design to be put on the quilt and then quilt over it being left with removing the paper. I use Golden Threads paper for this which makes that part fairly easy, however it is still a lot of work doing it row by row. I trace the design on the paper using a blue water soluble pen as I do not want any unwanted marks on the quilt from a pencil or similar.

Starting off...there is the row of the Cloud Nine design


This photo was taken after the first few rows...you still can see remnants of the yellow Golden Threads paper (the blue meander thread is my basting - I do baste all my quilts before quilting). I do take out the paper as I go, however leave the majority of the last row for alignment of the next row. This quilt made alignment a bit easy because of the seams which I could check against every now and then to keep the rows as straight as possible. I could have saved myself some time in just tracing one row and then stitching through layers of paper with no thread in the machine to create multiple copies, however I prefer to trace the rows. That way I get used to the thread path which makes the quilting easier. You probably wonder how I attach the paper to the quilt...some people spraybaste the paper onto the quilt, which means you have to wash your quilt upon completion. I found a better solution for myself. I use inexpensive sticky glue dots...they stick to the paper well and hold it in place. They come off the fabric easily (when you remove the paper they stick to the paper) without leaving any residue behind. I do attach the upper side of the paper with pins, however that is the only spot that I use pins, because it is very easy to overlook pins when overlapping the rows which means you could inadvertently stitch over a pin (yep, learned the hard way). 

This did not take that long at all. I did 8.5 rows in total and am seriously happy with how this turned out. Love the design which just flowed well and was very easy to stitch out. Made even better with the Bernina Q20 stitch regulator which gave me some beautifully uniform stitches and very nice points. In fact, quilting a row was done in a couple of minutes as I could go reasonably fast, not having to worry about stitch length or anything. 

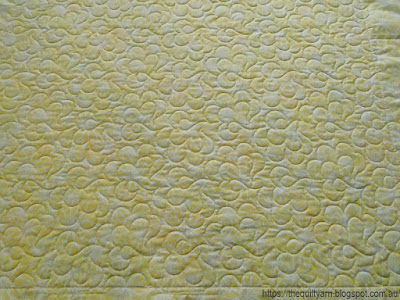
Next photo is a bit dark and the design looks a bit busy this way. I used a shaded orange Aurifil 50/2wt thread with hues of orange, orange-yellow and a lighter colour. It blends in just beautifully and all you see is the texture of the design.


Thrilled with how this turned out. Really like this design, so easy to stitch out and gives the most beautiful texture.


Karin

Wednesday, 10 March 2021

Edge to Edge Design On Sit Down Longarm

Working on finishing my 'Block Quilt'.

This is a new pattern for my Etsy shop. Will have the write up done in the next couple of weeks. Basically I constructed this one to again try an edge to edge design on my sitdown longarm. So once basted and secured around the edges, I was looking for a design.

First though I did some serious thread testing. I have got this variegated Superior Fantastico (40wt) thread and for the life of me I was going to use this on this quilt. Had some problems with this thread in the past and was determined to work out what this thread needed in the bobbin.
This is what that looked like...did little samples for days!
Problem also was that I have a purple backing...duh, did not think about thread colour  when putting this together. Usually people use Bottom Line in the bobbin for Fantastico thread. I have some Bottom Line spools and one cone, but unfortunately all in white to beige tones, so this was not going to be an option. Had read somewhere that it is good to pair a more grippy thread in the bobbin with polyester on top. Tried a purple Rasant thread but somehow I had some fuzzy stitching on the back. Not necessarily bad tension but some fuzzy stitches (as if the needle was damaging the fabric). Next I fiddled with Aurifil 50/2 in a grey colour...that could work but still had some fuzzy stitching here and there. Tried So fine thread and that worked very well. The strange fuzziness on the back disappeared mostly, however only had that in a sort of tan colour. In the end, I ended up using the grey Aurifil colour and with some fine tuning, including going to a different needle,  got the tension not perfect but way better than in previous attempts.
 
In the end I chose the same edge to edge design that I did about two months ago...Daisy Dotz#2 from Urban Elementz. Just love that one and thought it would be a good exercise to do it again (anyway that was my excuse).
Starting off...
I am using Golden Threads paper...drew the design with a blue water erasable pen on it and attached it with sticky glue dots which you can get in a stationary shop. That works like a treat. The glue dots adhere very easily to the paper and you can just stick this on your fabric. No residue...they pull off easily as you pull off the paper. Will also try to pre-stitch this design to make multiple copies in one hit as was suggested by a reader when I did this last time, as the tracing does get tedious as you go along.

Absolutely love doing this
The design is not too arduous in terms off getting the paper bits off and looks great. Wondering whether this might be a bit much in terms of looking a tad busy as this is not exactly a calming quilt. However, now I am committed and will just run with it. Remembered that I was thinking exactly the same when I did this design on another quilt.

Karin

Friday, 4 December 2020

Small Irregular Grid Quilt

I had fun with the little irregular grid quilt. After much deliberation I decided to do a fun edge to edge design from Urban Elementz, called Daisy Dotz #2


I had bought this a while ago from the Fat Quarter Shop to try out the printed paper sheets. There are 4 sheets at 48in wide in the packet. As I had another project in mind for this, I traced the design off onto my trusted Golden Threads paper. I have done an edge to edge design on the stationary longarm before  and spent some time working out exactly how I wanted this to be placed. With the printed sheets ready to go, that was fairly easy as there are 'helper lines' printed on and you also got the previous row as a ghost design to go by.
Here are some process shots:

Starting off...bit hard to see as I traced the design off with the blue water erasable pen (I am overly paranoid to transfer marks onto the quilt).
Stitched out the first row
I do not attach all of the paper  over the entire quilt at once. Just too awkward to hold and handle...I stitched this out row by row having studied the design and understood exactly how it aligns from row to row. In case you are wondering how I attached this...tried 'Sticky Glue Dots' for the first time! This worked an absolute treat...I attached the dots to the paper and lightly pressed onto the quilt. Had some anxiety as to whether they would be hard to remove from the quilt, but they came off incredibly easy with the paper. 
I removed some of the paper as I went along...this is really easy, all it needs is a little tuck diagonally across and the paper starts separating. The only thing you have to keep in mind when doing this on a sit down machine or DSM is to keep the designs relatively simple otherwise you are going to be there for hours plugging out the little paper bits that get stuck in the points. This design is 6 1/2in and was a delight to work with...nice sweeping lines and easy to remove the paper.

Finished this today and I must say, I love this simple design...looks great on my little quilt.
I used hot pink thread for this quilt (Aurifil 50/2), not my usual choice of colour! However I had basted this quilt before I started and used a hot pink thread for that (so I would see it easily). When I saw the thread on there, I just loved it and chose to do the design in that colour. Just had to be careful in the end taking out my basting stitches as it was basically the same colour.

Back of the quilt
How good does this look!

And my personal favourite
Could have been even better if I had used a higher weight thread. 

Very pleased with how this turned out. Linking up to Freemotion Mavericks over at Lizzie Lenard Vintage Sewing.

Karin

Popular Posts