Showing posts with label Freemotion quilting. Show all posts

Wednesday, 25 January 2023

Side Tracked Once Again - To Do Tuesday 25/1/23

I am absolutely hopeless when it comes to staying on task!

I was working through my list for the To Do Tuesday Linky Party when I got what I call the 'design bug'!

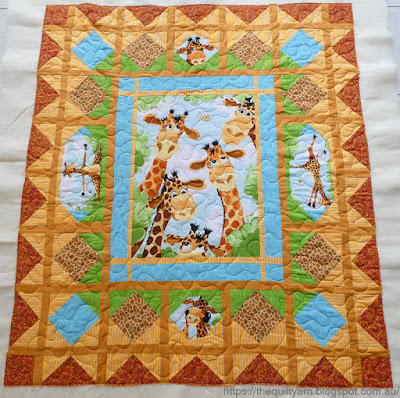
It started when I pinned and basted this cute little charity quilt from the Orange Tree Quilters Group. Absolutely fell in love with this even though it had a lot of very crooked blocks and was absolutely not straight. Loved the design and the colours they used. 

In looking at this I decided that I needed to do an allover design on this. Would have loved to do an edge to edge design but given this a charity quilt, this seemed too time consuming, so it had to be something that I could do freehand. Feeling absolutely bored with the allover meander, I thought some swirls and feathers would be nice and promptly made up a design that including both. 

So I started practicing
I am pretty good at freemotionquilting, but obviously muscle memory takes more than a few hours or even days...this was certainly a good reminder. No matter what I did, my brain would not allow me to freely travel across an area without getting lost as the swirls would constantly throw me into a direction where I did not want to be. It truly is a matter of sustained practice over time. However, as I was doing this over and over again, I noticed that I was starting to work out how to travel in one row...and that is when I truly got into it! Got my Ipad out and started drawing...

Over the next few days, yes days...I developed my own pantograph design
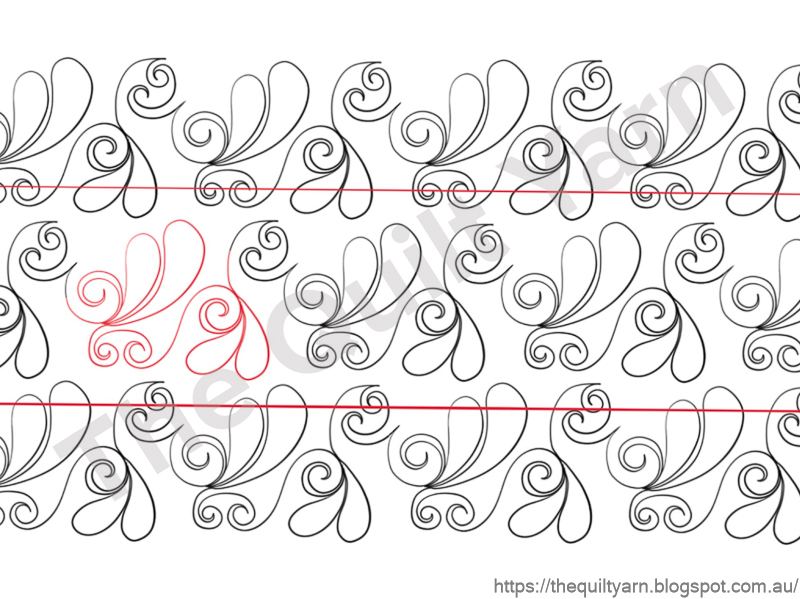
Why on earth did I do this...no idea, but I got hugely excited about this and felt like sharing that little achievement. The design itself is not finished...some lines need tweaking and my overlap is somewhat dodgy, so there are changes that will have to be made for it to become usable, but wow, this was a lot of brain teasing fun. I am planning to tidy that up over the coming weeks so that I am able to use this on one of my quilts. Very curious on how this will quilt out in terms of texture.

For my little charity quilt though I decided in the end to do an allover meander as I have got more pressing items on my list that need finishing and no joke...days had passed since I basted that quilt. Looking at it again I thought that the meander would be the best design to grab some of the fullness in certain blocks and distribute that around a bit and with the frequent direction changes in the design it did just that and it turned out beautifully. I do think that the meander design is severely underrated...such a good design to use when you have a bit of a disaster of a quilt in terms of the piecing. The alarming areas of fullness I had in some areas of that quilt do not feature at all after the meander and look all part of the overall picture. Definitely was the right choice!

Well, my tasks from last week were:
- to finish the pattern write up and put it up as a new listing in my Etsy shop✅
- to cut out the material for a new pattern ready to be constructed; the pattern is ready to go in EQ8, just a matter of putting it all together - partially done
- to pin and baste another charity quilt (I think I got two more to go in the bag that I picked up last year from the Orange Tree Quilters group)✅ 

So, for the coming week I have set myself the following tasks:
- to start working on a new pattern, i.e. get off the computer and do some sewing!
- to pin and baste another of those charity quilts and maybe even get it quilted.

Tuesday, 2 August 2022

Finishing off some Panels

Found two more panels in my stash which I am currently finishing off. Went through some of my fabric and needless to say, I got way too much fabric stuffed in every corner of the room. Finishing off the two panels I thought that I would get rid of meters of backing and use up some additional fabric for the binding. However as I am also looking at a new pattern I promptly ended up at the fabric store purchasing meters of fabric (colours that I did not have in my stash), so in fact I ended up with the same (if not more) amount of fabric in the cupboard. Can't win...

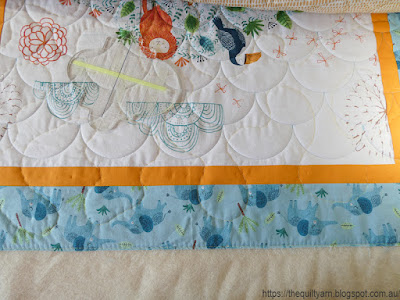
I am quilting the trusted clamshell design again on the panels. Really like the design for baby quilts and for me it is the most time efficient design to quickly quilt out. This time though I made it a bit bigger for the first panel as the panel has larger characters on it and I thought it would look a bit better if I went up by an inch.

For this I used Amanda Murphy's 5in circle template. Was interested to see how this would work at that size and also how I would go with not having the 'stopper' that is on the Multi Clamshell ruler.
The wadding for this panel is 60/40 wool/polyester and the whole thing felt really puffy and light weight when I basted it. Wondered how that would go with a bigger clamshell.
First few rows went without a hitch. I actually did not miss the stopping notch that the Multi Clamshell ruler has. As this circle is bigger I had to anyway quilt half of it, then change my grip to quilt the other half. Don't think there was one stop where I went over. The fluffiness of this gave me some issues though as the whole thing was extremely movable as I went along. I again used a drawing 5in circle to always mark my mid point of each clam after I finished a row to ensure that my row continued to be straight and in line with the one underneath.
Inaccuracies do creep in as you go along however. For me it usually happens when I need to turn the quilt and quilt the clams the other way. I don't worry much about it though as this is not noticable and you can fudge your way through as I have done in the photo below...a bit of a side step to get back to how it should be. Not ideal, but does the trick and unless you go looking for it, will not feature at all.
Coming to the end of a panel is always interesting as you then can see how accurate (or not) your rows have been. Was pleasantly surprised with this one as the last row of clams was 'spot on'.
Finished this in a couple of hours and looks quite lovely in that size.
The quilt feels light and fluffy...will put the binding on tomorrow and then it's onto the next one. And that's it...no more panels in the cupboard and the next quilt show is months away, so theoretically no  opportunity to purchase any more panels unless I go specifically looking for it. Don't know what it is with me and those cutesy panels.

Linking up to the To Do Tuesday Link Up by Texas Quilt Gal. As this is my first link up I do not have a list from last week...
For next Tuesday I would like to have the following things finished:
📌Attach binding to the above quilt and hand sew to back
📌Quilt the second panel and attach binding
📌If time allows, complete one more block of my Elizabeth Hartmann wall hanging

Karin

Friday, 29 July 2022

Minimal Quilting

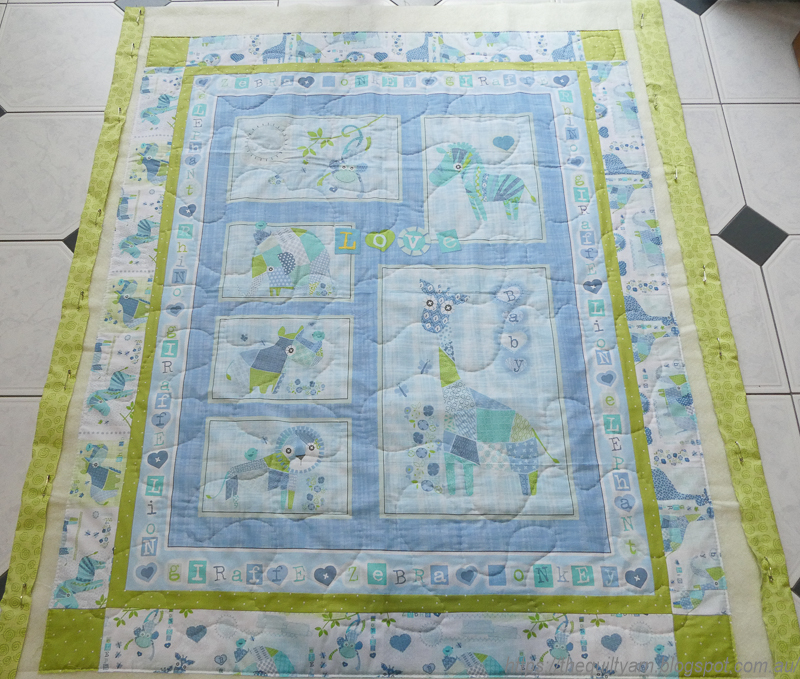
Working away on the charity quilts. Had two identical panels this time and did one with an overall meander. While this was straightforward and nice I just did not feel like doing exactly the same on the second panel.

So, I decided to do some outlining and stick with some minimal quilting. This proved to be quite hard for someone like me who quilts most things really quite densely.

First things first was the preparation. This is an important step to keep things straight which proved a bit of a hassle with this panel as the center section was slightly bowed out due to the borders having been added. Can't overstate how important it is to take your time...I do pin my quilts probably excessively and then I baste them on the machine with an overall meander.
This is a lot more work but has served me well over the years...never had a pucker and there is nothing that moves in unwanted directions. As you can see the quilt is very pale and when I meandered over the first panel the characters went under a bit, so that is why I decided to outline them on this one to emphasize them a bit, as they were actually quite cute. Was a bit nervous over outlining the boxes and how this would look in terms of straightness but went ahead anyway. Normally I would have outlined the characters and probably put some background quilting inside of those boxes and some sort of design in the sashings. However the brief for the charity quilts is not to over-quilt them which proved to be a bit of a challenge as you really had to think this one through in terms of consistent quilting across the quilt.

The batting is 100% wool which gives this a bit of puff which was nice for bringing out the characters.

Had to decide what to outline and what not to keep the quilting consistent over the surface of the quilt to leave similar areas unquilted. This worked quite well and was very relaxing as most of this was done freehand which I enjoy. Used a small straight ruler for the boxes which I also echoed. Discovered that there were words in the the second border which I did not realise before, just saw a lot of letters. You can't see this properly on this photo but I outlined every heart that separated the words to make that stand out a bit more...really quite cute. The blue sashing looks a bit puffy (is however perfectly flat when smoothed over) but decided not to quilt that down because if I did that then I felt that I would have to go full hog like quilt the background in the boxes, do the borders etc.
Probably not how I would have finished this off for myself but it is a very charming, cuddly quilt which no doubt somebody will love.

Karin

Monday, 4 April 2022

Background Texture

Currently doing Bethanne Nemesh' Breaking Boundaries class. It is as intensive as the Feather Fiesta class was that I have just finished with her. Very enjoyable and lots of learning and experimenting. She certainly packs a lot into those classes.

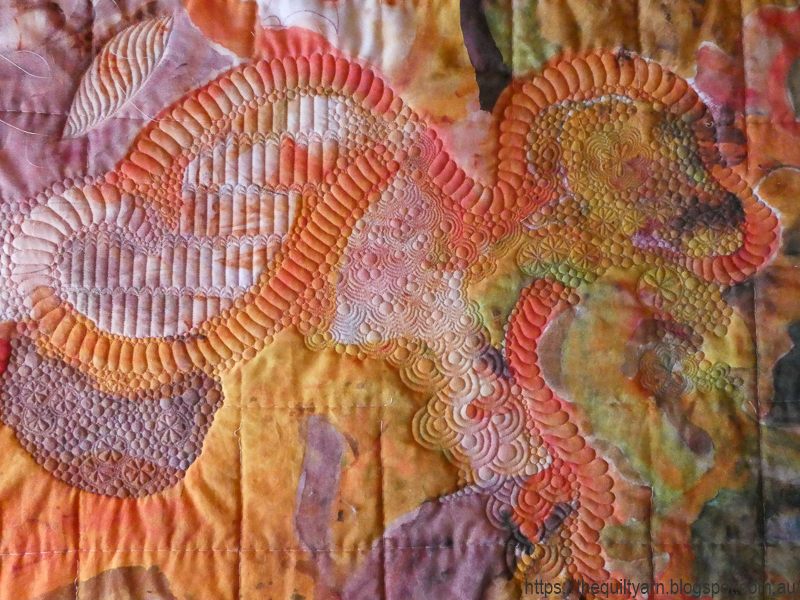
After a while I got a bit bored with my practice sandwiches and while I could have used the pre-prepared improvisational quilts, I decided to use a very colourful and interesting panel that I had in my stash. Yep, got majorly side tracked once again!

The panel is called Art Excursion by Denise Burkitt for Free Spirit Fabrics. 
It is very pretty with its vibrant colours and odd shapes. I was thinking that I may have finally bitten off more than I can chew. I started off with a loose plan to fill the wormy structures and then add backfill in the surrounding areas. Sounded easy enough but as I found out the transitioning is not that easy. As I go along I find that I start interpreting the fabric in different ways...new ideas emerge and the original plan has already been surpassed by impromptu decisions to do something completely different. Couple that with some unfamiliar background fillers plus stitching with 100wt Invisafil is making for an interesting journey. Bernina Q20 is behaving fabulously...I am using prewound decobobs in the bobbin and am stitching in manual.

Not entirely sure what this will look like when finished...I am hoping for an organic flowing picture over the surface that makes sense to me and the viewer (what exactly that picture is remains unclear at the moment) but I am also really aware that someone may look at it and see it as nothing more than colouring in a background. Very interesting exercise. So far I like the 'worms' best...seem to be able to do that for hours. The panel is quite large and I have heaps more to go with no firm plan anymore. Should be interesting to see how this develops. I am thinking that it could turn out to be a stunner or a complete and utter flop.
 
Linking up to Freemotion Mavericks at Lizzie Lenard Vintage Sewing

Karin

Saturday, 26 February 2022

Finishing Off and Starting Something New

It's been a while again...I tend to forget what I post and where, so some may already have seen pictures of some of these projects.

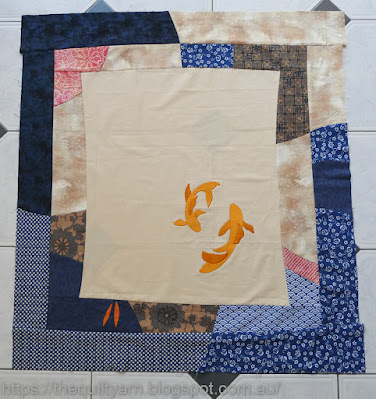
I finished my Koi wall hanging quilt top. Had to wait for some new applique foundation paper to arrive before I could continue. I had some Dupioni silk from my kit left and decided to make a second fish. This was somewhat nerve wrecking as there was not a lot of room for error. I had all these very small fins to make and turn the silk over so I was very careful not to stuff up as there was only just enough silk to make this one fish. Went very slowly and deliberate trying not to stress and it worked out fine.

Looks really nice, very pleased with it. The Breaking Boundaries class will start this weekend...should be great!

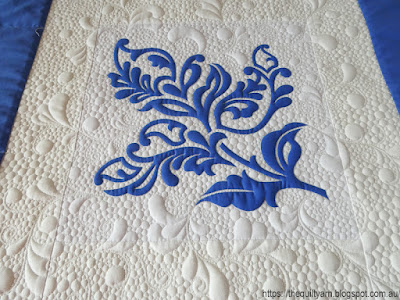
Also continued on my Nemeshing piece. As this is a lot of pebbles I did this over a couple of weeks, doing a little bit every now and then. It is hard to finish something when you know it has not turned out exactly how you had imagined it, however I thought it would be  good to finish this, so I would have a visual reminder of where I went wrong. 
I am calling this...'Pebbles with a Hint of Nemeshing'...as many of my smaller swirls have disappeared through the pebbling. Just did not make them fat enough and also thought that the double batting that I used was not the best idea. Live and learn! Will do some more feather practice in the blue border to finish this off.

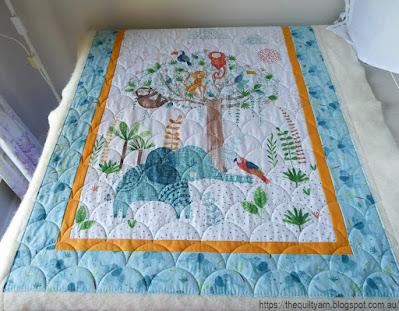
Then I started another Baby Panel quilt. Discovered that I have done this panel before but when I bought it obviously did not remember this. Had to laugh, as the whole time I was thinking that I really liked this little panel...no wonder, bought it before because I liked it then! The Panel is called 'Jungle Fever' designed by Rebecca Jones for Clothworks Fabrics.
Did my favourite design over it again the other day...clamshells with the HQ Multi Clamshell Ruler. Love doing this on baby panels/quilts.
I do not mark the entire quilt top to do this. What I usually do is mark the first 2 rows, in this case two lines across the width of the quilt top 2in apart. The largest clamshell of the HQ Multi Clamshell tool is 2in x 4in, I then quilt the first row and mark a little tick half way on top of each clamshell. Then comes the second row, making sure I hit that little tick mark as I go along. After that I do not mark the horizontal lines anymore as my first two rows should have laid the foundation for being pretty much straight. I do however, continue to make little tick marks on top of each clamshell as I go along to just double-check that my clamshell are centred correctly. 
As you go over an entire quilt there are inaccuracies that creep in which I think is unavoidable. A slight shift in the ruler can make your clamshell slightly smaller or a bit of sliding and you are a bit off centre. I do make small adjustments as I go along like lengthening or shorten some clamshells however do have an eye on whether they are remaining straight and centred on each other. It is always a bit of a surprise to come to a space in the quilt, like a seam or similar where you then can see how accurate you have been. In a panel though there is not much you can go by and the real test came right at the end with this quilt top when I hit the first border. You can see that the top of my clams (the added lines in there is my basting) are approximately half an inch away from the first border. Not every single one was exactly the same but overall this was looking pretty good. There is no way that you are going to perceive little inconsistencies when looking at the finished quilt. Happy with that...this will be a cute little quilt for my Etsy shop.
Now onto the binding and then I will concentrate on the Breaking Boundaries class.

Karin

Monday, 18 October 2021

Patience Corner Quilt Finished

This quilt is from the Orange Tree Quilters group. Initially I was actually a bit shocked by the loud pink squares, but after closer inspection, I must say that whoever put this together did an amazing job. If you look closely, the colour arrangement mirrors itself on the diagonal with the darker batik fabric running through the center. That looks so effective.


For some reason I have always associated the Patience Corner block with garden beds and thought it would be fun to put something a bit flowery in the squares. I quilted this with a deep maroon Rasant (40wt) thread visualizing that the center would look somewhat unquilted as the thread just blends in and in the "garden beds" on the sides I would have some flowers in it. Well, that is exactly how this turned out. Love it!

The quilting was done with a 5in Pro Echo ruler for the bigger squares and a 3in Pro Echo ruler for the black squares. It is quilted on the diagonal, i.e. quilting half the motif, moving over the black squares doing half the curves etc. from one side of the quilt to the next and then back again to finish off the curves and motifs. This way I could move over the quilt in a continuous manner which was much quicker than doing it block by block.

Some close ups


Really glad I tried this out, worked really well and was a very efficient way of quilting this. Many of Natalia Bonner's designs for her 9 Patch Quiltalong would be suitable for this quilt, depending on what fabric is used of course and how much time you would want to spend on this (many of her designs need some backtracking in the ditch around the block).

Linking up to Freemotion Maveriks at Quilting & Learning-What a Combo

Karin

Thursday, 14 October 2021

Patience

You have to laugh...I have been ditching away for the last two days on another charity quilt from the Orange Tree Quilters. I was going to try out my new Natalia Bonner Mini 4n1 ruler on an actual quilt but things never go to plan.

When I unpacked the quilts I picked up the other day, I saw that I got another Patience Corners quilt. Last time I did an overall Baptist fan which looked nice, but this time I wanted to do something different. Given I wanted to try out the ruler, I patiently ditched along all the seams...not my favourite thing, but I thought I may as well practice my stops and starts. After all these years, I am still burying my threads rather than just cutting them off like longarmers do.

The quilt is loud and very pink, but I was surprised how different it looked when I had most of it ditched. It really made those pink squares stand out. Very cool!
My practice of starting and stopping was really needed. The Bernina Q20 has a tie off function which I really like when starting off. You can set it so that the machine makes 4 - 5 stitches on the spot and then stops. It makes the most invisible and tidy tie off, however so far I have always buried the threads even with the tie off. This time I double secured my thread with some added tiny stitches and soon found that I was was able to just cut the thread off at the beginning. Stopping was a different matter...I approached this in reverse...tiny stitches, tie off and then had a look what that looked like. Somehow I could not get that right for half the quilt...when tugging on the thread, I felt that there was too much give and I often ended up burying them again. However, I finally got it and was able to just cut my threads off...looked fabulous on the back for most of it and given that I had the tiny stitches beforehand absolutely nothing became loose. This was a great help, otherwise it would have taken me double the time to complete, if not more. I really need to get used to doing this, saves so much time.

Then, finally I was ready to go on the quilt with a ruler only to realise my 4n1 Mini ruler (the smaller curve) was not big enough to get me to the center of the block. Doing my design with the bigger curve ended up too skinny. The square is over 4in...obviously did not try this out beforehand in my planning.

So back to the good old ProEcho rulers from Lisa Calle. Used the 5in Pro Echo curve ruler to give me the curve that I wanted and used a smaller one to do the curves in the black squares. I had to use the purple thread as the backing is a deep purple. Tried a hot pink thread with the purple in the bobbin but the pokies you inevitably get here and there were just annoying me. I don't usually stitch with darkish thread so this is also a bit of an experiment.
Might look a bit too floral, but will try this...could look interesting because it will go under in some of the squares and only stand out in the light ones. That could be a cool effect. Had looked at other designs but wanted something that is continuous as I don't want to backtrack or do the squares individually as that would take me too long. This way I can can travel along on the diagonal over the entire quilt.
Hmm...this could either look really good or be a bit much for the eyes. We shall see...

Karin

Saturday, 18 September 2021

Trialing A Cloud Design

Working on my next panel...Have it cut to size and was preparing a backing in order to baste this up but then discovered that my backing had tiny holes right across the middle in regular intervals right across the length of the entire piece. Only bought this yesterday, so it had not been lying around here. Looks like there was a label attached or something and that may have just been ripped off the bolt. Was not impressed.

So had to find another piece, wash it and was left with some time on my hands.

Decided to trial a cloud design with the Handiquilter Multi Clamshell ruler. Thought that this could look quite nice over a baby quilt. For this, I did mark a grid out as there is no way I can orient myself over two rows without having any reference points.

First tried the 3in clamshell. This comes out as 3in x 6in, so rather largish (the fabric is dark brown, however would  not photograph as dark brown as it is pretty overcast today and my sewing room is pretty dark...looks like I took a black and white photo)

...then tried the 2in clamshell
This is most likely the size that I will go with. Works well with the grid marked in and like the clamshell design... on a sitdown longarm or DSM, is a very forgiving design. Inaccuracies do creep in, but with the reference lines, I was able to do some fudging here and there and stay on track. 

Might give that a go on the next panel.

Karin

Tuesday, 23 March 2021

Natalia Bonner's 'A Year of Stars'

Progress
Finished all of the framework for the sashings and borders. I do not have a huge curve ruler (Natalia used a huge curve for her quilt), hence I used my Pro Echo #12 ruler to put the scallops into the border. That was challenging enough! In the end I just made it fit. Not ideal as the curves were slightly different all over, but in the end I doubted that this would feature much. Having done this, I  realised that my curves were too shallow for putting feathers in there, so I had to come up with something else.

Decided to put Ribbon Candy in there which looks very nice indeed. Ribbon Candy has become one of my most used designs. So very versatile.
Then I went on and filled the remainder of the border with Stacked Swirls.  Look at that texture!
This was a bit of work but I thought that this was the ideal piece to further practice the design.
Stitched this out in a day and today started to fill in the sashings of the first completed row with pebbles
That's it, will now wait to complete the next three stars on top of this row to fill in the next section (I am trying to avoid uneven compaction as I go along as that makes it harder to quilt your designs out. 

Karin

Wednesday, 13 January 2021

Freemotion-Quilting Again

Ahhh...after what felt like weeks on end, I finished my three quilt tops and am finally able to get back to what I love most... freemotion-quilting.

Made a start on my Natalia Bonner 'A Year Of Stars' quilt for the quiltalong that has commenced in January.  As I am not on a frame longarm, I have to secure my quilt with stitching in the ditch before I can start all of the ruler work. I did order some Monoploy thread on a cone which arrived recently and started with testing my tension.
I have a few blocks that ended up in the 'not so perfect bin' and I am using these for testing. On the Q20 I used a Universal 70/10 needle and Bottomline in the bobbin. I deliberately am using a different bobbin thread - normally I use Aurifil but I am a bit more in experimental mode with this machine and I have a few spools of Bottomline thread that need to be used. Had no issues really. The tension came in at 1.25 which was comparable to what I have read about on other owners' blogs. The testing did not take long and I was ready to tackle the stitching in the ditch.
I am using my trusted Handiquilter Ditch Ruler for this task. Must say that that ruler is one of the rulers I probably use most of all. It is just a good size for my hands and it has those handy notches that you can align on your seam. In the photo I am quilting on the right of the foot, but I often change over and also quilt with the ruler on the left side. Have not figured out which side is more comfortable for me. I think it depends how much bulk I am dealing with at the time, where the pins are and what the seam feels like.

How good does this look with invisible thread
I am using stitch regulation, so it is looking nice and even (except for those times when I wobble). Bit undecided whether to stitch in the ditch around the elements of the blocks with the invisible thread or to leave that until I go into the block for the ruler work design. I will do the ruler work with Aurifil 50/2 thread, probably in a light off white colour which would stand out a fair bit if I do the ditching in the block with that as well. On the other hand, I am unsure how much back tracking is involved in the ruler work, so I will have lines that will stand out more anyway. Will ponder on this as I go along. 

This was almost therapeutic! Tomorrow, no doubt, I will be whinging about the stitching in the ditch as I will get impatient to start the ruler work. Watched the first of Natalia's videos on YouTube and can't wait.

Linking up to Midweek Makers over at Quilt Fabrication.

Karin

Friday, 4 December 2020

Small Irregular Grid Quilt

I had fun with the little irregular grid quilt. After much deliberation I decided to do a fun edge to edge design from Urban Elementz, called Daisy Dotz #2


I had bought this a while ago from the Fat Quarter Shop to try out the printed paper sheets. There are 4 sheets at 48in wide in the packet. As I had another project in mind for this, I traced the design off onto my trusted Golden Threads paper. I have done an edge to edge design on the stationary longarm before  and spent some time working out exactly how I wanted this to be placed. With the printed sheets ready to go, that was fairly easy as there are 'helper lines' printed on and you also got the previous row as a ghost design to go by.
Here are some process shots:

Starting off...bit hard to see as I traced the design off with the blue water erasable pen (I am overly paranoid to transfer marks onto the quilt).
Stitched out the first row
I do not attach all of the paper  over the entire quilt at once. Just too awkward to hold and handle...I stitched this out row by row having studied the design and understood exactly how it aligns from row to row. In case you are wondering how I attached this...tried 'Sticky Glue Dots' for the first time! This worked an absolute treat...I attached the dots to the paper and lightly pressed onto the quilt. Had some anxiety as to whether they would be hard to remove from the quilt, but they came off incredibly easy with the paper. 
I removed some of the paper as I went along...this is really easy, all it needs is a little tuck diagonally across and the paper starts separating. The only thing you have to keep in mind when doing this on a sit down machine or DSM is to keep the designs relatively simple otherwise you are going to be there for hours plugging out the little paper bits that get stuck in the points. This design is 6 1/2in and was a delight to work with...nice sweeping lines and easy to remove the paper.

Finished this today and I must say, I love this simple design...looks great on my little quilt.
I used hot pink thread for this quilt (Aurifil 50/2), not my usual choice of colour! However I had basted this quilt before I started and used a hot pink thread for that (so I would see it easily). When I saw the thread on there, I just loved it and chose to do the design in that colour. Just had to be careful in the end taking out my basting stitches as it was basically the same colour.

Back of the quilt
How good does this look!

And my personal favourite
Could have been even better if I had used a higher weight thread. 

Very pleased with how this turned out. Linking up to Freemotion Mavericks over at Lizzie Lenard Vintage Sewing.

Karin

Tuesday, 15 September 2020

More 9 Patch Ruler Work

Block 3 and 4 of Natalia Bonner's 9 Patchalong
This one was a beauty...continuous line design, always looks great. Of course, mine was not entirely continuous as I got confused. I am certainly learning a lot in terms of thinking through your stitching path before you actually have a go. I made myself a little folder on the Ipad with these blocks and an accompanying stitching diagram, because no doubt, next time I look at it, I will have forgotten how it goes. 
My accuracy is definitely improving and I am finding the ruler work increasingly easier. The stitch regulator on the Capri is a big help as I can focus in on the stitching without having to worry about the stitch length. 

The next block was interesting
Lots of straight lines and again some concentration was needed to follow that stitching path to make it a continuous design. Easy to execute and looks also good when only stitched in one direction.

Today then I tackled the border. Followed Natalia's suggestion of stitching a loopy design above the scallops, however then encased this with a wiggly design (Natalia cut her border off past the loopy design which I did not want to do). I used the HQ Wiggle Wave ruler for this exercise
This ruler is fast becoming my favourite wave ruler. 

The ruler makes it very easy to fit your waves into the border. All I did was measure my border and determined how many repeats I will fit into the border. On the long side I was out by half the repeat. If you look on the ruler, half of the length would have ended me up on a high point in the corner which I did not want, as I started on a low point. In order to end on a low point and make the corners look the same, I then needed to reduce my waves by 3/4in across the length of the border. I normally struggle with this when drawing out a border, but with this ruler I find it is quite easy as long as you keep track of what you are doing. So, as I am stitching along the wave and stop in the valley or a  high point, I shift the ruler by about 1/4in to elongate the curve, 3 times before the center and 3 times after the center. Without fail this works a treat and I arrived smack bang at a low point in the corner, making my corners appear identical. The only marking I did was an approximate position of the repeats so I knew I was on track as I was stitching along. I could, of course, have chosen a different starting point for the corner, however I thought it was safer to start at the beginning of the repeat as I get easily confused with these things. Maybe next time I try a differently shaped corner by starting on a high point or somewhere in between.
 Anyway, more ruler work coming up in the border. I am thinking of going around it one more time with a piano key design...not sure yet what width though or maybe a pinstripe arrangement. We'll see.

Thoroughly enjoying this quilt along.

Karin

Wednesday, 26 August 2020

9 Patchalong With Natalia Bonner

Where is the time going...

I finished my Lana Lemur quilt and now am working on a nine patch quilt for Natalia Bonner's 9 Patchalong. This is going to start on 1st September  with Natalia showcasing new designs using her rulers every Tuesday and Thursday on YouTube. There is a FB group you can join to showcase your work and have a look what others are doing (already there are a few variations on this quilt top).

I am stitching along with a friend to further hone in on my ruler quilting skills. I think so far I have done about three ruler practice quilts, trying out different rulers and techniques. Find this very useful in terms of just focusing in on accuracy and how to hold a ruler for best results. 

So, I managed to get that quilt top together and am currently stitching in the ditch with a straight ruler.
I am using clear Monofilament thread in the top and a prewound in the bobbin. The Capri is behaving nicely and I am practising using the stitch regulator for this task. Must say it really makes a difference in how this looks on the back of the quilt. Quite impressed with that...looks so much neater compared to when I do this task in Manual mode.
I am looking forward to this stitchalong. Natalia's designs are always very straightforward, but quite clever in the way she uses them to dress up blocks in a quilt. While I do not have her rulers, I think I have enough rulers to match what she is doing on the quilt, basically using a straight and a few curved rulers. Already Natalia has posted designs for the sashings and the borders which I do quite like, particularly the scalloped border design. Looking forward to this.

Linking up to Cheeky Cognoscenti for her weekly Long Arm Learning Linky Party.

Karin

Thursday, 13 August 2020

9 Patch Along with Natalia Bonner

I am working on my quilt for the 9 Patch Quilt along with Natalia Bonner which is set to start on 1st  September.
Blocks are almost done, now I only have to do the sashings and border, and insert another row of 4in blocks. You could have ordered a preprinted panel from Honest Fabric, but with shipping costs that was not an option for me. Luckily this comes together quickly which was half the attraction. I had been watching Natalia's YouTube series of Let's Stitch - a block a day over the last few months and was impressed with the range of designs she has come up with for 365 days in a row!  Unfortunately I did discover that QAL sort of half way through and  had too many other things going on to participate. So when I saw the announcement of the 9 Patch Along I jumped at it. I love what Natalia does with her rulers. Very straight forward and clever designs that will fit a range of quilts.

The focus of this stitchalong is Natalia's 4-N-1  and Inside Out mini rulers. While I do not have those, I have enough curves and straight rulers to substitute and use this quilt for practice. Should be good fun and keep me busy with another two projects on the go.

All in all there are going to be a total of 9 video lessons on YouTube. Those are free and anybody can join. A big Thank You to Natalia...incredibly generous! 

Looking forward to this...

Karin

Wednesday, 29 July 2020

Lana Lemur Quilt Continued

Well, it's been a while again. After a somewhat rocky start on the quilt, I am now on my way
This is going to be much harder than I imagined. I am following Claudia Pfeil's demonstration in one of the classes that was shown on The Quilt Show. This class is available as a DVD called 'Claudia's (P)Fillers. In the class, Claudia is demonstrating how to create fillers effortlessly using her longarm machine, going from one to the other using pebbles, lines and other geometric fillers.

It looked so easy! When I finally started it, it was not quite that easy and I am breaking thread much more than I should, however I need time to think and just 'going for it' did not work that well for me. Claudia uses the Greek key pattern as one of her fillers. While I can do this, I had problems as soon as that shape hit another shape...just could not think that through and started to make very odd and ugly lines. In the end, I decided to use the echoed spiral filler. I can do this in my sleep and am more used to it hitting other shapes with that. So far, so good!

I think I will add another filler to the mix to loosen the whole thing up a bit otherwise I am going to get super bored with this and I also think this is going to get too dense. I was thinking that I will include areas of just meandering boxes which should be in nice contrast to the swirls and frilly work.

This is going to be interesting. I am not good at doing improvisational work and my lack of planning is giving me some kind of anxiety. Also including some ruler work in the circles which has been fun so far. Great learning for me! 

Really curious whether this will work out. If it does not I will have to make another Lemur quilt! Just too cute.

Karin

Saturday, 11 July 2020

Little Doilie Project Finished

This was a lot of fun to do...it’s the first time I tried this and must say, I really enjoyed this. Got the doilie from the local Op shop for a dollar and placed it in place with spraybasting. Not quite round, but close enough.
I ran out of ideas for the delicate border of the doilie, so left that alone. If I had stitched that down I think it would have turned out too flat. Could not resist though and hyperquilted a little bit in the feathers, then decided that that was enough.
If you have read my previous posts, I used Bethanne Nemesh’ Lily Line ruler 3 for the frame around the doilie. The frame turned a bit into an overall background fill, but I like it. The ruler was an incredible time saver and the design was easy to execute (once I had decided on which parts of the ruler I was going to use). Fantastic tool!

Had a few issues with my tension for the pebbles on the new Capri. Lots of flatlining and cursing. I used Aurifil 50/2 for the quilting and similar to the Sweet 16, the thread behaved quite fiddly. I recently purchased the horizontal spool holder and ended up putting the almost empty spool on that, this time threading the thread straight down rather than looping the thread around the thread guide (as you are
supposed to do)...and to my utter surprise, no more tension issues! Have long suspected that the fiddliness of the aurifil thread has to do with the thread path rather than the tension setting. Will do some more testing around this...tried it the other day with a different colour thread, but with the spool on the ‘normal’ thread mast, again threading the thread straight down the thread guide and again had much better tension. Go figure...

Karin

Popular Posts