Sunday, 29 January 2017

Progress Notes

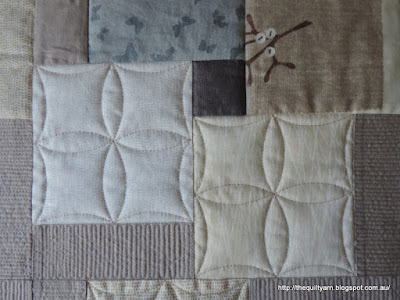
I finished my ruler work on the Field Guide quilt. If you are following my blog you would have seen that I recently purchased the Clarity Ruler foot from Accents In Design

I will not go on about it in this post...Please see earlier posts HERE and HERE for some information about the Ruler foot. Suffice to say that I LOVE it! It is easy to attach and most importantly stays on, easy to adjust and best of all, it is 'see through', so you can see very clearly where you are going.

My quilt had laid dormant for a good year and while it was not the easiest to practice on I did muddle my way through the gazillions of squares that needed to be filled in. Some look great and others, well, not so great! The important thing for me was to get a grip on eyeballing the 1/4" distance and aligning the ruler correctly and practising quilting with a ruler. I very early figured out that going behind the ruler foot with the ruler is not my thing and followed a particular path that I then did over and over again...with time and more squares, this got easier and I also became a lot faster at completing them. Put a few safety steps for myself into place;
- foot off the pedal when aligning the ruler to prevent accidentally coming down on the ruler; once aligned, lower your foot and move against the ruler
- ruler out of the way when bringing up the bobbin thread to start quilting, and
- not pressing too hard against the ruler foot when following the curves.

As mentioned before, had no issues with thread breakage or tension issues, in fact the stitching quality is really good.
Now I only have to finish the lines in the light-brownish rectangles
Who's brilliant idea was this?? I continued on this the other day and am going through the lines with some speed. This quilt just needs to be finished. Not one of my better works, but too nice to just have lying around as a UFO.

I did do a lot more playing around with the Ruler foot...definitely like it and can highly recommend it. Last year when playing around with rulers I was definitely less sure about quilting with rulers, but I must say this new foot has definitely given me confidence in terms of including some ruler work in my projects.

Karin

Wednesday, 18 January 2017

Clarity Ruler Foot - Impressive!

I have been quilting with the clarity ruler foot from Accents In Design for a few weeks now.
To practice I chose to continue on my Field Guide quilt which has a continuous line design in it. Given that the lines had to be marked, it came to a complete standstill. As I have a little arc ruler I thought that I give that a go, because that meant minimal marking, i.e. only a center mark and then four dots halfway on each side of the block. The block measures 4 1/2" and my arc ruler is a small 4" arc ruler. This meant that I had to eyeball the alignment of the ruler.😬

Probably should have started with something a little bit easier as my experience with rulers is limited. Not only did I have to eyeball the distances but also had to deal with a rather puffy quilt under the machine. Can't really give any specific suggestions other than that you need to try and work out what works best for you. In my case I decided on a particular path which meant that the ruler was always in front of the needle or on the side of it. Even though I could have stitched behind it, I decided rather quickly that that was not going to work for me. Started off rather wonky but got better with time
as I experimented with where to place my fingers, how to hold the ruler and how to eyeball the 1/4" distance. Needless to say the first few were not that good, but I noticed improvement after a while. Had to laugh though...had definite trust issues with the ruler. Spent a long time aligning it and finally stitching my line, only to shift the ruler in the last minute thinking that this can't possibly finish at the point it was supposed to. Well, the ruler was never wrong, but I frequently was!

In terms of settings on the Pfaff QE 4.2:

Needle: Titanium Needle 80/12 (have found that Titanium Needles work better with the ruler feet in general...no idea why)
Thread: Aurifil 50/2
Tension: as usual 3.8
Needle position: +1
Mode: Springfoot Freemotion

Here are two of the 'improved' examples
Some misjudging of the arcs going on, but overall looking nice and tidy. Also found this to be getting quicker.
Only a quarter of the squares left on the quilt...

I am very impressed with this foot...had no issues at all with tension or skipped stitches and after 2 weeks of continued use, this foot was still securely attached. My Westalee foot had the habit of falling off after a while...probably from the vibration of the stitching and that was most annoying and irritating. Had to take the Ruler foot off the other day as my daughter wanted to stitch the hem of her Jeans and today attached the foot again...curious to find out how easy it would be to re-adjust the foot to its exact setting. Well, happy to report that this was no problem at all. Attached the foot, lowered it and then only had to make minor adjustments to get it exactly right. Very easy.

Apart from this I have been working on my drawing for the Wholecloth
Almost done, just need to go over it with a darker pen. I am even thinking that I could use the ruler foot for some of the straight lines...I do feel confident with that by now. Maybe even the arcs following the drawn line...we'll see.

Karin

Monday, 9 January 2017

2017 Finish-A-Long


Finish-A-Long 2017

Can't believe it...the 2017 Finish-A-Long is here. This worked well for me last year, at least for the majority of the year. Lost the plot a bit in the end and forgot to link up for the last quarter. Did actually finish one of my quilts that was on the list for the last quarter.
Overall I did very well and finished a number of projects over the year that otherwise would have lingered on...
So, a new year and a new list...this event is run by several bloggers all over the world. If you want to read up on it HERE is the link to one of them, Rhonda's Quilt Ramblings in the USA.

My list for this first quarter includes the following:

#1 Bird On The Wire Wall hanging

Made a great start on it end of last year to practice some free flowing feathers learned in a workshop with Bethanne Nemesh

Loved doing the feathers but got bogged down in filling in the background. This is taking me forever...hoping to get back into it!

#2 A Field Guide
Embarassing...for the second year on the list...really struggling with this. However got the new Clarity Ruler foot and am making some progress. This quilt was the  reason that I ventured out into exploring ruler work on a DSM and I have been experimenting ever since as I wanted to speed up the process of marking the continuous lines into the squares, i.e. less marking and more stitching.
The new Ruler foot is working very well indeed...however I must say, I might have wanted to start with something a bit less ambitious as it is one thing to quilt something on a little practice sample to practicing ruler work on an actual quilt. I am about half way through and will report on the experience in a future blogpost. So far, so good...really hoping to finish this quilt.

#3 Wholecloth
In the design stages, so this entry will probably not count, however this is by far the most time consuming element for me
Hoping to tidy up my center design and to finalise my draft, so that I actually can make a start on this. Also am struggling at the moment to decide what fabric I will stitch this out on...have some silk, however cannot come up with a decent way of marking this and am currently thinking of reverting back to just cotton fabric.

#4 Thousand Pyramids quilt
Absolutely no progress made on that one, so hoping to at least complete as many units as I can in the 3 months period
So here is the plan: finish the Bird wallhanging and do as much as I can on the Field Guide quilt. At the same time, work on the design for the Wholecloth and hopefully in between also do some more of those triangle units.
That is probably all I will be able to achieve in the next 3 months.

Linking up to Rhonda's Quilt Ramblings with my list. The linky will be open until the 14/1/17 and the finishes linky opens on 26/3/17.


Karin

Monday, 2 January 2017

Clarity Ruler Foot

Very excited...my new Ruler foot arrived from the US. This is the Clarity Ruler foot from Accents In Design
 
 
Completely 'see through' and comes with a little washer. The washer is optional and did not fit my machine (Pfaff QE 4.2) but as it turned out I don't seem to need it anyway. I attached the foot with one of my bigger screws from another foot I have. This was simply because the screw is easier to attach. The normal screw fits just as well. Attaching the foot was easy...you just follow the steps of the enclosed pamphlet and presto...
Here is the foot attached (excuse the crusty mat...I definitely need a replacement as you can see). In terms of adjustments there are only two things that you need to do 1) lower the ruler foot until it just glides across your quilting top and 2) center your needle in the middle of the foot (on the Pfaff 4.2 the needle setting was at +1). And then it's time to try this out and make sure that the stitching is right. Here is the extent of my adjustments
I am including this to show you that it does not take that long to get the setting right...for me it was mainly making sure that I had the foot at the right height, particularly when going backwards. The Pfaff machine can be a bit finicky going backwards and once the backward stitching had no skipped stitches, I had the adjustment right.


Next I stitched this out
Love this foot! It was so easy to stitch with some precision due to the 'see through' nature of the foot and this example brought this out beautifully.

Getting a bit sick of always stitching out practice pieces I decided to finish off a little something that I had lying around for a while. When making some baskets from an Accuquilt pattern I had these beautiful 4" batik squares left over. I had sewn them together with some sashing not really knowing what to do with them next...perfect to practice some ruler work on. This will now become a little mat for the cat.
I first stitched-in-the-ditch all around the squares with the straight Accents In Design ruler. Never done that before...this worked fantastic and was a real time saver. Really enjoyed doing this...

 As you can see I tried some other rulers out on this as well from the Westalee range. Now, this is not recommended by the makers of the ruler foot as they are thinner in height and I certainly would recommend caution with this. However as these rulers are out there, people will try this...I think it is easier when you have a thinner batting like I had on this piece as there is very little chance of the ruler slipping under the ruler if you watch it and be very aware of the damage that you could do. So in doing this I went very slowly and was very careful. Also got in the habit of aligning my ruler foot first against the ruler where I wanted to start to stitch, then flicking the ruler out of the way, taking the first stitch to bring up the thread, securing the stitch, needle down and only then re-aligning my ruler against the foot again. This acted a bit as a safeguard to avoid accidentally bringing the foot down when the ruler was in the way.
Overall I must say that I preferred the Accents In Design ruler because of its height and the handles that it has got. I might have to look at getting some thicker rulers for this foot.
Anyway, I had some fun with trying this out...my only problem was my inexperience with rulers and reading the lines correctly. For the life of me, I did not seem to get the alignment right most of the time and also experienced the ruler slipping away at times...but that is just practice. The foot itself is brilliant...you can see where you are going and the stitching itself felt effortless...the foot also stitches beautifully without the ruler, so that you can fill in areas as you go along. Backstitching in particular was easy with this foot. I really liked it.
I then went on my quilt...you know that one that has been sitting around for a year. Was curious on how difficult it would be to use the rulers on that.
I am not going to say that this was easy...it wasn't! The difficulty though was not the foot, but rather  the alignment of that little arc ruler that I have, as I had to eyeball the alignment and I am really not used to that. Also had to work out a way of stitching this out so that the ruler was where I could actually see it. Also, this is quite a puffy piece, so I went extra carefully along...worked well actually, only had a few wonky stitches here and there when the ruler was moving away or I inexplicably did not follow the ruler.

Overall impression...really like this ruler foot...I can see better where I am going and the foot has a similar feel to my other FMQ feet, so the stitching feels quite natural. I had no issues with adjustment whatsoever, however, in fairness this might also have been because I already fiddled for a while with the other ruler foot I have, hence already had a sense of what I needed to adjust.

So maybe now I will complete this quilt...those continuous curves look great, however they are thinner than the ones I had marked in by hand, so this will be fairly noticeable as I already had done one third of the squares...well, I decided yesterday that that cannot be helped...if I wait until I marked everything this will never get finished.

Karin

Popular Posts