My goals from last week
- hand-sew the binding to the backfiller project and create a hanging sleeve (otherwise this will end up in the cupboard) - almost done!
- finish the sock!❌
- pin and baste the Australian christmas quilt.✅
Not super productive this week, but some learning occurred! Also finished another three cat blocks which for some reason was not on my list.
I pinned, basted and quilted that blasted Christmas Panel quilt. The panel is called 'Bush Celebration' design #DV5394 in the Devonstone Collection. I bought a new pantograph design from Urban Elementz called 'Ginger Snap' by Apricot Moon Designs. The design is large (8in) , so I mucked around with reducing it in size to a level that was comfortable to do on a sitdown machine. You absolutely can asked Urban Elementz for a different size for a small additional fee, however I absolutely had no idea what size to go for and also wanted this design for another quilt, so possibly was looking at a number of sizes. In addition, I am a very visual person and needed to see the different sizes.
Not necessarily great for a Christmas quilt, but I did not want to get a Christmas design which I would only use once or twice and the Ginger Snap appealed to me as I can use that on many different types of quilts.
So I made a start with the design reduced to about 6 in.
As I suspected, not that easy to keep consistently round even though I am following a drawn line. I possibly could go a little big bigger but definitely not 8in. I think I would start to struggle to keep going on those drawn lines. Loved the look of this and got excited about it, however...
...did not like it on that christmas quilt
As you can see took me a while to get a really good picture of that and I was ho-humming for a while whether to continue or not. In the end I decided to take it out. Just was not the right design. I felt that the playful design created additional busy-ness and was somewhat just wrong.
So I took it all out which took hours! Then I steamed that section to get rid of the stitching marks and lo and behold the iron spat out some brown gunk all over the section! Lucky for me all that rinsed out with cold water and also helped with making those stitching lines virtually disappear. I noticed that I got rid of my basting and put that back in once it was dry. Not ideal and I did make a mental note not to remove basting stitches in the future until I am definitely finished (as this caused some additional problems in the end).
In terms of design I was by now over it. Knew that I needed a calm repetitive pattern, so went with the clamshell design and finished this today.
This was not as easy going as it usually is. The batting is wool, so fairly soft and a little bit puffy. Had some issues staying on track as this panel does not give you a lot of points where you can gauge your alignment. Felt like I was going a bit blind and am actually a bit surprised that this looks fine as I was definitely out of alignment a number of times. Then when I had finished my last row, I flipped it over and wow...two clams had puckered in the last row and another clam had a pucker in the row below. I reckon this was the result of me re-basting it after I had rinsed it. Well, undid the last row and the pucker underneath, took my edge stitch out and re-did all that and finally finished this! What a saga! Looks good though with a calmer design.
On a more positive note, I did play around with the ' Ginger Snap' design in the week as I want to use that for my emerging cat quilt. I did look for cat related designs, however many of them are fairly involved, i.e. have lots of smaller elements which would be too tedious as I am stitching this out with the use of Golden Threads paper. I needed something simple that makes it easy to remove the paper. The Ginger Snap design also comes with different elements inserted, like flowers, hearts, stars (then called Ginger Flowers/Hearts/Stars etc) so I decided to insert a cat paw into it. Spent some time drawing out a decent cat paw in one of my drawing programs, then substituted the circle of the design with the cat paw at an angle. Stitched out (a bit roughly) two different sizes, one at 6-1/2in and one at 5-1/2in.
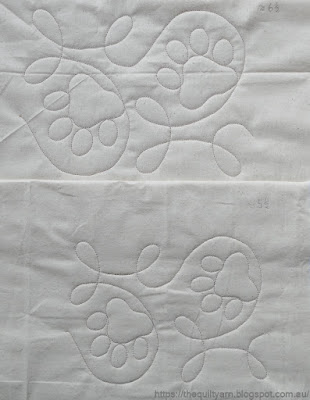
Stitched out really well and actually was easier than doing the circle. I reckon I probably can go a bit larger in this as I do not have to be so consistently roundish. Really cute and will be great for the cat quilt. Now I only have to fine tune this a bit in terms of size and my drawing (I think one of my claws is angled a bit weirdly), but definitely do-able.
So for the remainder of the week I am planning to
- finish hand stitching the binding on the backfiller project.
- cut and prepare the binding for the Christmas quilt and attach it to the quilt.
- (OMG) finish that sock!
- make another 3-4 cat blocks
- decide which project to tackle next (this could be dangerous...definitely do not start another project before finishing what's on the list!)
- get back to my Etsy shop and prepare for Black Friday sales as well as thinking about a new pattern.
.png)


 These were supposed to be quick throw together projects...took me quite a while to finish this of as they got bigger and bigger as I went along. However I was really pleased with my efforts as I only used scraps to complete the quilt tops and fabric from my stash to construct the backings. Even pieced together some wadding for one of them, so absolutely no money spent on these quilts.


