Wednesday 28 February 2018

Wholecloth Quilting - Laying Down The Groundwork

So you got your fabric and your design...what's next?

Actually a fairly simple but hugely important step. You will need to iron your fabric and mark in the crosshairs. I usually do that with the iron first
It is very important that this is correct as your whole design is based on those simple lines. See my marker...I have decided to use the trusted Sewline Chalk Pencil. If you are like me you probably have a variety of markers. It pays to test them out beforehand. I had another chalk pencil where you could wipe the line with water and it disappeared. Next day though the lines were back, even after a second rinse. So that was too dicey for me. Then I got another pen that has a liquid chalk tip...nice to use but am always a bit skeptical when you can remove the lines with heat...means that there is some chemical reaction that makes the lines disappear. So in the end I settled on the old Sewline pencil. Obviously if I was using light fabric, I would use the common blue water erasable marker...tried and tested to work well.

Once the lines are ironed in, I mark them in
And now for the fun part, marking in the framework. I used Cindy Needham's Ultimate Shape for this part of the marking process.
First hiccup...I had a half inch line next to the border. Somehow over the distance of marking with the stencil, inaccuracies must have crept in (or my measurement of the center might have been out) and I only got 1/4in clearance. This was not what I had in mind but decided that this was the new design choice and pressed on. I also marked the half line in the border as I know from experience that I am going to struggle later on with finding the half point...once it is all quilted I will also have some compaction, so I thought it is better to mark the border as well while I was at it. This took most of the afternoon. Then came the basting. I could have used spray basting, however last time I did this I had to wash the floor twice as I had ended up trampling the sticky stuff all over the place. In hindsight though, maybe that would have been the better choice. Definitely would have been quicker!
Anyway, I always pin baste the wholecloth first and then baste all over it with thread to avoid any shifting of the fabric.This takes forever!
My lines have softened but are still relatively easy to see. Once I work out how to approach this in terms of stitching path I will lightly strengthen the lines with the Chalk pencil as I go along, if that is what is needed.
Must admit that I am having second thoughts about this as I am going along. This looks so involved and I am wondering whether I can actually pull this off. I am planning to now stitch the framework using my straight and arc ruler. This sounded ok on a theoretical level but looking at all those lines now, I am beginning to wonder whether I have bitten off more than I can chew.

Will keep you posted 🙀.

Karin

Sunday 25 February 2018

Wholecloth Quilting - Where To Start

Where do you start.

I wrote a post last year on what goes into the preparation for a Wholecloth. Currently thinking of doing a number of posts on the topic of wholecloth quilts to demystify the process.

First and foremost is planning. I spend an extraordinary amount of time on planning these projects given that I am going to spend the next few months on this one project. Once it’s basted and you are stitching there is very little you can do to alter your design or re-draw sections. Trust me, I tried...it becomes incredibly messy, is very unlikely to work and you will be in a world of pain.

Personally I like to see a picture of the Wholecloth before I start. This can be achieved by drawing it out on paper (or sections of it) or using the computer. I tend to use EQ8 or my Serif Drawing program. No consistency in which I use, whatever suits the design I will use. For the current Wholecloth I used the EQ8 program, as I am using one of their stencils. I printed the stencil out and then put it in the shape, photographed it and imported this back into the EQ8 program to make into a block. This is how I started off to just have a bit of a look at the overall picture. As I liked the design I then found the shape I was looking for in the block library and placed my stencil into it.  Then I just explored different settings and arrangements until I liked the look of it.

I did a lot of playing around with this...different sizes, different arrangements and different colour ways (EQ8 has a whole range of Aurifil thread colours in their thread library). Love the EQ8 program as it is fairly easy to move things around (although I am still getting used to the update) and get a good look at the end product. In addition I find it very useful in looking at dimensions, i.e. how big should my motif be in this arrangement. If you make it too big it is going to look too busy and crowded, if too small it is going to create a problem in terms of the surrounding open space.

Alternatively, if you had a motif that you liked and wanted to put it into a cathedral window shape, you could draw out your cathedral window and trace your motif into it or, even easier...


...you can use Cindy Needham's Ultimate Shape stencils which makes that job superfast. All you do is mark your shape and off you go...


My first attempts at this from last year with the feathers oriented in different ways. I made some photocopies of this initially and cut out the squares to see what I liked better

After all of this I started to stitch out the motif and surrounding plumes to get a bit of a sense how this would work, i.e. will I work freehand, use rulers, trace the motif? Also trying different threads and  batting, getting a bit of a feeling for the design. Stitched this out about four times and noticed that I needed to do a little bit more work on aligning the motif. Went back to the EQ8 program and edited the motif, drawing in some diagonal lines for alignment in the center. Also adjusted the size of the motif just by a tad to allow for a bit more space around the curve.
As I am stitching this on very dark grey (charcoal) fabric, I am thinking that I will only use minimal marking as it is much harder to mark with the white sewline chalk pencils. Decided to use Cindy Needham’s Shape Stencil to get the framework down, then use rulers to stitch this out. The curve of my ruler does not magically correspond with the Ultimate Shape, however this does not matter as the Ultimate Shape will give me the points to align my ruler. The curvature of my ruler will be slightly bigger than the Ultimate Shape curvature (hence I had to do some adjusting of the size of the motif in EQ8). The motif will most likely be pounced using Golden Threads paper.
The feathers....unsure...don’t feel like marking them in, but will need to think about consistency. Probably will do some semi-marking, i.e. just lightly draw in the tops, so I can follow this and have the same number of plumes on each side.

Next step is to draw this out on my trusted IKEA paper (love that paper roll) using Cindy Needham’s stencil to align the motif, draw in the plumes...
You can see that my ruler is slightly more curved than the shape. This is only a rough copy...as I am not tracing off this, this is good enough to give me an idea of how this will work. Yesterday then I tried out a number of different markers, but decided in the end to stick with the one I know...the Sewline Chalk pencil. All I need to do now is to draw in the shape across the quilt top and I am ready to go. So I thought 😆 Discovered today that my fabric width is not wide enough, hence had to extend the center by adding on individual borders. Not what I had in mind, but so be it. Given that this piece will have a very distinct border, that all fits.

This will be a busy Wholecloth with lots of individual stops and starts, so a busy backing fabric is in order.

...and this is only the beginning! If you are thinking this is a bit obsessive, you are absolutely right. However, I have learnt my lesson of being unprepared in the midst of months and months of stitching when you arrive at the point of...hmmm, that does not work...not a good feeling, let me tell you. Thinking about writing a bit of a series on Wholecloth quilting. Let me know if you are interested and/or have particular questions about the topic. Not that I am an expert, but I obviously have done a lot of learning over the last few years and thought it might be helpful to share some of the resources or point people in the right direction.

Karin

Friday 16 February 2018

Patsy Thompson's January 2018 Ruler Work Winter Course

Running a bit behind but I finally managed to knuckle down and finish the last 2 lessons of Patsy's free online workshop. The end result is stunning of course as I have followed Patsy's design pretty closely to have a sample of the lessons that we have done over January.


Just need to bind it now and then it is done.

Really enjoyed this workshop...if you want to have a look, head over to Patsy's blog and read over the 9 lessons. Lots of really good information to get you started on ruler quilting coupled with handy hints and lots of inspiration. Particularly enjoyed the last lesson where Patsy showed how to extend the outer arches to cover the length of the area...this would not have occurred to me. I probably would have looked at the ruler and thought...'oh, that does not fit' and moved on to a different ruler or different design. While it did not work for me on the first trial, I did manage to get those arcs down in an orderly fashion and Patsy was right, once you fill the areas you will not see those little hiccups that happen on the way.

This is a lovely design and I would not mind doing something similar to that on a bigger scale, i.e. extend the design out, maybe adding a different frame and another border. Lots of possibilities. But first I will do another wholecloth that has been on my list all of last year and I am determined to stitch that out
Like always, I am curious as to what this would look like...I am thinking black background and cream or gold thread. This could be an adventure on the new Sweet 16 as I am still struggling at times to get the tension 100% right. Have started to work out dimensions in the EQ8 program, just need to fine tune now and work out how I am going to mark this and what parts are going to be marked. I am intending to put the framework down with one of the new arc rulers and am still debating whether to mark the feathers in or just do them freehand. The motif in the middle will definitely be marked in as this design relies on the precise alignment of the motif, particularly in the border. 
So lots of work ahead.

Karin

Tuesday 6 February 2018

Patsy Thompson's January 2018 Ruler Work Winter Course

I am catching up with lesson 8 and 9 of Patsy's online Ruler Workshop and have the basic framework stitched out
This is how far I got over the weekend...now it is just a matter of filling this in and finishing off. Lovely design!
Must say that I did not find this easy at all. Had some difficulty putting in the star spikes with a straight ruler as they are quite long and I found it difficult to gauge the tick mark at the other end, so had to re-do some lines before I got it right. Used  the straight skinny ruler from Handiquilter for that which I find quite tricky to use as it is about 10in x 2.5in. Nice length but hard to hold even with three Handigrip strips on there. I think the trick really is to stop and re-position your hands which of course, I did not always do.
The arcs are done with the Pro Echo 12 ruler. Also tricky as the whole ruler does not extend over the whole area so you had to do it in two halves, so to speak. I am glad that Patsy did talk about that in her last lesson as I would not have thought about doing it that way. Worked well after some failed attempts and I got the framework down eventually, looking great.

Bit sad that this little online course is finished but really appreciative of the amount of work that Patsy would have put into its presentation. Like always, learned a lot and am itching to try my own design at some stage soon...so many possibilities, very exciting! Also will be on the lookout for Patsy's second Ruler DVD which should be coming out at some stage in the next few months.

Karin

Monday 5 February 2018

New Rulers

My new arc rulers arrived from the US
They are the Lisa Calle's Pro Echo rulers. I got size 8 and 12 thinking that this is probably of most use to me at this point in time. There is a whole set of sizes available and I would have liked some additional sizes but with postage this is all I could afford without being overly greedy. Husband made remark about  how many more rulers I could possibly need...wow, I can think of plenty more!

I stitched out some arcs in the following sample (first two spaces from top down)
Effortless alignment, very happy with that.

The next 3 spaces of arcs were done with the Westalee Corner Mark Ovals
You might have wondered why I got those...they are extremely useful in creating arcs of different sizes. If you look at the last space, I used the smallest of the three ovals and got five different sizes out of that by just aligning it to the next quarter inch mark. This represents very good value for money and would be very useful for different sashings and smaller borders. If you then look at the bigger ones, there are a lot of sizes in there, so for that reason alone I think they are useful to have in your repertoire of rulers, i.e. able to make just simple arcs, interlocking designs and a variety of orange peel designs, all in a multitude of sizes. This was a better option for me than buying a dedicated swag design set with a few different sizes...found that a bit limiting and wondered how often I would use that. Similarly, did not want to end up buying different size ovals as standalone rulers as I am then limited to a few select sizes. 

That's it for me for a while with rulers...unless I smuggle them into the house 😜

Karin

Friday 2 February 2018

Westalee Corner Mark Ovals

Had a gift voucher for Christmas for Punch with Judy and (amongst other things) got the Corner Mark Ovals from Westalee.
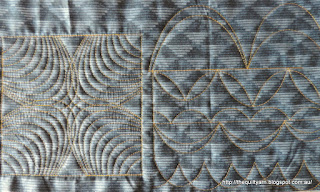
I think these are really good value for money as they give you lots of different sizes of half ovals to use which is why I got them. Did a bit of an initial play with it the other day which is a bit hard to see because the fabric is patterned, but I hope you get a sense of how versatile these ovals can be.
Did a bit of a block design and then just used the ovals to produce some arcs of varying width and lengths. This is very useful for sashings or small borders.

Will endeveaur to stitch out a bit of a sample on solid fabric so it's easier to see. For now I will need to get back to finishing off Patsy Thompson's January Ruler Workshop to finish off lesson 7 and 8.

Karin

Popular Posts