Tuesday 25 January 2022

Bird on the Wire Wall Hanging

Running behind in my blog. Here is a quick shot of the finished wall hanging.

Still have the binding and hanging sleeve to do. Turned out nice however I would have liked my batting with a bit more loft. It is just too flat and the heavy background quilting just about obliterates some of the feathering. Obviously did not think that through well enough. I had used a heavier thread to do the feathers and thought that that would be enough. Did not really think too much about the loft. Well, live and learn.

Here is the wall hanging that I did some years ago.

I thought that it would give me a bit of a comparison of 'then and now'...but not really. They are both quite nice, but different, as I got a bit carried away in the current one with all those feather variations, so cannot really compare the two.

Now onto the next project...in Bethanne Nemesh Feather Fiesta class we are up to her signature backfill 'Nemeshing'. Had a bit of a play already and must say that it is just great...flows...comes relatively easy and just looks great. Bit of a messy practice piece, but have a look at the border about half way down. Stitched that out without any marks and relatively quickly in one go. Perfect organic border treatment. Loved doing that.
Will stitch out a small printed panel next with this backfill. Should be interesting.

Karin

Tuesday 18 January 2022

Multi-tasking and New Pattern

I am still multi-tasking. In fact, I have added things to my list...🙀

Finished the third quilt top for Bethanne Nemesh February online workshop 'Breaking Boundaries'. No problem at all after all those borders I did. Fabric selection maybe a bit odd, but I do need to make some space in my 'fabric cabinet'. I reckon this fabric is a good 10 years old and with the binding cut out it will all be gone. 

Then I continued on the feathering. The class on variations was 3 hours long...a marathon of online watching. I could not do it in one hit and spread it over a few days. Given that I had started on the 'Bird on the Wire wall hanging, I thought I might as well give some of those variations a try. Also did start on some of the backfilling today but forgot to take a photo.
Close ups
That was good fun...tried all sorts of weird and wonderful things on that. Some of them worked great and some maybe not that well, but all good practice. I am stitching the feathers with Superior Fantastico variegated thread. I am using Bottomline in the bobbin and while it is better on the Q20 I still feel that I am struggling with that thread...this time it was pulling the bobbin thread up a fair bit (and actually just as I am writing this I realise that I should probably have tightened my bobbin more). I was following the settings that were given on the Superior web site, but maybe I just need to run my bobbin thread tighter. Mind you, I am also using a fairly thin batting of 60/40 Cotton/Poly blend of average quality which may have also played into this. Anyway, I managed to get a decent quality out of the thread for most of the time, so I did not worry too much about it.
I was really happy about how my curves turned out. In general I can do them better if I have feather variations in there. Not sure why that is happening.
This is stitched following Bethanne Nemesh' method of spineless feather quilting, i.e. you do not pre-stitch your spine, but stitch the feathers and spine all in one go. I deliberately chose the variegated thread to see how well that would work for me and I must say, you cannot really see any difference unless you look really closely trying to follow the feather path. Happy with my efforts.

Also sold a little quilt in my Etsy shop this week...great! That of course got me thinking that I need to get going on continuing to fill my inventory, hence sat down to do a new pattern (and another little quilt).

Here is a stylised shot

Nothing too drastic...a variation on the good old pinwheel. I have a lot of bright tone-on-tone prints left over. Not strips, but also not enough to make an entire quilt out of the colours that are left. So I gathered the bitses and pieces and decided to use them up for this idea. This will be colourful and again fairly bold. Still need to decide on placement and also I am eyeing off those cut off triangles to maybe incorporate them as well...we shall see. Love those quilts. While I was at it, also cut another panel to size to use for another round of clamshell quilting.

So, fairly busy over here and I don't think it will be letting up as I keep adding to my list of tasks.

Karin

Monday 10 January 2022

It Worked!

Still doing the curved piecing. I cannot tell you how many of those curved borders I have done by now...feels like dozens.

Was fairly nervous about putting a mitred frame around my finished quilt tops but there was only one way of finding out how that would work for me and that was obviously doing it. 

However, decided to bite the bullet and frame the two quilt tops
This went smoothly. I took my time and went very, very slowly and to my big surprise this turned out great. A few hiccups here and there like my glue not holding my fold in place and also being unable to see the foldline clearly on the white fabric, but we got there in the end. This is a smallish quilt so the so this made it easier.

I then looked at my improvisational little quilt. My sides needed longer border strips, so I had to piece them. When it came to putting the curvy bits together, I realised that I would have to match the seams of each pieced border fabric on the curve. This took a few attempts but eventually (with a pin every 1/4in) I managed to match the seam
...so much so, you hardly can see it. Next issue was that I now had a very long strip of curved fabric that needed trimming. The strip went beyond my cutting table and was slightly bowed.  My longest ruler is about 18-1/2in, so even folded in half I was struggling. I started trimming this in 1/8in increments from each side as I was paranoid of stuffing this up until I finally arrived at the desired width. This was time consuming but I definitely did not want to construct additional borders so I took my time with this and taking that little bit longer definitely paid of. My strips ended up dead straight. Attaching them was just as easy going as the first quilt. I laid it all out on the ironing board and prepared two corners at the time to sew. 
I can honestly say that I would now feel very comfortable doing mitred borders on any quilt.

Here is the result
Like the look of this...corners match perfectly and I managed to keep the borders as straight as possible. This will look fantastic all filled in with FMQ.

Also made a start on Quilt 3 for the Breaking Boundaries class (Bethanne Nemesh Online Workshop starting in February)

More curvy borders, this time block size. Promptly miscut my border material and will have to do it again, so it matches the size of the other border strips that I did. Does not matter though as I can use this to practice on once the workshop gets going. 

Definitely learning a lot.

Karin

Monday 3 January 2022

Happy New Year

Wishing everybody a Happy and Healthy New Year!

I have been plugging away at my curvy piecing over Christmas in readiness for Bethanne Nemesh' 'Breaking Boundaries' class which begins in February.

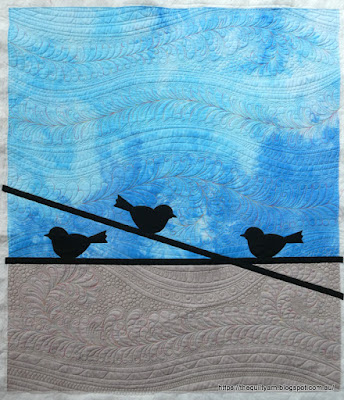
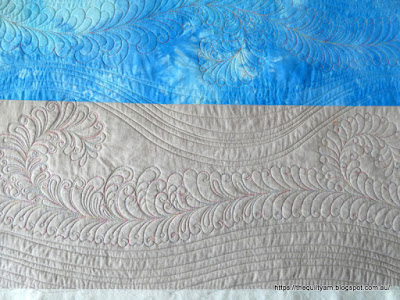
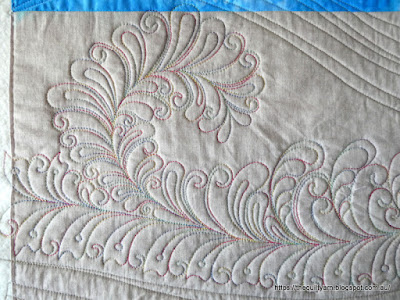
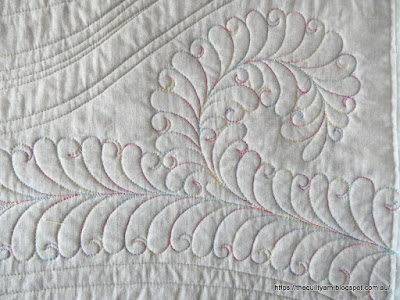
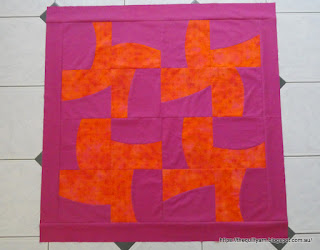
Finished this one in screaming colours

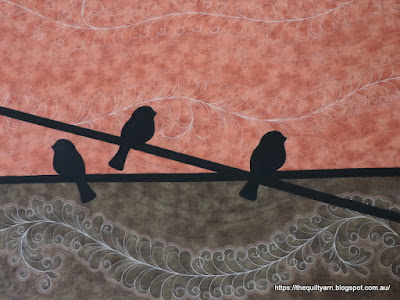
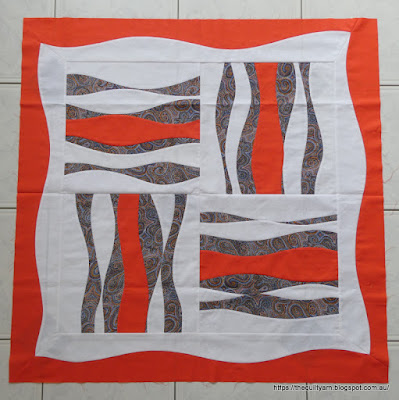
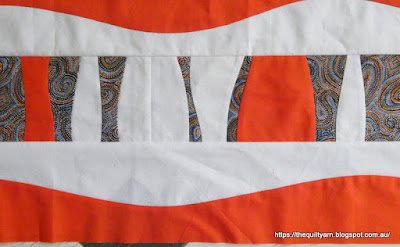
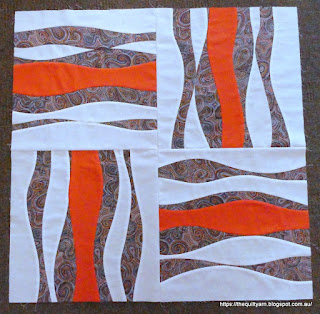
...and then made a start on this one
Love the colours of this one, particularly the Aboriginal fabric. The fabric is made from a painting by Warlukurlangu artist Pauline Napangardi. When I saw it in the shop I straight away knew that this was the perfect fabric for this project.
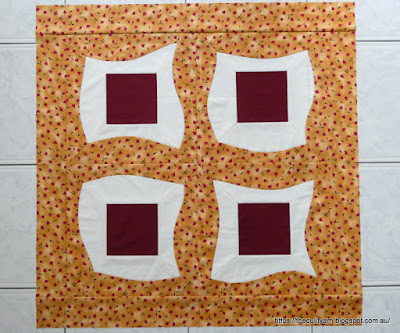
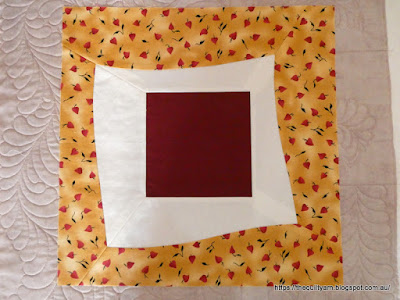
Well, this piece is supposed to have also borders with curves in it. So I made this too, however stuffed it up when trying to cut them to size as they were slightly bowed out. The more I tried, the more width I lost, so in the end I decided to make new borders rather than continue to muck around with it. 
This is still in the process of happening...

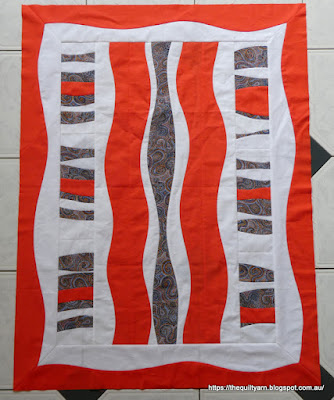
In the meantime, I started another one...just because! I now had four wonky borders left, a test block and a number of pieces of cut offs from the blocks above as well as one strip of the fabulous designer fabric. So, as usual, stopped halfway through the project above and did some improvisational piecing of my own. First, I spent about a whole afternoon straightening those wonky borders. I 'borrowed' a brand new 90 degree tool from my husband's workshop and used that to straighten one end and once I had at least one straight edge, I carefully started to straighten out the other edge. Also, starched the borders before this adventure to have a bit more control over the curvy borders. This took absolute ages to do but I really wanted to see whether I could pull this off. Once I done this I then used the Aboriginal designer fabric as a curvy center strip working with the tiniest of margins when cutting it. I really wanted to use this up and strangely enough this did work out. I then attached the bitses and pieces that were left over and tada...

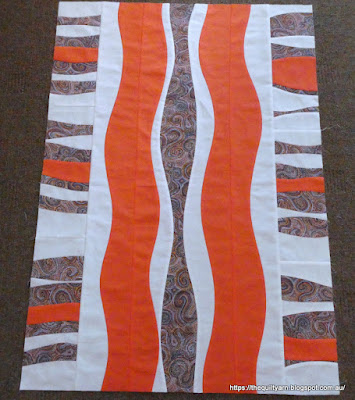
Love how this turned out. Maybe it could have used a bit more planning but I don't know, that seems to defeat the purpose of improvisational piecing a bit. This sort of just evolved, the longer I stayed with it, the more of an image formed...I did change the sides a bit from the way I had originally attached them, shortening some so I had enough white fabric left on each side. Did not think that through beforehand, as I needed to shorten the whole center section a bit. Throughout the process of putting this together, I almost treated this like some fragile commodity (just about everything was wavy and the success or failure depended on how well I would keep this straight)...starching it as I went along, checking continually for straightness and in general being super careful not to stretch this inadvertently out of shape. Happy to say that my little quilt center (it's about 25 x 36in) is perfectly straight down to 1/16 of an inch. Initially I was just going to attach an orange border and be done with it and use it for additional FMQ practice for the class in February, but I trialed the wavy borders around this one and that would look truly spectacular, so for the moment I am sitting on the fence. That would mean making more wavy borders (I have done 8 so far) and I am not sure how I will go with mitering them in the corners.

Decided to go back to the second project to finish the borders with their mitre in the corner and see how I go with that. If I manage that alright, I might make another set of wavy borders for my improvisational piece. This is all going to be filled with FMQ fillers...can't wait, this will be great!
 
But here we go...the year has just started and I am already doing what I always do, i.e. getting side tracked and just starting something else (when I still have to finish another two of Bethanne quilts on top of all the other things that are on the list).

Karin

Popular Posts