Saturday 30 December 2017

Planning for 2018

Before the year is up, here are my two recent finishes
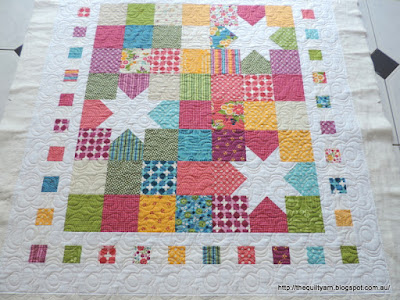
e2equilting on Sweet 16

Another ruler practice quilt
I feel I am starting 2018 with a clean slate...haha, I wish!

So, what is on the agenda for 2018...I feel that 2018 is going to be a year of many changes. 

1. I need to get back to my blog. This year has seen me neglecting my blog severely due to many different issues like work, life in general, new Sweet 16 etc...I did post on IG a fair bit on what I was working on at times but I must say, I do enjoy blogging more due to the interaction with your readers. It is nice to hear from like minded people all over the world and I have had some very interesting exchanges over the years, a lot of handy tips on sewing related issues as well as finding tons of inspiration and encouragement. I am planning to get back to more regular updates and also am planning to write a bit about my experiences with the HQ Sweet 16. I have found that there is not that much around on the net other than people getting the machine and loving it. Can't say that that was my experience. I am attending a HQ group on a monthly basis which has been extremely helpful and I am hoping to share some of the learning on the blog.
Also need to clean up my blog a bit, refresh in general and work out a few technical issues like how to put photos side by side...

2. I am planning/just about to start another wholecloth quilt. The first one will be a bit of a practice run to see how I go on the Sweet 16 using a completely unfamiliar thread to me (Magnifico from Signature) and also using rulers to construct the framework. Really looking forward to this. If this works well, hopefully I will then get on to another wholecloth (on black cotton) that I designed last year. Nothing earth shattering, more or less a repetition of a pattern over the surface, but it should look nice on a dark background. Then there is the silk that I acquired some years ago...if I can get the rulers to work for me then a silk wholecloth could well be on the horizon. We'll see...

3. The blasted 1000 Pyramid quilt...what was I thinking!! I am by now more than halfway through...the photo was taken when I was still very excited about this 😏

One can only hope that I find some motivation to finish this!

...and another baby quilt like this...I am planning to write up the pattern for my little Craftsy pattern shop, this time with cute 'ducky' fabric in green and blue. Another one of those jobs that I did not get around to this year.


4. I am going to participate in Patsy Thompson's ruler online workshop during January. This should be good fun! Patsy is an incredible teacher and looking over her blog usually gives me tons of inspiration...hence the new wholecloth that I am starting.

5. I am looking at retirement/semi retirement in 2018. Big change! What exactly that will look like is still a bit uncertain, but it is definitely coming. This should be very interesting and should provide me with more time to concentrate on my creative adventures...I am looking forward to this new phase in my life and have a few ideas around this...most of them are quilting related of course!

Could go on with other projects that are in the back of my mind, but I will stop here as I don't like too much planning in my quilting. Usually inspiration strikes and then I get side tracked into another direction...new intense learning activities (like is currently happening with the rulers for me)... which may or may not work out. I really enjoy that more haphazard approach...works well for me and keeps me interested. If I knock off my project list above I shall be very happy.

I am linking up to the #2018Planning Party over at Quilting Jetgirl

2018 Planning Party
Karin

Thursday 28 December 2017

Handiquilter Ruler of the Month Club - The Mini Oval

This month we got the Mini Oval shape
I like those rulers where you can stitch on the inside and this one in particular sits really nicely in your hand. So I tried a few shapes...beautiful little ruler
Was quite amazed at the different shape I was getting shifting the ruler over a bit using those lines etched on the ruler and all of a sudden getting a pointy leaf shape. This was not obvious to me initially. Really pays to play a bit with the rulers as I discovered with this one.
As I had some time to play a bit during this Christmas break, I did come up with a number of different designs suitable for some small borders or sashings
How useful is this little thing! Using half of the arc gives you 1 1/4in shape. Will be on the lookout for slightly bigger ovals. Had no idea on how useful that simple shape is.

Finished my practice ruler quilt in the last few days. In fact, am spending my time sewing bindings on three different quilts...should have done this ages ago. The quilt turned out great, a bit wobbly in parts as I was learning to use the rulers as well as the machine, but overall I am really happy with my efforts. Have a great selection of weird and wonderful designs on there.
By far my favourite ruler has been the Line Grid ruler
How tidy do those grid lines look...so impressed with that ruler!

There is one more ruler to come which will be a quilting-in-the ditch ruler. At the moment I am using the straight rulers that I have for quilting-in-the-ditch. I really think that quilting-in-the-ditch with the ruler just comes down to practice. Since I got the machine I have done all my ditching with a ruler and feel that it is getting easier...not as clean yet as I can do on my normal sewing machine, but getting there...such a time saver doing it on the Sweet 16 though...definitely prefer it.

Karin

Saturday 16 December 2017

More Rulerwork

I have been bitten by the ruler bug! After reading a number of blog posts over at Patsy Thompson's blog the other day, I went and finally got myself an arc ruler and a set of circle rulers. This was not cheap, however I did research this quite intensely and concluded that I was not going to get around spending a fair amount of money. I looked at all sorts of options, some of them in the US but also over here. I have tried the Westalee circles ruler before and while it did the job I thought that the circle rings that Handiquilter produces would be a better option for me in terms of holding the ruler and stitching around it, particularly for the bigger circles.
Circles Ruler - Gold Set 2" - 11"

Arc C Ruler
As you may know, my passion is wholecloth quilting and in the past I stitched out all my designs from a traced drawing on the DSM. That was fine, but very time consuming and particularly with circles and arcs very difficult to do. Stitching freehand is fine but as soon as you hit long curved lines you are bound to get little wobbles here and there. While this usually does not matter, in a wholecloth design this is usually the center design and becomes quite obvious and a bit annoying, particularly when you are on your last arc and messed it up. It's all possible but it just takes so much longer.

Part of the reason for the HQ Sweet 16 for me was to use rulers more and make my quilting a bit easier and faster, hence my intense practice with rulers at the moment. The motif that you see on the top of the blogpost is not traced or drawn but done after dinner in a couple of hours just using the arc and circle rulers. I began with Cindy Needham's Ultimate Round Stencil (best thing ever!) and marked this quickly on my fabric which gave me a skeleton to work from and then just went around using the lines to align my rulers.
This worked really well once I had figured out how to align the arc ruler to give me accurate echo lines (it does take me a while to figure out all the lines on rulers). Even managed to put it a 1/2" echo and then realized that the little circle ruler I have is 3/4" so I had to fill this in freehand. Obviously I would make my pebbles smaller usually so it would look a bit neater. The possibilities are endless in terms of shapes, size and how you fill this in and the prospect of laying this down in a couple of hours  is very exciting, particularly when coupled with background fillers and grids. So, don't regret my purchase, in fact should have done this a long time ago...such a time saver and relatively easy to do, just as always...practice, practice and more practice.

Already mentioned in my last post...Patsy Thompson is running a ruler workshop on her blog in January. If you are interested in ruler quilting have a look. She is a fabulous teacher and all of her videos are so informative...this is bound to be great. Can't wait.

Karin

Thursday 14 December 2017

UFO Sampler

I thought that I had posted about my UFO sampler quilt but now have realized that I put most of the photos on IG!
Anyway, I have been using this as yet another practice ruler quilt and tried just about every ruler that I have on this. The center is finished and I have arrived at the borders. For this, I tried out the Handiquilter Wave ruler.
I have got the 8" wave with a 0.75" and 1.5" depth. Most of my borders end up around 4 -5" and I thought that this would just fit nicely. After a minor struggle to work out the middle of the border (I am so spatially challenged!) putting the wave in was a breeze. Does not really matter if you are slightly off in holding the ruler as it is wavy. This was a bonus. After having stitched the wave, I then shifted the ruler and roughly marked the boundary for the feathers in.
This was easy as and the end result is very neat

Bit hard to see as the batting is not particularly puffy and I used the Aurifil 50/2 thread that just seems to blend in but this is only for practice and to have a bit of a trial to see how this ruler works. I only did the feathers from corner to corner and put a bit of a corner design in as I initially could not work out how to get around the corner, but when I had finished the first feather I saw that I could have taken the feathers into the corner lifting up towards the corner of the quilt and meeting the corresponding feather from the other side. Well, next time...

The real advantage with the ruler is that I only had to think about placement in the beginning. After the first border I could take the ruler and align it on the line that corresponded with the inside of the border (took a note of this!) and off I went. This saved a huge amount of time if I compare it with how I usually would have done it, i.e. used my curvable ruler and drawn it in for every border. Was pretty pleased with this.

Almost done now, so I will post a photo of the entire quilt once it is done.  Some of my handiwork

Actually getting better with the rulers and their alignment...in fact, I am getting a bit addicted to this (as you will see in my next post...). Got so many ideas!

Also, if you have not seen it ...Patsy Thompson will run a Ruler Workshop on her blog in January. Patsy is one of my favourite quilters and visiting her blog the other day I stumbled across this. This sounds like good fun and I will definitely participate. In fact, going over a number of her blog posts about ruler work in general my head was buzzing with inspiration.

Karin

Tuesday 5 December 2017

Almost there!

I finished the quilting on my baby quilt
This took me a while as I have developed a good dose of Bursitis in one shoulder. As I decided against a cortisone injection, I had to take it a bit easy with the FMQ. Also had to re-evaluate my set up with the machine. Initially I thought the machine sat too low, hence one day we took the machine off, turned the table around and put the legs higher...what a hoot!...only to realise a bit later that you could quite easily adjust it by one person just lifting the machine with the table on one side and the other person adjusting the legs. Took 5 seconds!
Once I had done this, I realized that the problem most likely was not the height of the machine, but the way my chair was not adjusted properly at all. When we set the machine higher I then also had to set my chair higher, actually right to the top, so that left me no room for finer adjustments and my legs were not at a right angle. So, we put the machine down again and I inspected my chair...had to lift my lumbar support as this was just flopping around at the bottom and also tried to get the height right. Good posture when FMQ is so important...although I am not sure my shoulder issue was caused by the quilting alone. Might just be one of those things that come with age.
Anyway, so this went very slowly but without any trouble. As I previously mentioned, it is a bit time consuming as I used the Golden Threads paper method to get the E2E design on the quilt but it was much easier than I thought. The design remained straight across the quilt top...the beginnings and endings (as I did it in 3 sections across the quilt) were hardly noticeable and I was able to keep distances more or less consistent. A slight miscalculation occurred at the bottom as I had decided to follow the distances in the pattern as closely as I could, so it did not end up exactly where I wanted it to end, but that was fine. Really enjoyed doing this for a change.
Now I only have the binding left. I used spray basting for the first time and now wonder whether I should wash the quilt...probably should, I reckon.

Also did a bit of a play with my HQ Versa Tool ruler in between
Must say that I am getting better with my continued ruler practice...did not once trail off to the side and was quite impressed with this. This is a 2in clamshell. Initially I had marked a 2in line across the piece but then I just build on that. Even though the clamshell is not huge, this would look lovely on a smallish baby quilt. It gives a really nice soft feel to the quilt, so this could be another option for an overall design. Stitching this out on a quilt I would probably mark the whole quilt with 2in lines though just to make sure that it is kept straight.
I am getting quite enthused about different overall designs, but after this I will have continue on my other ruler quilt...have too many UFOs at the present.

Karin

Popular Posts