Friday 31 March 2023

My New Rulers Have Arrived!

I have been waiting patiently for my new rulers from Michael Quilts. I ordered them about mid-March and they arrived a few days ago which was incredibly fast considering the distance. Had one of the charity quilts ready to go...a cute little Nine Patch quilt in brown tones.
The rulers were packaged well and came with a page of instructions on how to use them. I have got the original Fab5 Fan set consisting of 3,5,7,9 and 11in half circle (Michael Quilts also sells an expansion set with the even numbers now).
I have done several quilts with a Baptist Fan design in the past. My issue was with the awkwardness of using full circles. In the past I have used Amanda Murphy's circles up to the 7in circle and then switched to the Handiquilter circle rings for the 9 and 11in. As you can imagine this was rather awkward to hold and inaccuracies were unavoidable. Nevertheless the Baptist Fan design is a forgiving design and the quilts that I did do looked ok. However when I first saw the Baptist Fan rulers from Michael Quilts I saw that he had additional lines on the rulers for alignment as well as half circles and thought that this might be easier to manage on a sitdown machine.

So, I went to work on the little charity quilt.
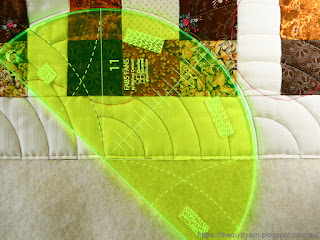
This is the largest ruler which just about fills in my hand. As you can see I put some stable tape behind it to prevent the ruler from sliding, however noticed in the second row that that was not enough. I took some of that off and put the more grippy Handiquilter sticky grips on there as well as using a large strip of that white gripper material you use for lining draws to stabilise the ruler. Quilting a Baptist Fan design on a sitdown machine is harder than doing it on a frame, I believe. On a sitdown everything moves...you are holding a large ruler that begins to slide, your quilt is shifting or dragging and your movement in itself might shift the ruler. Add the compaction that is occurring, it can be really quite tricky and you do need to adjust your expectations a bit in terms of how perfect you are going to quilt this out. I noticed in the second row that I was sliding and adjusted the grippy material, however once you are out by a bit you are out of alignment and will have to make a decision on whether to continue or not. As I have done this a few times, I was used to this and continued...the rows looked even across and my fans were looking good in terms of consistency.
Of the five rulers most of the times they were in (almost) alignment, in fact the 5in ruler was always in alignment but across the quilt the upper rulers were sometimes out by as much as a 1/4in. When I had done half of the quilt I also noticed that my fans had shrunk ever so slightly in width...again, a consequence of doing this on a sitdown machine by probably pushing too much against the ruler and thereby inadvertently also slightly shifting the quilt over. Half way through then I had to turn the quilt over to avoid having all this material in my lap which then meant I was doing the fans top down. I found this actually a bit easier and was happy with my alignment, in fact by that stage it seemed to have improved as I did do a bit of fudging here and there.
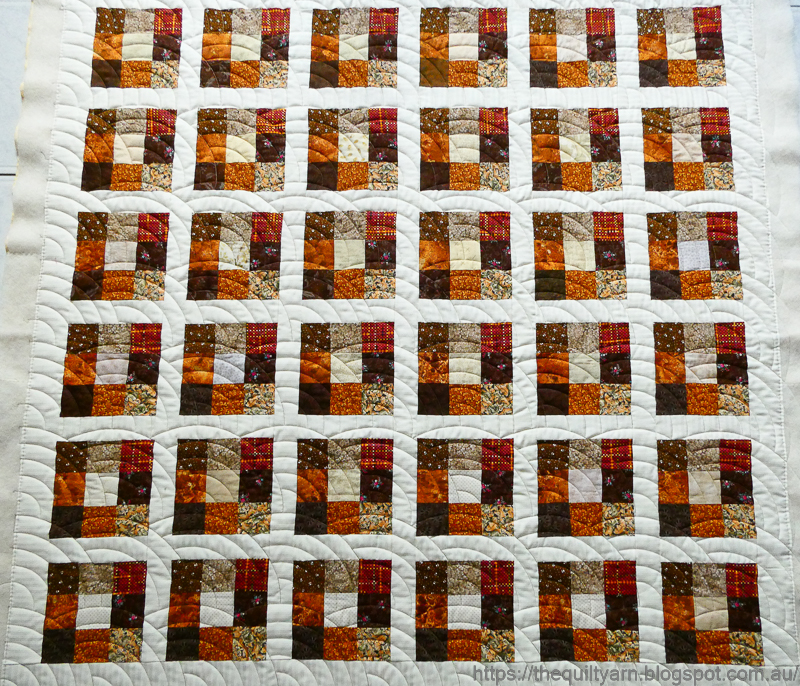
The completed quilt
The back
I love the Baptist Fan design...looks really nice and my fans appear very consistent. Actually comparing it to a previous quilt I can definitely see the difference that the rulers have made. The spacing of the fans looks so much better.

In critically examining the quilt though I saw that my fans seemed to have sunk on one side. Now that made absolutely no sense as they do look perfectly straight on the back. After a while though I realised that the quilt had a slight bow on the bottom and aligning my first row to this I carried that through all the way to the top...something to watch out for next time! But the design is very forgiving as I said before and that little mishap is hardly noticeable as your eye is drawn to the consistency of the fans.

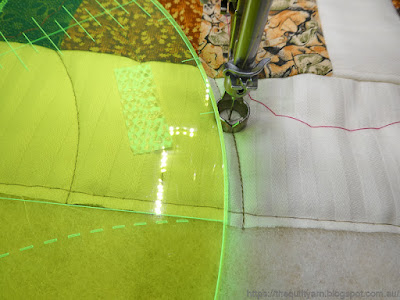
Really impressed with these rulers. They are as great as I thought they would be. Apart from three points of alignment that you use for doing your fans, there are also little tick marks of 1in for advancing to the next fan and then there is this little mark for when you have to start a new Baptist fan.
See that little mark on the ruler...that is how far you travel up again to start your next fan with the small 3in ruler. I really appreciated this being there as I stitched this quilt with a light brown thread, so backtracking in a haphazard way was highly noticeable on the white sashing and this little mark ensured that you don't go too far and awkwardly backtrack back where you need to start. Made for a really clean start of the little fan.
Overall, really happy with the rulers and will do the next charity quilt with them as well.

In terms of linking up to To Do Tuesday which I am a bit late for as I did get carried away with the new rulers: I did put my design together for my wholecloth, washed the fabric and am ready to start the tracing...waiting for some thread now to see what colour I am going to stitch this out.

For the remaining few days I will
- start tracing my design onto the fabric
- baste another little charity quilt.

Lots of other things to do , but as my machine has finally gone for a spa treatment, that's it...I am off the hook in terms of piecing anything, so that will have to wait. 

Linking up to To Do Tuesday #13 over at Quilt Schmilt and the Favorite Finish Monthly Link Up at Meadow Mist Designs.

Karin

Wednesday 22 March 2023

To-Do-Tuesday 22/3/23

Another week has passed with some progress. I seem to be working in starts and stops. 

My tasks for the week were:
 pin and baste another charity quilt
- make a start on the drawing of the wholecloth quilt✅
- make a few more scrap quilt blocks.

Lots happening over at our place though which did not leave a lot of time for quilting. We have been working on getting my father-in-law's house ready for sale. Just one more clean up around the house and then it is ready to go on sale after Easter. It's been a long and arduous journey and I will be glad when it is over. On the bright side though, it was also my birthday last week and I went online shopping...always great fun! Still had a voucher from Christmas for one of the local quilt shops. Got a few odds and ends but also purchased Bethanne Nemesh' Lily Love Line ruler #1. 

Had a try in the week on some scrap material
What an amazing little thing...the heart comes out at 4- 1/4in x 5in. I like the way that this stitches out...all done in one hit...shape, feathers and all. Very easy to do as it is not a huge ruler which can be massaged to go where you need it to be. Also interesting is the way Bethanne makes her rulers multi-purpose. This little heart shape can also be used for a quick border.
The border was incredibly easy to construct...no fuss, just flipping the ruler over to get the wave going with the end feather in place and then going back to just fill that in. Really liked this for a bit more of an informal border. The curl is not that deep, hence easier to fill, particularly if you put a few curls in the mix.

But back to my birthday...it's great getting older. Nobody knows what to get you and I always have quilt related ideas to fill that gap. I had my eyes on some Baptist fan rulers from Michael Quilts in Texas (?I believe) for some time, but so far had not acted on that as the postage is understandably high. Well, this is what we ordered for my birthday! Very excited about this as I think those rulers are the best thing since sliced bread. Have watched some You Tube videos, read the reviews...now just waiting to try them out. I will baste one of my little charity quilts so I am ready when they arrive. Looking forward to this and will report back on this of course.

In between I did more work on my wholecloth...I said I would be drawing this out, which I did, but I did it in the new drawing program (Affinity Designer 2). This was extraordinarily difficult, but as I had already started drawing it in the program I felt compelled to finish this to see whether I could pull this off. Probably should have started with a simpler design. Most of it was manageable until I decided to put some Amish Feather Curls in the border. While I am good at drawing and designing in general I did struggle with my spatial understanding or whatever you want to call this. Got very confused with the direction of the curls a number of times. I managed to draw one quarter and then had to mirror and rotate the piece to make up the border with the curls going around the border in the right direction and that is where problems started to occur...my quarters did not line up 100% and for the life of me could not understand what was happening. This is what I mucked around with for most of the week. It finally dawned on me where I had gone wrong (likely to do with me changing my snapping option a number of times and also going in individually to clean up some feathers, thereby ensuring that they would not match when tiled). The drawing by that state had an alarming amount of layers and little sub layers and it was absolute hell to try to fix some of that. However, I finally finished it and am happy with the alignments...it is almost perfect. There is a tiny mis-alignment in the feathers only which is not a big deal as I will simply correct this when I trace this onto fabric. Everything else aligns 100%.
Still got confused today when taping this together but am very happy with the result as I now have a workable copy to trace from. Mind you, this has also shown me with some certainty that I need to watch some more tutorials about this program...there is so much I do not know as evidenced when drawing this out. I did come across a few functions by accident that were extremely useful and powerful and I am certain there are lots of others that I could have employed to make the job easier. 

So, for next week I will concentrate on:

- putting my design together and starting to prepare the wholecloth; hopefully I will start with the marking, but we shall see. I am planning to stitch this out over the next two months
- baste a charity quilt ready for the Baptist Fan rulers; can't be long now...they went to Italy from the US, then to Qartar and should be on their way to Australia...

That's it...will leave it at that as I also have one more session of the Wholeloth workshop to do and realistically will not have time to do much else. Have several quilting projects though that will need to go back on the list when things quieten down a bit.

Linking up to To Do Tuesday#12 over at Quilt Schmilt

Karin

Wednesday 8 March 2023

To Do Tuesday#10 - 7/3/23

Was quite productive over the week.

Here are my goals from last week
- continue working on the wholecloth design, i.e. starting to get the design on paper (this, no doubt, will take several attempts)
- pin and baste one of the charity quilts ready for quilting ✅
- prepare for the wholecloth workshop that is coming up in 2 weeks (where has the time gone!!) 
- sort out some 2in strips into light and dark and start the blocks. 

Did not continue on my wholecloth as this needs some peace and quiet time. Had too many other things going on. However, managed to put together one of the charity quilts
Already did a post on that (HERE). Feel very lucky to always get such interesting quilt tops from the Orange Tree Quilters group. Again, really like this quilt. Very tastefully put together and very well pieced. As described in my post earlier I decided on a swirling design that I had not done before. After some hesitation, just went for it and it turned out absolutely perfect. Definitely a design I will use again. Found it easy to execute and it just went effortlessly over the quilt top. The whole thing was finished in about 2 hours. Was able to stitch this reasonably consistent and keep it to a slightly bigger scale.
Looks great and suits this quilt top very well. The funny thing was that I remembered that I had a Kaleidoscope template which I bought many, many moons ago and never tried out. This quilt top was calling out to me to give that a try. Then yesterday I was looking for the template...for the life of me could not find it, so I started thinking that maybe I had wanted to buy it and never did! Had to laugh at that...as quilters we accumulate so many things over the years, some useful and others not so much and then there is this thing that you cannot even remember what you bought. I nearly gave up on my search for this template...I had by then searched three different rooms for it. But finally a vague memory came into focus...I thought I had stashed it away in the packet of another hardly used template and lo and behold, I found it. So, I have the smaller Kaleidoscope ruler which will make 8in blocks. Maybe over the next few months I will tackle that. Really like the look of just using one colour in different tones. So effective!

Also started on my scrap quilt over the week, but have not taken any photos yet. Sorted my strips into light and dark and have done a few test blocks. Discovered that I have a problem with my Pfaff machine. For some reason I cannot produce an accurately sized block. Already noticed this when sewing my last pattern but then thought that this was due to me being sloppy. When sewing my test blocks though I was very careful and reasonably accurate with my sewing but my blocks were falling short by 1/8-1/4in. Now even with the occasional sloppiness, I have never had this much of a problem. Looking at my needle I suspect that it is not in the centre for some reason. No idea of how long this has been a problem or whether I got the machine back like this from one of the last repairs (feed dogs did not lower)...only just noticing it. In the end I changed my needle position by 0.3mm and have been able to achieve my 9-1/2in block, but will have this looked at when the machine goes for service at the end of the month. Too weird!

Apart from this I was preparing for my Mini Wholecloth workshop that starts this Friday. Feel prepared and am hoping to inspire a few people. Should be good fun.

Linking up to Quilt Schmilt for the To Do Tuesday Linky Party #10

Nearly forgot to set new goals for the coming week:
- pin and baste another charity quilt
- make a start on the drawing of the wholecloth quilt
- make a few more scrap quilt blocks.

Karin

Sunday 5 March 2023

Choosing a Quilting Design

I finished one of the quilt tops from the Orange Tree Quilters group. Another beautiful little quilt!
It is a Kaleidoscope quilt...I had forgotten how effective they can look and remembered that I actually have got the template for this. Did buy the template set very early on in my quilting journey but never got around to actually make one of these, in fact forgot that I had this!

Like the colours...very tastefully put together.
Its a smallish sort of quilt...from memory about 52in square. In looking at it I was unsure how to quilt this. Did not really feel like stitching-in-the-ditch, even more so as every block had the centre seam pressed open. Don't like to stitch over open seams and so decided to do some sort of overall design. The quickest, of course, is meandering but also did not feel like that.

Consulted one of my favourite books...Machine Quilting Solutions by Christine Maraccini. Its an older book from 2007 but has a lot of easy-to-do designs for everyday quilting in there. Chose a swirling  design which I had not done before. In her introduction to the design Christine says:
'This edge to edge design is one of the quickest ways to get a quilt finished. It will add visual movement and has a texture and feel that beg the owner to cuddle up in it.' The only difficulty, as I could see it and Christine pointed out, was to get the design a bit bigger to maintain the softness of the fabric and batting when you touch it. However, the swirl design was perfect as one of the red fabrics had a dainty swirl design on there and it was unobtrusive enough for the secondary pattern to still shine through.

Did one practice run on a piece of scrap and started wondering whether I could execute this consistently over a large area. In the end I decided to just go for it...if you never try, you never know! Was a tad nervous to start off with as I can  get incredibly confused with swirls and their direction, but to my surprise this went incredibly easy. I quilt loosely in rows as a sitdown longarm quilter, just having 1/4 of the quilt under the the machine at a time. Had absolutely no problem moving along swirling my way from one end to the other. Going back then and down, I could see my empty spaces and could reach out with a swirl to fill that in. My swirls ended up maybe 1-1/2 to 2in across, sometimes smaller, but that did not feature too much. Given that the swirls are a bit more dainty it felt very open and soft.

This is why I like to quilt these quilts for the charity group. I get some pretty quilts, an overload of inspiration and I get to try different quilting designs that I may not otherwise use. This quilting design is a definite keeper...I think it took me about 2 hours to complete. I used the stitch regulator on my Bernina Q20, so did not have to worry about my stitches looking fine and went over it with a medium speed which ensured that I could get the swirls a bit bigger (think bigger, more sweeping movement). It was incredibly easy to fill and in the end I was actually quite amazed at the consistency with which I had quilted this across the quilt top. The quilt looks amazing with it and feels nice and soft. This is definitely a design that I will use again. 

Karin

Popular Posts