Monday 27 June 2022

Clamshell Quilting


Have been clamshell quilting again. After having finished my big background filler project I made a start on the charity quilts that I picked up about a month ago. To my delight they are little baby quilts in really nice bright colours. Love those!
Me in action
The finished product

I am playing a bit with Idea Pins on Pinterest at the moment. If you want to see the process head over to my Pinterest account and watch my Idea Pin on clamshell quilting (under the Ruler Work board). Would be great if I could display this here but I am not sure there is a way to do that.

Karin

Tuesday 21 June 2022

Another Quilted Nursery Panel

Love doing those...

Cute and quick to do. I quilted it with an overall clamshell design which is easy and relaxing to do with the Handiquilter Clamshell ruler. A little bit of care has to be taken to keep it straight but if you go slow and take your time with the alignment it always works out.
This little quilt measures 33.5in x 39.5in, a good size for a 'drag along' quilt or as a floortime play mat. I used a 100% wool batting which gives this a nice plush and soft appearance.

For more detail, head over to my Etsy shop

Karin

Friday 10 June 2022

Background Filler Project

I m back onto my background filler project after a few weeks of a bit of a break. Felt somewhat overwhelmed with the enormity of the project and lost some steam to keep going. So I did a few other projects to take my mind off mainly working on some listings for my Etsy shop but also 'playing' around on EQ8 with some new patterns (fantastic program...was able to manipulate a pre-existing layout into the custom size that I wanted, changed it a bit and ended up with at least 5 different versions of possible quilts - there is another blog post waiting to happen). Will finally include an applique design that my daughter drew when she was really young. 

In addition and to stall further I looked at social media, specifically Pinterest and started to clean up my account a bit, organized my boards and in general had a bit of a look what had accumulated over the last 10 years. Well, stumbled across their Idea Pins and got inspired to give that a try...so did some videos (which I generally find really hard), read about Idea pins and watched a few YouTube videos and finally managed to put some reasonable videos together to try that out. Did that on my phone which worked really well. The topic was not super exciting -  'Basting a Quilt on a Sitdown Longarm' but that was what I was doing at that moment. Must say, that came out really nice and worked a treat for me. Might do that again as I like it better than Instagram Stories or reels.

Finally though I re-looked at my background filler 'monster'. We had a bit of sunshine yesterday so I took some photos.


 Close up of the fern area that I really like


Those darker areas gave me a lot of trouble with the Invisafil thread. Being that fine at 100wt I had real trouble seeing where I was going. If you look at the darker area I had to do the pebbled area first leaving a channel to then fill in the rainbows. That was incredibly challenging on the old eyes.

...and then I finally continued and finished off that side...not too bad...

Almost there...continued a bit further on the right but will take that out today as I am not happy with it. The key on this thing seems to be pre-planning. If I am unsure what design to use, it is best to stop and think that through carefully rather than charging ahead.

So, hopefully I will make it to the end of this over the coming week!

Karin

Sunday 5 June 2022

Christmas Table Runner Finished!

It's June and I have finished my christmas table runner! This is the last of four that I did out of one panel purchased last year. The panel was 'Snow Place Like Home' by Sharla Fults for Studio E Fabrics. Bit chuffed with my efforts as this could have easily ended up in the UFO pile...was just lying around from last year and I had of course moved on to other things. 

Did not take me a long time to put together and like with the others that I did I kept the quilting to a minimum for a clean modern look. Just outlined the snowmen, blocks and sashings and put some channels in the sashings and border.

It measures 18-3/4in x 41in and I actually quite like it as a wall hanging. Really cheerful.


It's up and running in my Etsy shop if you are interested. 
 
Karin

Thursday 2 June 2022

How To Square Up a Quilt Panel

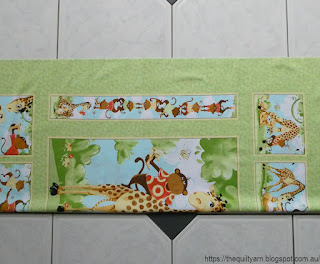
Finally did some research around how to properly square up a panel. While it is relatively straightforward  for panels with wide open spaces around the edges it becomes a bit more of a hassle when you have distinct borders around your panel, like in the one I am tackling at the moment. 

I did cut the selvage edges off on top and bottom first and took that as my true straight line. I then straightened the longer sides a bit and of course, it was not straight. The problem with that is that I cannot just straighten it out as the images on the panel are surrounded by a border which would look skewed if I just straightened that.

Consulted the internet and came across a fabulous video 'Squaring up Hoffman Fabric Panels' . Of all those little videos I watched this appealed to me the most as it involved a no fuss easy way to straighten out your panel by just folding it and re-folding it and ironing it into position. The first thing the lady said was not to cut off your selvage edges...argh...had already done this! Put some pins in place to hold those straight edges together and folded my fabric in half, re-aligning things, folding it again into quarters, and got it pretty much straight. Ironed it and the iron blasted a stream of brownish gunk onto my quilt (iron obviously needs a good clean out)!

Had to wash my panel again (whoever buys this little quilt will have a very clean quilt as I do pre-wash all my fabric before using it, so this was the second wash for this panel). Next problem...it is pretty rainy and grey over here at the moment. If it was summer, I could have dried this nicely on the veranda and blocked it into shape but with the bad weather had no choice but to hang it on the washing line.

Hung it in a way that hopefully would not distort the panel too much more.
Got it inside later in the day to have a look at the distortion...not too bad actually, just bowed out a bit to the right which was the case before I washed it again.
The piece was still just that little bit moist, so I started the folding process of halving it, then quartering it and ironing it dry at the same time. I did tug a few times very gently on the diagonal in the hope of getting rid of the bowing as well. Repeated that process over and over again
After folding it again and again into quarters and ironing it, had a pretty good result. I did end up trimming all the edges of my panel by a tiny bit at the top and bottom and about a quarter of an inch on each side. The design on the side of the panel (the rectangles with the monkeys) were not exactly aligned with the designs on top (and had a fair amount of give), so the final cuts on the sides produced a tiny bit of variation in the border size. As the variance was quite small I decided that this was good enough, unless of course somebody goes to it with a ruler.
Happy with the end result

My top is straight and when I put the quilt sandwich together I will pay attention to the straightness of the boxed designs and then the quilting (most likely a quick clamshell design) will take care of the rest I should think.

I have another panel to do after this one and will try this method of straightening again (minus the cut off selvage edges and the mishap with the iron) as this seems to be working very well.

Karin

Popular Posts