Wednesday 30 January 2013

WIP #3 - Baby Quilt

WIP #3:
Well...finally made a start on my baby quilt.  I am really excited about this as I have been wanting to do this quilt since last year. even bought the fabric last year. I have done this quilt before but wanted to make it again in different fabric and a little bit bigger as well (cot size)

Bit of a hold up as I realized  that the blue fabric had "for home use only". This annoyed me to no end. As I am thinking of putting this pattern on Craftsy I thought I better not use it so bought a very similar blue dotty fabric which does not carry that restriction.

Felt very productive, as I managed to do all the cutting and write down a basic outline of how I want to write up the pattern. This will be a very easy and quick-to-do quilt, involving basic strip piecing.


Bit of a peek at the blocks...so cute, the zebras will be hopping all over the place.


Managed to chain piece a fair number of blocks already. This is super easy to do and should come together quickly.

Linking up to WIP at Freshly Pieced.

Until next time

Karin

Monday 28 January 2013

Anything Goes - Quilt & Sew Linky Party

Marelize from Stitch by Stitch is holding a weekly Linky Party.  Check it out...find her button for 'Anything Goes - Quilt & Sew Linky Party' on the side bar or simply use the link provided.

I have been trying to sew together a Spool block as part of the Blockbase Sew Along over at the EQ blog 'Behind the mouse'. This Sew Along has been running for a while and has been a great experience in terms of seeing the colour arrangements other quilters use for the same block.

For this week the block to make is #1407a of Barbara Brackman's Encyclopedia of Pieced Quilt Patterns, the Spool. This certainly is an exercise in sharpening your sewing skills. I have done inset seams before, but this is a while ago...obviously slightly overconfident, I pieced the first portion of the block together (there are 4 spools in the block)


Complete fail...this is the pressed version and as you can see it is completely out of shape and there is something wrong with the measurements. So, my winging it, just did not work...so much for confidence.

Today, I had another look and discovered that my measurements were out by at least 1/8" and I also had to do some reading up on inset seams to refresh my memory.

Second attempt turned out much better


1/4 of the Spool block


 Thought it might be helpful to show the pressing of the seams. Not sure whether this is correct, but the seams seemed to fall this way and the portion of the 1/4 block turned out nice and straight. My block will be 8 1/2in, so this is 4 1/2in square.


Have a great week.

Karin

UFO Sunday- An Arrangement of Small Pieces

I have a few UFOs left over from last year.

UFO Sundays on the Free Motion Quilting ProjectInstead of working on them I dragged out some blocks that had ended up in the UFO block pile and decided to sew them up. I started on these blocks early last year, having visions of making a bed sized quilt out of them.  I  experimented with the block in terms of its construction as I did not want to foundation piece it and made a few trial versions of the block...not exactly sure what happened next, but I think I decided the fabric was just not right, at least not for a whole quilt.

I love this block. It is called 'An Arrangement of Small Pieces'  and traces back to the The Kansas City Star (1928-1960). Such an unassuming little block that offers so many possibilities. I still have an idea for a quilt in my head (and on EQ7) but have not yet found the fabric for it.  I think this will be a case of  knowing it is the right fabric when I see it. Have a look  at the tutorial I wrote last year if you want to have a bit of a look on how to make this block.

I thought that the blocks, while not strictly matching in colour arrangement, could look nice together on a white background to make into a table runner. That way, they are not forgotten in that pile and I can use this to practice my FMQ in the border...I am thinking feathers all around to soften the strong geometric look.

This is how far I got in just a few hours ...ready to baste! (might have to have a look at my other blocks in the UFO block pile ...there are probably a few small projects in there). Table runners are such excellent practice pieces for FMQ.

Apologies re photo... This could be better. Somehow I just could not get a better shot and the white fabric on a white background made it look a bit "bla" (so I edited the grey surround in).


Linking up to Leah Day's UFO Sunday on the Freemotion Quilting Project.


Until next time

Karin

Saturday 26 January 2013

FMQ-McTavishing


Finally...

I have been piecing since Christmas (non-stop) and have 2 items ready for basting...while I was doing that, I nearly stopped half way through to continue to FMQ. Had to be really firm with myself to keep on task. Have another project that needs finishing before I can devote my time to FMQ again. Don't you love those self imposed targets!

Really, two sewing machines would be great, then you could hop in between. Mind you, I would still have the same problem in that I would be drawn to FMQ rather than the piecing. Bit of a dilemma at times.

Anyway, had to have a play and tried McTavishing after watching Leah's video. Not that easy actually in terms of working out where to go next. Love the texture though and am thinking about where I could incorporate this design im my projects.

Back to piecing...

Linking up to Freemotion Quilting Friday on the Freemotion Quilting Project.


Karin

Wednesday 23 January 2013

WIP #1- The Colour Adventure

WIP #1:

Late last week: Making good progress. Blocks are finished and ready to sewn together:


I was unsure whether to leave the paper in when I was sewing it together, however trialling this I found that this was too tricky in terms of getting the points to meet. So, I took part of the paper out as I went along. This worked fine, however, steep learning curve here...I should have secured my thread when sewing on the lines of the foundation and actually also used a smaller stitch length (I used stitch length 2, I think I should have done 1.5).

So, removing the paper was like walking on egg shells...I had to be super careful not to rip my stiches out. Had some very tense moments there, but got through it. Must say, I do not like working with paper foundations and have found a new sense of admiration for people who piece entire bed quilts like this. On a positive note, the pressing of the seams was not nearly as difficult as I originally thought.

Well, this is how far I got this week...Funny, I thought I had it all planned out in terms of what this was going to look like,  but then things change. Overall I was not a 100% happy with it as the merging points are fairly bulky (even after trimming them a bit)  and will make FMQ over it very tricky. Also made the points a bit wonky. Colour wise a solid black border would have probably been better but once the purple border was on I did not want to take it off again due to the fragile nature of the seams. The purple border idea followed my thinking that I would just use this as a FMQ project and for that reason wanted a 2" border to put a swirly design in there. Decided to just finish it off and be done with it. I will probably put a mix of colours around as the binding. The photo does not really do it justice...in real life it is very intense to look at...probably one of the more unsettling quilts I have done. Still trying to work out whether I like it or not.


However I am getting a bit excited about the next stage...FMQ. Almost having withdrawal symptoms as I have not FMQ for the entire month. Can't wait...have definite ideas for this one which no doubt will change as I go along...like I said at the beginning...this should be interesting.

Linking up to WIP Wednesday at Freshly Pieced to have a look what others are up to.

Until next time

Karin

Saturday 19 January 2013

Blockbase Sew Along #7

This is Blockbase Sew Along #7 and the block for this week is Thunder and Lightening (#1774).


I foundation pieced this block to keep it to 8", as all my other blocks are that size. Also thought it would be quicker...ha, ha, maybe not. Without fail, I did not have all of the areas covered, struggled with orientation of the fabric to be flipped  over (the whole reverse thinking does my head in) and usually once or twice, cut off the fabric that I had just sewn on...given that I am working on a foundation pieced project at the moment you would think that I would get better at it, but somehow my brain really struggles with foundation piecing.

Anyway, have a look at all the blocks at the Blockbase Sew Along over at the EQ blog 'Behind the Mouse' ...it is really interesting to see the one block in different colour combinations and how this changes its appearance.

Until next time

Karin

Wednesday 16 January 2013

WIP #2- Spider Web Quilt

WIP #2: Spider web quilt

Done some more research on the Spider web block and different ways of construction. In order for this to be a simple 'on the side' project, it has to be something where there is a minimum amount of calculations, measuring or concentration...all I want to do is use up my alarming amount of scraps.

Well, I already used the first method which involves sewing the strings on to a muslin foundation. That works fine, but made the block a bit heavy for my liking.

Another way would be to use paper as a foundation. If you want to read up on that method, you could head over to Bonnie Hunter's website for instructions. Another great site was Quilting Bee Blocks as it  provided instructions as well as links to the various ways of constructing the block.

Well, here is my way, a bit of a combination of methods. I am using very thin interfacing as the base to work from. I like working with interfacing as it is lightweight but strong enough to act as a foundation. I leave the interfacing in the block upon completion; again, this is for convenience, as I do not want to sit and remove paper foundation. I cut a square of interfacing exactly 9 3/8" and then cut it on the diagonal for a 12" block (finished size).


Next, I made myself a template. Now this was the only time I put a lot of concentration into getting it exactly right. This template is for a finished 12" block. Head for the links above if you want to see how you can make your own template.


Align the template with the interfacing and draw two lines for the kite shape. The template includes the seam allowance.

Line up a piece of your chosen kite shape fabric RS up exactly with the line and place the next strip WS up on top of it and sew a 1/4"seam. Flip over and finger press or use a iron on low heat to set the seam (you don't want hot, as it will distort the interfacing behind it).


Next, turn your triangle over so that you are looking at the interfacing and fold over the interfacing on the drawn line on the other side of your kite shape. Align your ruler on the fold and draw a line on the fabric of your kite shape.


Cut along this line and flip the piece over again, and align your next strip of fabric to the cut kite shape.


 Now here is the beauty...if you did draw (and cut) your line a bit off where it actually should have been  when drawing alongside the folded over interfacing, you will see it, as your kite shape is also drawn onto the interfacing (using the template) and the interfacing is see through, so you can see it from both sides and hence can make minor adjustments (i.e. line up your strip with the line drawn on the interfacing).

(Alternatively, at this point, you could have treated this as a foundation and just stitched 1/4"off the drawn line on the back of the piece, i.e. sewing on the interfacing).

Sew in place using a 1/4"seam allowance, flip over, press and then continue to attach strips to either side of the centre kite shape.


This is what you will end up with


 Now all that is left is to trim off all the excess fabric to create the triangle, using the interfacing as your guide.


Iron the seam allowances open when assembling the block (I use a mini iron to open them up and then press the block from the RS)
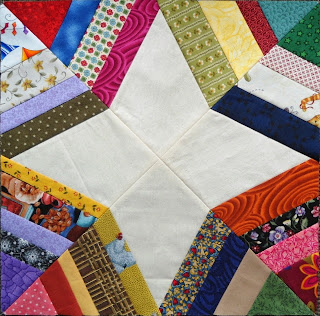


I achieved excellent accuracy with this method, my points match absolutely beautifully and I was able to streamline the process without having to use paper, cut out the kite shape or measure each piece individually. Added bonus, my blocks are very stable due to the interfacing being left in place, however not as heavy as when I used the Muslin as a foundation.

With that sorted out, I am looking forward to just continuing with those blocks over the rest of the year until I have enough for a bed size quilt. 


Karin

Tuesday 15 January 2013

Ideas for 2013

I am a list person. I have too many ideas and limited time. My list for this year is slightly ambitious, even for myself, as it includes projects not completed/started from last year and already a myriad of new ideas in my head.

Well here it goes...will be interesting to see at the end of the year what I actually managed to do.

  • WIP: Foundation-pieced colour quilt 'The Adventure'
  • Wholecloth: probably will take some time to bring this to fruition
  • Baby quilt: have bought material to do this one again; planning to write up the pattern for people to use...have started the write up.
  • Placemats: have a great idea for placemats which will also serve as a practice for FMQ designs
  • Dutch Table Runner: currently existing in my head
  • Maple Leaf Table Runner: also only in my head at the moment
  • Blockbase Sew Along: continuing
  • FMQ Quilt Along: need to produce some quilts first
  • FMQ: repeat of the December Freemotion Quilting Challenge at SewCalGal on solid background to make a cushion out of it.
  • Attending a workshop in April on FMQ  (feather designs)...no doubt there is a quilt in there
  •  UFO: string quilt...changed this into a spider web quilt...in production
  • Bag: got a book voucher for X-mas and bought 'Fresh Fabric Treats' with your favourite Moda Bakeshop designers...there is a simple bag pattern in there that I like. Promised my daughter a bag.
  • Bed size quilt: An Arrangement of Small Pieces...idea from last year; still feel the need to do this one; design is done, got a definite picture in my head, but have not actually done anything about it.


Karin

Wednesday 9 January 2013

WIP Wednesday at Freshly Pieced

WIP No 1: On-going Adventure Quilt

Working away on my foundation-pieced colour quilt. Colour placement is actually much harder than I thought...without fail I produced blocks that presented a bit of a thorn to my eyes when placed in their position...too much of one colour in one spot or the arrangement itself is not to my liking.


Anyway, I am getting there. I think this will be just a wall hanging. The array of colours is just a bit overwhelming and I decided that I would like the colour wheel section in the middle to be the centre of attention. If I continue with the quilt in scrap fashion as I originally envisaged, I think I will loose the whole point of this. As you can see I am definitely overthinking this...

The border will be black to make those colours really stand out but also to do some FMQ in light thread all over it. Really looking forward to this. Actually having some withdrawal symptoms as I have not done any FMQ for a few weeks and am in need of a finish so I can set up my machine for FMQ.

WIP No 2 : Scrappy Spider Web Quilt


This originated from my by now UFO project, that actually had not really taken off from last year. I started my second string quilt early 2012 to get rid of my scraps and had all good intentions to continue this throughout the year to be ready for Christmas. Well, that just did not happen...

As I have done a string quilt before, I felt the need for something a bit different but still easy enough to just have going on the side for those times when one does not feel for anything too complex. I have always liked the spider web quilts and decided to start on this. In terms of construction I considered the way that it was shown on the Craftsy BOM last year, but decided in the end to produce a template for the kite shape to cut down on the measuring (yep, I am a bit of a lazy quilter). I used Muslin as the foundation, so all I had to do was to place my kite shape over the triangle, draw two lines and off I went...worked very well and gave me adequate accuracy. Having completed a block I am now considering whether this will be too heavy...the muslin adds a fair bit of weight and bulk to the block.  Alternatively, I could cut out the muslin kite shape using my little template and use the thin interfacing that I normally use for string piecing. I definitely do not want to use paper...I want this to be a project on the side, where you can just sit and add strips without much thinking.

Has anybody used the Muslin as a foundation ? Be interested to hear about the weight issue.

PS. Yep, tried the interfacing and it cuts down the weight/bulk by half, I reckon...will demonstrate next time.

Linking up to WIP Wednesday at Freshly Pieced

Until next time

Karin

Tuesday 8 January 2013

Freemotion Quilting Linky Party

SewCalGal is holding a Freemotion Quilting  Linky Party during January.

I did not officially participate in the 2012 Freemotion Quilting Challenge...not because I did not want to but I just had to restrict myself in terms of the number of things that I was committing myself to at the time. Also, I had just started blogging and I must say, felt somewhat overwhelmed with the variety of projects that were directly speaking to me...a bit of inspiration overload.

I did however follow the Freemotion Quilting Challenge from month to month and did try out a number of things. All the tutorials were of such a high standard and I did learn a lot from them.

Here are some of the things I tried:

Diane Gaudynski's tutorial on feathers was the missing link for me...I finally managed to produce some decent looking feather shapes. Well, maybe not that decent looking in this picture, but I really felt that I was actually getting the shape. Following the tutorial I did continue to practice feathers throughout the year. While I probably still have a way to go, it certainly provided a solid foundation to work from and I did improve over the course of the year. Also discovered that I do better my my Machinger gloves off when I FMQ at a lower speed.


Also tried the Jester design from Wendy Sheppard during the August tutorial.
A fun design which I no doubt will use again.


Angela Walter's tutorial in July inspired me. Her tiling design was interesting and a fun way to jazz things up a bit. I went on a tangent here and ended up getting her book 'Freemotion Quilting'. This was another one of those occasions when things just clicked for me. I practiced the Concentric circles and discovered another one of her designs, the Swirled Hook which I had tried to 'get' unsucessfully for some time...for some reason her illustrations and explanations worked for me and after some practice I can honestly say that I now can do this design in my sleep. A very versatile design that works particularly well in sashings but also as a filler.

Cindy Needham's tutorial in June provided me with the idea to try her simple lines in the background of my little cat wall hanging. What a revelation...this worked fantastic and quickly and efficiently flattened out an area and bonus... looked absolutely stunning. Also taught me to let go of my need to be perfect as the lines are neither completely straight nor consistent.


Well, and then there is this little beauty


The December challenge with Patsy Thompson. I already posted about this before but just had to include this here again. I was so inspired, sat down and literally did this challenge straight away. This, i.e. quilting in borders,  is something I have struggled with for a while in terms of deciding re designs or simply having a go  at something a bit different...I was absolutely amazed at the outcome and am planning to do this again on a bit of a nicer piece of fabric...after doing the first 5 borders I also finally managed to tackle my own personal little challenge: to quilt some continuous feathers all around, something I had wanted to do for a long time and it worked absolutely perfectly. Even did some of Patsy Thompson's in-lining of the feathers and the motif in the middle (her little video was absolutely excellent). This was such a good practice piece to do and I learned heaps from completing it. Needless to say, discovered Patsy Thompson's webpage ...I think there will be a lot more feather quilting coming up for me.

While I have not mentioned all of the tutorials here, there was definitely something from each and every one that I took away, i.e. I just went the other day and bought some black netting to try Don Linn's way of marking designs on fabric...

In terms of tips...I reckon...PPP - Patience, Persistence and Practice.

Thanking SewCalGal and all her contributors for this amazing learning experience. Very much appreciated and I no doubt will continue to refer to the tutorials for as long as they are available on the net. Would encourage anybody to have a go and try out some of the designs or just read up on the advice that is provided in the tutorials. Brilliant.

Linking up to SewCalGal's FMQ Linky Party.


Karin

Saturday 5 January 2013

Freemotion Quilting Friday

Looking at Leah's Goddess Quilt, I began to think about what message I would like to give to myself this year and without hesitation I thought "Be kind to yourself". Coming into the New Year I already had started to feel the subtle pressure of joining in on several different things, plus have about five different projects of my own in my head (and two already started) and also have to complete some tasks that are leftover from last year. As I have a tendency to stretch myself too thin all the time, I thought that I might put on the brakes a bit for a while. For the time being I will concentrate on the tasks that I have set myself for the beginning of the year. I will follow along on the progress of the Goddess quilt and see whether I have some time later on, but if I start that now, everything else will just fall behind and I will become hopelessly overwhelmed. Maybe I just do a little practice sampler again to try out different designs. Not sure yet.

My new FMQ project is a Wholecloth quilt, albeit in its infant stages. Have played with the idea for a while, however must say that I do not have any experience with this. I took my little design and played around with it and managed to come up with an idea for the centre. The next problem was how to draft this into a whole design that I can transfer to fabric. Played around with paper for a while but in the end decided that I needed to get it drawn into the computer so that I could resize it and print out a quarter section of it for marking onto fabric.

I had some time over Christmas to tackle this and here is my first unpolished attempt:


This needs serious adjustment as the little hook picture does not fill out each square, hence just stands disconnected. However, on the upside, this gives me something to work from...

Have no idea on how big to make this, but started out with each hook being about 4 - 5 inches. Also seeing it in print, I thought that I might need something in each corner. Actually finally getting it into the computer was great as it allowed me to play around with it and try different orientations and arrangements.

I like this as a centre...no idea yet what I will do in the surrounding area. Also got a bit discouraged the other day when I started to look around on the internet, however had to remind myself, this will be my little wholecloth and it may just turn out very simple and plain and that  will be alright. For some reason I am a bit fixated on this. Isn't it strange how some things just need to be pursued...

Linking up to Leah Days Freemotion Quilting Friday

Free Motion Quilting Friday


Until next time

Karin
Wednesday 2 January 2013

WIP Wednesday at Freshly Pieced


WIP Wednesday at Freshly Pieced


I am linking up to WIP Wednesday over at Lee's at freshly pieced. This is the first time I am linking up...looks like good fun.


Well, 2013 is here and I am still in the planning stages for the New Year. Have too many ideas and too little time. Will have to make a list.

At the moment I am working on 2 definite projects and another few in my head :)

The first one I started way back...a foundation pieced play with colours. Finally had some time to get cracking on this. Here's a bit of a taste


Eventually managed to work out the sequence of the foundation. Went through a whole lot of confusion there for a while and kept on producing mirror images...together with sorting out the colours that became a bit of a nightmare. Then I realized that I had forgotten to reverse the image when I printed the block out bigger, so kept looking at the block the right way, but producing a mirror image...duh!!

Not sure what this will become exactly...but am making it with the intention on FMQ feather plumes in the yellow star. Initially I thought that I would then use a filler design in the coloured section, but now I am unsure as there are a lot of seams to travel over. Had not considered this...every project always becomes a bit of an adventure. In fact, I should call this 'The Adventure' as I am also not sure I like the solids in there. However, I promised myself to only use what I have in my overflowing stash container, so I probably will just run with it (ha, ha...note the 'probably' in the sentence).

As you can see this one is still truly in the exploration stage. Should be interesting to see what happens next.

Looking forward to having a bit of a look to see what other quilters have been up to.

Karin

Tuesday 1 January 2013

The Visitor

Just a quick picture of one of our regular visitors...have been waiting to get a shot of him for a while. We live in an area that has quite an abundant bird life and the Magpies come at regular times during the day to get fed or just to lurk around. They are closely related to the Crow and are fairly large (this one seems a bit younger). Reminds me of Hitchcock's 'The Birds' when several fly about...because they are so big they make quite a bit of noise when flapping their wings.


Wishing everybody a Happy New Year.

Karin

Popular Posts