Tuesday 31 March 2020

Let's Do Some Ruler Work Linky Party #5

Hi...hope everyone is keeping well and safe and keeping up some sense of normalcy in this crazy time. While we are not completely locked down over here, strict measures of social distancing are in place and I assume that lots of people are staying home, as we are. Thank you to those that linked up last time. We had
 - Sue Daurio from Sue Daurio Quilting-Longarm Services and Quilts with an absolutely amazing quilt constructed by Denniele Bohannan from Louanna Mary Quilt Design and quilted by Sue,
- Terry from On Going Projects using a Circle template to great effect, and
-  Rebecca from Cheeky Cognoscenti with several posts (which were quite funny), outlining some struggles, showcasing some fantastic straight line quilting and showing her wall-mounted rack for rulers.

I have had a super lazy week as I had day surgery last week (yep, they closed off elective surgery the day after I had mine!). Whilst only minor, I did take it a bit slower as anesthetics tend to knock me around a bit. However, I did finish off a quilt top and also tried another ruler from the Ruler of the Month Club 5 that was sent to me via post from my local shop.

 The HQ Curved Crosshatch Template 

The ruler is about 8in long and 1-1/2in wide, very nice to hold, particularly if you are stitching on a DSM which I currently do. So I explored a bit of grid quilting, something I have wanted to do for a while as I felt somewhat unclear about which way I should stitch my grids particularly in odd shapes.
I did some arcs...the curve is not the same top and bottom and I found it helpful to use this to make irregular channels. The first grid was stitched following a horizontal and vertical line just drawn through the shape and the second following diagonal lines. On the third arc, I followed the shape of the curve which is probably something that I do most times. The last arc...I am not entirely sure what I did there, but I think I only followed the vertical line in the middle which gives you that intricate lacy pattern.

Then I did just outlines and curves across blocks which then could be filled. The two curves are very close to each other, so I don't think I would be using it a lot to do echos.

This morning then when I was online, I came across the cyberquiltingshow from Handiquilter and watched a video with Debbie Brown where she used the Multi Clamshell Ruler to make spirals. That was completely ingenious so I had to try this straight away...
What a great idea!  Debbie Brown completed the first line on her longarm in the video however you could also have a more open swirl travelling along the drawn line like I did in the second line. This would make a fantastic E2E design across a more geometric quilt top and having tried this I think I could even pull this off on a DSM on one of the baby quilt tops that I have completed.

So, time to link up with anything to do with rulers that you have been working on or have worked on in the past.
Please note: following some advice and seeing that lots of people will be staying home the Linky Party will from this week forward run on a weekly cycle (Tuesdays). Hopefully this will help with people remembering when it is on and get this going a bit.


You are invited to the Inlinkz link party!
Click here to enter

Karin

Friday 27 March 2020

Happy Scrappy Houses Quilt Top Finished!

The House quilt top is finished. Took a bit longer than anticipated as I made it very scrappy indeed and underestimated the amount of time it would take to cut the scraps to the required size. But what a beauty!
This is a free pattern over at Bonnie Hunter's Quiltville site. My quilt comes out at 56in x 67in, a nice size for the sofa. It's one of the older patterns that I did see when I first started quilting and recently re-discovered. Definitely is a pattern that 'eats' up a lot of scraps, but will take some time to cut out and put together. In Bonnie's version the sashings are in one colour, however I quite liked the idea to make it a little bit more colourful as I already had decided on that blue border thinking that this would give it a nice, cheery contrast.

The blue border...I have had this fabric for at least 10 years! All it says on the selvage is David Textiles. Had about 2m of this, saving it for something special.
The photo really does not do it justice. It is just beautiful and I knew straight away that this was it. Funny how you just know sometimes exactly what you want to use for a particular quilt.

I had a bit of fun with this quilt, putting all sorts of characters in the windows for a bit of amusement.

The sloth, my absolute favorite
The hippo timidly looking out of the window
The piglets
The little chicks
...and many others, but I won't bore you to tears. Bit more work in terms of cutting them out, but brings a smile to my face every time I look at them. So darn cute!

I am planning to piece a backing together using some of the bigger scraps and some ugly fabrics. I did this last year for a small quilt and really enjoyed the process...like putting a jigsaw puzzle together and looks fantastic (remains to be seen for this quilt in terms of mixing in some uglies). I am determined to make this quilt entirely out of scraps and unwanted fabric.

In terms of quilting, I am thinking of doing an E2E design, however this will have to wait until I have my stationary longarm again (due to what's happening in the world, there seems to be a delay and I have no idea when I will get the new machine). The way this is going, I will have a lot of quilt tops to quilt once the machine arrives.

Next on the list is another pattern that I want to put together or maybe another fox quilt or maybe that irregular grid design...I have so many projects on my list!

Linking up to Off The Wall Fridays hosted by Nina Marie over at Creations...Quilts, Art...Whatever

Creations by Nina-Marie
Karin

Monday 23 March 2020

Testing Times

More and more restrictions in place across Australia.

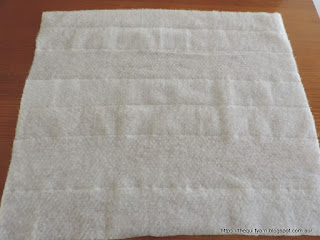
I spent most of the weekend watching the news and quilting. Finally got around to something I had been wanting to do for a long time...and that is, sewing my batting leftovers together. I did chuck a lot lot out about 2 months ago, but again have quite a selection of leftovers. I seem to keep everything!

I could use batting tape which I have used before, however that would be a bit expensive. This is only to be used for the many practice sandwiches that I do. Just to give you an idea of how much batting  is leftover from one quilt
This is about 28in square and is from the overage of the Traffic Jam quilt that I just finished. I use a three step zigzag stitch for this, but you could also just use a simple zigzag stitch. I have used this to piece together batting pieces for a quilt before and it presents absolutely no problems when quilting.

So, I spent the entire evening just rattling down batting pieces and have a whole stack of them ready to go.
I will do this from now on with all the leftovers rather than using fresh batting for the practice sandwiches. Way too much wastage going on.

Today then I continued on the Scrappy Houses quilt (see that empty space..this is where the new machine is supposed to go...still no word!)
Decided to take the scrappiness to the next level by also making the sashings all out of different fabric. A bit more work intensive but I am hoping to really reduce the stash of accumulated fabric cut offs as much as I can.

This is how far I got
I am not matching or coordinating colours because that would probably drive me insane and, of course, had a red cornerstone together with a red sashing. Very annoying but I will just leave that and sew them together as they come through the machine. Otherwise this project will become too time consuming. This is just meant as a throw for our sofas, so it will do. Planning on a very pretty dark blue border and then it will be done.

Linking up to Oh Scrap! over at Quilting is more fun than Housework to show off my progress and have a look around at what other quilters are up to.

Karin

Friday 20 March 2020

New Pattern - The Traffic Jam Quilt

Not sure how exactly this title came about, but it stuck.

This is my new pattern available in my Etsy Shop in two different sizes, i.e. crib/baby quilt size (40.5in x 50.5in) and lap quilt size (50.5in x 60.5in). I took my time with this as I always test the patterns myself, so I can be assured that my instructions are correct and easy to follow. The quilt itself comes together very quickly and could be done in a few days. It is extremely beginner friendly using strip-piecing as the main technique.

While the pattern is easy to do you could also end up with an entirely different looking quilt if you vary the placements of colours which I always find fascinating, like for example in this variation:


With that being done, I am already working on another pattern that includes the old time favourite 'the stretched star' arrangement. Bit excited about that one, ready to wash my fabric, got another Accuquilt die to speed things up, now let's see how long that will take!

Karin

Tuesday 17 March 2020

Let's Do Some Ruler Work Linky Party #4

Another 2 weeks have gone by and the world has become a somewhat scary place. Hope you are safe and well and keeping your spirits up whether social distancing, self-isolating or in actual quarantine.

I have not been blogging for the past 2 weeks mainly because my blog has been the target of spam galore. Initially I tried to limit this with word verification however that did not work at all and eventually I put on 'comment moderation'...something I have not had to do since I have had the blog, but it just got too much. So, for the moment, I will run with the 'comment moderation' to see whether it subsides. Very annoying.

Anyway, today I tested the Heart Shaped Ruler of the Handiquilter Ruler of the Month Club 5. Still have not got my new machine so I am doing this on my domestic sewing machine, the trusted Pfaff Quilt Expression 4.2.

The HQ Double Hearts Ruler

This ruler is the only ruler from Handiquilter (as far as I know) that you actually turn over to complete the heart. Usually you only use the side with the writing facing you otherwise your design would not come out accurately as the lines are scored on the bottom side and turning it around would distort alignment.

Obviously can be used to make motifs in a hurry and also heart designs in a sashing or border space.


So, here it goes...did some sashing designs to start off with by just shifting the ruler along (using the smaller heart shape). The full smaller heart in the second line comes to 2-1/4in, so fits nicely in a 2-1/2in space.
Then I did the motifs. The bigger motif with the nested hearts (love this!) comes out at 6-1/2in and the smaller one at 4-1/2in. Very handy to quickly put a motif into a square, something which I do quite often in the baby quilts that I make. I actually have a heart stencil that I normally use for this, however that means drawing it out, then going over it etc. ...this ruler makes the job much easier, all you need to do is put in the cross hairs to quickly and accurately stitch out the design. Even on this little practice sandwich it came out very accurate. Also did the hearts running up a center line which could be used in a border by stitching one side first, turning the ruler and then going down again on the other side. Too easy!
Stitching this out on a domestic machine though was interesting. The ruler is quite big, i.e. 7in x 4-1/2in, so it is somewhat awkward to hold. Also, as you are turning it over, I did not put the Handigrips on. Let me show you what I used instead, something that I use quite often with all rulers (even if they have the Handigrips on) for added stickability.
I bought a roll of this white rubber-like non-slip liner from the hardware store that you can use in drawers and under the carpet. I usually have two little rectangles that I slip under the rulers to help prevent them from slipping. Works really well, however I have been known to sew them to the back of my quilt, as I keep losing them as I go along! Something to watch out for...

Very handy ruler to quickly do some heart designs!

Time to share what you have been working on with rulers whether it is an old post or something you have done recently. Similarly, any tips or tricks that others could benefit from as they embark on the ruler quilting adventure would also be great.

You are invited to the Inlinkz link party!
Click here to enter

Karin

Tuesday 3 March 2020

Let's Do Some Ruler Work #3

How quickly does time go...must apologise as I forgot to post last Tuesday. No idea how this happened. We have arrived at Ruler Linky Party #3. Please consider participating to get this linky party off the ground and I will ensure that I keep to my fortnights. Also notified my followers re the wrong date 😲...apologies for that also! The next Ruler Linky Party is now on the 17 March!

Must say my timing for the linky might not have been the best as I am actually without my Sweet 16 at the moment, so I had to familiarise myself again with my DSM which in itself has been interesting. I started ruler quilting in all seriousness on the Sweet 16, so going back onto the DSM has been a challenge. Having said that though, it is all do-able and works just as fine. I dare say it takes a bit longer as you have to spend a lot of time checking the alignment because of the limited visibility...definitely have been spoiled with the Sweet16! While I have got some quilts ready to be quilted, I decided to wait for the new machine to arrive, so for the moment I am just playing around with rulers on the DSM (and doing an extraordinary amount of piecing).

I had a gift voucher recently for the Fatquartershop and discovered that they carry some longarm rulers, so I carefully went through and decided to get one of the earlier HQ rulers that I had been eyeing out here in Australia, the Multi Clamshell Ruler
 I spend a long time thinking about what rulers to get as there is just such an overwhelming variety on the market and they are in general so seductive. As I have participated in a number of Ruler of the Month Clubs (run by Handiquilter...No 6 is coming up soon!), I have got quite a collection, so any addition has to be carefully weighed up. This is a ruler that I specifically bought for allover patterns and sashings and borders. I was a bit surprised at its size...it just about covers my whole hand and on the DSM that added an additional challenge for some reason (I think it distracted me when trying to align it properly), however after a few designs I got used to that.
Here is what I trialed
The ruler has 1 1/2, 2, 3 and 4in clamshells. For those of you who have the Versa tool, it is important to note that the Versa tool has the 4in clamshell shape, however lacks the centering line going vertically down the ruler. Easy fix, I did draw that on the ruler when I was doing an overall clamshell design with the Versa tool. So, if you only ever want to use that size the Versa tool is just fine. However I wanted the smaller sizes for sashings and borders to give me some options. Again, you could use half circles to do just the same, if you got them, however I like the ruler stopping me just at the place where I am supposed to be. As you can see above the smaller sizes make quick and easy sashing designs, most notably the orange peel design and the interlocking clamshell design. I did come up with that funny leaf design on top of the clamshell...actually really liked that but not sure where and when I would use that, however it would fill up a border very nicely and is fun to do. My grid design above is something I want to do on a bigger scale over one of the quilt tops...here I just did it with the 1 1/2in clamshell to get the placement right. Love the look of that.

Also, on a side note, my DSM (Pfaff) initially kept shredding the thread...I put a titanium topstitch needle in and the problem disappeared. I had forgotten about this little hint. For some reason it works better with those needles and the shredding stopped.

Let's have a look at what you have been working on...
You are invited to the Inlinkz link party!
Click here to enter

Karin

Sunday 1 March 2020

Best Tool Ever!

I have been looking for one of these for a while by now and saw it recently in the Fatquartershop. This one is the Quick Press Seam Roller by Lori Holt.

Lately I have been making a few quilts that required to press the seams open (Fancy Fox quilt and also the Lana Lemur Quilt). Particularly on the Lana Lemur quilt I had to press each seam open as I went along (lots of tiny little pieces put together) which required me to constantly get up and go to the ironing board (which for me is in a different room) as accuracy was a must for that quilt. Not a big deal, however I had seen these rollers before and thought that this is the perfect solution to press your seams as you go and only getting up to press completed units with the iron, thereby saving a bit of time and streamlining the process.
When trying this out, I must say, I was absolutely impressed...definitely flattens the seam with very little effort, just rolling over it. This is really helpful and the seam is as good as if it is ironed.

Highly recommended!

Karin

Popular Posts