Saturday 30 December 2017

Planning for 2018

Before the year is up, here are my two recent finishes
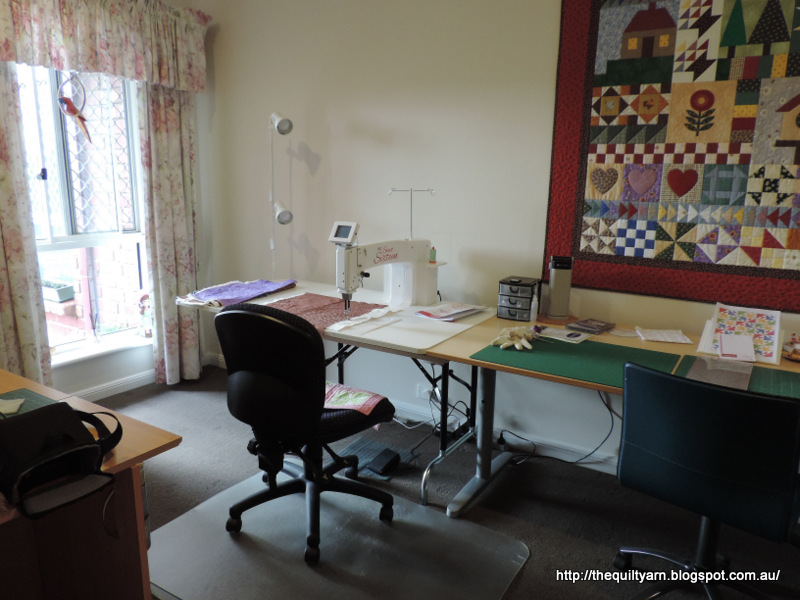
e2equilting on Sweet 16

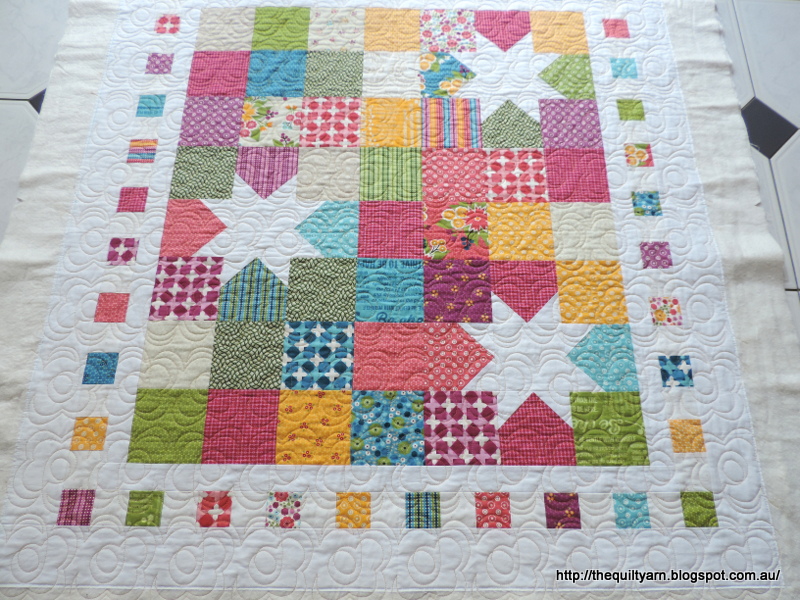
Another ruler practice quilt
I feel I am starting 2018 with a clean slate...haha, I wish!

So, what is on the agenda for 2018...I feel that 2018 is going to be a year of many changes. 

1. I need to get back to my blog. This year has seen me neglecting my blog severely due to many different issues like work, life in general, new Sweet 16 etc...I did post on IG a fair bit on what I was working on at times but I must say, I do enjoy blogging more due to the interaction with your readers. It is nice to hear from like minded people all over the world and I have had some very interesting exchanges over the years, a lot of handy tips on sewing related issues as well as finding tons of inspiration and encouragement. I am planning to get back to more regular updates and also am planning to write a bit about my experiences with the HQ Sweet 16. I have found that there is not that much around on the net other than people getting the machine and loving it. Can't say that that was my experience. I am attending a HQ group on a monthly basis which has been extremely helpful and I am hoping to share some of the learning on the blog.
Also need to clean up my blog a bit, refresh in general and work out a few technical issues like how to put photos side by side...

2. I am planning/just about to start another wholecloth quilt. The first one will be a bit of a practice run to see how I go on the Sweet 16 using a completely unfamiliar thread to me (Magnifico from Signature) and also using rulers to construct the framework. Really looking forward to this. If this works well, hopefully I will then get on to another wholecloth (on black cotton) that I designed last year. Nothing earth shattering, more or less a repetition of a pattern over the surface, but it should look nice on a dark background. Then there is the silk that I acquired some years ago...if I can get the rulers to work for me then a silk wholecloth could well be on the horizon. We'll see...

3. The blasted 1000 Pyramid quilt...what was I thinking!! I am by now more than halfway through...the photo was taken when I was still very excited about this 😏

One can only hope that I find some motivation to finish this!

...and another baby quilt like this...I am planning to write up the pattern for my little Craftsy pattern shop, this time with cute 'ducky' fabric in green and blue. Another one of those jobs that I did not get around to this year.


4. I am going to participate in Patsy Thompson's ruler online workshop during January. This should be good fun! Patsy is an incredible teacher and looking over her blog usually gives me tons of inspiration...hence the new wholecloth that I am starting.

5. I am looking at retirement/semi retirement in 2018. Big change! What exactly that will look like is still a bit uncertain, but it is definitely coming. This should be very interesting and should provide me with more time to concentrate on my creative adventures...I am looking forward to this new phase in my life and have a few ideas around this...most of them are quilting related of course!

Could go on with other projects that are in the back of my mind, but I will stop here as I don't like too much planning in my quilting. Usually inspiration strikes and then I get side tracked into another direction...new intense learning activities (like is currently happening with the rulers for me)... which may or may not work out. I really enjoy that more haphazard approach...works well for me and keeps me interested. If I knock off my project list above I shall be very happy.

I am linking up to the #2018Planning Party over at Quilting Jetgirl

2018 Planning Party
Karin

Thursday 28 December 2017

Handiquilter Ruler of the Month Club - The Mini Oval

This month we got the Mini Oval shape
I like those rulers where you can stitch on the inside and this one in particular sits really nicely in your hand. So I tried a few shapes...beautiful little ruler
Was quite amazed at the different shape I was getting shifting the ruler over a bit using those lines etched on the ruler and all of a sudden getting a pointy leaf shape. This was not obvious to me initially. Really pays to play a bit with the rulers as I discovered with this one.
As I had some time to play a bit during this Christmas break, I did come up with a number of different designs suitable for some small borders or sashings
How useful is this little thing! Using half of the arc gives you 1 1/4in shape. Will be on the lookout for slightly bigger ovals. Had no idea on how useful that simple shape is.

Finished my practice ruler quilt in the last few days. In fact, am spending my time sewing bindings on three different quilts...should have done this ages ago. The quilt turned out great, a bit wobbly in parts as I was learning to use the rulers as well as the machine, but overall I am really happy with my efforts. Have a great selection of weird and wonderful designs on there.
By far my favourite ruler has been the Line Grid ruler
How tidy do those grid lines look...so impressed with that ruler!

There is one more ruler to come which will be a quilting-in-the ditch ruler. At the moment I am using the straight rulers that I have for quilting-in-the-ditch. I really think that quilting-in-the-ditch with the ruler just comes down to practice. Since I got the machine I have done all my ditching with a ruler and feel that it is getting easier...not as clean yet as I can do on my normal sewing machine, but getting there...such a time saver doing it on the Sweet 16 though...definitely prefer it.

Karin

Saturday 16 December 2017

More Rulerwork

I have been bitten by the ruler bug! After reading a number of blog posts over at Patsy Thompson's blog the other day, I went and finally got myself an arc ruler and a set of circle rulers. This was not cheap, however I did research this quite intensely and concluded that I was not going to get around spending a fair amount of money. I looked at all sorts of options, some of them in the US but also over here. I have tried the Westalee circles ruler before and while it did the job I thought that the circle rings that Handiquilter produces would be a better option for me in terms of holding the ruler and stitching around it, particularly for the bigger circles.
Circles Ruler - Gold Set 2" - 11"

Arc C Ruler
As you may know, my passion is wholecloth quilting and in the past I stitched out all my designs from a traced drawing on the DSM. That was fine, but very time consuming and particularly with circles and arcs very difficult to do. Stitching freehand is fine but as soon as you hit long curved lines you are bound to get little wobbles here and there. While this usually does not matter, in a wholecloth design this is usually the center design and becomes quite obvious and a bit annoying, particularly when you are on your last arc and messed it up. It's all possible but it just takes so much longer.

Part of the reason for the HQ Sweet 16 for me was to use rulers more and make my quilting a bit easier and faster, hence my intense practice with rulers at the moment. The motif that you see on the top of the blogpost is not traced or drawn but done after dinner in a couple of hours just using the arc and circle rulers. I began with Cindy Needham's Ultimate Round Stencil (best thing ever!) and marked this quickly on my fabric which gave me a skeleton to work from and then just went around using the lines to align my rulers.
This worked really well once I had figured out how to align the arc ruler to give me accurate echo lines (it does take me a while to figure out all the lines on rulers). Even managed to put it a 1/2" echo and then realized that the little circle ruler I have is 3/4" so I had to fill this in freehand. Obviously I would make my pebbles smaller usually so it would look a bit neater. The possibilities are endless in terms of shapes, size and how you fill this in and the prospect of laying this down in a couple of hours  is very exciting, particularly when coupled with background fillers and grids. So, don't regret my purchase, in fact should have done this a long time ago...such a time saver and relatively easy to do, just as always...practice, practice and more practice.

Already mentioned in my last post...Patsy Thompson is running a ruler workshop on her blog in January. If you are interested in ruler quilting have a look. She is a fabulous teacher and all of her videos are so informative...this is bound to be great. Can't wait.

Karin

Thursday 14 December 2017

UFO Sampler

I thought that I had posted about my UFO sampler quilt but now have realized that I put most of the photos on IG!
Anyway, I have been using this as yet another practice ruler quilt and tried just about every ruler that I have on this. The center is finished and I have arrived at the borders. For this, I tried out the Handiquilter Wave ruler.
I have got the 8" wave with a 0.75" and 1.5" depth. Most of my borders end up around 4 -5" and I thought that this would just fit nicely. After a minor struggle to work out the middle of the border (I am so spatially challenged!) putting the wave in was a breeze. Does not really matter if you are slightly off in holding the ruler as it is wavy. This was a bonus. After having stitched the wave, I then shifted the ruler and roughly marked the boundary for the feathers in.
This was easy as and the end result is very neat

Bit hard to see as the batting is not particularly puffy and I used the Aurifil 50/2 thread that just seems to blend in but this is only for practice and to have a bit of a trial to see how this ruler works. I only did the feathers from corner to corner and put a bit of a corner design in as I initially could not work out how to get around the corner, but when I had finished the first feather I saw that I could have taken the feathers into the corner lifting up towards the corner of the quilt and meeting the corresponding feather from the other side. Well, next time...

The real advantage with the ruler is that I only had to think about placement in the beginning. After the first border I could take the ruler and align it on the line that corresponded with the inside of the border (took a note of this!) and off I went. This saved a huge amount of time if I compare it with how I usually would have done it, i.e. used my curvable ruler and drawn it in for every border. Was pretty pleased with this.

Almost done now, so I will post a photo of the entire quilt once it is done.  Some of my handiwork

Actually getting better with the rulers and their alignment...in fact, I am getting a bit addicted to this (as you will see in my next post...). Got so many ideas!

Also, if you have not seen it ...Patsy Thompson will run a Ruler Workshop on her blog in January. Patsy is one of my favourite quilters and visiting her blog the other day I stumbled across this. This sounds like good fun and I will definitely participate. In fact, going over a number of her blog posts about ruler work in general my head was buzzing with inspiration.

Karin

Tuesday 5 December 2017

Almost there!

I finished the quilting on my baby quilt
This took me a while as I have developed a good dose of Bursitis in one shoulder. As I decided against a cortisone injection, I had to take it a bit easy with the FMQ. Also had to re-evaluate my set up with the machine. Initially I thought the machine sat too low, hence one day we took the machine off, turned the table around and put the legs higher...what a hoot!...only to realise a bit later that you could quite easily adjust it by one person just lifting the machine with the table on one side and the other person adjusting the legs. Took 5 seconds!
Once I had done this, I realized that the problem most likely was not the height of the machine, but the way my chair was not adjusted properly at all. When we set the machine higher I then also had to set my chair higher, actually right to the top, so that left me no room for finer adjustments and my legs were not at a right angle. So, we put the machine down again and I inspected my chair...had to lift my lumbar support as this was just flopping around at the bottom and also tried to get the height right. Good posture when FMQ is so important...although I am not sure my shoulder issue was caused by the quilting alone. Might just be one of those things that come with age.
Anyway, so this went very slowly but without any trouble. As I previously mentioned, it is a bit time consuming as I used the Golden Threads paper method to get the E2E design on the quilt but it was much easier than I thought. The design remained straight across the quilt top...the beginnings and endings (as I did it in 3 sections across the quilt) were hardly noticeable and I was able to keep distances more or less consistent. A slight miscalculation occurred at the bottom as I had decided to follow the distances in the pattern as closely as I could, so it did not end up exactly where I wanted it to end, but that was fine. Really enjoyed doing this for a change.
Now I only have the binding left. I used spray basting for the first time and now wonder whether I should wash the quilt...probably should, I reckon.

Also did a bit of a play with my HQ Versa Tool ruler in between
Must say that I am getting better with my continued ruler practice...did not once trail off to the side and was quite impressed with this. This is a 2in clamshell. Initially I had marked a 2in line across the piece but then I just build on that. Even though the clamshell is not huge, this would look lovely on a smallish baby quilt. It gives a really nice soft feel to the quilt, so this could be another option for an overall design. Stitching this out on a quilt I would probably mark the whole quilt with 2in lines though just to make sure that it is kept straight.
I am getting quite enthused about different overall designs, but after this I will have continue on my other ruler quilt...have too many UFOs at the present.

Karin

Friday 24 November 2017

Handiquilter Ruler of the Month -

This ruler for this month is the Line Grid Ruler
Absolutely LOVE this ruler!

Finally the answer to my inability to do a grid just with a ruler. I have tried to do a grid with a straight ruler many times following the markings on the ruler. Without fail my grid ends up visibly inaccurate...just cannot align the ruler properly, it seems. So I was interested in this ruler and whether it would work better for me.

Definitely does!
I managed this simple grid (placed diagonally across) with relative ease and looking at it, it looks accurately spaced at 1/2in intervals and my lines are very straight. This is a bit exciting. While I will still do my larger grids with the stencil I have, for smaller sections this is ideal. The ruler is larger and you have a good grip on it when doing your lines...really like this one. Will try the different angles which are strategically placed across the ruler for ease of alignment next. 

Karin

Wednesday 22 November 2017

E2E on HQ Sweet 16

Overcome my stage fright and finally went onto the quilt. See my previous post on my preparation for quilting E2E on the Sweet 16.

First section completed...I used my EQ program to guide me in the placement of the motif. As you can see I brought the design right up to the edge of the quilt with some of it going to be taken up by the binding. I did a lot of shifting the design to and fro in the program and this was the best way to align it so that I get a similar look of the motif at the bottom as well.


Action shot with the paper attached

Could you do this on a DSM...you probably could for a smallish quilt, however I do think the space around the HQ Sweet 16 makes this a lot easier. What you see here is me quilting from the top down going across from left to right, so as I am approaching the end of the edge I have got the bulk of the quilt to my right. This would be somewhat difficult under the DSM. I was also glad that I could have the paper lying nice and straight. Even though I attached it with masking tape where I could there is the potential of movement if you are not careful. As I went along I quilted sideways at times and then often turned the quilt to have the design facing me lengthwise as I approached the end. The space around the machine makes this very easy. Not so easy was to follow a line...I am totally out of practice and had to go really slow. So there are some minor variations in the design but that will not be noticeable at all.

Not exactly a fast process. For this quilt I have to trace and quilt the design in 3 sections. This is ok for this baby quilt but I doubt I would do this on a Queensize quilt...that would take ages. At the moment I am tracing one evening and then the next evening I quilt the design across, taking the paper out after each section.
Very happy how this is turning out. This is a welcome relief from the allover designs I usually do (meander, swirling, loops etc). Not sure I will do this all the time but once in a while this could be quite interesting. The only thing to remember is to keep the design a bit simple and somewhat free flowing, otherwise you will sit there ripping out the paper for ages. In my little design the paper comes away fairly easy, the time consuming factor is more the tracing of the design. Looking at it though...well worth it, really suits this little quilt.

Linking up to Esther's blog for her WOW=WIPs on Wednesdays

Karin

Wednesday 15 November 2017

New baby quilt

I have been steadily working away on 3 different quilts. Yes, why do one if you can do several at once!

Finished my baby quilt. This one is made out of charm squares and gave me a bit of a headache as I also had obtained a packet of 2 1/2in squares in the same range, somehow thinking that they would make up 4 1/2in squares. Well, they obviously don't and after a lot of internet surfing I finally came up with a combination of designs.
I found the idea with the stars in the center on Pinterest...Vanessa Christensen from the V and Co blog. She had the charm squares and stars arranged this way in a small quilt in some greenish tones. Very pretty. I added some additional borders to use up my 2 1/2in squares...EQ7 came again very handy as the math just did not add up and I needed to do some tweaking. To my big surprise this worked out very well. 
The quilt is by now spray basted and ready to go! Spray basting was definitely a first for me...not sure I like it...got it all over my feet and then spread it all over the floor...bit messy. But I have got something special in mind for this one and spray basting was the better option.

I am planning to do an edge to edge design on it on my HQ Sweet 16. We learned about this in the group I am attending and given that I am really bored with my allover designs this seemed a great option. I selected a design from the EQ Quilting Designs Add-on Program Volume 8 called 'Mini Moonflower Design'. Got very enthused about this and tried it out on a piece of white cotton
While not the most exciting design I thought that this was simple enough to trial on this quilt. I think it suits this little quilt.
In between of course, EQ8 came out and I had to shift my baby quilt from EQ7 to EQ8...today I spent some time on it trying to work out the size of the design and most importantly the placement. While this is all do-able, a bit of planning is a must, particularly as this design is straight across in very definite rows, so I had to make sure it does not sit on every seam line and looks well spread out while still appearing as a consistent overall E2E pattern. The motif consists of 2 rows of flowers and I ended up making this eventually 10in high. The next issue was to pay some attention to the edges and the spacing. EQ 8 was enormously helpful with this...
I worked in Zoom mode and placed my motif where I could effortlessly start...also used that little ruler in EQ8 to measure the approx. distance at points so I have an approximate for placement. I then exported the image using the 'Export Marquee Selection' and pasted it into a Word document, so I can have a look at it when placing the motif on the quilt.

So now I have got a picture of the top left corner and the top right as well as the bottom. Also took an image of the approximate spacing which will be about 1/2in.

Now it is just a matter of doing it! The motif will be stitched out using Golden Threads paper and I will most likely do this in sections. My only fear is that this might not end up straight across for some reason. Well, we shall see...


If this works out I might get some simple pantographs to expand my options a bit in terms of overall designs. Found some really nice ones on the Golden Threads web site. Lots of possibilities!

Karin

Friday 27 October 2017

Handiquilter Ruler of the Month Club - the Swiss Cheese Ruler

Another month has gone by...

This month we were introduced to the Swiss Cheese Ruler
The ruler has three different sizes of circles, i.e. 1/4in, 3/4in and 1 1/4in.

This was a bit of fun playing around with this.
First tried just fitting the circles within lines...not that easy if you have trouble being exact in putting your lines down, but again, I think this is only practice. The circles are easy to do. If you look at the ruler you will notice the opening...in the Westalee rulers they insert a little piece to close that gap. With the HQ rulers that gap can be distracting as the foot sinks slightly into it and creates a bit of a notch. However, if you slow down a bit at that point and concentrate this is not much of an issue and even if you get a bit of a notch it is hardly noticeable.
I did try the 1/4in circles which are tiny, tiny...while they do create beautiful little pearls on a practice piece, I had problems fitting them nicely into my lined up 1/4in space. Personally  I think it is easier to do them freehand. The other two sizes are great though as you will not be able to keep it nice and straight if you were to do them freehand.
The square next to it has the orange peel design done with the 3/4in circle. For that I drew a grid in the square first and put my circles neatly into each square and then completed the overlapping circles. That worked really well and is a good way of doing this design at that size.
Next I did just lines with alternate circles, again at the 3/4in size. 
Really like this design...I used the straight edge of the Slice Ruler to give me a straight line and then just switched to the circles in between. I think I did draw a loose grid in the background first to keep my orientation straight.
And another one
Filled in some of the 1 1/4in circles as this is what they showed on the Handiquilter website. Thought initially that this was quite boring but actually looks really interesting. If you have them all lined up in a border and fill every alternative one, this could look quite good.

Overall really like this ruler as the circles are small enough to be used in blocks, sashings and borders in a variety of ways. While small I know from experience that no matter how careful you are to follow a drawn line, you will not achieve a tidy round circle freehand even at the 3/4in size. The 1/4in circle however is just a tad too small for me and unless I figure out how to align it precisely I probably prefer to do those little pebbles freehand.

Karin

Tuesday 24 October 2017

EQ8

I upgraded my EQ7 to the new EQ8 program and have been looking around the new program a bit. It does look quite different but is very intuitive. This is important to me as I do not like reading manuals.

So I drew my favourite block...bit rusty on this so just used the easy draw facility and drew 'An Arrangement of Small Pieces' as a 9in block, then coloured it, saved a copy and went on to explore the export options. Same as before, you can copy to Windows clipboard or export as a Windows Metafile. I had issues with that in the last program, particularly when trying to use this as a piecing diagram where you draw individual units out of the block.

Happy to say, this worked very well (could just be that I finally figured out how to do this properly!)


So I exported the block using the Clipboard option, then opened my Serif Drawing program and pasted the block in there, then ungrouped the block, so I could pick the individual units up. As I copied this with outline and fill, I then had to click on the units, and grouped the fill and outline together before moving the piece. This allows you to create a nice little piecing diagram. As I am in my drawing program I could now have added text or arrows etc. to demonstrate the piecing of the block.

Looked at the Rotary Cutting Chart (rounding to 1/8in or 1/16in)
Here is a snapshot
...and also looked at the Foundation Piecing option which now comes out coloured (if you want)

All very interesting...lots of little changes. The navigation around the program will take me a while to get used to, but overall a much more user friendly experience.

Curious to see what else I find. There are a lot of new features to explore, like you can now take pictures of your fabric to use in your quilt...need to get on to that as I find it very useful to use the fabric that I am actually using when designing a quilt. This could be much easier than the scanning that I have done before.
Head over to the Electric Company website if you want to know more about this upgrade.

Karin

Saturday 14 October 2017

Useful resources

Had a book voucher that needed to be spent and got myself a very useful little book
The book is aptly titled 'FreemotionQuilting Idea Book' by Amanda Murphy and goes through a variety of commonly used blocks illustrating different quilting designs that one could use on them. I often struggle with blocks and what to do in them so I think this will be very useful.

Also treated myself to yet another Craftsy class 'Freemotion Motifs for Classic Blocks' with Natalie Bonner in one of their recent sales . In the class Natalie goes through quilting ideas for common shapes as well as borders, sashing and Applique and demonstrates the quilting on her longarm machine. I have started watching the class and already used some of her little designs in my ruler quilt.
Simple, but very effective designs which can be done on the domestic as well as longarm machines.

Can highly recommend this class if you are like me and stand in front of a pieced quilt with that absolute blank look.

Karin

Wednesday 11 October 2017

Progress Report on HQSweet 16

If you have been following my blog you might be aware of my initial struggles with the new machine. Happy to report that we have arrived at a place where we seem to be on the same wavelength. After having spent a month or so trying to figure out the tension issues I must say that I now got a pretty good sense of the tension, at least for the Aurifil thread that I use most.
I did buy a Towa tension guide at a recent quilt show though...not so much to figure out the tension but to have a definitive number that I can use. This is important when you want to continue quilting with half-empty bobbins. As the tension is set on a full bobbin I have found that a bit fiddly as the drop test is no longer that reliable. While you could go with setting the screw where you know the tension roundabout sits, I do like the Towa guide in that it gives me a number, so all I have to do is set the bobbin to that number (which I determined with a full bobbin). This makes this very quick. And of course, I like the security of numbers over you just get a feeling of where that tension should sit. Over time that will probably change in that you do get that sense/feeling on where your tension should sit, but for a 'newbie' this is a great help.

I have quilted a baby quilt and a charity quilt on the machine and have had no problems. The other day then I tackled a shadow trapunto piece, now moving forward to the more detailed quilting that I am used to.  Yes, definitely getting used to it...the sound of the little tension spring was initially irritating but over time I have realized that I need to listen to the motor instead...that gives me my rhythm. Speed is amazing on the machine, but for the time being I will continue with my snail pace as this is what I am used to. Enjoying the ruler work, even though I am not that good at it, but that was one of the reasons I got the machine...to extend myself so that I have that option of using different rulers in my quilting.

I am in the midst of a piecing marathon at the moment trying to complete several quilts at once as I have ne new quilt ops to quilt on...getting bored already! However, one is finished and ready to be basted
Made out of UFO blocks! Not sure what I will use it for, but I like it. Probably will try my rulers out on this one. My 1000Pyramids quilt top is painful...have done 5 rows and am starting to struggle.

Speaking of rulers...got a Wave ruler at the recent show
Two lots of waves, ideal for feather borders.
Did a bit of doodling today ...felt a bit confident and used the Towa guide to try Superior Fantastico thread (40 wt). On the Superior website you can look up what the Towa number is when using different threads in the top coupled with a Deco Bob Prewound. That was very handy and worked really well for me after relatively little mucking around. Initially tried my Aurifil 50/2 in the bobbin, but the Prewound which is a Bottomline thread was the better choice. Was happy with my quilting...stitches looked fine and some of the wobbliness is gone and I feel that I am getting back to normal.
More ruler practice coming up shortly when I pick up the next ruler from the Handiquilter Ruler Of The Month club.

Overall, having fun

Karin

Wednesday 4 October 2017

Multitasking

I am out of quilt tops to quilt on...hence I am continuing on my 1000 Pyramid quilt. Wow, what was I thinking...there are so many points to match! Given my tendency for sloppiness in piecing this is going to be very painful.

Have done 2 rows so far, aiming for a King Single size. We shall see...

You would think that a scrappy quilt like this would make a bit of a dent in the stash, but I have to say I have hardly noticed the difference. What I did notice though was that I have an extraordinary amount of red fabric in the pyramids...just about every pyramid has some sort of red tone in there. Constructing the pyramids is good fun as you can chain piece along. Particularly love my new gadget...the Cutting Gizmo
Makes separating the chain pieced units very fast.

While I was doing this and looking at my stash in general (I really need to do something about this!), I found a stack of orphan blocks...I think they were from an EQ7 quilt along some years ago of which I dropped out after a few months. The blocks were very intricate and many were paper pieced. You would think that they were all nice and straight, but 'no' they were anything but straight...found some nice grey fabric to go with it (the fabric was from a Jelly Roll from Moda which I think was called 30s Playtime) and put some sashing around it, fudging a fair bit to get some straightness happening.
Love those blocks. This will not be exact and the piecing is somewhat wonky in parts but it will be great to practice some more intense ruler quilting on. I am planning to put a 4 in border around it in the grey fabric and also try out my new Waves ruler on that to put some feathers in. This should be fun.

Apart from that I have been searching the internet for a bit of an interesting pattern for Charm squares. I got a packet of Charm squares (Meadow Bloom by April Rosenthal) from the Fat Quarter shop last year to make into a baby quilt...as they had a special going at the time I also got a packet of 2 1/2in squares of the same range to go with it, not thinking much about how to combine this...
Found some simple ideas on the Internet and after a lot of math was able to combine some ideas on the EQ 7 program and come up with a way to use both the 5in squares and the 2 1/2in squares. Nothing spectacular...just squares to keep it simple. Currently waiting for my order of an 4 1/2in finished Accuquilt die to cut out some additional fabric to go with it. Figured that I often use this size and while I could cut it, I do like the efficiency of the cutter. Takes no time to cut out a whole stack of squares and you are ready to go.

So, hopefully in a couple of weeks I will have 3 new quilt tops to play with.

I am dropping in to Esther's Quilt Blog  who hosts WIPs on Wednesday

Karin

Popular Posts