Saturday 26 February 2022

Finishing Off and Starting Something New

It's been a while again...I tend to forget what I post and where, so some may already have seen pictures of some of these projects.

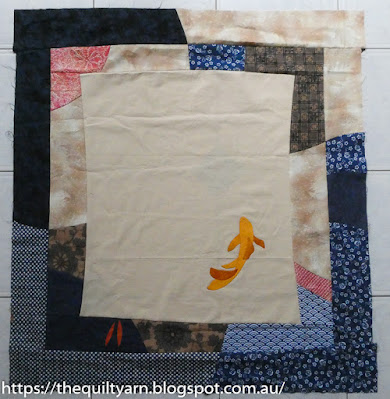
I finished my Koi wall hanging quilt top. Had to wait for some new applique foundation paper to arrive before I could continue. I had some Dupioni silk from my kit left and decided to make a second fish. This was somewhat nerve wrecking as there was not a lot of room for error. I had all these very small fins to make and turn the silk over so I was very careful not to stuff up as there was only just enough silk to make this one fish. Went very slowly and deliberate trying not to stress and it worked out fine.

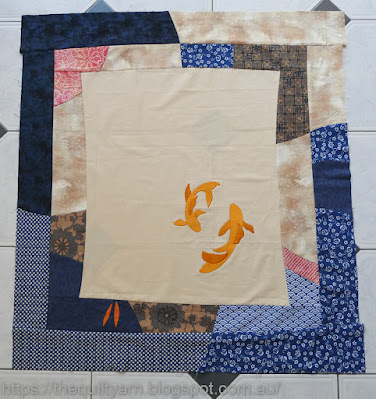
Looks really nice, very pleased with it. The Breaking Boundaries class will start this weekend...should be great!

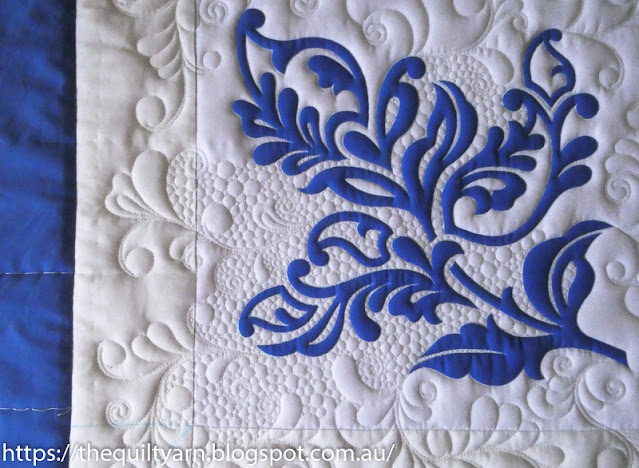
Also continued on my Nemeshing piece. As this is a lot of pebbles I did this over a couple of weeks, doing a little bit every now and then. It is hard to finish something when you know it has not turned out exactly how you had imagined it, however I thought it would be  good to finish this, so I would have a visual reminder of where I went wrong. 
I am calling this...'Pebbles with a Hint of Nemeshing'...as many of my smaller swirls have disappeared through the pebbling. Just did not make them fat enough and also thought that the double batting that I used was not the best idea. Live and learn! Will do some more feather practice in the blue border to finish this off.

Then I started another Baby Panel quilt. Discovered that I have done this panel before but when I bought it obviously did not remember this. Had to laugh, as the whole time I was thinking that I really liked this little panel...no wonder, bought it before because I liked it then! The Panel is called 'Jungle Fever' designed by Rebecca Jones for Clothworks Fabrics.
Did my favourite design over it again the other day...clamshells with the HQ Multi Clamshell Ruler. Love doing this on baby panels/quilts.
I do not mark the entire quilt top to do this. What I usually do is mark the first 2 rows, in this case two lines across the width of the quilt top 2in apart. The largest clamshell of the HQ Multi Clamshell tool is 2in x 4in, I then quilt the first row and mark a little tick half way on top of each clamshell. Then comes the second row, making sure I hit that little tick mark as I go along. After that I do not mark the horizontal lines anymore as my first two rows should have laid the foundation for being pretty much straight. I do however, continue to make little tick marks on top of each clamshell as I go along to just double-check that my clamshell are centred correctly. 
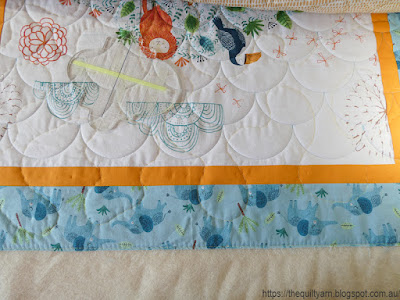
As you go over an entire quilt there are inaccuracies that creep in which I think is unavoidable. A slight shift in the ruler can make your clamshell slightly smaller or a bit of sliding and you are a bit off centre. I do make small adjustments as I go along like lengthening or shorten some clamshells however do have an eye on whether they are remaining straight and centred on each other. It is always a bit of a surprise to come to a space in the quilt, like a seam or similar where you then can see how accurate you have been. In a panel though there is not much you can go by and the real test came right at the end with this quilt top when I hit the first border. You can see that the top of my clams (the added lines in there is my basting) are approximately half an inch away from the first border. Not every single one was exactly the same but overall this was looking pretty good. There is no way that you are going to perceive little inconsistencies when looking at the finished quilt. Happy with that...this will be a cute little quilt for my Etsy shop.
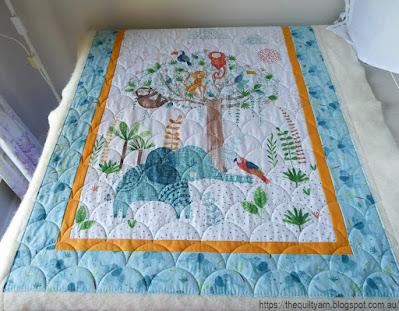
Now onto the binding and then I will concentrate on the Breaking Boundaries class.

Karin

Thursday 17 February 2022

The Koi Wall Hanging

Bethanne Nemesh' Breaking Boundaries online workshop is starting this weekend. I have been working on the koi wall hanging which is the 5th project in the pre-recorded workshop in preparation for this class.

It looked fairly straightforward just looking at it, but as I watched the video I realised that there was a bit more to it. Nothing too difficult but it demanded a fair amount of concentration and thinking things through. I followed Bethanne's basic layout...this is how I learn best just following along thinking the steps described through. There are of course a million different ways of doing this but I just did not trust myself to pull off my own design. Even the fabric selection was challenging...

This was not easy as I had something a bit special in mind for this. My youngest daughter who is a potter had brought me fabric from Japan when she did a residency there about 2 years ago. No surprises, she chose some blues but also that oddly earth coloured fabric which just looks like the clay she uses at times. I really did think about what I wanted to portray for this wall hanging and thought about a murky pond at dusk with that odd light that you get just before darkness sets in. Like in Bethanne's wall hanging I put the sun (which is Shibori silk that came with the kit from Bethanne) on the side shining over a little bit to the other side and then put the darker pieces around it. The Japanese fabric was different. It was only 15in wide and I did only have a fairly limited amount so had to think this through carefully. Probably the first time I used the carpet as my design wall...
The individual curves were easy to do, particularly now as I have done that many of it. What was new was the curves continuing from one border into the adjacent one. Watched that video intently and promptly cut my sun to smitheeriens...did not match at all. No idea how that had happened, so with the last piece of Shibori silk I cut a new curve and hoped for the best. Was relieved when that worked and encountered no other problem with that. After the first border was done, the second border then matched some of the seams of the first border. Oh, what fun on a curve! As I had done this before for one of my other pieces I felt slightly confident with that.
Then came the koi...Bethanne uses needleturn applique which is machine stitched to the background. Never had done this before, so gave that a go. The first fin of the fish that I tried was a complete disaster and unusable (the Dupioni silk, also from the kit, frayed like crazy and I did not manage the points at all). Again, only had a limited amount of the silk as well as the fusible paper product that came with the kit. Made a few more mistakes but managed to get one koi done.

 Apart from one bulky area I did very well on this, mind you, took me ages as I was going super slow on everything for fear of stuffing it up. Very impressed with my efforts and must say I quite like the look of needleturn applique. Gives you a very fine finish. 
I now have a little bit of silk left and have ordered more fusible paper product in the hope of finishing another koi. We shall see...overall really happy with how this turned out. There are a few things that turned out a bit different than I had imagined but that was to be expected.

What a great learning experience this was...while I was doing this and following along the video I was already thinking about how I could use this method for a project of my own. I have this digital fabric lying around that would make a very interesting background. Need to think some more on this. Apparently Bethanne has another project up her sleeve which we will hear about on Saturday. Can't wait!

Karin

Monday 7 February 2022

Not Everything Works Out Every Time

We arrived at Nemeshing in our Feather Fiesta class. So I prepared that little pre-printed panel that came with the kit and made a start on it with some gusto.

Really thought I 'got' this...shapes flowed easily and gracefully over the area. I have extended my panel to make more room for practice and was slightly overwhelmed with all the space, however managed to fill it in  rather nicely.

Then I started the pebbling...

Can you see what's happening! My shapes are just not wide enough and I am losing some of the smaller shapes in the pebbling. Bugger, really thought I had this worked out but probably spent too much time concentrating on making the feather sprays (which was also a bit challenging as I tend to do them smaller being on the sitdown machine...every time I thought I was making them really long, I maybe moved 1.5in at the most). 

On the plus side...I am stitching with 100 wt Invisafil (Wonderfil) and love it. Not sure why I have never used that before for back filling. Usually use it for stitch-in-the ditch and it is brilliant for that, literally blends in anywhere. It is absolutely perfect for back filling and doing those pebbles.

Will finish this off despite the slight mishap...will just look like a lot of pebbling and will be a good reminder for next time. Might have to do a bit more practice around this to challenge my muscle memory as it is clearly working against me here. Have surrounded this with a blue border which I might use to do more feather variations as practice really is the key to master new concepts and executing a new design. 

Karin

Friday 4 February 2022

A New Look at the Traditional Pinwheel Block

Always surprising what I come up with. A few weeks ago I sat down to tidy up a new pattern on the EQ8 and as is so me...started playing around with various other blocks. Before I knew it, I had another pattern which spoke to me...it reminds me of Propellers and I just had to make it.

So, here is the new listing in my Etsy shop...The Modern Pinwheel Baby Quilt pattern. Very easy to do and comes together very quickly as you can chain piece the units as you go along.
While I called it Propeller Quilt, I put it up under the general heading of Pinwheel quilt, as there is a quilt block that is called the Propeller block which looks entirely different.

In the absence of any other good ideas I just called my block a pinwheel variation. For some reason though it reminds me of blades and I could imagine this to be an excellent quilt in darker colours for a little boy.


Had some fun designing with this, e.g. look at it in just one colour with a different block mixed in

Quite liked this but restrained myself from doing this one, as I decided to use my leftover tone-on-tone scraps for the new quilt pattern. That way I could justify to start yet another thing when I originally wanted to do an entirely different pattern.

My little quilt measures 36-1/2in x 45-1/2in and I deliberately did not use an overall quilting design on it. I liked the clean crisp look of the wheels and thought that texture would distract. Maybe I could have done some ruler work on it, but decided that I had too many other things on the go. So, I just stitched in the ditch around all seams which did not take long at all. I may put that quilt up for sale in the next few weeks as I cannot continue to hoard these quilts.

Back to FMQ for me now as I have to finish a little panel with Nemeshing which should be great fun and then I will go back to the pattern that I was originally going to do.

Karin

Popular Posts