Wednesday 30 November 2016

Pfaff Quilt Expression 4.2: Tension

I have been merrily freemotion-quilting away over the last week. Very enjoyable indeed!


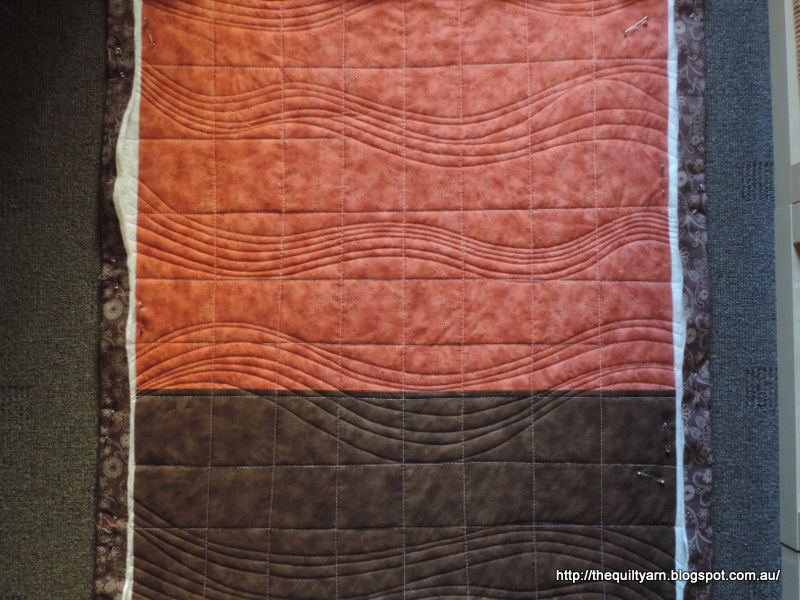
Since the last service of the machine which was earlier in the year, I did notice some tension issues, particularly when stitching on the thinner cotton batting. I was not particularly fussed about this as it was very minor. It made sense to me as the technician would service the machine, then try out the tension via the decorative stitches and make slight adjustments, if necessary. I doubt he would have tried the machine on its freemotion quilting capabilities...anyway, every now and then I did notice that the bobbin tension was just a touch looser than what I had come to consider normal. Made a mental note to mention this to him next time.

During my recent feathering though this started to become a bit more noticeable.
If you look at the left side for the third curl you can see that the top thread is starting to lie on top of the fabric while I was stitching the curvature of the swirl...while this is not a big issue it did, sort of, through my concentration off every time this happened. So it was time to tackle this. While my stitching looked ok otherwise, it was time to have a bit of a closer look. I put some dark brown thread in my bobbin
You could clearly see that the bobbin thread was coming through. While this is not entirely preventable, this was just a bit too much and definitively accounted for my top thread lying on top of the fabric particularly when going slightly faster.

The Pfaff machine has a drop in bobbin case which is similarly adjustable as in machines with the  'normal' bobbin cases. When I took the bobbin case out and pulled on the bobbin, it did feel particularly loose. If you need to start fiddling with your bobbin tension, I suggest that you make a note (or better still, draw or photograph the position of your tension screw) at where your tension screw sits before touching to change it. Alternatively, you can use a second bobbin case to alter your tension. I have got a second bobbin case and changed this. You will need a tiny screw driver for this

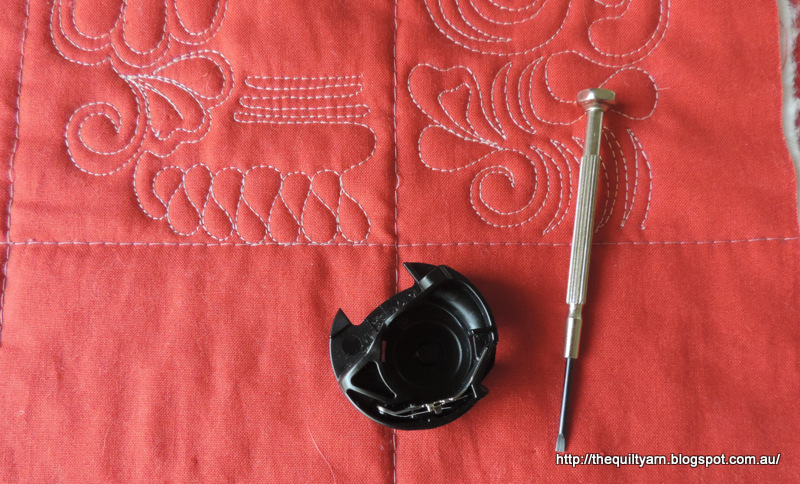
My tension screw in the bobbin that I am using was sitting at just after 12 o'clock, so I tightened the new bobbin case to about 10 past 12 o'clock, turning the screw to the right.

If you don't know which side I am looking at, here is a photo of the bobbin case in my hand. The closed section of the bobbin case is facing my palm
You can see that my tension screw has been set at about 10 past 12 o'clock. Tried this and presto...we are back to normal
This is still stitched with the dark brown bobbin thread so the tension is just right, enough to pull the top  and the bobbin  thread right into the batting.

You will probably wonder why I did not talk about the top tension...normally with tension issues, you will adjust your top tension first. In my case I have stitched with the same thread for years (Aurifil) and use the same top tension (usually sitting at about 3.8). In order to adjust the tension, I would have had to make the top tension looser...given the thread was lying on top that would suggest that the top thread is pulling the bobbin thread too hard making it come up through the layers. However going down in tension would mean that my stitching would not look quite right as the top tension would be getting too loose. So the problem was clearly with the bobbin tension. Hope that made sense.

Stitched the next section without any problems and was loving it. Almost done with my little wall hanging!


Karin

Wednesday 23 November 2016

Lines Can Be Tricky

Started on my Bethanne Nemesh wall hanging. First step was to stitch blocks of wavy lines across the little quilt top (approx. 33in x 21.5in).

Easier said than done. I can imagine this to be effortless on a longarm machine...you just glide your machine over and you are done! Well, not so with a DSM. The machine is right in front of my nose, so even having a nice flat set up is of no great help as I cannot see beyond the machine. And while this would work for just one line, it would be difficult for several lines next to each other, as I just would not be able to see. Should maybe practice this.

So I looked in my tool box...what could I use to make the job easier? Remembered that I have the Sensormatic Echo foot
Gave that a go...and discovered that I am very much out of practice with this foot. In order to get it to glide across the surface, you need to have some speed, so on the lowest speed setting you need to depress the foot pedal all the way down (while at the same time watching where you are going) in order to get the gliding motion. Not used to that at all! Usually I start my stitching slow and gather speed as required. While you can also do this with this foot, when you are very slow it makes this annoying clunking sound...very irritating! Anyway, I did manage to get a grip on that and completed my first block of lines, only to realise that this was much too even (even with varying the width). This is actually not what I wanted for this quilt top.

So back to marking some lines on the top...I did this very loosely with an air erasable pen on the lighter fabric and some soap on the darker fabric, changed my foot back to the 6D Dynamic  Freemotion foot and stitched them out following my lines more or less. Afterwards I was thinking that I probably should have done this in the first place. You can see where I used the echo foot on the third block of lines...nice, but just too orderly.

Lines are done
As you can see there are some open spaces in the lines blocks...these will be filled with some FMQ later on. The spaces between the lines blocks will now be filled with some feathers a la Bethanne Nemesh, i.e. spineless, freeflowing, different types of feathers. This will be interesting. I think I might begin with a 'normal' type of feather first and then do the last three following Bethanne Nemesh method, weaving in different feather shapes as I go along.

Need to settle on a thread colour next...would like to use something light, maybe even different colours across the lot. Unsure...too many choices, as usual.

Linking up to Let's Bee Social over at Lorna's Sew Fresh Quilts

Karin

Monday 21 November 2016

Leftover Pouch

OMG...I have been bitten by the bag bug. Still making little pouches, ever since I heard about the Bag It Link Up up over at Elm Street Quilts.
I promise, this is the last one for a while...I mean how many pouches do I really need?

Could not resist though. I used the same pattern as for my last pouch (Pattern a la Carte from The Wooden Bear) as I liked its easy construction. Very quick to make and turned out just as nice second time around.

I used some of the last bits from my Drifting Leaves quilt and just sewed some strips together, using bits and pieces. Also used leftover small bits of fusible fleece and stitched them together for use, so felt particularly frugal.

The pouch is very pretty with two different sides


So cute...found some beads and a thin leather strap in the cupboard so I used this for a bit of fun embellishment.

Linking up my little pouch to Bag It Link Up over at Elm Street Quilts. Elm Street Quilts is running this event right into December and you can link up any bag which gives you an entry in the event. Really enjoying this event, but that's it...no more! I actually need to get going on some other quilts.


Karin

Thursday 17 November 2016

Another Finish

Finished my Drifting Leaves Quilt, however will not be linking it up in the FAL 2016 as I forgot to mention it on my goal list for this quarter. Never mind, I know it's the second finish.

I must say this quilt is one of the most beautiful projects I have done in a while. To clarify, this is not my pattern...I won the fabric and some Auriful thread earlier in the year through the Aurifil blog (Auribuzz). Initially I had planned to make a little Owl quilt from this, but when the packet arrived I realised that I did get a Snack Pack which consists of 2 1/2in strips. The fabric was just so beautiful and I really did not want to cut them up...so, in the end I did the quilt that was displayed on the back of the packet which was Shannon Brinkley's 'Drifting Leaves' Quilt. This quilt truly displayed the fabric in the most favourable way and I always had wanted to just make a strip quilt.

And here it is
Drifting Leaves - approx. 49in x 62in
I enjoyed making this quilt and used it to try a few different things on it, i.e. using a number of different decorative stitches to attach the leaves. I have posted about this HERE

Also, I laboured over how to quilt this. I really like the wavy lines that are used for some of the modern quilts, however for this quilt doing wavy lines horizontally did not suit. Doing wavy lines the length of the quilt freehand would be possible however I doubted that I would be able to maintain them somewhat straight and consistent over the length of the quilt doing them on a DSM. There were very few reference points (other than where I pieced two strips together) and some of the leaves were slightly tilted which would have surely send me down the wrong path.

In the end I decided to use my machine...I selected one of the wavy decorative stitches and stretched it out to maximum width, shortening the stitch length at the same time and put it into the machine's memory for continued use. I then made a bit of a plan on how to tackle the quilting


First I put a basting stitch right through the center both vertically and horizontally (I was using wool batting and even though I had it pin basted, I did feel it needed some extra securing). I then used masking tape to give me a straight line down the middle and another strip of masking tape some 8in away. I only stitched approx. 8in at a time, then stopped and did the next 8in following the numbers at the top. I also turned the quilt with every wavy line, going up and down which was a bit cumbersome, but ensured that I had no dragging of the lines. I was very curious (as in petrified) as to what this would look like...initially also a bit unsure what exactly I would follow once I had stitched the first line. When I started at the second line, it all made sense...I rode my sewing foot along the hills of the wavy line, sometimes just gliding along it and other times shifting it a bit to get some variation. This worked like a dream. As I was approaching the 8in masking tape, I could clearly see whether I was straight or a bit off and could make slight corrections. Overall this kept me very straight...in terms of variation and wonkiness, we are only talking about half an inch here and there.

Work in progress
Not that you can see it very well, but here is the first finished 8in, ready to take the tape off and go for the opposite side
Close up of the lines...I used two different colours...just because! Loved the texture that was emerging
And so I went along doing line after line. In retrospect, I could have structured this a bit differently and left some empty space that I could have filled in with some tree bark FMQ...that idea came about half way through the quilt! That would have worked really well as I would have had the lines for guidance.
The texture is gorgeous...just right for this quilt. At some stage I thought this might get too stiff because of the dense quilting, but it turned out great and it really suits the quilt.

What thread do you asked....Aurifil 50/2 wt, of course! This certainly eats up a lot of thread but you will be amazed...this is all I used for this quilt.
So economical, it's amazing!

Linking up to Let's Bee Social over at Lorna's Sew Fresh Quilts and also to the Needle and Thread Thursday Linky Party over at My Quilt Infatuation

Karin

Saturday 12 November 2016

Patterns a la Carte Pouch

A while back I won a Pattern a la Carte from The Wooden Bear through the FMQ challenge run by Quiltshopgal in 2015.

I finally got around to making this pouch.

With this pouch there were several themes that you could choose from  the web site. I chose the following
 I printed them on Matilda's Own Printable Fabric Sheets (you need two sheets if you want to include the side label) and cut out the bits that I needed super carefully. The pouch pattern was fantastic...there were three different options to change the look of your pouch and the instructions were easy to follow. The only thing I changed was the batting...I used my trusted fusible fleece.

Here is the completed pouch
The only issue I had was that my printable fabric did not like the heat that much and got slightly singed in parts. Had this problem before when making labels and ironing them...something to watch out for next time. Apart from this, this is one of the best pouches...the zipper is inserted with a casing on either side which looks fabulous, the pouch itself is very quick to put together and best of all, the lining sits like a glove.
Definitely will be doing another one of those once I get some more of the printable fabric sheets...this time paying more attention to the heat or maybe I should hunt around for a different product (as this has happened before with one of my labels).

Linking up my little pouch to Bag It Link Up over at Elm Street Quilts. Elm Street Quilts is running this event right into December and you can link up any bag which gives you an entry in the event. I might even do another one out of the leftovers of my Shannon Brinkley fabrics!

Karin

Friday 11 November 2016

Onto the Next Project

While I am finishing off the Drifting Leaves Quilt I have started to prepare the next project...Bethanne Nemesh' Bird Wallhanging. I did a class with her at the Australian Machine Quilting Festival, which was fantastic...the pattern for this little wall hanging was included. From memory hers was done in blue and yellow tones and looked stunning, to say the least.

Mine is going to be in Australian colours...the heat, the dust...the sunburnt country!
Can't wait to get going on this...lots of FMQ quilting coming up using Bethanne's 'Feather Faster' method of stitching spineless feathers across the quilt. Have not fused the birds as yet as I still need to construct the wire they are sitting on. Also wanted to see whether the bird is black enough to stand out from the brown. Looking at my instructions, I think they get fused on after the quilting...? Not sure about this.

Excited about this as I am hanging out to get back to FMQ. Have not done any FMQ other than a bit of doodling here and there for a few weeks.

Karin

Thursday 3 November 2016

Zip It Up Craftsy Class

Got a free Craftsy class thanks to the Ultimate FMQ Challenge that was run by Quiltshopgal during the summer.

After much searching and considering I got the 'Zip It Up' Craftsy class with Joan Hawley. While I have done zippers before, I definitely struggle with them and thought it was time that I had a bit of a look on how to do this properly. There are three bags to choose from in the class, all with different ways on how to insert the zipper. I rather liked the Bendy Bag...a small bag with an interesting shape where the zipper was cut and a casing was attached.

So I bought some psychedelic zippers
I am so easily distracted...I have so many other things to finish and to start...little bags were not really on my radar, but this was just too enticing.

I finished this little bag in a day (so satisfying!), having watched the 'Zip It Up' class in its entirety when I first got it.

Well here it is...the Bendy bag
Very sturdy little bag. It uses Fusible Fleece for stabilising. I quite like that product. Easy to work with and gives little bags like this a lot of stability and form. For the fabric, I grabbed what I had...these two Fat Quarters came from my goodies bag that we all got at the Australian Machine Quilting Festival. Nice and bold and the combination of green and purple looks great.
...and another shot. Very impressed with this. This uses a casing for the zipper which was easy enough to do following the class with every step. I literally hit the repeat button again and again...Actually I had very few issues other than pressing ahead and not listening and then finding out that I was supposed to do something different, like for example trimming all the seams to 1/8in. Completely missed that but for the last seam, so all the others are 1/4in which obviously worked just as well.
Cute little bag. Actually beginning to realise what I have been doing wrong with zippers in the past...while this zipper is not perfect, it is looking pretty good, i.e. it is sewn in straight for a change and fits in perfectly.

Highly recommended class...would not mind getting Joan Hawley's other class 'Zippered Bags with a Twist: The One-Zip Way' class. That looks really interesting as well.

Linking up my little Bendy bag to Bag It Link Up over at Elm Street Quilts. Elm Street Quilts is running this event right into December and you can link up any bag which gives you an entry in the event. Great!


Karin

Wednesday 2 November 2016

Drifting Leaves Quilt

I am working on my Drifting Leaves quilt. This is from the fabric that I won in the Auribuzz Blog Hop. The fabric is by Shannon Brinkley from her Dryad collection. It is absolutely beautiful and in the end I decided to follow her Drifting Leaves pattern which simply sews all the strips together.

For the leaves I ordered some of the Multicolour Print...gorgeous, gorgeous, gorgeous. Had trouble cutting into this, but managed to cut out my 17 leaves.
I am using this as a bit of a practice or re-acquaintance for some of the decorative stitches on the machine. I have another applique project in mind where I do want to use a variety of stitches. So I trialed  several different stitches to secure the leaves onto the fabric. Definitely was very rusty in doing this...some examples:
Filled circles as edge
Blanket stitch
...and close up of the uneven satin type stitch. I liked this one best as you cannot see any hiccups that will invariably happen
Uneven type satin stitch
Used various other options from the choice of stitches, some worked better than others. This time I used my Aurifil thread to do the applique which worked great and looks great as the colours coordinate nicely.
Quilt is now ready for basting
Found some nice dark blue dotty fabric in my never ending stash (the stuff I have got in there is unbelievable!) and put the binding together today.
Linking up to Lorna's Let's Bee Social over at Sew Fresh Quilts

Karin

Popular Posts