Thursday 28 January 2016

Trying My New Toys

While basting my baby quilt the other day, I got my wall hanging ready for basting as well, trying my new Ultimate Background Stencils from Cindy Needham.
Ultimate Background Stencil Collection
Marked part of the Japanese panel that I acquired at the last quilt show with the Twisted Grid (Papa size) stencil.
Twisted Grid
Had watched Cindy Needham's YouTube videos and placed the Twisted Grid vertically (the stencil has a horizontal and vertical alignment line) which gave me this great sense of movement which will look fantastic for the sky part of that wall hanging. Not sure whether I should have maybe used the smaller size...there was just so much choice! The marking was done with a thick blue water soluble marker and went like a dream. How did I ever do without these stencils...what a time saver! As this is just a little practice piece, I was a bit sloppy with alignment at times, however this was easy to correct and ultimately will not show. I am now debating whether to stitch this freehand or with the walking foot. Also not sure whether I am going to fill it or not...quite like it like that.
For the rest of the panel I used the Mama sized clam shells...and maybe I will throw in some Bamboo stencil. As I will be stitching with black thread on a black background this will just be texture. This should be fun!

While I was playing around with the stencils, I realised that these stencils could have a multitude of uses, not just background, i.e. my Triple Line stencil could easily be used for my Tumbling blocks quilt to fill in the individual blocks...very useful indeed.

Now back to the basting for me...


Karin

Monday 25 January 2016

First Finish for the Finish Along 2016

Bit of multi-tasking going on. While working on my other quilt, I cut the binding for this one and finished it off.

My first finish for the FAL2016
Whole Cloth inspired by Patsy Thomson 34.5inx34.5in
Love the back of this quilt
The FAL certainly gave me renewed energy to finish things off. Even attached a sleeve and hung it up. I found this beauty amongst the Christmas decorations in the cupboard. I remembered that I had not been happy with something and had put it away. Looking at it now, I struggled to find exactly what was wrong with it...

When attaching the binding, I remembered...apart from some design and technical issues, this quilt was bearding like there was no tomorrow. Not entirely sure why...maybe the backing was too low in quality...not really sure. Overall though, a really nice effort. I started this late 2013 and finished the quilt top in the beginning of 2014 when I had gone through all of Patsy Thomson's Freemotion Quilting Fun with Feathers DVD's, applying the things that I had learnt and trying out some pretty specky in-lining of the feathers. I then microstippled the surrounds. Can you believe it! I think I chose microstippling as I was not really confident to do anything else at that stage. Now I would put some gridwork in the background, I think. This really shows the continuous learning that occurs with FMQ.

Very happy with the outcome.

This is the first finish for the FAL2016. My original goal list is HERE

2016 FAL

Linking up to Eleven Garden Quilts for the 2016 FAL Quarter Link-up

Back to the baby quilt...

Karin

Wednesday 20 January 2016

Quilt Top Finished

My  baby quilt top is finished...this is the first of the quilts I nominated for the FAL 2016 to complete by the end of March.
Finished quilt top measuring approx. 52inx44in
I was thinking that the end result, while lovely, certainly does not correspond to the effort that goes into constructing one of these using the Y-seam technique. On the whole, it took me about 4 weeks to make my way through the Y-seams. I did find making the individual tumbling blocks easy and also managed putting the blocks into individual rows fairly quickly. The fiddly bit is really putting the rows together. If you want to have a bit of a look how I did construct this, please see my tutorials about Y-seams Part 1 and Part 2.

I am already thinking about the next one
Have this cute 'bug' fabric (bought several years ago) that I matched up with some simple tone-on-tone fabric. I think I might try out the strip piecing method for that one and see how I like the end result, i.e. will that seam across the top diamond really bother me that much? We'll see...

Not sure yet how I am going to quilt my Hippo quilt...whether allover design or just echoing around the diamonds and a bit of a loopy design in the borders.

Well, next job will be the basting which I really hate, so I am going to leave that for the weekend when it is hopefully a bit cooler.

Have not been over to Lorna's for some time (check out her Ugly Christmas Sweater QAL), so I am linking up to Let's Bee Social #108

Happy Quilting!

Karin

Thursday 14 January 2016

Y-Seam tutorial Pt. 2

Part 2 of the Y-seam tutorial is about how to sew the baby blocks together to make the quilt top. If you missed the post about the construction of the individual baby blocks please head over to Part 1

Ok, so you have your completed baby blocks in front of you
Tackling the rows (cut off the dog ears as you go)
 ...flip them on top of each other and align them carefully. As per normal you can feel with your fingers where the seams meet and nestle together.
Flip on top of each other
Once you are sure that the seams are nestled against each other, insert the pin right on the seam line and take the units over to your machine.
Inserting a pin close to the aligned seam lines
This looks dangerous...align your foot for stitching a 1/4in seam allowance and by turning your hand wheel insert your needle as close as you can get to the seam line with the pin still in place. The needle from your sewing machine now acts like the pin, so you can take it out and start sewing your 1/4in seam allowance.
Turn the hand wheel and insert your needle right on or closest to seam line
Like before, I stitch a few stitches into the seam with a small stitch length, then reverse back to my starting point and continue down the seam increasing my stitch length as I go. Do not stitch into your seam allowance as your Y-seam will not be sharp or lie flat. As you approach the bottom you will see your blue dot on the wide angle, slow down, decrease your stitch length and stop exactly on the blue dot (reverse a few stitches to secure, stitch forward again exactly to the blue dot).
Continue sewing the blocks together in this manner until you complete your rows
Now the fun begins...putting the rows together! I sewed the rows together in a zig-zag manner, starting from the middle (I felt that the alignment was easier from the middle out). Flip the second row over the first in a diagonal manner.
Flip the second row onto the first in a diagonal manner
My little red writing on the seam says 'Align this seam' as it was hard to see on the photo which seam I was actually pointing out. Again feel the intersections where the seams meet and also look at the blue dot that you placed on the wide angles. At this point I placed a couple of pins to hold my alignment in place however then flipped it over as I found it easier to stitch from one seam line to the next (rather than stitching towards the solitary blue dot with no indication whether the blue dot was right on the mark or had shifted slightly (in which case you would have a mismatch which in this pattern is very obvious).
Once aligned, flip over to insert your pin on the seam line
I followed the same process as above when stitching the rows together, i.e. aligned my seams which at this point involved six seams so you are going to deal with some bulk and the alignment is fairly tricky. Again I inserted a pin directly on the seam line and took it over to the machine, aligned the 1/4in seam allowance and used the sewing machine needle to hold the arrangement in place...then got rid of the needle and started sewing (decreased stitch length, stitched down and up again to secure the stitching)
You need to be fairly vigilant at this stage as you need to make sure that all the seams underneath are out of the way so you don't catch one of the seams in your stitching. Also, a word of warning on re-doing your seams. While I certainly have undone some seams that did not match, there is only a few times that you can do this before the seams become distorted or frazzled and it will become impossible to get a sharp point (yes, lesson learnt the hard way...had to re-do 2 entire rows as the seams of two blocks were completely distorted - remember the bias edges!). So spending a little bit of extra time on this step will save you from a lot of grief.
Perfect point
This was lucky...not all points turn out as nice as this one and with some you will just have to let go...I won't lie, the construction of this quilt top required a lot of patience, however once I had worked out how I was going about it in a bit of a systematic way, I managed my way through it with an appropriate amount of cursing and carry-on.
Press the point in a circular way
The seams will be pressed in a circular manner once the entire quilt top is finished.

Well, and this is it...not easy, but also not impossible if you go slowly and take your time with aligning your pieces.


Karin

Thursday 7 January 2016

2016 Finish-A-Long

2016 FAL
This what I need!

As you may have noticed I have not had a post with any goals, words, plans or the like... I have got so many projects lying around that I am genuinely confused.

This was the case until I came across the 2016 FAL event...have not participated before but this sounds like exactly what I need...some direction. Even if I only achieve half of what I put down for myself it will be so worth it. The FAL is an event that has already run for a few years and allows quilters to link up with a list of UFOs at the beginning of the quarter and then at the end of the quarter with a finished item (each finished project is a separate link as I understand it). Each link is also an entry into a random draw for great prizes. The links will be hosted on a number of hosting blogs all over the world at once. If you wish to find out about the schedule, information and the sites involved please visit one of the hosts at  'A Quilter's Table' 

Now for my list:
#1 Baby Blocks quilt - the dreaded Y-seam
This is my current project so this should work fine. I only have one more row to go and then the outside diamonds...how hard can this be. Quilting, binding...we shall see!

#2 Japanese Panel
This must be the third time I am showing this photo. Given my obsession with FMQ, this spoke to me at a recent Quilt Show. I now have Cindy Needham's collection of stencils and thought that I could try a variety of grids on the Panel.

#3 Whole Cloth
This is an older project (year before last?) I did come across the other day...only the binding to be done. Not sure why this ended up in the cupboard. Definitely needs to be completed.

and..another Whole Cloth that will no doubt go into the second quarter but I want to start listing this as I keep putting this off. As a bit of a personal goal I want to at least get this marked on the fabric, ready to be tackled during the second quarter.
There are so many more...no wonder I am feeling overwhelmed.

Linking up to Jess from Eleven Garden Quilts as she is closest to me.

Karin

Wednesday 6 January 2016

Y-Seam Tutorial Pt 1

I certainly started the New Year with a challenge to myself...to complete another Baby Blocks quilt using the dreaded Y-seam.

I have done the Baby Block design years ago
This started off as a great idea for a quilt but once I got into it, I nearly despaired. Those seams drove me nuts and it ended up becoming a little Mini wall hanging. I surprised myself in actually completing this. I still remember the cursing and carry on...needless to say, it took ages to complete.


You know how you sometimes look at a fabric and know exactly what you should do with it. Well, that was the case for me with that pretty Hippopotamus fabric (Urban Zoologie) by Ann Kelle for Robert Kaufmann fabrics. I thought of Baby Blocks straight away...mind you, initially I thought I might use the easier strip piecing method that I had found on the net, however then the call for a challenge took over.

There is a fair bit of information on the net about how to do y-seams but I need to write my own tutorial, so I can look back at it, if I ever want to do this again as there is a fair bit of variation on the net on how to press seams, how to align everything etc. I am determined to become proficient at this...I still got some 'bug' fabric that would also make a nice little baby quilt.

I used Sharon Hultgren's Easy Six Ruler from EZ Quilting to cut out the diamonds. If you do not own this, there is a wealth of info on the net on how to cut the shape at a 60 degree angle using a normal ruler. My blocks are made up of 3 1/2in diamonds.
Once cut out, I marked each piece 1/4in from the edge with a dot on the wide angles only. Mental note to self...use the blue water soluble marker pen rather than a black pencil mark!
Mark 1/4in seam allowance at the wide angles
Precision is an absolute must here as you rely on these marks for alignment of the pieces and to get sharp and tidy points. I used a template that had holes for the 1/4in seam allowance to mark this as sloppiness set in when using a ruler.

My diamonds ready to be sewn together
Align your pieces starting with the green top diamond onto the hippos....there are differing views on whether to start stitching at the blue mark 1/4in away from the top or whether to start at the longer end. My preference was to start stitching at the blue dot with a small stitch length, then stitch back and continue sewing down the seam increasing the stitch length to my normal stitch length again...all the way to the end.
Start stitching at the blue dot
Some quilters also leave a 1/4in gap at the narrow angle on the bottom, however I found that this is not necessary. Once done, flip it open...do not press your seams with an iron at this stage. Remember, you are dealing with bias edges!

Finger press the seam allowance towards the Hippo fabric
Again there was some variation...some people open up all of their seams, others do not. I tried several methods of pressing the baby block (once finished!) but stuck to my usual way and lightly finger pressed the seam towards the hippo fabric.


Now for the fun part...take the next diamond and place it on the top diamond
Stitching the Y-seam
Do not overuse pins! Usually I am a pinner however I have found that pinning tends to distort your alignment and the less pins the better, so I used at a maximum two pins at this stage. Once you get the hang of this, it is actually easier to not use pins at all. To sew it, I flipped my piece over and started exactly at the previous seam line (again starting with a short stitch length, stitching back to anchor the point and then continuing with the seam at the normal stitch length). It is important that you get this right, i.e. do not stitch one stitch into the seam allowance as your seam will pull and not sit right. So no chain- piecing here, in fact, it is fairly intensive with having to align your needle to hit the right spot, going forward and then going back the exact number of stitches, adjusting your stitch length  and dealing with bias edges, however with a bit of patience and calmness, all possible.

Sewing of last seam

Now that you stitched the second seam, take the top piece and rotate it anti clockwise (covering the hippos), pulling the top green diamond out of the way as shown above. As previously, start stitching exactly at the existing 1/4in seam line, stitch forward and back a few stitches and sew all the way to the bottom. When completed, finger press the seams in a circular manner and open up the center, exposing three perfectly shaped little mini diamonds.

Press seams in circular manner
And that's it, the completed baby block. I did press my block lightly and super carefully with the iron before I went on to the next phase, but this is a personal preference...as long as you don't overdo it and distort your blocks, I do not think it matters.
Part 2 will go into how to put the rows together and then join the rows in a zigzag fashion to complete the quilt. This is where the cursing is going to happen...happened to me this time again, however I am getting better (cursing has eased) and I am going to photograph this step-by-step  as I could not find a lot of tutorials on actually putting all of this together. So I hope that you find this somewhat useful and will join me again in this little adventure.


Karin

Sunday 3 January 2016

Excitement Plus

If you followed thequiltyarn on instagram you would have seen my Christmas present to myself that arrived just a few days before Christmas...

Well, when the package arrived (must say, the US postal service is amazing) I wrapped up the package in Christmas paper and put in under the tree to be unwrapped on Christmas day even though I was busting to open it. This was a lot of fun...

Here it is...Cindy Needham's Stencil collection (have a look on her web site if you have not seen them before)
The Ultimate Stencil (circle and square)
Ultimate Background Stencils
 There are 20 stencils all told, six of which come in three different sizes

Papa, Mama and Baby size
Now just have to work out how to store them...I could hang them but my sewing room gets full sun in the afternoon and I do not always remember to close the curtains and have nearly buckled one of my mats just lying on the ground (we are talking about 40 degrees plus here). If I want to hang them I will need new hooks on the wall that does not get the sun. Anyway, at the moment I am keeping them in the package they came in...very sturdy and flat.

I think I will start trying out a few stencils on the panel that I acquired at the last quilt show.

I could put the twisted grid in the top part (or maybe use several at once?) and use the medium sized clam shells in the black part... so many choices!

There are a number of  short You Tube videos on Cindy's web site where she demonstrates the use of them and also shows how she quilts some of her more involved fillers. Very informative!

What a great time saver this will be. Very happy with my purchase.


And here for a Christmas present that I did not buy myself
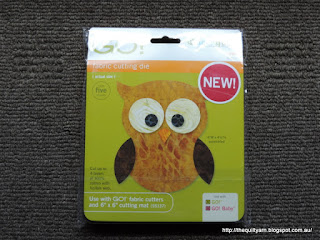
How cute is this owl?
I saw this at the last quilt show and absolutely loved it, even though it appears to only make this one shape...while you can use it to make the owl, you can also use it to make different types of animals like a pig, a racoon, a frog and several others. Too cute! I will start with the owl, I think...perfect for baby quilts.

Anyway I am back to my Baby blocks quilt...

Karin

Popular Posts