Monday 26 August 2013

Playing with Colours WIP

Made great progress on my latest WIP 'Playing with Colours'. Blocks came together very quickly and "ate" up most of the fabric.

Made a real silly mistake with my setting triangles though...as they had to be pieced I cut out squares of the blue fabric and cut half square triangles to attach to the white square...ha, ha...only to realise that this places the outer edge on the bias. Of course, I had cut up a whole lot of squares in preparation for this! I am really a bit out of practice with all my piecing at the moment.

After waking up to this and thinking this through in a bit more detail, I remembered my Companion Angle. Yah!...that allowed me to cut strips of fabric and then cut out the  triangles to the required size placing the outer edge on grain. Much better...can't believe I just overlooked this in the first place. However, this also meant that I was running dangerously short of the blue fabric.

This goes to show there is a good reason why one should always buy meters of fabric!


A few tips:

- think before cutting into any fabric!
- measure twice before cutting anything!
- pay attention to the seams when placing your blocks!

Yes, I did make a few more mistakes along the way like cutting an entire strip of blue fabric too short...in the end I had to do some very creative piecing to make this fabric go all the way.

To top it all of, when I had sewn all the blocks together and was about to sew the rows together, I realised that I had turned some of my blue four patch units the wrong way so that the seams did not face the right way for sewing the rows together! Can you believe it...I did undo lots of the blue blocks and one by one fixed them up...that took almost an entire day!

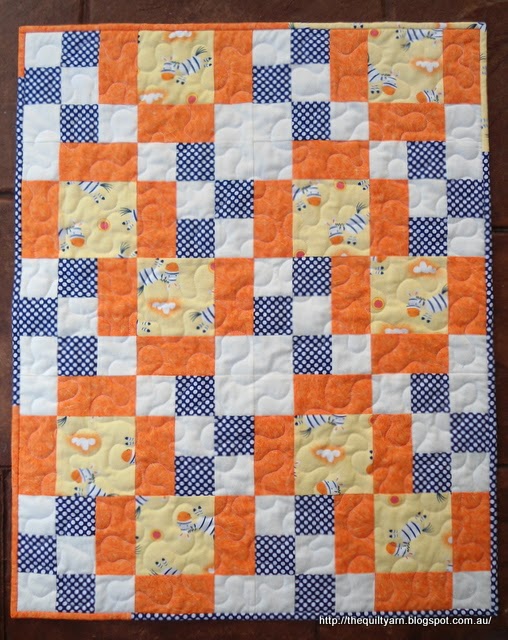
Finally yesterday it was time to square off this quilt top. Well, I can tell you that this took me several hours, as I took it especially serious. With hardly any blue fabric left, I could not afford to make any more mistakes, so I measured everything super carefully and squared it off bit by bit, taking my time with every step. This quilt will not have an additional border so it was important to get that right if I want a reasonably square quilt.

Turned out great! What a relief.

When I went through my stash the other day to look for suitable backing fabric I found this long forgotten heart fabric sitting right at the bottom of my container. I have got about 4 meters  of this...I could not believe it!  This is actually part of a range of  heart-themed fabric that I bought when it was on special. Not having any particular project in mind, this has just been sitting around. This is perfect as a backing for this quilt. Very cute.


This fabric is crisp and feels super smooth...so, would you wash this?  I did... in fact, I wash all my fabrics, even whites. This is because fabric contains certain chemicals as well as sizing,  apart from the fact that there is usually excess dye left in the fabric (and as I suspected there was a fair amount of red dye that came out in the wash...I use Colour Catchers when I wash fabric, so most of the dye is caught by that and anything left over will be rinsed out).

Quilting- wise not sure what I will do with this...for this project I was more focussed on the design and have not thought too much about the quilting. I don't think I will do an overall design as I think this could be too much. At the moment I am more looking at emphasizing the rows through the empty white spaces. We'll see. first I need to piece my backing together and then baste this baby.

Linking up to Anything Goes Linky Party at Stitch by Stitch. Check it out:


stitch by stitch

and WIP Wednesday over at Freshly Pieced


Karin

Sunday 25 August 2013

The Quilt Photograph Workshop

Ok here it comes...task for August was photographing fabric:

The photos were taken with a simple digital camera that by now is a few years old...no bells, no whistles...just takes pictures. Could not even tell you what this camera does...it's a Sony with some optical zoom capacity. I got this one when my daughter got a newer and better model when she went to Europe with her school.

This was taken in the evening - no natural light
I tried to take pictures a couple of times at night, but quickly realised that just does not work, so nowadays I wait for daylight to do my pictures.

Much better, taken in the daytime, but enclosed by white box
Here I experimented with a white box but as you can see this produced a shadow.
 

Taken in the same spot without the white box on white background


Taken in a different room in front of the window
It is currently winter in Australia so the light is not that great and photographing outside was not an option last week as it rained non-stop. Usually I take my pictures in front of the window in my sewing room. While I do get a bit of a shadow this usually works fine. Another good spot is on top of my sewing cabinet, however then I do get the TV in the background. I would like my photos to look blurry in the background, but have no idea of how to do that or whether this camera is indeed capable of this.

I quite like the photo of the coloured fabric on the white background. Probably should cover my background with a white sheet or something. That spot on top of my sewing table has the best light for photographing small things like fabric or single blocks.

So the main issues for me are:
- natural light and  a consistent spot to shoot my photos
- editing...I use Picaso which is easy enough, but I do spent a lot of time editing due to my poor shooting


Also wondering how many people use their phone to take pictures. I certainly have taken a few photos with my phone and must say, the phone almost does better pictures than the camera. Maybe I should experiment with the phone a bit more.

Linking up to Plum and June's Quilt Photography Workshop to have a look at how other people went about shooting their fabric.

Plum and June


Karin

Monday 19 August 2013

Playing with Colours - Again

As you would have noticed I am playing around with a lot of different designs at the moment due to being on leave at the present. As usual, overflowing with ideas and spending lots of time on my trusted EQ7.

I am still working away on my Disappearing Four Patch Country quilt...done most of the cutting, finally worked out the pressing of the seams and starting to produce the units in assembly line style.

At the same time I had a bit of a look through my stash...amazing what is in there. Some years ago I bought a lot of solid/tone-on-tone type fabric of different colours. I think the idea was to make a type of star quilt that would have a graduation of colour across the quilt top. Well, that idea was left behind and the fabric has just been sitting there. So, I trialled a few different things, but in the end decided to keep it simple otherwise I am running the risk to loose momentum on my enthusiasm to make a dent in that stash.

This is the first instalment of what I came up with. Simple, very colourful and easy to construct. That's what I am into at the moment...strip piecing and assembly-line construction. Set together with another block in an interesting layout, this makes for a nice children's quilt.


What do you think? As you can see I collected these very bright primary colours. I have meters of some of that and it just needs to be used up. Not sure what to call this block other than Four Patch. Hmm...maybe too simple.

I will make a few more of these blocks together with an alternate block and have a bit of a look at my idea.

It's Monday, so I am linking up to Anything Goes Linky Party by Stitch by Stitch.

Karin

Sunday 18 August 2013

Pets on Quilts Show 2013

Voting has now started at Lilypad Quilting for the Pets on Quilts Show 2013 and will go through to Saturday night,  24th of August.

VOTE FOR ME

I am Gorgeous Abby, entry #1


Seriously, there are some beautiful entries to look at and entering your vote will make you eligible for a prize, so head over to Lilypad Quilting for your chance to win.


Karin

Saturday 17 August 2013

Quilter's Show & Tell - Quilts with Pets

This is turning out to be the week of the cat.
 
For all those Cat lovers out there...my entry for this week's theme 'Quilts wit Pets' is this little wall hanging that I made out of a Panel that my daughter urged me to buy some time ago. I finally cut it up last year and used it as a FMQ practice piece to produce this little wall hanging:


The quilt measures 18in x 22 1/2in and now adorns my sewing room. For more detail on the FMQ you can find some close ups HERE
 
Head over to the Quilting Gallery for this week's entries. Voting will be open from Friday to Monday morning. 

Karin

Wednesday 14 August 2013

The Quilt Photography Workshop


Plum and June are holding a monthly Quilt Photography Workshop which starts off on August 25.

Basically it is for all of us who feel somewhat challenged with taking photos of their work and aims at improving our blog photography -the quality of our photos, the composition, the use of lighting, the variety, limiting the amount of post-editing etc.

The first link up is on August 25  and is all about taking photos of fabric...any fabric...your stash, favourite fabric or anything else to do with the fabric you are using. Actually I usually already struggle with this alone...this could be embarrassing.


Karin

Monday 12 August 2013

The Cat Mat

Look what I produced in just 1 day...

A mat for the cat...now you may wonder about this, however there is as good reason for this. Our cat is pretty well spoilt (that goes without saying) and has free reign of the house. She has a habit of lying on the bed which in itself is ok, if she would have the good sense to lie at  the foot end.  But no, she lies right on the top end and if she could she would no doubt plonk herself on the pillow...so we continually have to block off the pillow as we really do not want to share our pillows with her (bit allergic to the hair). Hence the Mini quilt.

For those of you who have been following my blog you will recognise this pattern...this is the leftover blocks and fabric from my baby quilt...I had an issue with my zebras being upside down in the original baby quilt so I re-did the quilt. These blocks were already sewn into rows, so all I had to do was sew a few shortened rows together and ...voila', I had a mini quilt. Even managed to use up all of the zebra fabric for part of the back and pieced together a few strips of leftover fabric for the binding...felt great to use up all the leftovers.


Did a large scale stipple all over it to keep it nice and soft...this was actually a bit tricky to stay at a consistent large scale level. However, given that this was a quick project I did not fuss too much over it and just went for it. Turned out really nice...ha, ha, I actually like the feeling of this quilt much better than the original.

Well, the idea is that we will put the little quilt on the bed and given that she is a cat she will assume that this is exclusively for her to lie on...that way we might gain some control over where she lies.

And did it work?

The ignoring trick


Mildly interested
May need some more convincing.

Success - I knew this would work

Linking up to Anything Goes Linky Party at Stitch by Stitch.


Karin

Sunday 11 August 2013

Pets on Quilts 2013


Pets on Quilts

My favourite event of the year is on again - the Pets on Quilts 2013 event hosted by Lilypad Quilting.

I had so much fun with this last year...the entries were absolutely gorgeous and some of them were positively hilarious. I think I spend about one week going through those entries and had many chuckles...


I have chosen this photo of our cat, Abby...love the way she pretends not to be there and the way she
is ignoring the camera as only a cat can.

Head over to the event of the year and spend some time looking through all those wonderful entries. The  virtual pet show will be open for new entries from now (August 11) until Saturday (August 17) and then voting will start on Sunday (August 18).  Voting will continue through the next Saturday, August 24. Did I mention prizes... for details please head over to Lilypad Quilting.

Let the fun begin...

Karin

Thursday 8 August 2013

Craftsy Pattern Store

Finally managed to set up my pattern store...very humble beginning with just 2 patterns, but I am super impressed with it as I have been talking about this for a long time.

Check out my new pattern


This is the first of a set of 4 placemats I am intending to complete.  I am thinking of having 3 placemats with a white sheep and then reverse the colours and have one with a black sheep...a bit of fun at the dinner table!

Here is the link to my pattern store:


I'm a Craftsy Designer

Karin

Wednesday 7 August 2013

A new WIP: Scrappy Country Quilt

As you may know I decided to make another scrappy Country quilt using the Disappearing Four Patch block

 Love the look of this block and think that it lends itself particularly well for a scrappy type of quilt.


Going through my stash the other day, I finally decided to use my 'special country fabric'.  This is fabric I won (21 Fat Quarters) in a competition run by the Australian Patchwork & Quilting Magazine in 2011 (Vol 20, No 7) to celebrate Leutenegger's 120th birthday. The fabric was an assortment of prints from Windham Fabrics, Andover Fabrics, Henry Glass, Robert Kaufman, Blue Hill Fabrics and SPX Fabrics....just beautiful. This is a start...not sure what else I will throw in.

My selection so far


Have not progressed that far, but made a start. The blocks come together easily and accurately and finish up at 8 1/2in square. Bit out of practice with piecing though...took me a while to figure out which way to press my seams. Got all confused.

My progress so far


This is exciting!

Linking up to WIP Wednesday at Freshly Pieced with guest blogger Liz from Shush - I'm Quilting

Karin

Saturday 3 August 2013

FMQ Friday

Short Update...not much progress since last week.

However, the feather frame is finished ...yah! Each feather took me about 3/4 hrs and I only managed 1 - 2 per day.

Now I only have to work out what to fill the space in between with. Will have to take a bit of a break as I will have to get to the city to purchase a thread that blends in unless I decide to use white....still a bit undecided what exactly I want this to look like. I got so carried away with my feather design that I did not consider filler designs. I could of course stipple this down...bit bored with that though.

 
Started just doodling with the machine...have not done this for ages...


Wow, quite an assortment of weird and wonderful shapes...I liked the spikey design but for the life of me could not get away from quilting it all in a row. I had seen this somewhere on the internet and in the picture it was definitely a filler design filling up an entire area...definitely not quilted in rows.

 Quite like this filler. Seen it on some of Patsy Thompson's projects and quite like the look of it.

However, I tended to get lost in it...did not come that naturally to me...definitely one to practice as I think this is a very useful filler as it lends itself to fill out all sorts of spaces.

Might have to check out Leah Day's 365 + designs to see what else I can find.


Linking up to FMQ Friday over at the Freemotion Quilting Project with Leah Day.

Until next time

Karin

Friday 2 August 2013

Are you a beginning quilter?

Had this post in my mind for a while ...for all those beginning quilters that look over the internet coming across all those wonderful quilts. I did not blog when I started quilting and I would imagine that looking around  the net could become quite intimidating and to some extent discouraging when you are a beginning quilter.

Therefore I thought I share my very first quilt with the world...warts and all. It a simple sampler quilt that I put together following instructions of a tutorial for beginners by Gloria Massard from Sew A Quilt on the internet. Now this is several years ago but the basic information is still there. This is how I learned quilting. The original tutorial had 6, 6in blocks...a Log cabin, Four patch, Flying Geese, Rail Fence, Diamond in a Square and Pinwheel block.

I got so enthused about it all that I just kept going and made it into a little quilt.


The end product looks alright from afar and I remember how proud I was (and still am) that I accomplished this. As you can see, already then I preferred the solid type of fabric.

Now let's take a closer look:

The Log Cabin block was somewhat hard and turned out seriously crooked...too many pieces involved
 I loved the simple Four Patch
 This was the first block I made and I was hooked
 The Pinwheel block had a big knob  in the middle where all the seams meet...in fact, there is a bit of a hole there.
 Flying Geese block
Diamond in the Square block...this was hard and from memory, I don't think it ended up 6"...but, hey, it looked great.


Actually, none of the blocks turned out at exactly 6 ".  I then put some sashing in between which did not really line up properly, but this probably helped to even it all out a bit as the whole quilt turned out reasonably straight.
 
Left the best for last...my stitching in-the-ditch was an adventure, to say the least. I used beige thread as this was what I had read in magazines about. Did not realise at that point that you could buy invisible thread and it also did not occur to me to use something maybe a bit less obvious. Still remember being quite perplexed about reading that  the quilting in-the-ditch would literally disappear in the ditch. Well, mine definitely did not, ha, ha...


So, hope you can see we don't all start with those amazing works of art, but from experience I can honestly say that each subsequent quilt obviously became more accurate and my workmanship  improved over time...it does not actually take very long at all to get the hang of it.

Happy quilting

Karin

Popular Posts