Here are the templates (except for the smallest one)

Beginning the Baptist Fan design at the bottom of the quilt from left to right is an absolute pleasure. Looks great and you always feel like...yah, I got this!

Interestingly though that did not seem to happen for the first few rows, in fact the templates aligned really beautifully.


I think I said it before in an earlier post that stitching these fans on a sitdown machine will never be as accurate as doing it on a longarm machine on a frame simply because you have everything movable, i.e., the bulk of your quilt shifts around, maybe even creating drag and on top of that you have the templates that can easily shift ever so slightly.
I have the Handiquilter sticky (and grippy) tape on the back of my templates (I also had just a rubber type sticky thing on the back initially, however found this too slippery). As you go up in template size, they are big. The 11in fan is as big as my hand, so it is important to stop several times during the stitching of that curve to reposition your hands as repeated shifting will make your entire row shift to the left. A little bit of shifting over is not too bad, however if you are not careful this could go out of hand. My 1/4in shift over was ok and I doubt that it will be noticeable to the recipient of this quilt. Funny enough, once I had discovered the slight shift and paid attention to the drag of the fabric, it did not occur again, i.e. my finishing fan on the right side remained in the exact same position which made me think that I struggled with the drag of the quilt when I started off.
In order to counteract this I folded my quilt in an accordion style manner so that the area to be quilted could move freely. That seemed to fix that issue.


I stitched the Baptist Fan with Omni thread (about 40wt; TEX 30) on my Bernina Q20. Had not stitched with a thicker thread for some time, so this felt a bit like stitching with a rope. (Had no problem with it, the tension sat on 5 using the same thread in the bobbin; needle 100/16) Forgot that there is a fair amount of backtracking involved and at times I struggled to get that to look really neat. However that is where these templates shine. The larger template has got these 1in markings that you can use to travel on your previously stitched line.

Another stress point in quilting this on a sitdown machine is when you have to turn your quilt over as you approach the middle of your quilt and there is just too much fabric in front of you. Switching it around means you are now quilting from right to left towards you rather than away from you. I always find this a bit harder however have found that it often fixes slight mis-alignments as you now quilting in the other direction. Another point to watch for is fatigue, that feeling of …oh, this will do, I just need to finish this row etc. and disregarding the mis-alignments. If you are tired, stop and do something else and come back to it with a fresh mind honing in on the alignment to get that back on track as you can fudge this here and there to get back to an almost perfect alignment.
So, did I stay straight? That is always a bit nerve wrecking when approaching the end as it will show you how well you executed your design over the quilt. Mine was not too bad at all. All fans finished approximately at the same point (except for one side which was a bit higher). Little indiscretions will not matter here as this will be covered by the binding, so overall I was really happy with it.

The finished quilt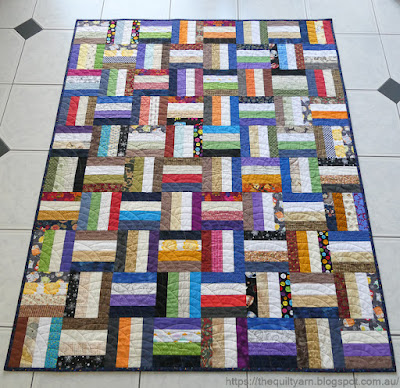 and the back


Currently debating whether to do this on my next scrap quilt which is bigger than this one. Just really like the look of the Baptist Fan for scrappy quilts in particular.
Karin


