Wednesday, 29 November 2023

To Do Tuesday #50

Well, I had quite a list a few weeks ago (can't believe I missed that many):

- finish hand stitching the binding on the backfiller project.✅- currently working on the hanging sleeve
- cut and prepare the binding for the Christmas quilt and attach it to the quilt.
- (OMG) finish that sock!
- make another 3-4 cat blocks
- decide which project to tackle next (this could be dangerous...definitely do not start another project before finishing what's on the list!)
- get back to my Etsy shop and prepare for Black Friday sales as well as thinking about a new pattern.-started

I did finish a few things over the weeks even though it was a fairly busy time. However, then when I really wanted to make a dent in my list, I got Covid...again! Very annoying ...apparently we are facing another wave over here so I suppose it was inevitable. And I just had been to the doctor recently and we did talk about another booster. I was going to have a look when I had my last one...haha, here I am. Good news though is I now do not need a booster for another 6 mths. Like last time Covid was difficult but it did not seem to incapacitate for that long this time. I did a test on Sunday and today already feel much better.

So, progress...I did do a couple of things

Finished a few more cat blocks and now only have 6 more to do (of a total of 25 blocks)

Would have had one more if it was not for that inexplicable 1/2in missing on one block. Absolutely no idea how that happened other that it was around the time when the brain fog was starting to set in.


Finally also finished my second sock
Only had about 5 rows to go before shaping the toe, so I was able to do that over the last few days. The socks fit perfectly. I really like this wool...Signature 4ply from the West Yorkshire Spinners. Feels very nice against the skin.

For readers who follow my blog I showed a picture of a design last time that I want to use for my cat quilt
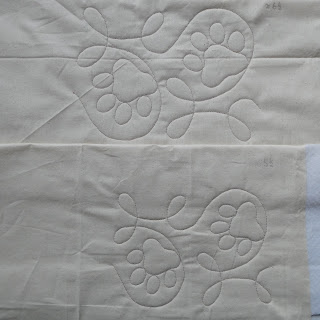
This is a variation of the 'Ginger Snap' edge-to-edge design where I inserted a cat paw instead of the circles that were there.
To make this workable I would have had to invest a few more hours of mucking around with my design to make that truly work. 

In the end I emailed Urban Elementz asking whether the designer could make me a design like this as it would mean they could just erase the circles out of their design and insert a paw. I am sure it was not that easy but I thought it does not hurt to ask.

About a week later they emailed back with the finished design. They were able to work with designer Melonie J. Caldwell and Apricot Moon Design to create the new 'Ginger Paw' design! How is that for great customer service!!!
Here is the new design
This has saved me hours of tracing and trying different sizes for the paw and the little claws are just in the right spot for effortlessly sewing around (mine were a bit crooked). I am over the moon...this will look great.
Well, and then there was Black Friday and they had a great sale on so I got another design called "happy Times' by Hermione Agee. Was looking for another playful swirly design.

The last few days I literally spent in the recliner chair...drawing! I have been looking at an old wholecloth design that I still have not stitched out and worked out what was bothering me about which meant the design had to re-jigged. I am using the Affinity Design 2 program which is brilliant but also quite challenging. The drawings I do on the program are usually fairly involved with hundreds of elements all on different layers. It was near to impossible to alter the original drawing as things were grouped together at different points and I had been particularly slack with naming my layers properly, so often could not find things, In the end I decided to draw it again, copying some groups but this time systematically labelling everything I was doing, so that any alterations in the future would be easier.
It was horrendous. The main layers are on the right side (all nicely labelled this time)...each of them opens to reveal elements, groups and underneath that every single stroke, so as soon as you open one layer you scroll for ages to try to find what you are looking for. I am actually quite bored with this wholecloth by now, however do want to stitch it out as a reminder of a class that I did many years ago with Cindy Needham. The Amish Curling Feather was a more recent addition and I struggled with that...in the end I decided that I would have them curling around the corners as well rather than have the feathers start from both corners because that would have meant that I would have ended up with the feather going the wrong way approaching the next corner and the piece is not big enough to do a 'meet in the middle of the border scenario for another decorative element. Please with my efforts, everything is locked down, all my measurements are correct, so hopefully this is it! The whole thing will come out about 38in square.

So, this was my week. What am I planning?
- try to finish 6 cat blocks and cut out the sashing ready to go.
- sew on the hanging sleeve to my background filler project
- take some photos of my Christmas quilt. I think I will put that in my Etsy shop for sale even though it is a bit late now...well, there's always next year.

...and I think, that's it. 

Linking up to To Do Tuesday #50 over at Quilt Schmilt

Karin

Tuesday, 14 November 2023

To Do Tuesday #45 - Christmas Quilt Panel

My goals from last week
- hand-sew the binding to the backfiller project and create a hanging sleeve (otherwise this will end up in the cupboard) - almost done!
- finish the sock!❌
- pin and baste the Australian christmas quilt.✅

Not super productive this week, but some learning occurred! Also finished another three cat blocks which for some reason was not on my list.

I pinned, basted and quilted that blasted Christmas Panel quilt. The panel is called 'Bush Celebration' design #DV5394 in the Devonstone Collection.  I bought a new pantograph design from Urban Elementz called 'Ginger Snap' by Apricot Moon Designs. The design is large (8in) , so I mucked around with reducing it in size to a level that was comfortable to do on a sitdown machine. You absolutely can asked Urban Elementz for a different size for a small additional fee, however I absolutely had no idea what size to go for and also wanted this design for another quilt, so possibly was looking at a number of sizes. In addition, I am a very visual person and needed to see the different sizes.
Not necessarily great for a Christmas quilt, but I did not want to get a Christmas design which I would only use once or twice and the Ginger Snap appealed to me as I can use that on many different types of quilts. 

So I made a start with the design reduced to about 6 in.
As I suspected, not that easy to keep consistently round even though I am following a drawn line. I possibly could go a little big bigger but definitely not 8in. I think I would start to struggle to keep going on those drawn lines. Loved the look of this and got excited about it, however...

...did not like it on that christmas quilt
As you can see took me a while to get a really good picture of that and I was ho-humming for a while whether to continue or not. In the end I decided to take it out. Just was not the right design. I felt that the playful design created additional busy-ness and was somewhat just wrong.
So I took it all out which took hours! Then I steamed that section to get rid of the stitching marks and lo and behold the iron spat out some brown gunk all over the section! Lucky for me all that rinsed out with cold water and also helped with making those stitching lines virtually disappear. I noticed that I got rid of my basting and put that back in once it was dry. Not ideal and I did make a mental note not to remove basting stitches in the future until I am definitely finished (as this caused some additional problems in the end).
In terms of design I was by now over it. Knew that I needed a calm repetitive pattern, so went with the clamshell design and finished this today.
This was not as easy going as it usually is. The batting is wool, so fairly soft and a little bit puffy. Had some issues staying on track as this panel does not give you a lot of points where you can gauge your alignment. Felt like I was going a bit blind and am actually a bit surprised that this looks fine as I was definitely out of alignment a number of times. Then when I had finished my last row, I flipped it over and wow...two clams had puckered in the last row and another clam had a pucker in the row below. I reckon this was the result of me re-basting it after I had rinsed it. Well, undid the last row and the pucker underneath, took my edge stitch out and re-did all that and finally finished this! What a saga! Looks good though with a calmer design.

On a more positive note, I did play around with the ' Ginger Snap' design in the week as I want to use that for my emerging cat quilt. I did look for cat related designs, however many of them are fairly involved, i.e. have lots of smaller elements which would be too tedious as I am stitching this out with the use of Golden Threads paper. I needed something simple that makes it easy to remove the paper. The Ginger Snap design also comes with different elements inserted, like flowers, hearts, stars (then called Ginger Flowers/Hearts/Stars etc) so I decided to insert a cat paw into it. Spent some time drawing out a decent cat paw in one of my drawing programs, then substituted the circle of the design with the cat paw at an angle. Stitched out (a bit roughly) two different sizes, one at 6-1/2in and one at 5-1/2in.
Stitched out really well and actually was easier than doing the circle. I reckon I probably can go a bit larger in this as I do not have to be so consistently roundish. Really cute and will be great for the cat quilt. Now I only have to fine tune this a bit in terms of size and my drawing (I think one of my claws is angled a bit weirdly), but definitely do-able.

So for the remainder of the week I am planning to
- finish hand stitching the binding on the backfiller project.
- cut and prepare the binding for the Christmas quilt and attach it to the quilt.
- (OMG) finish that sock!
- make another 3-4 cat blocks
- decide which project to tackle next (this could be dangerous...definitely do not start another project before finishing what's on the list!)
- get back to my Etsy shop and prepare for Black Friday sales as well as thinking about a new pattern.

Linking up to To Do Tuesday #45 over at Quilt Schmilt.

Karin

Tuesday, 7 November 2023

To Do Tuesday #44 - Playing Around With Shapes

My list from last week included:
- continue on my freemotionquilting project✅
- continue and hopefully finish my sock❌
- make another cat block or two✅
- re-think my Australian Christmas tree quilt. It is ready to be pinned and basted but I am now thinking of maybe just doing a pantograph over it rather than doing an involved backfiller as I am not really sure what I am going to do with that quilt. As I got other projects to finish I am thinking that this will just hold me up unnecessarily.
- deliver the charity quilts and pick up a new lot.

I finished my backfiller project! Just have the handstitching of the binding to do...

Some close ups...


Very happy with the end result even though I had a few problems with it. I stitched this with 100wt Invisafil and had some tension issues which was annoying as well as unusual. I put it down to using a small orange spool which kept on getting stuck at the top of the spool. For a while then I put the small spool on the horizontal spool holder but that also did something to the tension. So all in all there are some unsightly tension issues on the back particularly in the orange sections which in the end I decided to overlook. A first for me!
I did stretch myself a little bit with this piece and deliberately tried designs that I had not done before. I cannot remember exactly how many designs we went through in Bethanne Nemesh' Breaking Boundaries class but there were many...ok, just looked it up...over a 100, so as you can imagine, you do not really practice all of them in one go. I remember trying most of them, but then discovered pretty quickly some favourites which I then started concentrating on. So going back over the class I chose a few that I had not done that much before and some where I had some problems with so this whole project became a bit of a practice piece. Attaching the binding was a joy as there was so much to look at...I could see some of the designs that I executed really well and some of the others where I was a bit challenged. Some designs were a surprise like the white right corner in the second photo. The design is called tree rings and looked interesting so I gave that a whirl and stitched it out on a diamond grid. If I was to do it again I would stitch the grid first and then do the rings but in this piece I did everything in one hit so it is a bit more wonky in places. I really like the look of that...just very interesting if you include a little pocket like that. I think had I stitched the grid beforehand I could have concentrated more on where I start my rings as sometimes they just melted into each other. But still, good fun and easy to do.

After this I had a bit of a break, but managed to make a few more cats
I am determined to get this done! Have actually one more cat, so all told 13 blocks so far. Just need to continue to put one day per week aside for just making cat blocks. Undecided at the moment whether to go for 20 or 30 blocks. We shall see...

Spent also some time thinking about the Christmas quilt and started looking for an allover design I could do on that. Spent countless hours on the internet looking over my favourite shop 'Urban Elementz' for a suitable pantograph. Still looking...also thought I could just do a larger scale swirly design on it, but just a bit undecided at the moment.

While looking around on the internet, I came across Elizabeth Hartmann's new pattern 'Cats in Pajamas'. Very cute indeed, but what really caught my attention was the allover quilting design. Her quilts were quilted by Emily Hoppe of So Sunny Quilts using Julie Hirt’s 60s Mod Butterfly. Went all over the internet to find that design but could not find it in a format where I can self print this as it is for longarm machines where you load the pattern into the machine.

However that sent me into exploring my rulers, so today I played all day with stitching out something similar with the HQ Petal Pusher Ruler.


Obviously not the same, but could look really nice on a little baby quilt. I offset my petals just for the fun of it and marked a grid on my fabric and literally just stitched out the vertical lines and then went over it putting the petals in. Such a simple idea and looks quite nice.
Also tried the other shape
My grid was too large which I only realised once I had already started. After that got out the star rulers and started playing around with that and so the day went, just playing around. I am always looking for new ways to use my rulers particularly doing allover designs. Not sure with this as there is some marking involved obviously, but for a smaller piece, that could work. I did deliver all my charity quilts last week and picked up a new stack. If there is a very small baby quilt amongst that lot, I might give that a try.

So this was my week. I am always very disorientated once I finish a more involved project and it takes me days to settle down to do something else, so for the coming week I will keep my list as modest as I can.
- hand-sew the binding to the backfiller project and create a hanging sleeve (otherwise this will end up in the cupboard)
- finish the sock!
- pin and baste the Australian christmas quilt.

Heading over to Quilt Schmilt for the To Do Tuesday Linky Party #44

Karin

Popular Posts