Showing posts with label FMQ. Show all posts

Saturday, 16 December 2017

More Rulerwork

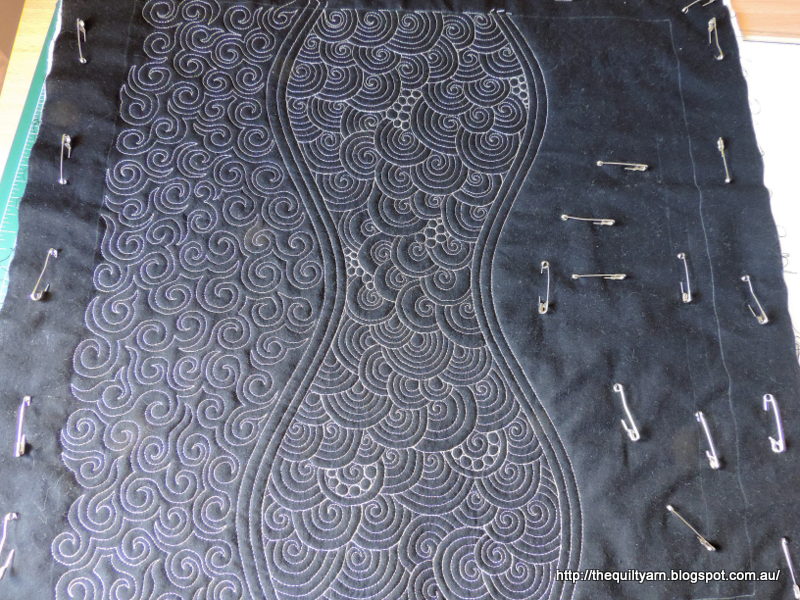
I have been bitten by the ruler bug! After reading a number of blog posts over at Patsy Thompson's blog the other day, I went and finally got myself an arc ruler and a set of circle rulers. This was not cheap, however I did research this quite intensely and concluded that I was not going to get around spending a fair amount of money. I looked at all sorts of options, some of them in the US but also over here. I have tried the Westalee circles ruler before and while it did the job I thought that the circle rings that Handiquilter produces would be a better option for me in terms of holding the ruler and stitching around it, particularly for the bigger circles.
Circles Ruler - Gold Set 2" - 11"

Arc C Ruler
As you may know, my passion is wholecloth quilting and in the past I stitched out all my designs from a traced drawing on the DSM. That was fine, but very time consuming and particularly with circles and arcs very difficult to do. Stitching freehand is fine but as soon as you hit long curved lines you are bound to get little wobbles here and there. While this usually does not matter, in a wholecloth design this is usually the center design and becomes quite obvious and a bit annoying, particularly when you are on your last arc and messed it up. It's all possible but it just takes so much longer.

Part of the reason for the HQ Sweet 16 for me was to use rulers more and make my quilting a bit easier and faster, hence my intense practice with rulers at the moment. The motif that you see on the top of the blogpost is not traced or drawn but done after dinner in a couple of hours just using the arc and circle rulers. I began with Cindy Needham's Ultimate Round Stencil (best thing ever!) and marked this quickly on my fabric which gave me a skeleton to work from and then just went around using the lines to align my rulers.
This worked really well once I had figured out how to align the arc ruler to give me accurate echo lines (it does take me a while to figure out all the lines on rulers). Even managed to put it a 1/2" echo and then realized that the little circle ruler I have is 3/4" so I had to fill this in freehand. Obviously I would make my pebbles smaller usually so it would look a bit neater. The possibilities are endless in terms of shapes, size and how you fill this in and the prospect of laying this down in a couple of hours  is very exciting, particularly when coupled with background fillers and grids. So, don't regret my purchase, in fact should have done this a long time ago...such a time saver and relatively easy to do, just as always...practice, practice and more practice.

Already mentioned in my last post...Patsy Thompson is running a ruler workshop on her blog in January. If you are interested in ruler quilting have a look. She is a fabulous teacher and all of her videos are so informative...this is bound to be great. Can't wait.

Karin

Sunday, 4 December 2016

Feather Faster Wall hanging

Making good progress on my Feather Faster wall hanging. What a great practice piece! Learned so much from stitching this out. As mentioned before this wall hanging came from a class called Feather Faster that I did earlier this year with Bethanne Nemesh. In her class Bethanne taught us her method of producing gorgeous, free flowing, no marking feathers that are easier and faster to execute.
I was very curious about this and stitched out one of my more formal feathers first. I am a self taught quilter and have come to like the backtracking method (in comparison to the bumpback feathering technique). I find that backtracking is most useful as I can tidy up my feathers as I am backtracking...however I have become so used to it that I found Bethanne's method quite challenging.

So here is my first more formal feather
You can see how painfully orderly I am. Given the backtracking, this feather is dense and formal as I am only slightly changing shape and size. This is my muscle memory in action...I always stitch them like this and they do look very similar.

I threw in another challenge into this...to only mark the spine and stitch the feathers out without any assistance. To my surprise, this worked very well. Usually I will draw in a few feathers at the start and then stop after a while to draw a few others just to keep the shape and size a bit consistent, but obviously I have done this so often that it just happens anyway now.

Bethanne's method...this is me trying to loosen up in the second feather...not that easy

While I had some different shapes in there, I struggled with not to backtrack and even that is still looking fairly orderly

Third feather was getting better but the real change came right down in the last one. The bottom feather is much more relaxed. Really enjoyed stitching that out and felt that I really had gotten the hang of this. Was able to be a bit more freeflowing and also discovered that Bethanne's method allowed me to make slightly larger feathers. Very useful!
Also really liked Bethanne's way of stitching the curl with her Feather Faster method. In the beginning, I did make myself a bit of an outline what I wanted to stitch, but did not need this in the next few...found that this works really nicely with those curls and leaf shapes and turns out beautiful, no matter what you stitch. Much easier than the formal feather curl
Only got some filling in to do in between the lines and then I can attach my birds.

Karin

Tuesday, 30 August 2016

Intense Learning Time

The Australian Machine Quilting Festival 2016 is over. I have been on leave for the last few days and I have not done one scrap of quilting. In fact, my sewing room is such a mess that I would need to clean up before doing anything. And I am exhausted...I went for 3 days straight...on the bus, to town every day with lots of walking in between.
I am still on my design kick and am going through a very steep learning curve.
I took a class with Claudia Pfeil at the Quilt Festival which was about designing Wholecloth quilts. While this was a great class, it did not give me what I needed...we basically designed a Wholecloth around different size borders, similarly to an exercise I once had done with instructions from Patsy Thompson. Don't get me wrong, Claudia Pfeill's Wholecloth quilts were lovely and I don't want to knock the class. It was fun and it certainly is one way to go about designing a Wholecloth.

Not sure what I was looking for...I looked around the show and came across a really fantastic book by Judy Woodworth (as well as another book from Karen McTavish...how many books do I need?). The title looked promising

This book is very good and includes the 'how to', what tools to use, a little bit about feathers, designing a pattern, designing a Wholecloth quilt, some of Judy's designs and much more... it even has a section on thread painting. She certainly packed a lot of information into this one book! While I had come across many of the ideas in the book, it did make me stop and analyse where my 'block' is. I have got a lot of great tools (i.e Cindy Needham's stencils, rulers, gadgets...), I can draw somewhat and I can come up with little ideas...the issue centers around visualising the bigger picture and seeing it come together as a unified whole where you can see how things fit together and have a look at the general design, proportions and placement.

Now you can go and draw these things by hand, then make multiple copies like I have done the other day for an allover Wholecloth, however for a detailed design that becomes incredibly laborious. I did experience this in the last few months with my Mandala design...I spent weeks on getting my drawing right to the point of stitching with lots of time spent on redrawing sections I did not like...the stitching was really the easy part!

I have got EQ7 and that does help a bit, however EQ7 is not a drawing program. While it is do-able (i.e you can import an image), I was starting to realise that I need to make my life a bit easier. I have got an old version of the drawing program 'Serif Draw Plus' and finally went ahead and updated this to the newer version yesterday. Oh, the bliss...should have looked at this earlier as they have made several excellent improvements...now you can trace shapes with a B-spline curve which in my simple terms fixes the curve as you go along. Tracing on the computer has been incredibly difficult for me in the past, but with this new tool this is a breeze...a little bit like magic
So I drew a little design of just one small curl for testing and here is how that evolved into something quite usable
Scanned the drawn image of one curl (no doubt influenced by Karen MacTavish' book) into the drawing program, traced it with the B-Spline tool which was super easy, little bit of a tidy up here and there, re-sized it and made multiple copies on the page I was working on, grouping two together as a motif and then arranging them in this frame. Grouped together like this, I now have the freedom to enlarge or reduce, change the thickness of the lines, add or remove sections etc. Imagine this filled in with some featherwork...this could look quite good! I might even attempt to draw some feathers in the program...need to experiment more with this.Also played with the Autotrace function which the old program also featured, however I had only used this sporadically.

 Look at this traced image

Wrapping Paper - copyright 2013 of the Wrapping Paper Company (wwwwrapco.com.au)


Taken from some wrapping paper that had these pretty images of roses all over. I could have traced this, however that would have taken some time. In addition, it probably would have had some issues as I am not sure whether each shape would have to be closed or not. Still learning about this. I probably would have gotten there in the end, however here is where Autotrace came in handy. Had to do some tweaking but this came out unbelievably pretty and clear, considering it was set on a brownish background...autotraced the shape, got rid of the background with the cut out feature and now had an image that could be re-sized, coloured etc. Very impressed with that little test. So if I am really lazy, I could draw my feathers and have the program autotrace them. This is very neat.

Next thing I will do is to scan Cindy Needham's Master Copy of her Ultimate Stencils into the drawing program to use as a background to draw on. This way, I can 'play' with concepts for block designs on the program before drawing out the detailed design (idea came from Quiltshopgal who spoke about importing this to EQ7 the other day). This will save some trees...you should see all my drawings all over the place!

I am actually quite excited about this. So from last week's allover Wholecloth I now have at least three additional quilts in my head. The rate I am going I am not going to have time to do any quilting!
Experimenting, learning the improved program, trying out different ideas and designing workable patterns takes time.

Karin

Sunday, 24 July 2016

FAL 2016 Third Quarter - First Finish!


2016 FAL

Well, here we are...my first and only finish for the Finish Along Third Quarter! I have been working on this for a while during the second quarter and obviously could not make it to the Second Quarter deadline, so here is my long overdue finish of the Mandala quilt I have been working on.

You can find the list of my Third Quarter goals HERE

Our Guild is running a Mandala Challenge  for the 2016 Festival of Quilts. The quilt must be circular with a diameter of between 50 - 60cm. Any quilting technique is allowed! If you want to find out about the design process and how I used Cindy Needham's Ultimate Circular Stencil to draw this design, please go to the Mandala Challenge post.

I was a tad conflicted a couple of weeks ago, thinking that I had made the wrong thread choice as it is not contrasting enough. Was incredibly discouraged but thought that I better finish this off. Looking at it now, I quite like it...I am particularly impressed with how evenly round I ended up, given the challenge this provided with drawing up a perfect circle at this size.

Mandala Challenge finishing up at 55cm in diameter

Close up of the fantastic blue Aurifil colour (#2725)
Detail:

Mandala measures 55cm in diameter
Cotton fabric (Moda Solids) and Legacy cotton batting
Stitched with Aurifil 50/2 thread (Brass, Medium Red, Light Wedgewood, #6728); all the colours are from the Shannon Brinkley Dryad Thread box
Cindy Needham's Ultimate Stencil used to draft this design; Ultimate Background stencils used to fill the outer petal as well as the outer rim of the Mandala.

Very happy with the end result. Now onto the next project!

Linking up to Eleven Garden Quilts for the Finish Along 2016 Quarter 3 Link Up

Karin

Thursday, 4 February 2016

WIP: Baby Quilt

Quick update on the Tumbling Block baby quilt...finally finished the tedious SID and got on to the fun part...the actual quilting of the quilt.

Did some simple straight line quilting over the cubes. Used Cindy Needham's Ultimate Stencils (the 3/4in grid to mark my lines...so quick and easy! Then I quilted a simple loopy design over the hippos to de-emphasize the formality of the lines.
All in all, very nice, but a lot of work...forgot how much work it is to quilt an entire quilt just having done mostly pillows last year for the FMQ Challenge. This took forever!

I then decided to quilt a loopy heart design in the inner border. This is a design I am not that comfortable with and the best way to overcome this is to do an entire border
That turned out really nice and if you let go of perfectionism is an uncomplicated, fast design to use in a border.

The whole thing turned out a bit crinkly due to the quilting but I am hoping that this will ease a bit once it is all done. I like baby quilts to be quilted fairly heavily due to them having to be washed on a regular basis.

Linking up to WIP Wednesday at Freshly Pieced...just read that Amy will take a 2 months break and is thinking of finishing off her weekly linky. Fair enough too as she has run it for 5 years and the work that goes into a linky is just enormous. So, 'thank you' Amy for all the work that you put in in running this weekly linky.

Also linking up belatedly to Let's Bee Social #110...was quilting for most of the day yesterday and did not want to loose momentum...

Karin

Thursday, 31 December 2015

The Year In Review

What have I been doing all year?

Most of the year was committed to participating in the 2015 FMQ Challenge that Darlene from Quiltshopgal hosted. She did a brilliant job...posts were on time and super organised, heaps of options and wonderful tutors. Thank you so much Darlene!

I managed to complete 11 pillows...very proud of myself!
I did a different back for each pillow as well which is the reason why most pillows took about a month to do. 
Here are some of the backs that I really liked:


I basically freemotion-quilted the whole year, so there was not a lot of time to do much of anything else. Definitely sharpened my skills and got seriously addicted to grids. 
Quilted on silk for the first time
Stitched lots and lots of grids

Conquered the zipper
 Finished quilts...let's see
Stretched Star Quilt
 
WIP: A Field Guide

WIP: No Name as yet
1000 Pyramids in its infant stages
 Other fun projects

Most enjoyable year indeed...

Wishing everybody a very Happy and Successful New Year!


Karin

Wednesday, 19 August 2015

Progress on Pillow

Still working away on my pillow for the August 2015 FMQ Challenge at Quiltshopgal

This is the 8th pillow for this year...I am determined to keep up with the monthly challenges and so far have not missed a month. This has meant that I have not produced quite as much as I would have liked this year due to having to interrupt what I am doing to get going on the next pillow. However, I  am treating this challenge as an opportunity to learn and I would highly recommend these online challenges to all of those who have an interest in FMQ. Even though I am quite good at FMQ I get so much out of this ...being introduced to new experts, new designs, having to plan around designs, practicing grids, filling in odd spaces, blasted zippers, trying out new threads etc.  I particularly like this challenge, as Darlene from Quiltshopgal is giving different options each month so that there is something for everybody, experienced or just starting out. If you are reading this and just starting out you might want to have a look at this challenge...the link up for the completed pillows is open now until the end of the month.

Anyway, worked away on the front of the pillow, filling in the last panel of my little design.

Now this was not that easy and required some additional planning as I was unfamiliar with Angela Walters flower filler. Started off and had to stop for a while, drawing on paper to try to figure out how to quilt this. I have Angela Walters Craftsy class ' Small Changes, Big Variety'. When watching this I noticed that Angela Walters quilts her feather shapes different to me. I will quilt towards me, starting the feather on the curvature - while I can also go backwards, I always start with the curvature. Angela Walters can do them starting on the other side and going backwards...quite amazing! Now I tried this, but my brain could not cope, so I had to stick to my way of doing the feathers and have a bit of a think about which side I was going to end up on and which side I actually needed to be at. This took a little bit more planning than usual and I drew lots of A4 pages with various variations of the design.

Here is the end result
 Was very happy with this as all this drawing enabled me to actually get a really good hang of the larger feather filler...in the end I was able to fill a whole A4 page just with that and it looked fabulous. For this piece though I returned to the flower filler. I think that flower filler looks better when it is done with a blend in thread so you focus on texture. I started off a bit small but the flowers towards the top were spaced a bit nicer...all great learning.

Then I tackled the back. Decided to use my apple core shape (KimBradleydesigns 4.5")...finally using some of the many templates lying around here. When I attended a workshop with Kim Bradley a couple of years ago, this was one of the designs we practiced.
Very versatile as you can use the walking foot to do this...however, I was too lazy to reset my machine and freemotionquilted the lines which went just as quickly, if not quicker.

 Decided to continue with the swirl theme and filled every alternate shape. Hilarious...in every shape I was trying to come up with a particular way of doing it and every single one is quilted differently.

This was good fun...now I just have to put it altogether and put a zipper in. Very productive day.

Linking up to Let's Bee Social Linky Party to have a look what the rest of the quilting world is up to.

Karin

Sunday, 16 August 2015

FMQ Away

Working on my pillow for the 2015 FMQ Challenge at QuiltShopGal

Choose black calico to do my FMQ on...I like stitching with light thread on dark fabric. However, I noticed that I am a bit out of practice...some of my stitching is positively wonky, Never mind, it's the effect we are going for.
Had trouble with the swirls, just did not flow properly...but anyway, it did get done and now I only have the right side to do. Planning on some of Angela Walters flower filler, interpersed with some feathery bigger shapes. We shall see.

Until next time

Karin

Monday, 20 July 2015

FMQ with the Open Toe Freemotion Spring foot on Pfaff QE 4.2

Busy at work on my next pillow for the 2015 FMQ Challenge hosted by Quiltshopgal. In fact, doing the pillows takes up most of my time. Took the opportunity this month to give the Open Toe Freemotion Spring foot a bit of a workout.

Have not played around that much with it...usually use the Dynamic 6D foot in the Dynamic FMQ mode. No particular reason other than laziness as you do have to dismantle the shank for the Open Toe Freemotion Spring foot. The taking off of the shank is no big deal however when I am swapping and changing between FMQ and piecing I got into the habit of just attaching the Dynamic 6D foot.

This foot of course has nice visibility with the shank being off  (which you can also achieve with the modified ankle on the other foot...see my post about this HERE) and was nice to stitch with, although I feel that it is a tad more temperamental with its wide opening. My settings were:

Spring foot freemotion mode
Needle: 70/10 with Aurifil 50/2 thread
Tension: 3.4  (this varied a bit over the last few days...I swear that the cold is affecting the tension)
Straight stitch needle plate

On the whole it behaved itself and I had only a few skipped stitches which I was relieved about. I think when I first tried it, I had more trouble with that given the opening. In terms of stitching, I would be lying if I said I saw or felt a difference to the other foot (Dynamic 6D). Each stitches equally well. My sense is that the Open Toe Freemotion Spring foot is best suited to slower designs... mind you, I have not tried it on a faster design like swirls where you constantly change the speed of your stitching. Something to try out.

Until next time


Karin
Wednesday, 20 May 2015

Am I killing my quilt?

Honest opinions sought...

Started the FMQ of my Field Guide quilt. After some prolonged pondering on the matter, decided on an overall design as the quilt itself actually looks quite busy.

Choose a fairly common design which I found in Christine Maraccini's book 'Machine Quilting Solutions'  under the name of Heat Wave pattern. I think this design runs under various names.

There is really no trying out the design for a bit to see what it looks like and then maybe changing your mind (although I have done this before)...you either go for it or not. I decided to give it a go, seeing that the quilt would not be a heirloom but just a humble lap quilt to put over your knees in winter.

So, made a start and  did not really stop until I had quilted about half of it. Needed to concentrate to get into the swing of things, but also because I have a slightly more puffy batting this time and was in danger of creating puckers when coming too close with the individual hooks.

Well, here it is
Is it just me or have I quilted my quilt away? This photo was taken in front of the window, so I got a really good look at the texture.

Next photo taken in a different room with the texture not quite as prominent.
This is better, but now I am a bit worried...although not much I am going to do about it at this late stage...will continue with it and hope for the best.

The pattern looks quite nice close up, but yes, very textured.

Hmm...not sure

Linking up to Let's Bee Social over at Lorna's blog SewFreshQuilts

Karin

Wednesday, 4 June 2014

FMQ on the Pfaff 4.2

I have been exploring the 3 FMQ modes (Spring freemotion, Sensormatic freemotion and Dynamic spring foot 6D) of the machine. As you may have read, I had run into some difficulties. Apologies to non-Pfaff owners, as this will probably bore you to tears. However, there is very little around on the net about this and the manual is of no great help on this issue, so I thought this might be of use.

Springloaded foot
Open Sensormatic foot


Dynamic 6D foot
 My Springloaded foot as well as the open Sensormatic FMQ foot were giving me trouble on the new machine. I had the machine since January and have been mainly using the new Dynamic 6D foot for FMQ which is fantastic. I have quilted two quilts with that and experienced no problems whatsoever.


As this came as a bit of a surprise,  I booked myself into a session at my local sewing shop. When I rang, the owner asked whether I had kept my sample of trying these modes...of course, I had not. So, I sat down one evening and produced another sample, this time going methodically through the FMQ modes of the machine. This was interesting as the owner of the shop had already hinted that the opening of the open toe feet might be the issue.

Sample stitched with Aurifil 50/2 using a Microtex Sharp 70/10
From left to right: The Springloaded foot did not perform, even when I changed the pivot setting gradually down to -5 to hold the fabric in place. Had skipped stitches and thread breakage. Then did the closed Sensormatic foot (pivot height setting 0)... worked absolutely fine. Next came the open Sensormatic foot...did not work at all on a pivot of 0, but worked well on a pivot setting of -3. Did the Springloaded foot again on the Spring FMQ mode...this time at the slowest speed possible and pivot of -5. Worked ok, but there was the occasional skipped stitch. Very different to how this foot had performed on the previous Pfaff 4.0.
Close up of Springloaded foot at pivot -5

Then got carried away again with the Dynamic 6D spring foot, which of course, was fine. Back to the open Sensormatic foot on a pivot of -3...again (not shown), no hassles. Changed over one more time to the closed Sensormatic foot on a pivot of 0 and this continued to produce a good result. This was a most valuable exercise...

When at the shop, the technician confirmed that the openness of the Springloaded foot was the most likely cause of the problem, not holding the fabric down well enough with each stitch to catch the thread underneath. We talked about batting as my sample was stitched on a fairly thin batting (mixture of polyester and cotton, I believe). He also suggested to use the Dynamic spring foot 6D mode for this open foot...I did, and the problem of skipping stitches and thread breakage disappeared at the shop...mind you, there I used a sample of wool batting.


So, in order to use the Springloaded foot in the Spring foot freemotion setting I will have to reduce the pivot height to -5 and go very, very slow, or use the Dynamic spring foot 6D mode with that foot.


Hope this made sense.

Linking up to Let's Bee Social at Sew Fresh Quilts

Karin

Saturday, 9 November 2013

What?...I am not a machine?

Finally tackled the FMQ on my disappearing Four Patch quilt. Decided to go with an overall meander given the business of the quilt top.

I chose a 40/2 Aurifil thread in light green. Usually I use the 50/2 Aurifil thread but I had 2 spools of 40/2 thread sitting around, so I thought that I would give that a go. I love this thread...works beautifully and is the right strength for an overall meander. I am using a 80/12 Denim/Jeans needle for this.

So, off I went and straight away the issue of scale presented itself...I practised a bit on a smaller practice piece but gave up on that as it just does not compare with the 2m monster that I am doing.

This is what it looked like under the machine to get to the approximate middle of the quilt.

 
Squashed under the throat of the machine with the bulk of half the quilt top placed in front of where I am going to start quilting. The side not under the machine to the left is just loosely folded over so it does not drag...

Well, had several starts as I was a bit out of practice  but got there in the end. In terms of scale I aimed for about 1/2inch apart.


I started off a bit awkwardly and just managed to get back into the swing of things, warming up as I went along...when I stood back after I had done an entire quarter I noticed that I did much more sweeping movements later on, so my scale is slightly off...the lines had become longer and the shapes itself somewhat bigger (probably a bit hard to see in the photos, but believe me, it's there).


This annoyed me to no end until I got a grip on myself, hence the title of my post...no, I am not a machine and no matter how hard I strive this will never be consistent. I think I have this issue with every quilt top I am stippling...it takes a while to find a rhythm and settle into a particular scale and there will always be areas that will look slightly different and this will only become apparent when you are actually quilting over your quilt top rather than on those little practice samples. For example, now I have had an afternoon break from this and when I go back in the evening, no doubt, I will start off slightly denser and smaller again. I really had to remind myself in the end that this is the charm of handmade items, those little inconsistencies, odd shapes and all sorts of other issues in the execution of our work. As you can see, this gets me every time...

Anyway, I will stipple the middle section of the quilt and then probably do some lines in the black borders to de-emphasize that section....we'll see

Linking up to FMQ Friday at the Freemotion Quilting Project

Until next time

Karin

Sunday, 5 May 2013

Microstippling Completed

I finished the microstippling!

Hilarious...I love the back of this quilt almost better than the front.


Looking forward to the next part...more feathers.

Karin

Popular Posts