Showing posts with label Breaking Boundaries with Bethanne Nemesh. Show all posts

Tuesday, 10 October 2023

To Do Tuesday #41

Another week has gone by. I have not been doing much after my recent workshop finished. The group I had was really quite talented...they picked up the feather quilting very quickly and while not everyone finished the table runner during the sessions, we were able to go through all the fillers so that they can finish it at home. 

My list for this week was

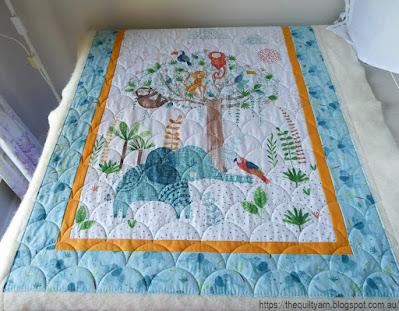
- bind the charity quilt✅
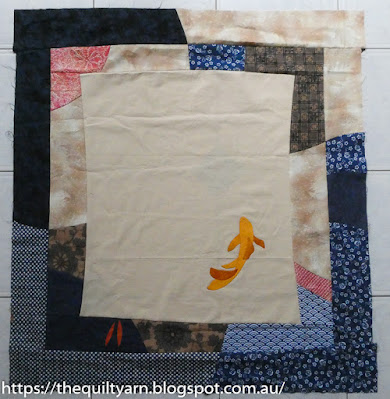
- baste the class sample from above and work out the quilting design, path and thread
- cut the pieces for a couple more cat blocks (no piecing at the moment as I am taking my machine to the workshop and leave it un-connected in between sessions)
- maybe baste another of the little charity quilts.

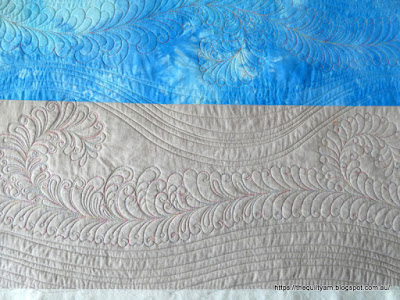
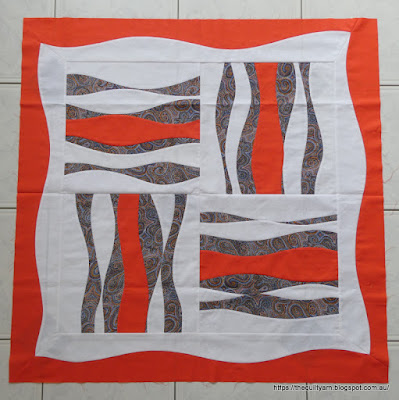
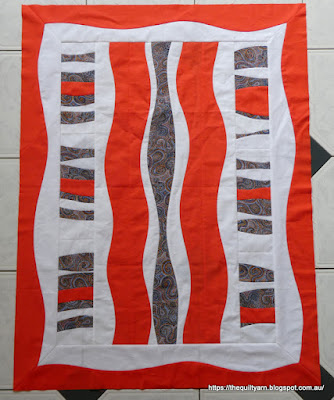
Well, I got two things done at least. I did baste the Indigenous looking quilt top and then got side tracked into trying to figure out which thread to use. 
Also re-visited the course I did with Bethanne Nemesh in 2021 'Breaking Boundaries' to re-acquaint myself with some of the design options. Bethanne's classes are available on 'Teachable' when you purchase the course. While it is running, you can watch the sessions on FB live but afterwards Bethanne puts them on Teachable so that you have lifetime access. I watched a couple of sessions again to refresh my memory of some of the designs and the different ideas on how to combine them.

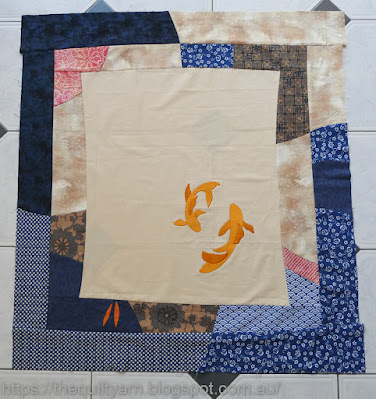
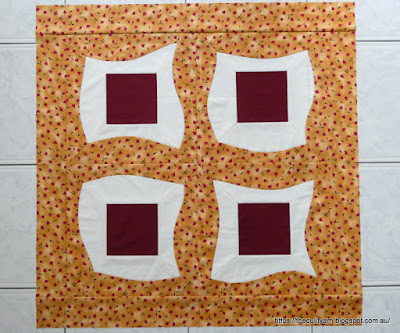
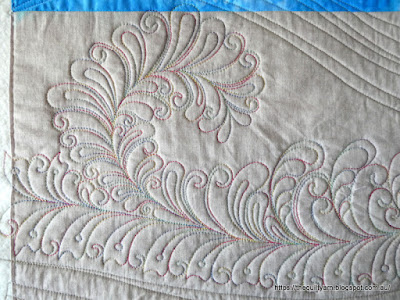
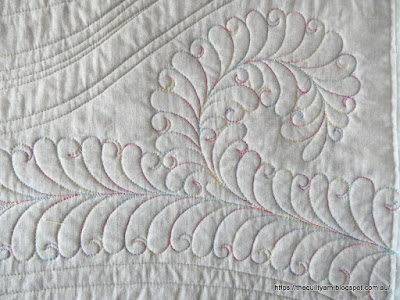
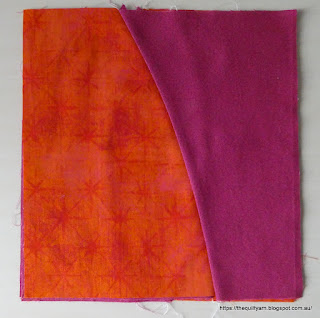
Then I trialed my thread. I decided to use 100wt Invisafil and will try to use a colour that blends across the burnt orange and white. Invisafil from Wonderfil has got the weird ability to just blend into the colour that it is on, its just a matter of finding the right match. Did a bit of testing on the various threads that I already have.
Not that you can see much on here...started off with my trusted tan colour (464) which was great in the orange section but slightly too dark on the white. Tried the Antique White colour which of course was great on the white and almost fine on the orange. Then used a peach colour and another darker tan...all almost there but not quite.
I now ordered a pastel grey, hoping that that will blend into the white as well as the orange. We shall see! If not, I might use the white colour to stitch across. If you are interested in this thread I also came across a great educational video on You Tube from Wonderfil explaining the many uses of this thread.

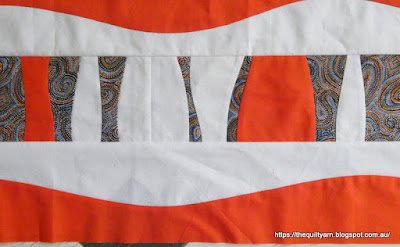
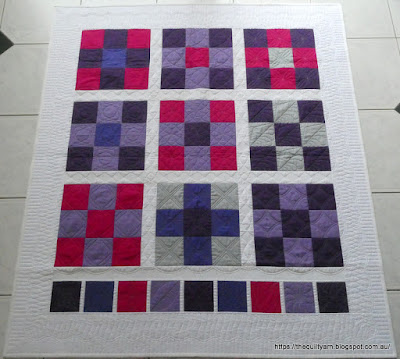
While I was at it, I stitched in the ditch around the seams with my trusted tan colour. I have been using Invisafil for a while now when stitching in the ditch but I am always amazed again at how well that blends in.

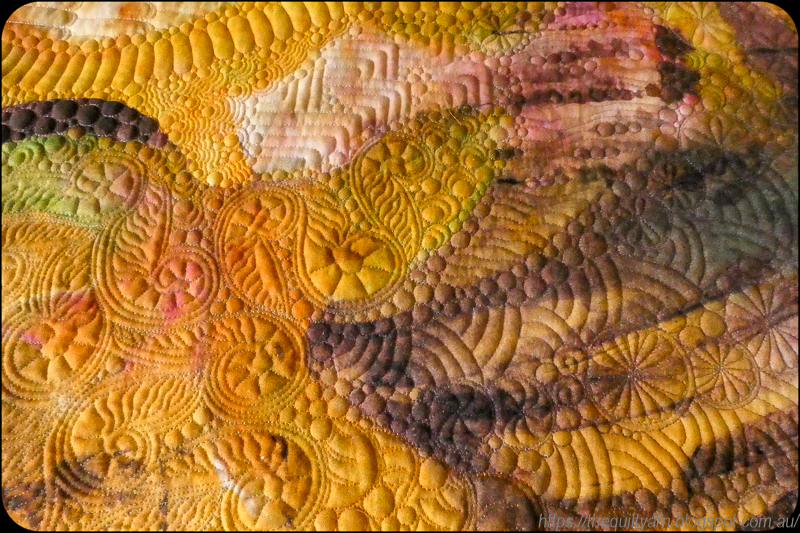
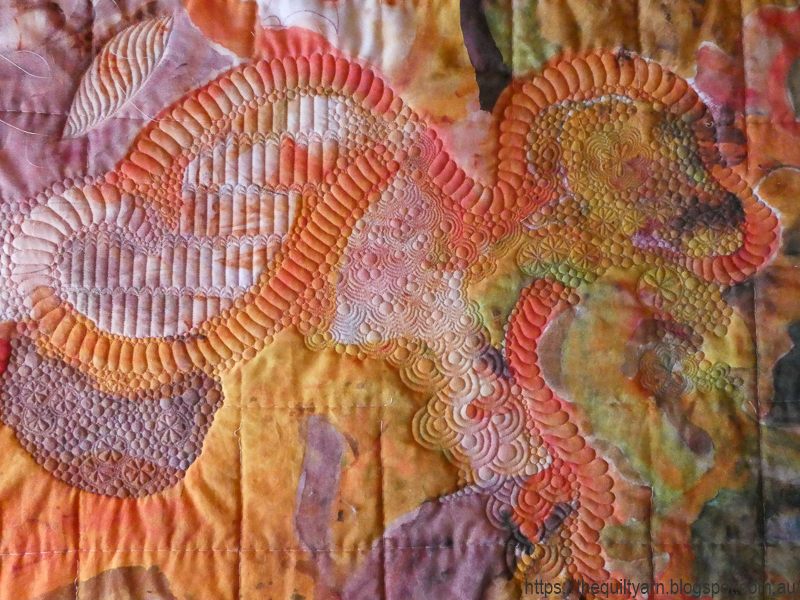
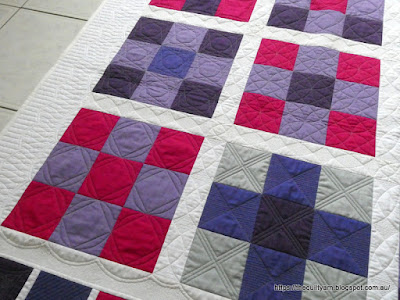
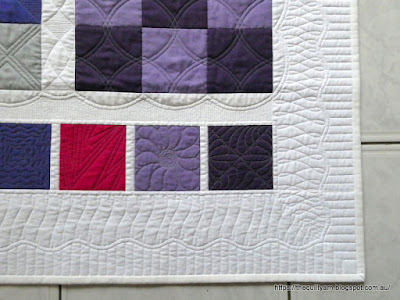
Close up
Stitching in the ditch on the orange fabric with my tan coloured thread...just about invisible.

And on the other colours...
Amazing thread!

So that's done, now I am just waiting for the grey colour to arrive to start with the filling of this project. should be interesting. all this is in preparation for another of these quilts which is a bit bigger and different in design.

So, for next week my list looks as follows
- once my thread arrives make a start on the filling of the quilt above once I worked out a bit of a plan on how to go about that
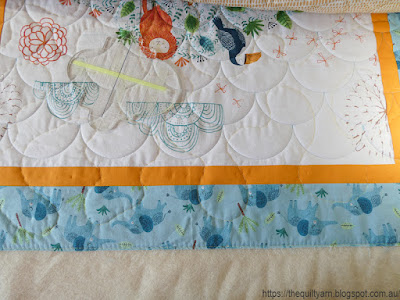
- baste another little charity quilt and hopefully start the quilting on that ...maybe another clamshell allover
cut the pieces for a couple more cat blocks 
- continue on my knitting projects

Linking up to To Do Tuesday #41over at Quilt Schmilt 

Karin

Friday, 10 June 2022

Background Filler Project

I m back onto my background filler project after a few weeks of a bit of a break. Felt somewhat overwhelmed with the enormity of the project and lost some steam to keep going. So I did a few other projects to take my mind off mainly working on some listings for my Etsy shop but also 'playing' around on EQ8 with some new patterns (fantastic program...was able to manipulate a pre-existing layout into the custom size that I wanted, changed it a bit and ended up with at least 5 different versions of possible quilts - there is another blog post waiting to happen). Will finally include an applique design that my daughter drew when she was really young. 

In addition and to stall further I looked at social media, specifically Pinterest and started to clean up my account a bit, organized my boards and in general had a bit of a look what had accumulated over the last 10 years. Well, stumbled across their Idea Pins and got inspired to give that a try...so did some videos (which I generally find really hard), read about Idea pins and watched a few YouTube videos and finally managed to put some reasonable videos together to try that out. Did that on my phone which worked really well. The topic was not super exciting -  'Basting a Quilt on a Sitdown Longarm' but that was what I was doing at that moment. Must say, that came out really nice and worked a treat for me. Might do that again as I like it better than Instagram Stories or reels.

Finally though I re-looked at my background filler 'monster'. We had a bit of sunshine yesterday so I took some photos.


 Close up of the fern area that I really like


Those darker areas gave me a lot of trouble with the Invisafil thread. Being that fine at 100wt I had real trouble seeing where I was going. If you look at the darker area I had to do the pebbled area first leaving a channel to then fill in the rainbows. That was incredibly challenging on the old eyes.

...and then I finally continued and finished off that side...not too bad...

Almost there...continued a bit further on the right but will take that out today as I am not happy with it. The key on this thing seems to be pre-planning. If I am unsure what design to use, it is best to stop and think that through carefully rather than charging ahead.

So, hopefully I will make it to the end of this over the coming week!

Karin

Saturday, 14 May 2022

Are We There Yet?

I have not posted that much in recent weeks because I am stuck on my background filler project. As usual the task is much bigger than expected and at the moment I am completing specific sections at snail pace!

This is what I am currently working on, i.e. the right side on the top. One little section in there took me ages to work out as I had to simultaneously think about the surrounding area and how this would all work out.

I must say, this project comes close to being a killer. Found some humour in it though when at various low points by thinking that I have finally managed to make quilting into an extreme sport. Thought this was too funny, took a bit of a break and have since continued on the right side with renewed energy. I am so close...once the right side is finished I literally only got two sections left on the left.
I reckon after this I will do another, more traditional wholecloth (we'll see 😆), something where I can just follow a pre-marked design.

So not much to report from here other than me being in a world of pain with the above project. Have managed though to baste my new pattern.
Love the look of this and while I did not want to spend that much time on quilting it, will likely do an edge to edge design (my new obsession). Definitely do not feel like stitching in the ditch and like the look of edge to edge designs.

Hopefully one of my next posts will be me having finished the background filler project and I can continue with the other projects that are slowly but surely accumulating (got five quilt tops from the Breaking Boundary class, a Snowman table runner and four charity quilt tops waiting to be done). 

Karin

Saturday, 16 April 2022

Still Working On Background Fills

Not much happening on this side of the globe.

Still working away on my background filler project. As usual, it is much bigger and time consuming than I had originally thought. However, I am getting a lot of practice in with some of the more unfamiliar shapes which is great.
I think that I now can do these little round flower shapes in my sleep. Also discovering which ones really flow for me and which ones to maybe leave for smaller areas. Definitely have overdone the pebbling a bit, I think, but have decided since then that this was meant to look like that...think forest floor or similar. We have had another lesson in the Breaking Boundaries class with Bethanne Nemesh since then, so there are even more fillers to explore. For now though I am going to keep it to some more floral motifs and possibly on the side some sort of straight line design before moving on to the second half of this piece. I have about the same area to fill in the second half and need to think that through for a bit.
Must say that this has been somewhat more challenging than I thought. I am using a wool batting which is giving me lots of nice puff, however it has also meant that I have to pay attention to in what order I quilt the various areas and has meant that I needed to break thread more often than I thought to cater for the compaction that is happening. I have found myself a couple of times in areas that had an alarming amount of puff which than needed to be quilted down and distributed evenly across. Definitely something I have to watch out for.
In other news, I have held my first freemotionquilting class the other day. That was very nice and very enjoyable. Had a lovely group of ladies who were keen to learn. It was actually very interesting to watch them quilt... some slow, some fast, a few ladies could freemotionquilt already a little bit while for some it was completely unfamiliar. I have freemotionquilted now for well over ten years and I was surprised at how much I could pick up just from watching them. We started with allover designs which are always a bit hard to do, especially if you are totally unfamiliar with the design. They all had a good go at it. The next class is background fillers which will be just a little bit more challenging as we will have to go more slowly and deliberately. Hopefully the ladies will throw in some practice in between. It will definitely test their patience and even more show how important sustained practice is. There is just no other way really of learning freemotionquilting unfortunately. Good fun ahead!

Karin

Monday, 4 April 2022

Background Texture

Currently doing Bethanne Nemesh' Breaking Boundaries class. It is as intensive as the Feather Fiesta class was that I have just finished with her. Very enjoyable and lots of learning and experimenting. She certainly packs a lot into those classes.

After a while I got a bit bored with my practice sandwiches and while I could have used the pre-prepared improvisational quilts, I decided to use a very colourful and interesting panel that I had in my stash. Yep, got majorly side tracked once again!

The panel is called Art Excursion by Denise Burkitt for Free Spirit Fabrics. 
It is very pretty with its vibrant colours and odd shapes. I was thinking that I may have finally bitten off more than I can chew. I started off with a loose plan to fill the wormy structures and then add backfill in the surrounding areas. Sounded easy enough but as I found out the transitioning is not that easy. As I go along I find that I start interpreting the fabric in different ways...new ideas emerge and the original plan has already been surpassed by impromptu decisions to do something completely different. Couple that with some unfamiliar background fillers plus stitching with 100wt Invisafil is making for an interesting journey. Bernina Q20 is behaving fabulously...I am using prewound decobobs in the bobbin and am stitching in manual.

Not entirely sure what this will look like when finished...I am hoping for an organic flowing picture over the surface that makes sense to me and the viewer (what exactly that picture is remains unclear at the moment) but I am also really aware that someone may look at it and see it as nothing more than colouring in a background. Very interesting exercise. So far I like the 'worms' best...seem to be able to do that for hours. The panel is quite large and I have heaps more to go with no firm plan anymore. Should be interesting to see how this develops. I am thinking that it could turn out to be a stunner or a complete and utter flop.
 
Linking up to Freemotion Mavericks at Lizzie Lenard Vintage Sewing

Karin

Saturday, 5 March 2022

More Curvy Quilting

The Breaking Boundaries online class with Bethanne Nemesh has started. She did a review of the improvisational quilting and added another project to the list.

This little quilt was incredibly easy to put together and super fast. Took me about half a day. My blocks came out at 12in which makes this a nice size for a little wall hanging. I deliberately chose the brown fabric with the light and and yellowish addition to match our surroundings in the family room. This will look great.
My curves were a bit gentler than what they were supposed to be as this piece was to practice deeper curves. Somehow mine ended up pretty gentle but I just liked the look of that.

I think I will do another one with more dramatic curves to practice this a bit more. One thing I really like about the improvisational quilts so far is that it 'eats' up a lot of fabric as the blocks are bigger and your starting point is usually a larger size. The brown fabric in this project had been lying around for years, so this was a great little project to just use this up.

Looking forward to the quilting of all those curved quilt tops.

Karin

Saturday, 26 February 2022

Finishing Off and Starting Something New

It's been a while again...I tend to forget what I post and where, so some may already have seen pictures of some of these projects.

I finished my Koi wall hanging quilt top. Had to wait for some new applique foundation paper to arrive before I could continue. I had some Dupioni silk from my kit left and decided to make a second fish. This was somewhat nerve wrecking as there was not a lot of room for error. I had all these very small fins to make and turn the silk over so I was very careful not to stuff up as there was only just enough silk to make this one fish. Went very slowly and deliberate trying not to stress and it worked out fine.

Looks really nice, very pleased with it. The Breaking Boundaries class will start this weekend...should be great!

Also continued on my Nemeshing piece. As this is a lot of pebbles I did this over a couple of weeks, doing a little bit every now and then. It is hard to finish something when you know it has not turned out exactly how you had imagined it, however I thought it would be  good to finish this, so I would have a visual reminder of where I went wrong. 
I am calling this...'Pebbles with a Hint of Nemeshing'...as many of my smaller swirls have disappeared through the pebbling. Just did not make them fat enough and also thought that the double batting that I used was not the best idea. Live and learn! Will do some more feather practice in the blue border to finish this off.

Then I started another Baby Panel quilt. Discovered that I have done this panel before but when I bought it obviously did not remember this. Had to laugh, as the whole time I was thinking that I really liked this little panel...no wonder, bought it before because I liked it then! The Panel is called 'Jungle Fever' designed by Rebecca Jones for Clothworks Fabrics.
Did my favourite design over it again the other day...clamshells with the HQ Multi Clamshell Ruler. Love doing this on baby panels/quilts.
I do not mark the entire quilt top to do this. What I usually do is mark the first 2 rows, in this case two lines across the width of the quilt top 2in apart. The largest clamshell of the HQ Multi Clamshell tool is 2in x 4in, I then quilt the first row and mark a little tick half way on top of each clamshell. Then comes the second row, making sure I hit that little tick mark as I go along. After that I do not mark the horizontal lines anymore as my first two rows should have laid the foundation for being pretty much straight. I do however, continue to make little tick marks on top of each clamshell as I go along to just double-check that my clamshell are centred correctly. 
As you go over an entire quilt there are inaccuracies that creep in which I think is unavoidable. A slight shift in the ruler can make your clamshell slightly smaller or a bit of sliding and you are a bit off centre. I do make small adjustments as I go along like lengthening or shorten some clamshells however do have an eye on whether they are remaining straight and centred on each other. It is always a bit of a surprise to come to a space in the quilt, like a seam or similar where you then can see how accurate you have been. In a panel though there is not much you can go by and the real test came right at the end with this quilt top when I hit the first border. You can see that the top of my clams (the added lines in there is my basting) are approximately half an inch away from the first border. Not every single one was exactly the same but overall this was looking pretty good. There is no way that you are going to perceive little inconsistencies when looking at the finished quilt. Happy with that...this will be a cute little quilt for my Etsy shop.
Now onto the binding and then I will concentrate on the Breaking Boundaries class.

Karin

Thursday, 17 February 2022

The Koi Wall Hanging

Bethanne Nemesh' Breaking Boundaries online workshop is starting this weekend. I have been working on the koi wall hanging which is the 5th project in the pre-recorded workshop in preparation for this class.

It looked fairly straightforward just looking at it, but as I watched the video I realised that there was a bit more to it. Nothing too difficult but it demanded a fair amount of concentration and thinking things through. I followed Bethanne's basic layout...this is how I learn best just following along thinking the steps described through. There are of course a million different ways of doing this but I just did not trust myself to pull off my own design. Even the fabric selection was challenging...

This was not easy as I had something a bit special in mind for this. My youngest daughter who is a potter had brought me fabric from Japan when she did a residency there about 2 years ago. No surprises, she chose some blues but also that oddly earth coloured fabric which just looks like the clay she uses at times. I really did think about what I wanted to portray for this wall hanging and thought about a murky pond at dusk with that odd light that you get just before darkness sets in. Like in Bethanne's wall hanging I put the sun (which is Shibori silk that came with the kit from Bethanne) on the side shining over a little bit to the other side and then put the darker pieces around it. The Japanese fabric was different. It was only 15in wide and I did only have a fairly limited amount so had to think this through carefully. Probably the first time I used the carpet as my design wall...
The individual curves were easy to do, particularly now as I have done that many of it. What was new was the curves continuing from one border into the adjacent one. Watched that video intently and promptly cut my sun to smitheeriens...did not match at all. No idea how that had happened, so with the last piece of Shibori silk I cut a new curve and hoped for the best. Was relieved when that worked and encountered no other problem with that. After the first border was done, the second border then matched some of the seams of the first border. Oh, what fun on a curve! As I had done this before for one of my other pieces I felt slightly confident with that.
Then came the koi...Bethanne uses needleturn applique which is machine stitched to the background. Never had done this before, so gave that a go. The first fin of the fish that I tried was a complete disaster and unusable (the Dupioni silk, also from the kit, frayed like crazy and I did not manage the points at all). Again, only had a limited amount of the silk as well as the fusible paper product that came with the kit. Made a few more mistakes but managed to get one koi done.

 Apart from one bulky area I did very well on this, mind you, took me ages as I was going super slow on everything for fear of stuffing it up. Very impressed with my efforts and must say I quite like the look of needleturn applique. Gives you a very fine finish. 
I now have a little bit of silk left and have ordered more fusible paper product in the hope of finishing another koi. We shall see...overall really happy with how this turned out. There are a few things that turned out a bit different than I had imagined but that was to be expected.

What a great learning experience this was...while I was doing this and following along the video I was already thinking about how I could use this method for a project of my own. I have this digital fabric lying around that would make a very interesting background. Need to think some more on this. Apparently Bethanne has another project up her sleeve which we will hear about on Saturday. Can't wait!

Karin

Tuesday, 18 January 2022

Multi-tasking and New Pattern

I am still multi-tasking. In fact, I have added things to my list...🙀

Finished the third quilt top for Bethanne Nemesh February online workshop 'Breaking Boundaries'. No problem at all after all those borders I did. Fabric selection maybe a bit odd, but I do need to make some space in my 'fabric cabinet'. I reckon this fabric is a good 10 years old and with the binding cut out it will all be gone. 

Then I continued on the feathering. The class on variations was 3 hours long...a marathon of online watching. I could not do it in one hit and spread it over a few days. Given that I had started on the 'Bird on the Wire wall hanging, I thought I might as well give some of those variations a try. Also did start on some of the backfilling today but forgot to take a photo.
Close ups
That was good fun...tried all sorts of weird and wonderful things on that. Some of them worked great and some maybe not that well, but all good practice. I am stitching the feathers with Superior Fantastico variegated thread. I am using Bottomline in the bobbin and while it is better on the Q20 I still feel that I am struggling with that thread...this time it was pulling the bobbin thread up a fair bit (and actually just as I am writing this I realise that I should probably have tightened my bobbin more). I was following the settings that were given on the Superior web site, but maybe I just need to run my bobbin thread tighter. Mind you, I am also using a fairly thin batting of 60/40 Cotton/Poly blend of average quality which may have also played into this. Anyway, I managed to get a decent quality out of the thread for most of the time, so I did not worry too much about it.
I was really happy about how my curves turned out. In general I can do them better if I have feather variations in there. Not sure why that is happening.
This is stitched following Bethanne Nemesh' method of spineless feather quilting, i.e. you do not pre-stitch your spine, but stitch the feathers and spine all in one go. I deliberately chose the variegated thread to see how well that would work for me and I must say, you cannot really see any difference unless you look really closely trying to follow the feather path. Happy with my efforts.

Also sold a little quilt in my Etsy shop this week...great! That of course got me thinking that I need to get going on continuing to fill my inventory, hence sat down to do a new pattern (and another little quilt).

Here is a stylised shot

Nothing too drastic...a variation on the good old pinwheel. I have a lot of bright tone-on-tone prints left over. Not strips, but also not enough to make an entire quilt out of the colours that are left. So I gathered the bitses and pieces and decided to use them up for this idea. This will be colourful and again fairly bold. Still need to decide on placement and also I am eyeing off those cut off triangles to maybe incorporate them as well...we shall see. Love those quilts. While I was at it, also cut another panel to size to use for another round of clamshell quilting.

So, fairly busy over here and I don't think it will be letting up as I keep adding to my list of tasks.

Karin

Monday, 10 January 2022

It Worked!

Still doing the curved piecing. I cannot tell you how many of those curved borders I have done by now...feels like dozens.

Was fairly nervous about putting a mitred frame around my finished quilt tops but there was only one way of finding out how that would work for me and that was obviously doing it. 

However, decided to bite the bullet and frame the two quilt tops
This went smoothly. I took my time and went very, very slowly and to my big surprise this turned out great. A few hiccups here and there like my glue not holding my fold in place and also being unable to see the foldline clearly on the white fabric, but we got there in the end. This is a smallish quilt so the so this made it easier.

I then looked at my improvisational little quilt. My sides needed longer border strips, so I had to piece them. When it came to putting the curvy bits together, I realised that I would have to match the seams of each pieced border fabric on the curve. This took a few attempts but eventually (with a pin every 1/4in) I managed to match the seam
...so much so, you hardly can see it. Next issue was that I now had a very long strip of curved fabric that needed trimming. The strip went beyond my cutting table and was slightly bowed.  My longest ruler is about 18-1/2in, so even folded in half I was struggling. I started trimming this in 1/8in increments from each side as I was paranoid of stuffing this up until I finally arrived at the desired width. This was time consuming but I definitely did not want to construct additional borders so I took my time with this and taking that little bit longer definitely paid of. My strips ended up dead straight. Attaching them was just as easy going as the first quilt. I laid it all out on the ironing board and prepared two corners at the time to sew. 
I can honestly say that I would now feel very comfortable doing mitred borders on any quilt.

Here is the result
Like the look of this...corners match perfectly and I managed to keep the borders as straight as possible. This will look fantastic all filled in with FMQ.

Also made a start on Quilt 3 for the Breaking Boundaries class (Bethanne Nemesh Online Workshop starting in February)

More curvy borders, this time block size. Promptly miscut my border material and will have to do it again, so it matches the size of the other border strips that I did. Does not matter though as I can use this to practice on once the workshop gets going. 

Definitely learning a lot.

Karin

Sunday, 19 December 2021

Last Finishes for the Year

Managed to finish off two more UFOs before the year comes to a close. Nothing too exciting but very happy to have completed this.

Natalia Bonner's 9 Patchalong quilt

This is from 2020...had finished the quilting and then just put it away. Even had the binding cut up. The binding has been sitting in my sewing room on one of the cupboards ready to go...since September 2020. Can you believe it?

Was actually really interesting to look back on this one. I had forgotten already what we did on this.
Looks great and is a really good visual of all the different designs to look back on.


Then saw the border...cannot even remember doing this. What a great idea to use the wiggly lines to split up the border width. Looks really effective, definitely something I would use again.


After this I also finished my Snowmen table runner. This was the first one I did and I completely mucked up the quilting on it. So did some unpicking and just went with some Ribbon Candy in the sashing after having soaked the entire area to get rid of the marks from the stitching. That worked really well and it turned out quite respectable in the end. Left the stars in the border, even though I did not like them, but you can hardly see them anyway. Ended up giving it to my daughter for her dining table. Have one more lot of Snowmen left to make into another table runner which will be another project for next year.
Would be great if I could say that this was it, but there is another UFO lurking in the cupboard waiting for a binding to do done. That will also be on the list for next year!

Also joined Bethanne Nemesh' Breaking Boundaries class which will begin in February. This is about improvisational piecing and background fillers and was the first class I looked at before I actually signed up for the Feather class (currently on a Christmas break to be continued in January). There is the option of piecing a number of quilts together before the classes start in February, so I made a start on this with some curved piecing. 

That was good fun. Can't wait to see what's next.

Karin

Popular Posts