Wednesday, 8 March 2023

To Do Tuesday#10 - 7/3/23

Was quite productive over the week.

Here are my goals from last week
- continue working on the wholecloth design, i.e. starting to get the design on paper (this, no doubt, will take several attempts)
- pin and baste one of the charity quilts ready for quilting ✅
- prepare for the wholecloth workshop that is coming up in 2 weeks (where has the time gone!!) 
- sort out some 2in strips into light and dark and start the blocks. 

Did not continue on my wholecloth as this needs some peace and quiet time. Had too many other things going on. However, managed to put together one of the charity quilts
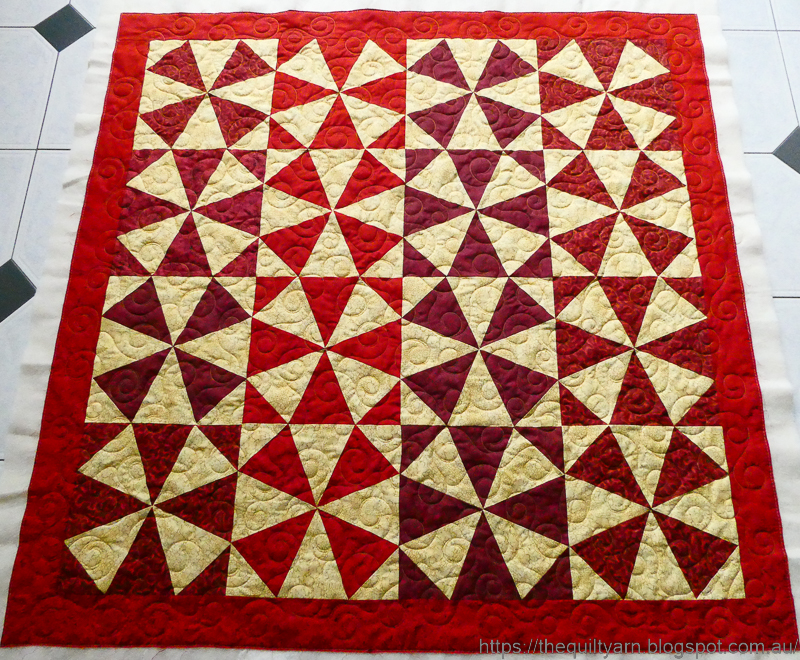
Already did a post on that (HERE). Feel very lucky to always get such interesting quilt tops from the Orange Tree Quilters group. Again, really like this quilt. Very tastefully put together and very well pieced. As described in my post earlier I decided on a swirling design that I had not done before. After some hesitation, just went for it and it turned out absolutely perfect. Definitely a design I will use again. Found it easy to execute and it just went effortlessly over the quilt top. The whole thing was finished in about 2 hours. Was able to stitch this reasonably consistent and keep it to a slightly bigger scale.
Looks great and suits this quilt top very well. The funny thing was that I remembered that I had a Kaleidoscope template which I bought many, many moons ago and never tried out. This quilt top was calling out to me to give that a try. Then yesterday I was looking for the template...for the life of me could not find it, so I started thinking that maybe I had wanted to buy it and never did! Had to laugh at that...as quilters we accumulate so many things over the years, some useful and others not so much and then there is this thing that you cannot even remember what you bought. I nearly gave up on my search for this template...I had by then searched three different rooms for it. But finally a vague memory came into focus...I thought I had stashed it away in the packet of another hardly used template and lo and behold, I found it. So, I have the smaller Kaleidoscope ruler which will make 8in blocks. Maybe over the next few months I will tackle that. Really like the look of just using one colour in different tones. So effective!

Also started on my scrap quilt over the week, but have not taken any photos yet. Sorted my strips into light and dark and have done a few test blocks. Discovered that I have a problem with my Pfaff machine. For some reason I cannot produce an accurately sized block. Already noticed this when sewing my last pattern but then thought that this was due to me being sloppy. When sewing my test blocks though I was very careful and reasonably accurate with my sewing but my blocks were falling short by 1/8-1/4in. Now even with the occasional sloppiness, I have never had this much of a problem. Looking at my needle I suspect that it is not in the centre for some reason. No idea of how long this has been a problem or whether I got the machine back like this from one of the last repairs (feed dogs did not lower)...only just noticing it. In the end I changed my needle position by 0.3mm and have been able to achieve my 9-1/2in block, but will have this looked at when the machine goes for service at the end of the month. Too weird!

Apart from this I was preparing for my Mini Wholecloth workshop that starts this Friday. Feel prepared and am hoping to inspire a few people. Should be good fun.

Linking up to Quilt Schmilt for the To Do Tuesday Linky Party #10

Nearly forgot to set new goals for the coming week:
- pin and baste another charity quilt
- make a start on the drawing of the wholecloth quilt
- make a few more scrap quilt blocks.

Karin

Sunday, 5 March 2023

Choosing a Quilting Design

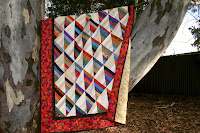
I finished one of the quilt tops from the Orange Tree Quilters group. Another beautiful little quilt!
It is a Kaleidoscope quilt...I had forgotten how effective they can look and remembered that I actually have got the template for this. Did buy the template set very early on in my quilting journey but never got around to actually make one of these, in fact forgot that I had this!

Like the colours...very tastefully put together.
Its a smallish sort of quilt...from memory about 52in square. In looking at it I was unsure how to quilt this. Did not really feel like stitching-in-the-ditch, even more so as every block had the centre seam pressed open. Don't like to stitch over open seams and so decided to do some sort of overall design. The quickest, of course, is meandering but also did not feel like that.

Consulted one of my favourite books...Machine Quilting Solutions by Christine Maraccini. Its an older book from 2007 but has a lot of easy-to-do designs for everyday quilting in there. Chose a swirling  design which I had not done before. In her introduction to the design Christine says:
'This edge to edge design is one of the quickest ways to get a quilt finished. It will add visual movement and has a texture and feel that beg the owner to cuddle up in it.' The only difficulty, as I could see it and Christine pointed out, was to get the design a bit bigger to maintain the softness of the fabric and batting when you touch it. However, the swirl design was perfect as one of the red fabrics had a dainty swirl design on there and it was unobtrusive enough for the secondary pattern to still shine through.

Did one practice run on a piece of scrap and started wondering whether I could execute this consistently over a large area. In the end I decided to just go for it...if you never try, you never know! Was a tad nervous to start off with as I can  get incredibly confused with swirls and their direction, but to my surprise this went incredibly easy. I quilt loosely in rows as a sitdown longarm quilter, just having 1/4 of the quilt under the the machine at a time. Had absolutely no problem moving along swirling my way from one end to the other. Going back then and down, I could see my empty spaces and could reach out with a swirl to fill that in. My swirls ended up maybe 1-1/2 to 2in across, sometimes smaller, but that did not feature too much. Given that the swirls are a bit more dainty it felt very open and soft.

This is why I like to quilt these quilts for the charity group. I get some pretty quilts, an overload of inspiration and I get to try different quilting designs that I may not otherwise use. This quilting design is a definite keeper...I think it took me about 2 hours to complete. I used the stitch regulator on my Bernina Q20, so did not have to worry about my stitches looking fine and went over it with a medium speed which ensured that I could get the swirls a bit bigger (think bigger, more sweeping movement). It was incredibly easy to fill and in the end I was actually quite amazed at the consistency with which I had quilted this across the quilt top. The quilt looks amazing with it and feels nice and soft. This is definitely a design that I will use again. 

Karin

Tuesday, 28 February 2023

To Do Tuesday - 28/2/23

Back again after a week of all things 'wedding'. Exciting but also very exhausting week. I did not do any quilting however managed to get in some design work in the evenings. I wrote a separate post about this as it was slightly more involved (HERE)

I did do some practice though the other day as I could not work out my drawing. Interestingly, this time I could quilt it, but not draw it properly. Normally I would say...if you cannot draw it you also cannot quilt it. 

I learned the Amish feather in Bethanne Nemesh' online Feather Fiesta workshop
This is what I stitched about a year ago. Since then I have not practiced this at all. When trying to wrap my head around it while drawing, went back to my notes and tried to figure out the sizing, particularly around the centre of the circle. Somehow I did not get this together properly when drawing, so that is when I quilted it out quickly to see how I would quilt my feathers, i.e. the size of them, the angle and the size of that little circle in the middle, so that I could get a sense on how I would place some guidelines when quilting this freehand. 
Here are my practice samples:
Noticed straight away when quilting that my inner circle needed to be smaller for me to get around in a flowing type way. Looking at the samples though I was amazed at how strong my muscle memory is. The size and the way I quilted this is very much like that sample from a year ago, albeit a bit more sloppy when I tried it quickly the other day. However, this helped in terms of working out the sizing and how to place my guidelines in order to quilt this out consistently.

Next stop...I need to put my wholecloth drawing on some paper. This will take another few weeks.

Apart from that, got side tracked again. I think I want to make this quilt
It is one of the first quilts I have ever done. I gave it to my daughter and looking after the cats in her house at the moment I was looking at this, by now, very old quilt. Definitely used up! It uses 2in strips in dark and light tones and is an excellent scrap project, so I am putting this on my list.

My list for the week is the following:

- continue working on the wholecloth design, i.e. starting to get the design on paper (this, no doubt, will take several attempts)
- pin and baste one of the charity quilts ready for quilting
- prepare for the wholecloth workshop that is coming up in 2 weeks (where has the time gone!!)
- sort out some 2in strips into light and dark and start the blocks.

Let's see how we go.

Linking up to To Do Tuesday over at Quilt Schmilt for the To Do Tuesday Linky Party #9

Karin

Monday, 27 February 2023

Putting a Quilt Design into Digital Format

Hello everybody...I have re-surfaced from the wedding week! My daughter got married last week and hence no quilting was done obviously. It's been busy but we did have a wonderful day. Everything came miraculously together, the weather was great, we had great food and everybody had a lot of fun. 
Currently looking after my daughter's cats as they have gone on a little honey moon.

While I did not quilt anything, I was not idle. In the evenings I finally spent some time fixing up my wholecloth design. This coincided with me getting a new app for the Ipad called Affinity Designer 2. If you followed my blog for a while you would know that I love to play around with designing in general. I just recently did my Mini Wholecloth design on the Ipad using 'Procreate'. 

It took me some time but I was able to work out how to get the drawing to scale so that I could print it off at the right size. This was no easy undertaking as I had to convert pixels to inches, set my grid behind it up in the proper way and be very precise in my drawing. I do like the program and feel quite comfortable with it and it has a lot of very useful features for quilters. I often do little drawings for some of my workshops on there.

The main difference between the two programs is that Procreate is not a vector program. Procreate is great for the Ipad if you want to do some basic drawing, sketching and painting. It is easy to learn and has a lot of features that I really like and find useful for designing.


However what I do miss is the ability to clean up my strokes, e.g. like in this little picture
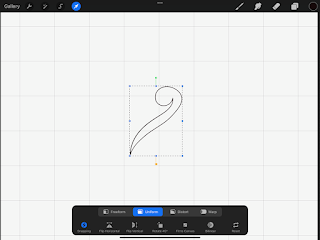
I can draw a shape quite easily with the Apple pencil, select it, make it bigger or smaller and as I found out put this little drawing into inches. What is missing though is the adjustment nodes to clean up your strokes. While I can set my brush up to work as streamlined as possible, I do find it annoying when I do make a wobble in just the last part which means I have to do it again if I want to use it for a diagram in one of the workshops. It is possible, of course, to be super careful and deliberate but I find that a bit of a hassle. For wholecloth design there is no way I can draw all my feathers the same in terms of angle and width/length etc. While that is ok for a smaller piece like the Mini Wholecloth I did above, this would be impossible to achieve on a bigger scale consistently. For the Mini Wholecloth above, I drew sections of the design on paper, then took a photo of it and imported it into the Procreate program. Then, very carefully, I traced the drawing. This was quite work intensive and at times frustrating (particularly after several cups of coffee), however worked out well in the end for this little piece. I traced 1 heart, 1 frame and 1 feather spray, so not too much at all. Once I had all that in the program I basically used copy and paste to make up the design. What though if I wanted to do a bigger design? I certainly could not imagine tracing an entire feather border...

So, I bought the Affinity Designer 2 App for the Ipad. This is a vector based program, very much like the the way Adobe Illustrator works. So, now I have some nodes that can be adjusted
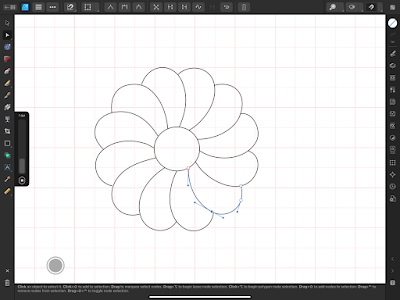
If I wobble or do not end up exactly where I want to be I can adjust the shape after I have drawn it. I used to use Ipad Graphics, an older program in the past for this but with the new updates this has stopped to work properly. So, I set out to test out the ease of the new App. Don't know about you but I am not one for reading manuals for hours...to me a program has to be intuitive and easy to learn. Affinity is definitely more complex than Procreate...there are things in there I do not even understand the English words that they are using. For a couple of days, I could not find the eraser, so in the end I did need to look at the manual. Their layer system also is somewhat way more complex and I struggled a bit with that. Still need to find something where you can name your layers as I had problems finding where I was at at times. If I could label the layers that might make that easier. Mind you, my test project was a wholecloth that I had drawn some years ago which needed sorting out in terms of size and also changes in design choices,
The settings were easy to change to inches and I was able to put a half inch grid behind it, so I could orient myself in terms of size when drawing individual shapes. I might have aimed a bit high as the wholecloth design came out to 36in. 
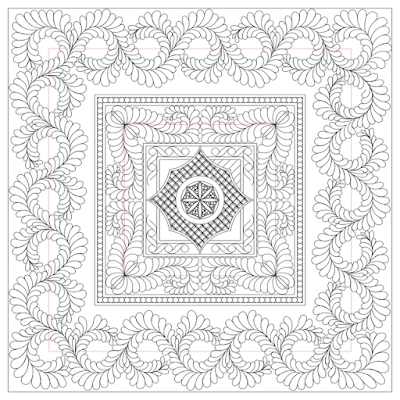
I went frame by frame, deciding on the space available, changed it a couple of times, added bitses I might use and worked out the middle section (minor alterations may need to be done...this is by no means finished). Found that the ability to work in inches and seeing what this looked like in terms of spacing extremely helpful. My feather arrangement in the centre was relatively easy to execute. I did one drawing, cleaned it up via the nodes until I was happy with it and then copied and pasted it around the centre motif. That worked really well. Then decided on the Amish feathers...now that became a bit of a nightmare. Made several mistakes in there in terms of how to quilt them...it's been over a year since I practiced this, however, my spacing is spot on, sort of. I should have lowered this a bit towards the frame in the middle, but lost the plot a bit in terms of sizing altogether at that stage. Funny enough with these Amish feathers, I can quilt them better than I can draw them.
The next day I practised sewing those feathers and realised that I need to follow how I normally quilt my feathers in terms of size and shape, so there would have to be an adjustment made on this image. This outer border was not easy. I drew two circles of feathers freehand, cleaned it up, then copied this to make a row. The corners were a bit of a hit and miss as they were slightly different. So, my copying and pasting created a lot of inaccuracies, however after a days of drawing, I just wanted to see what that looked like. If I wanted to produce a copy I could print from, I would have had to be more careful with every single circle using a combination of freehand drawing and copying to make this into a printable copy. However, patience had left me by then and I struggled to find the layers of individual shapes. The whole thing had just gotten too big.

All in all though, not a bad effort...it did clarify the dimensions perfectly for me, just need to do a few adjustments and get my head around the Amish feathers a bit more and we are ready to draw this out.

Incidentally today, I came across another feature...the slice
Only exported an exact quarter of the picture. If my Amish feathers were better, this would be perfect for printing. I might actually be able use the inner feathers and frames though as they were spot on. So, in summary, Procreate is great to get a draft of your design, try out different design ideas and as I found out you definitely can do some smaller, less involved drawings with some accuracy. However Affinity 2 is the program I would use if I wanted to create a precise wholecloth drawing that I could use to trace directly onto the fabric. 

Great exercise and lots to learn.
Karin

Thursday, 16 February 2023

To do Tuesday - 14/2/23

A little bit late but things have been a bit hectic around here.

My goals for this week were
- deliver the charity quilts to the quilting group and pick up some new quilts✅
- finish off the ditching of the new pattern
- start to write up the pattern, probably concentrating on the diagrams in the first place as this takes the longest
-make a bit of a plan what I want to achieve for myself over the next 6 months...I have got about five quilt tops ready to quilt and a wholecloth design. I feel I need to make some decisions around what to do next as I get frequently side tracked with other stuff and my quilt tops usually stay behind. That wholecloth design (which is almost ready), for example, has been on my to-do-list for at least a year and a half and absolutely nothing has happened. 

Well, not too bad considering that we are also preparing for a wedding next week which has necessitated several trips to the city.

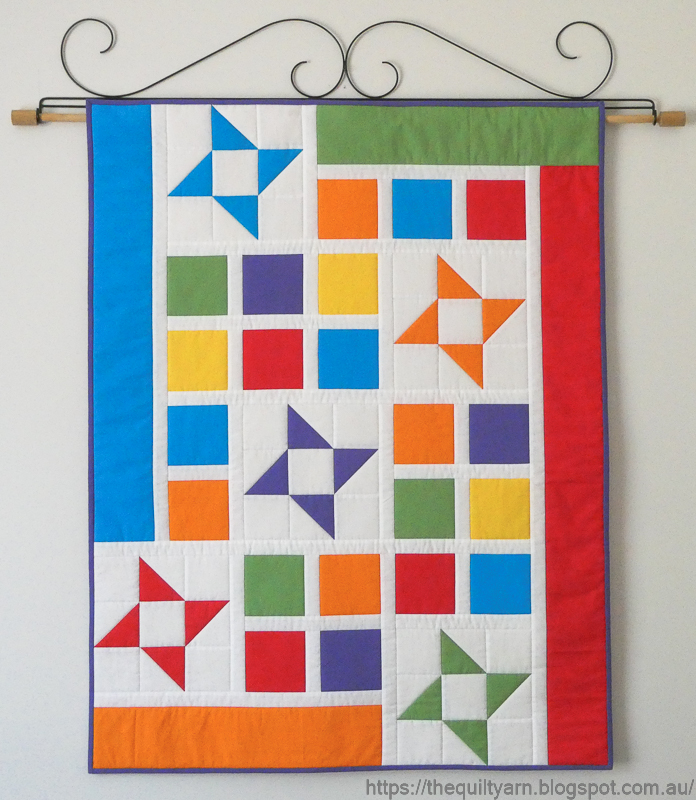
My new pattern is up and running. Very happy with that as the write up was a bit more involved than usual. You would not really think so as the quilt looks very simple, but as this is a custom layout I included a lot of little diagrams on how to piece this together. I do go by what I find easiest and I must admit, if I look at a pattern, I usually go by the pictures rather than any text.

Well, here it is - the Starbright Baby Quilt


The quilt is 34-1/2in x 44-1/2in. I only used minimal quilting as I liked the clean, crisp look of it.

With that done, I am now going to concentrate on my wholecloth design for a few weeks I think. I will not put any goals down for next week as it will be just too busy.

Linking up to Quilt Schmilt for the To Do Tuesday Linky Party...see you again in two weeks!


Karin

Wednesday, 8 February 2023

To Do Tuesday - 7/2/23

My tasks for this last week were:

- pin and baste the new pattern quilt top and hopefully start at least the ditching of it.
- quilt the charity quilt with the e2e design, attach the binding and the label ready to be delivered next week.
- not hopeful, however let's put it on the list...start with the write up of the new pattern, if possible.

Finished two things which is not too bad

Did a post earlier in the week about the last little charity quilt and how I went about quilting this (HERE) if you are interested in reading about this.
The quilt turned out fabulous
Absolutely fell in love with this...it is probably the first time I really felt that I would like to keep that quilt (which of course, I did not). Not sure what it was about this one. It is really very simple but the colours and the fabric...just really lovely. So I spent a bit longer on this one doing an edge -to-edge design over it which was the perfect choice. The design is Cloud Nine by Patricia E. Ritter available through Urban Elementz.

Then I started putting my new pattern together. Of course, it did not go as quickly as I had planned but managed to finish the quilt top, pinning and basting and currently doing the stitching-in-the-ditch. Looking very bold, just as I like it for little baby quilts
Have about half of it left to go and am undecided about further quilting. I quite like the bright uncluttered look, but I will think more on it as I am doing the ditching.

For this week I intend to
- deliver the charity quilts to the quilting group and pick up some new quilts
- finish off the ditching of the new pattern
- start to write up the pattern, probably concentrating on the diagrams in the first place as this takes the longest
-make a bit of a plan what I want to achieve for myself over the next 6 months...I have got about five quilt tops ready to quilt and a wholecloth design. I feel I need to make some decisions around what to do next as I get frequently side tracked with other stuff and my quilt tops usually stay behind. That wholecloth design (which is almost ready), for example, has been on my to-do-list for at least a year and a half and absolutely nothing has happened. 

For now, I am linking up to To-Do-Tuesday over at Quilt Schmilt for Linky Party #6


Karin

Saturday, 4 February 2023

Edge-to-Edge Design on a Sitdown Longarm

I finished my little charity quilt. Normally I would not do anything too involved on theses charity quilts...not because they are for charity but simply because I am volunteering my time and resources to quilt them. However I absolutely fell in love with the last charity quilt. Not sure what it is about this one, but I really like the very simple design and the colours of that quilt. The fabric reminds me of something but I cannot quite place it.

Such a pretty quilt and nicely straight. So I decided to do an edge to edge design over it. If you never looked into this check out the designs at Urban Elementz...so many choices and I am not sure whether I mentioned this before but there is also a whole section of some 50 plus designs that you can use for free. Really appreciate this.

For this design though I chose a panto that I had bought from Urban Elementz - the self print Cloud Nine Design from Patricia E. Ritter. I think that is the third design that I purchased from Patricia E. Ritter. Coincidence or maybe her design appeal to me because of their openness (for my purpose I do need the design to be a bit more open). 

I have mentioned in previous blog posts (e.g. HERE and HERE) how exactly I go about doing this on a sitdown longarm machine. I use Golden Threads paper to trace rows of the design. this time though I wanted this to go all a bit quicker and I used 8 sheets of Golden Threads paper and stitched the traced design through that rather than tracing off the design 8 times.
As you can see I trace with a blue erasable marker. This is because when you rip out the paper there are always little specks left in the stitching and I just want to be careful not to transfer any markings onto the quilt.
A brief look at what this looks like stitched through

I remove the paper as I go along, except for the last bit which I need for the alignment of the next row
I have done this design before so it went rather quickly. However, this time I did a bit of a stuff up in row 3...it was getting close to dinner time and I was hurrying along placing a row onto the quilt ready to go  for the next day. When I started it again the next day, my natural perfectionism was a life saver. I made a very sloppy petal about 2 swirls in and decided to take it out...only to realise when turning to the back that I had aligned my row on the previous already stitched one, so I had 2 swirls stitched twice! I was happy that I discovered it and proceeded to take my stitching out which is something you can absolutely do with the paper, however you have to be super careful. The paper is wafer thin and rips easily. Complicating whas the fact that I had stitched my design through the 8 layers with a very large needle which made the paper even more likely to just split. After I removed all the stiches, put my frazzled paper in place
You can see here how the paper is starting to split. I decided to ignore that bit and stitched as best as I can around those split papers. Worked fine as I was used to the movement of the design by that stage, but did make me somehow anxious, as it is very hard to see how it is turning out with all the paper on top.
In general I follow the lines as best as I can however this particular design is stitched with a little bit of speed...I can imagine that on a longarm on the frame you would really lean into that which also happens to a lesser extent on the sitdown, so lines are not always followed precisely. I have learned not to worry about that too much, however I do make sure that I hit the points correctly as when I align the next row, I can be assured that they are in the right place. In addition I check how my row aligns against the pieced seam lines...not measuring, however  having a bit of a look whether I am still straight and whether design elements hit the same spot as I go along. Works absolutely perfectly every single time.

The quilt looks just lovely

...and the back
Now I can say with some confidence that none of the swirls would be exactly the same, however it reads as consistent and looks absolutely spectacular. So happy with how this turned out.

Altogether I used 9 rows to quilt this. Had to trace one more design to finish off and must say I do prefer to stitch on the drawn line rather than those little dot lines, however it was much quicker of course, using the stitched through rows.

So satisfying. 

Karin

Popular Posts