Showing posts with label EQ8. Show all posts

Wednesday, 18 January 2023

To Do Tuesday - 17/1/23

My task from two weeks ago was

 - continue with the ditching and outlining of the Peter Rabbit quilt. No doubt, after I done that I will need a break! 

Done, in fact I finished it by now ✅


I ended up just putting a bit of a feather spray in the border which should have been a lot of fun, but was not. For some reason I had thread breakages and the needle did not want to go through the fabric. It shuddered at times the same way it happens when you hit a very bulky seam (and this happened just on the white fabric with nothing behind it). This perplexed me to no end. I put the quilt together, so I knew there was absolutely nothing obstructive behind the border! The fabric is off white with a bit of a swirly pattern on it. This was truly too bizarre. I tried all the normal things of changing to a brand new needle, changing the size of needles etc but it kept on happening. In the end I changed to a 100/16 needle and completed the border in stitch regulation which for me is a tad faster and has more 'stabbing power', so to speak. I reckon it was the swirly pattern on the fabric...not sure what that is made out of but it is usually a type of gluey substance printed on the fabric. I have not had this before so I think that this particular fabric was of dubious quality. Maybe the substance they used for this fabric was ever so slightly of a different composition...no idea! Or maybe it was the combination of that fabric with the backing which was not cotton but some cotton/poly blend. However, I had no such problem in the quilting of the blocks, so this does not really make any sense. Whatever it was, it was irritating to no end.

Anyway, I finished it and no, I did not relax after that, but tackled my Christmas sheep pattern. As you may know I sell patterns on Etsy which is good fun, but fairly work intensive. I was dreading this pattern a bit as I had to put the applique templates for my sheep into a digital format. And anyway, writing a pattern after you finished it a while ago is always a hassle. Thank God, I do take some notes while I construct my projects and while at times minimal, I had at least the size of my strips written down.
I do not use pattern testers but rely on myself and feedback from customers, so do the testing myself by actually going through with a fine tooth comb through every single aspect of the pattern. For this one this became quite intense due to the use of templates. Have been working on it for the last 3 days! After I managed to put the templates in digital form, I spent an extraordinary long time yesterday in making sure that they printed out accurately. In terms of writing a pattern I do use a number of programs - the sheep image is drawn into the EQ8 program which provides me with templates to construct the applique. I then converted this into a PDF document ready to print. The writing of this pattern is obviously quite easy as there is not much to this table runner in terms of quilting. I do use EQ8 to double check the yardage used for a project.  However, EQ8 gives you exact measurements which is not always practicable in terms of quilting. Like other pattern writers I do use a lot of tables and little helping apps to work out exactly how many shapes I get out of strips, how much yardage I need etc. Yesterday I was reminded of the exactness of EQ8 as it had an entirely different yardage figure for the inner border strips assuming that you only use two border strips instead of three...it always pays to double check these things and follow how you would actually go about constructing this. 

Anyway, almost done.

My tasks for the coming week are

- to finish the pattern write up and put it up as a new listing in my Etsy shop
- to cut out the material for a new pattern ready to be constructed; the pattern is ready to go in EQ8, just a matter of putting it all together
- to pin and baste another charity quilt (I think I got two more to go in the bag that I picked up last year from the Orange Tree Quilters group)

Let's see how disciplined I can be over this next week!

the Favorite Finish Monthly Link Up over at Meadow Mist Designs for my Peter 
Rabbit Finish

Karin

Wednesday, 8 January 2020

Easy Baby Quilt Revisited

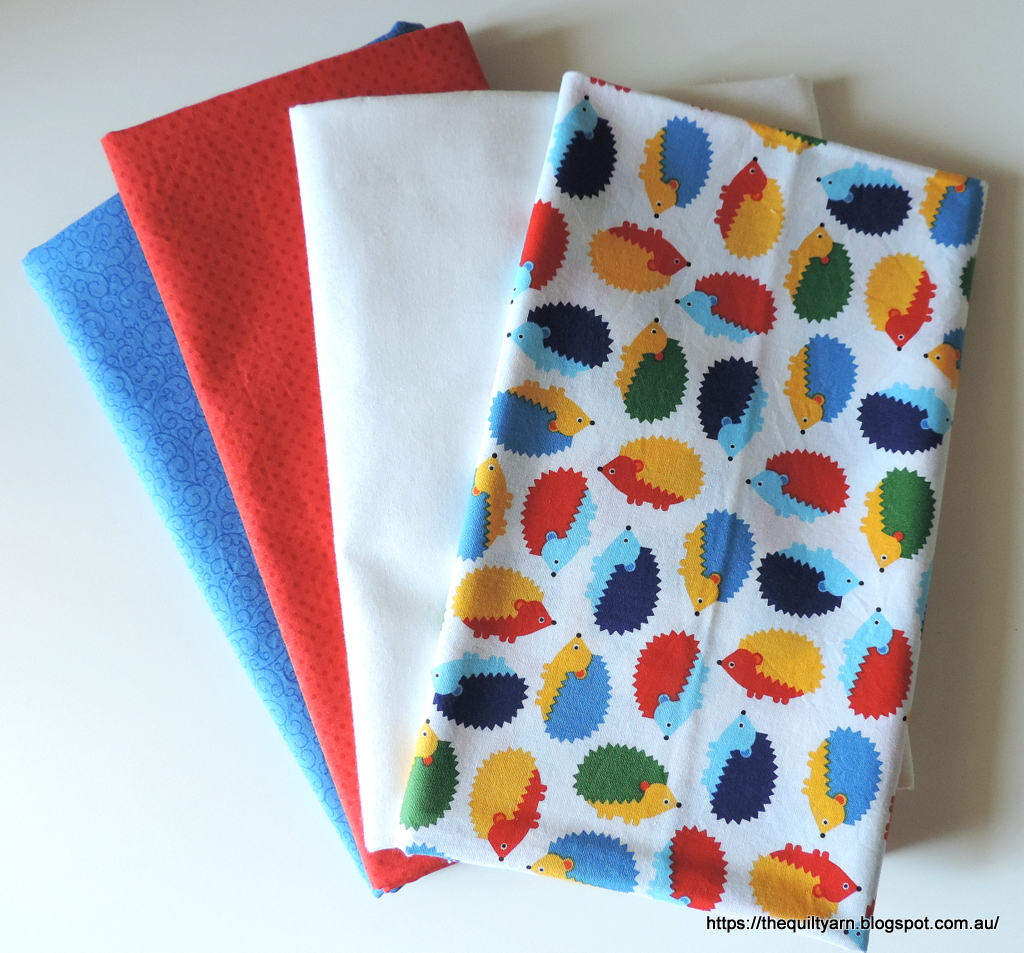
I decided to make my Easy Baby Quilt again. I have made this quilt twice already, but both times given it away. I have this gorgeous hedgehog fabric and thought it might be fun to stitch this up again.

I originally designed this to showcase cute fabric that was just too cute to cut up into smaller bitses. If you are interested in the pattern you can download this on the tab above under Free Patterns or you can follow along as I construct this myself. The pattern has been around now for a long time and has enjoyed some popularity. While this is not a formal Quilt-A-Long, I thought people might enjoy seeing me putting this together. Maybe you like to follow along...it's really very easy and comes together very quickly. If you got that cute, bright fabric this might be just the pattern for it.
Materials needed:
Materials:  
70 cm (3/4 yd) of white background fabric 
80 cm (7/8 yd) of blue dotty fabric for the blocks and binding  
70 cm (3/4 yd) of orange tone-on-tone fabric 
40 cm (1/2 yd) of feature fabric 
113cm x 143.5cm (44 1/2in x 56 1/2in) Backing fabric 
113cm x 143.5cm (44 1/2inx 56 1/2in) Batting 
Neutral Cotton thread for piecing 
Coordinating Cotton thread (e.g. Aurifil 50/2) for freemotion-quilting 
Rotary cutter, quilting ruler and mat 
General sewing supplies 
So, here is my selection of fabrics
How cute is that hedgehog fabric? I just got enough...it is 'Woodland Pals' by Ann Kelle for Robert Kaufman Fabrics. I wash all my fabrics and except for the white fabric this is ready to go. You might think that this is unnecessary, however I have had fabric bleed when washing quilts and I think it is just not worth it. I will also wash the white fabric to have a consistent feel to all of the fabric. Sometimes I starch my fabric...this really depends on what quality of fabric I am working with. If it is flimsy, I will starch it a bit to make it easier to work with.

After I done this I usually go onto my trusted EQ8 program to see what the potential quilt could look like. For this I  photographed the Woodland fabric (the other tone-on-tone fabrics can easily be matched by some of the thousands of fabric that comes with the program). The new EQ8 has an improved image worktable that allows you to import an image of  your fabric and then scale it to size. This makes importing fabric very easy (the only problem I had today was a slightly blueish tint-must be the light). I find the EQ8 program invaluable for just trying out different colour arrangements...find it really hard to visualise an entire quilt and the picture helps in just quickly seeing whether something works.

So, here is what this could look like
Hmm...that may need some developing...not quite 'there' for me.
Like this actually a little bit better with the orange spots in it...changes the pattern a bit and makes it look quite busy, but it goes with the 'busy' hedgehogs and in my mind pulls it all together. So the pattern needs to be changed up a bit. No stress...I will need less of the white background (of which I have got a fair bit) and some orange strips. If I count the orange squares above, it gives me 24 squares. A strip of 2 1/2in orange print cut across the width of fabric will give me 16, 2 1/2in squares (I know this as I got a table where I can look this up), hence I will only need 2, 2 1/2in orange strips. I think I have got a Fat Quarter, so that will make it 3, 2 1/2in strips across a Fat Quarter (in reality I probably need 4 strips to have some insurance for mis-cutting).

So, all set...this will become my Wednesday project!

Linking up to Midweek Makers over at Quilt Fabrication

Karin

Friday, 15 March 2019

Progress on Wholecloth

I get a bit obsessive from time to time 😆...I am used to it and know that I just have to run with it. If I don't, then I get stressed about not being able to follow my compulsions, bit of a vicious cycle really or, at least for me, the workings of the creative mind.

I have been stubbornly working away on my whole cloth border, beginning to doubt my own sanity. This was incredibly challenging and I was quite proud of myself to let many, many imperfections go. 

Here is the very last section to complete, pounced on and ready to go
Must admit that I was utterly amazed at this point that this actually had worked out, looking very pretty and frilly...just like I had imagined it.

So, onto the next slightly crazy idea...pebbles
Given that I had an unplanned 1/4in space I had decided earlier to fill that with pebbles and make it part of the overall plan. Turning out to be a bit of an additional challenge as I am quilting directly against the border which is pieced. So have to concentrate a fair bit to not go over the seam into the border...on the dark material that is very noticeable and distracting. 
Also, notice that space in the corner...still have not found a proper solution for this. The motif itself does not fit in the corner unless you cut it off half-way (how on earth did I not think of this beforehand!). Did not like the look of this and have tried to come up with an alternative which is proving to be a bit tricky. Have to still try out a few different ideas, however if they do not work,  then will just have to echo it. 

All in all though, very happy with my efforts...from UFO in my cupboard to completed vision, albeit slightly different. Will need to order some more of that charcoal fabric as I do not seem to have enough for the binding and then it will be done!

Will post some pictures of the completed quilt once it is washed (it's full of chalk) and bound and hopefully looking very pretty from at least 2m away. Still debating whether it should go into our local quilt show, but we shall see.

Karin

Wednesday, 6 March 2019

Vision Sort Of Accomplished!

I had a vision for this quilt and when this did not exactly go to plan I abandoned the project. Well, it has been resurrected and I have definitely been reminded why it became an UFO in the first place.

I have been working on the border for the last 1 1/2 weeks. What a hassle this was!

My initial thought of stitching this out using Golden Threads paper proved too difficult...the motif is just too frilly and to my horror I also had not taken into account that the borders were all slightly different, so it was back to the drawing board for me. The motif comes from EQ8 - Quiltmaker, Vol.8 and is called 'Curly Plume'.  Went back into the program and tried to adjust the sizing to my border. This proved very difficult indeed. While I could manage this on paper (and within the program obviously), getting this to fit my actual border was starting to become a nightmare because my measurements were a bit off to start with (due to compaction of the whole piece) and EQ8 is very precise. My border is 42 1/2in, give and take a little...after my first attempt to print out and glue together the whole border and it then not fitting my border, I started again, this time thinking this through a bit better. I sectioned the border into 4 equal parts, this time though making one of the motifs in one section a tad smaller in width (even though according to the program it should have fitted my border perfectly) to account for variation in my measurements (and to be able to have one section smaller to make necessary adjustments in the other borders).
Hard to see but I think you get the idea...painstakingly put together, section by section...allowing for adequate space at the bottom and top. Unfortunately for me this border relies on the correct placements of the motifs, particularly in the corners. Does not help that this is not a continuous border but individual motifs! You would think that this makes it easier but it did not as the beauty of the border relies on the correct placement of the motifs. After this I took one section at a time and made myself a stencil with Golden Threads paper, i.e. tracing it, then stitching it out without thread and then using it as a stencil with the chalk pounce.
Ready to stitch and hoping for the best

Bingo! See that white line on the left...I needed it exactly there, not close to it but exactly where it ended up. The first trial I did run into trouble on this very first line by being slightly over which made the placement of the next few sections too difficult, i.e. my other corner motif would have been misplaced.
So, I continued... and am happy to report it worked out.
Had some trepidation re the left corner but ended up in exactly the right spot with not a millimetre to spare. Writing this now, it sounds so very simple but I must say this nearly did my head in and the project was in danger of going back into the cupboard.

This truly must be the most crazy thing I have done for a long time and I definitely will not repeat this, just too labour intensive. But I had this vision of this quilt and it obviously needs to be completed. Not sure actually what exactly this will look like as I had a few issues. For example, the corner motif did not work out at all and I am now leaving that blank, probably just going to echo the space. Will have to wait and see. Also, there is a 1/4in space separating the border from the centre...that was also not part of the equation! Not sure whether I like the look of that, but it is what it is...will fill this with pebbles after I finished the border.
A word on the motif...very easy to stitch out but a hassle to keep consistent. You have to stitch this with some gusty to make it flowing and sometimes that works better than other times.
As I am not a machine and I am stitching on charcoal, you can see every little wobble and hesitation but I think , that is just too bad...it is, after all, done freehand, and this is as good as it gets.

Hopefully I am not running out of steam on this!

Karin

Sunday, 25 February 2018

Wholecloth Quilting - Where To Start

Where do you start.

I wrote a post last year on what goes into the preparation for a Wholecloth. Currently thinking of doing a number of posts on the topic of wholecloth quilts to demystify the process.

First and foremost is planning. I spend an extraordinary amount of time on planning these projects given that I am going to spend the next few months on this one project. Once it’s basted and you are stitching there is very little you can do to alter your design or re-draw sections. Trust me, I tried...it becomes incredibly messy, is very unlikely to work and you will be in a world of pain.

Personally I like to see a picture of the Wholecloth before I start. This can be achieved by drawing it out on paper (or sections of it) or using the computer. I tend to use EQ8 or my Serif Drawing program. No consistency in which I use, whatever suits the design I will use. For the current Wholecloth I used the EQ8 program, as I am using one of their stencils. I printed the stencil out and then put it in the shape, photographed it and imported this back into the EQ8 program to make into a block. This is how I started off to just have a bit of a look at the overall picture. As I liked the design I then found the shape I was looking for in the block library and placed my stencil into it.  Then I just explored different settings and arrangements until I liked the look of it.

I did a lot of playing around with this...different sizes, different arrangements and different colour ways (EQ8 has a whole range of Aurifil thread colours in their thread library). Love the EQ8 program as it is fairly easy to move things around (although I am still getting used to the update) and get a good look at the end product. In addition I find it very useful in looking at dimensions, i.e. how big should my motif be in this arrangement. If you make it too big it is going to look too busy and crowded, if too small it is going to create a problem in terms of the surrounding open space.

Alternatively, if you had a motif that you liked and wanted to put it into a cathedral window shape, you could draw out your cathedral window and trace your motif into it or, even easier...


...you can use Cindy Needham's Ultimate Shape stencils which makes that job superfast. All you do is mark your shape and off you go...


My first attempts at this from last year with the feathers oriented in different ways. I made some photocopies of this initially and cut out the squares to see what I liked better

After all of this I started to stitch out the motif and surrounding plumes to get a bit of a sense how this would work, i.e. will I work freehand, use rulers, trace the motif? Also trying different threads and  batting, getting a bit of a feeling for the design. Stitched this out about four times and noticed that I needed to do a little bit more work on aligning the motif. Went back to the EQ8 program and edited the motif, drawing in some diagonal lines for alignment in the center. Also adjusted the size of the motif just by a tad to allow for a bit more space around the curve.
As I am stitching this on very dark grey (charcoal) fabric, I am thinking that I will only use minimal marking as it is much harder to mark with the white sewline chalk pencils. Decided to use Cindy Needham’s Shape Stencil to get the framework down, then use rulers to stitch this out. The curve of my ruler does not magically correspond with the Ultimate Shape, however this does not matter as the Ultimate Shape will give me the points to align my ruler. The curvature of my ruler will be slightly bigger than the Ultimate Shape curvature (hence I had to do some adjusting of the size of the motif in EQ8). The motif will most likely be pounced using Golden Threads paper.
The feathers....unsure...don’t feel like marking them in, but will need to think about consistency. Probably will do some semi-marking, i.e. just lightly draw in the tops, so I can follow this and have the same number of plumes on each side.

Next step is to draw this out on my trusted IKEA paper (love that paper roll) using Cindy Needham’s stencil to align the motif, draw in the plumes...
You can see that my ruler is slightly more curved than the shape. This is only a rough copy...as I am not tracing off this, this is good enough to give me an idea of how this will work. Yesterday then I tried out a number of different markers, but decided in the end to stick with the one I know...the Sewline Chalk pencil. All I need to do now is to draw in the shape across the quilt top and I am ready to go. So I thought 😆 Discovered today that my fabric width is not wide enough, hence had to extend the center by adding on individual borders. Not what I had in mind, but so be it. Given that this piece will have a very distinct border, that all fits.

This will be a busy Wholecloth with lots of individual stops and starts, so a busy backing fabric is in order.

...and this is only the beginning! If you are thinking this is a bit obsessive, you are absolutely right. However, I have learnt my lesson of being unprepared in the midst of months and months of stitching when you arrive at the point of...hmmm, that does not work...not a good feeling, let me tell you. Thinking about writing a bit of a series on Wholecloth quilting. Let me know if you are interested and/or have particular questions about the topic. Not that I am an expert, but I obviously have done a lot of learning over the last few years and thought it might be helpful to share some of the resources or point people in the right direction.

Karin

Wednesday, 22 November 2017

E2E on HQ Sweet 16

Overcome my stage fright and finally went onto the quilt. See my previous post on my preparation for quilting E2E on the Sweet 16.

First section completed...I used my EQ program to guide me in the placement of the motif. As you can see I brought the design right up to the edge of the quilt with some of it going to be taken up by the binding. I did a lot of shifting the design to and fro in the program and this was the best way to align it so that I get a similar look of the motif at the bottom as well.


Action shot with the paper attached

Could you do this on a DSM...you probably could for a smallish quilt, however I do think the space around the HQ Sweet 16 makes this a lot easier. What you see here is me quilting from the top down going across from left to right, so as I am approaching the end of the edge I have got the bulk of the quilt to my right. This would be somewhat difficult under the DSM. I was also glad that I could have the paper lying nice and straight. Even though I attached it with masking tape where I could there is the potential of movement if you are not careful. As I went along I quilted sideways at times and then often turned the quilt to have the design facing me lengthwise as I approached the end. The space around the machine makes this very easy. Not so easy was to follow a line...I am totally out of practice and had to go really slow. So there are some minor variations in the design but that will not be noticeable at all.

Not exactly a fast process. For this quilt I have to trace and quilt the design in 3 sections. This is ok for this baby quilt but I doubt I would do this on a Queensize quilt...that would take ages. At the moment I am tracing one evening and then the next evening I quilt the design across, taking the paper out after each section.
Very happy how this is turning out. This is a welcome relief from the allover designs I usually do (meander, swirling, loops etc). Not sure I will do this all the time but once in a while this could be quite interesting. The only thing to remember is to keep the design a bit simple and somewhat free flowing, otherwise you will sit there ripping out the paper for ages. In my little design the paper comes away fairly easy, the time consuming factor is more the tracing of the design. Looking at it though...well worth it, really suits this little quilt.

Linking up to Esther's blog for her WOW=WIPs on Wednesdays

Karin

Wednesday, 15 November 2017

New baby quilt

I have been steadily working away on 3 different quilts. Yes, why do one if you can do several at once!

Finished my baby quilt. This one is made out of charm squares and gave me a bit of a headache as I also had obtained a packet of 2 1/2in squares in the same range, somehow thinking that they would make up 4 1/2in squares. Well, they obviously don't and after a lot of internet surfing I finally came up with a combination of designs.
I found the idea with the stars in the center on Pinterest...Vanessa Christensen from the V and Co blog. She had the charm squares and stars arranged this way in a small quilt in some greenish tones. Very pretty. I added some additional borders to use up my 2 1/2in squares...EQ7 came again very handy as the math just did not add up and I needed to do some tweaking. To my big surprise this worked out very well. 
The quilt is by now spray basted and ready to go! Spray basting was definitely a first for me...not sure I like it...got it all over my feet and then spread it all over the floor...bit messy. But I have got something special in mind for this one and spray basting was the better option.

I am planning to do an edge to edge design on it on my HQ Sweet 16. We learned about this in the group I am attending and given that I am really bored with my allover designs this seemed a great option. I selected a design from the EQ Quilting Designs Add-on Program Volume 8 called 'Mini Moonflower Design'. Got very enthused about this and tried it out on a piece of white cotton
While not the most exciting design I thought that this was simple enough to trial on this quilt. I think it suits this little quilt.
In between of course, EQ8 came out and I had to shift my baby quilt from EQ7 to EQ8...today I spent some time on it trying to work out the size of the design and most importantly the placement. While this is all do-able, a bit of planning is a must, particularly as this design is straight across in very definite rows, so I had to make sure it does not sit on every seam line and looks well spread out while still appearing as a consistent overall E2E pattern. The motif consists of 2 rows of flowers and I ended up making this eventually 10in high. The next issue was to pay some attention to the edges and the spacing. EQ 8 was enormously helpful with this...
I worked in Zoom mode and placed my motif where I could effortlessly start...also used that little ruler in EQ8 to measure the approx. distance at points so I have an approximate for placement. I then exported the image using the 'Export Marquee Selection' and pasted it into a Word document, so I can have a look at it when placing the motif on the quilt.

So now I have got a picture of the top left corner and the top right as well as the bottom. Also took an image of the approximate spacing which will be about 1/2in.

Now it is just a matter of doing it! The motif will be stitched out using Golden Threads paper and I will most likely do this in sections. My only fear is that this might not end up straight across for some reason. Well, we shall see...


If this works out I might get some simple pantographs to expand my options a bit in terms of overall designs. Found some really nice ones on the Golden Threads web site. Lots of possibilities!

Karin

Tuesday, 24 October 2017

EQ8

I upgraded my EQ7 to the new EQ8 program and have been looking around the new program a bit. It does look quite different but is very intuitive. This is important to me as I do not like reading manuals.

So I drew my favourite block...bit rusty on this so just used the easy draw facility and drew 'An Arrangement of Small Pieces' as a 9in block, then coloured it, saved a copy and went on to explore the export options. Same as before, you can copy to Windows clipboard or export as a Windows Metafile. I had issues with that in the last program, particularly when trying to use this as a piecing diagram where you draw individual units out of the block.

Happy to say, this worked very well (could just be that I finally figured out how to do this properly!)


So I exported the block using the Clipboard option, then opened my Serif Drawing program and pasted the block in there, then ungrouped the block, so I could pick the individual units up. As I copied this with outline and fill, I then had to click on the units, and grouped the fill and outline together before moving the piece. This allows you to create a nice little piecing diagram. As I am in my drawing program I could now have added text or arrows etc. to demonstrate the piecing of the block.

Looked at the Rotary Cutting Chart (rounding to 1/8in or 1/16in)
Here is a snapshot
...and also looked at the Foundation Piecing option which now comes out coloured (if you want)

All very interesting...lots of little changes. The navigation around the program will take me a while to get used to, but overall a much more user friendly experience.

Curious to see what else I find. There are a lot of new features to explore, like you can now take pictures of your fabric to use in your quilt...need to get on to that as I find it very useful to use the fabric that I am actually using when designing a quilt. This could be much easier than the scanning that I have done before.
Head over to the Electric Company website if you want to know more about this upgrade.

Karin

Popular Posts