Showing posts with label Cindy Needham's Ultimate Stencil Collection. Show all posts

Sunday, 23 September 2018

Australian Machine Quilting Festival 2018

Well, it's come and gone. Great event organised by Tracey Browning from Constantine Quilts right here in South Australia, Adelaide.

I went for 3 days straight and must say, I was totally exhausted by then. While exhilarating and fun, I also felt slightly overwhelmed with inspiration, as usual. Currently washing some fabrics to try out Ricky Tims Convergance quilts idea...luckily, I took a week's leave to recover and let the ideas sink in and just finish off some things.

My last class was a Wholecloth drawing class with Cindy Needham. After a bit of a lecture on Wholecloth design (also got a CD of this as part of the class which I still have not had a look at) we got to draw for the whole afternoon. Cindy had the entire stencil collection out for the class to use. Usually I draw a bit and then loose focus unless I have got a very definite idea, but that day I was super focussed and just about finished an entire Wholecloth, measuring about 36in in the afternoon.
It was very interesting to see how people approached this in the class and every piece looked very different to the next (not that I saw that many as I had my head down the entire afternoon). I started with my little motif in the middle, not really sure what to do with it. However, I thought, it will come to me as I go along and just kept extending it out.
I used Cindy's Ultimate Stencils for the middle section, first drawing in the motif with the circle stencil and then using the square stencil to extend it out. I do usually do a bit of filling as I go along, just to get an idea of what could go in there...will always have to have some cathedral windows in there, so marked this in. Also tried one of Cindy's tiny border stencils in one of the inner borders and got myself very confused with direction initially. Then I went out further and put some feathers in the inner part and to finish this off I used Cindy's High Tide border stencil for the outer border...and presto, I had an entire Wholecloth! Not the most exciting design, however lovely to look at and a very workable design. I will re-draw this on paper and tidy up some areas and then stitch it out to have a bit of a memento of this class.
After the class, I went straight upstairs and bought Cindy's Border Stencil collection.
Now this was not part of the plan 😏. I had looked at them before on the internet and had thought that I do not need this as I can draw the basic shapes myself. Doing this class though I realised how very handy they are...in the inner part of my drawing I wanted a bit of a curly type feather and then realised that I could use one of the border motifs (simple swirl) to just mark the curve in and off I went with my feathers. This was so handy and fast and looking now at those basic shapes I can see how useful this is going to become. Also liked the border stencils with the corner element and middle line cut out for alignment (I do struggle with this at times). This was a breeze to put into my border with a bit of fudging fitted nicely into that space. Obviously when I am going to draw it I will work this out a bit more precisely, but even drawing it in this roughly, it looks very good.

Enthused plus!!!

Karin

Sunday, 25 February 2018

Wholecloth Quilting - Where To Start

Where do you start.

I wrote a post last year on what goes into the preparation for a Wholecloth. Currently thinking of doing a number of posts on the topic of wholecloth quilts to demystify the process.

First and foremost is planning. I spend an extraordinary amount of time on planning these projects given that I am going to spend the next few months on this one project. Once it’s basted and you are stitching there is very little you can do to alter your design or re-draw sections. Trust me, I tried...it becomes incredibly messy, is very unlikely to work and you will be in a world of pain.

Personally I like to see a picture of the Wholecloth before I start. This can be achieved by drawing it out on paper (or sections of it) or using the computer. I tend to use EQ8 or my Serif Drawing program. No consistency in which I use, whatever suits the design I will use. For the current Wholecloth I used the EQ8 program, as I am using one of their stencils. I printed the stencil out and then put it in the shape, photographed it and imported this back into the EQ8 program to make into a block. This is how I started off to just have a bit of a look at the overall picture. As I liked the design I then found the shape I was looking for in the block library and placed my stencil into it.  Then I just explored different settings and arrangements until I liked the look of it.

I did a lot of playing around with this...different sizes, different arrangements and different colour ways (EQ8 has a whole range of Aurifil thread colours in their thread library). Love the EQ8 program as it is fairly easy to move things around (although I am still getting used to the update) and get a good look at the end product. In addition I find it very useful in looking at dimensions, i.e. how big should my motif be in this arrangement. If you make it too big it is going to look too busy and crowded, if too small it is going to create a problem in terms of the surrounding open space.

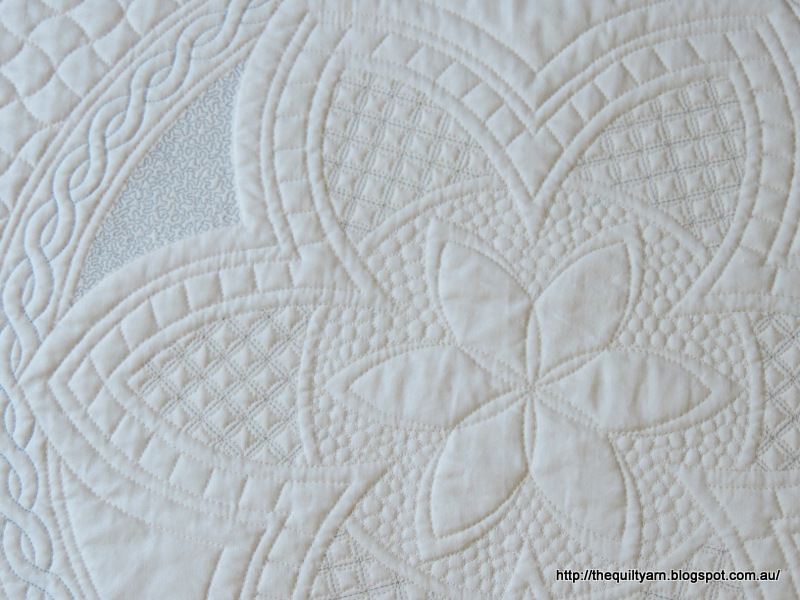
Alternatively, if you had a motif that you liked and wanted to put it into a cathedral window shape, you could draw out your cathedral window and trace your motif into it or, even easier...


...you can use Cindy Needham's Ultimate Shape stencils which makes that job superfast. All you do is mark your shape and off you go...


My first attempts at this from last year with the feathers oriented in different ways. I made some photocopies of this initially and cut out the squares to see what I liked better

After all of this I started to stitch out the motif and surrounding plumes to get a bit of a sense how this would work, i.e. will I work freehand, use rulers, trace the motif? Also trying different threads and  batting, getting a bit of a feeling for the design. Stitched this out about four times and noticed that I needed to do a little bit more work on aligning the motif. Went back to the EQ8 program and edited the motif, drawing in some diagonal lines for alignment in the center. Also adjusted the size of the motif just by a tad to allow for a bit more space around the curve.
As I am stitching this on very dark grey (charcoal) fabric, I am thinking that I will only use minimal marking as it is much harder to mark with the white sewline chalk pencils. Decided to use Cindy Needham’s Shape Stencil to get the framework down, then use rulers to stitch this out. The curve of my ruler does not magically correspond with the Ultimate Shape, however this does not matter as the Ultimate Shape will give me the points to align my ruler. The curvature of my ruler will be slightly bigger than the Ultimate Shape curvature (hence I had to do some adjusting of the size of the motif in EQ8). The motif will most likely be pounced using Golden Threads paper.
The feathers....unsure...don’t feel like marking them in, but will need to think about consistency. Probably will do some semi-marking, i.e. just lightly draw in the tops, so I can follow this and have the same number of plumes on each side.

Next step is to draw this out on my trusted IKEA paper (love that paper roll) using Cindy Needham’s stencil to align the motif, draw in the plumes...
You can see that my ruler is slightly more curved than the shape. This is only a rough copy...as I am not tracing off this, this is good enough to give me an idea of how this will work. Yesterday then I tried out a number of different markers, but decided in the end to stick with the one I know...the Sewline Chalk pencil. All I need to do now is to draw in the shape across the quilt top and I am ready to go. So I thought 😆 Discovered today that my fabric width is not wide enough, hence had to extend the center by adding on individual borders. Not what I had in mind, but so be it. Given that this piece will have a very distinct border, that all fits.

This will be a busy Wholecloth with lots of individual stops and starts, so a busy backing fabric is in order.

...and this is only the beginning! If you are thinking this is a bit obsessive, you are absolutely right. However, I have learnt my lesson of being unprepared in the midst of months and months of stitching when you arrive at the point of...hmmm, that does not work...not a good feeling, let me tell you. Thinking about writing a bit of a series on Wholecloth quilting. Let me know if you are interested and/or have particular questions about the topic. Not that I am an expert, but I obviously have done a lot of learning over the last few years and thought it might be helpful to share some of the resources or point people in the right direction.

Karin

Wednesday, 24 August 2016

Doodle Follow up

I made multiple copies of the designs that I doodled the other day using Cindy Needham's Ultimate Shape and laid them out to see what this would look like for an allover Wholecloth
No 1
Motif a bit too big in there but nice overall design with the symmetrical feathers.
On point
No 2...turned out a bit wild
Bit on the busy side

On Point
Now you could play around with toning this down a notch by maybe only using every alternative block and putting something a bit calmer in its place.

No 3
A favourite

Here again on point
I then took one of the copies and imported this into my EQ7 program as an image. Bit of advertisement for EQ7 here...I struggle to visualize whole quilts and bought the program some years ago to assist with that. It's got a lot of neat features, but the best is still that you can see a quilt in its entirety before you make it. Now I could have traced the block, but that would have taken too long...all I wanted was an overall visual of what this could look like. The actual block for the Wholecloth will be drafted by hand, all I need to do is trace the motif that I took from the EQ7 add on 'Quilting Designs No 8'. Got a bit excited about this as this motif comes with a matching border design. Little bit of mucking around as I had to flip the alternate block and also get the approximate border size happening
Bit hard to see as the image had the motif in a somewhat subdued colour (it printed out fine), but you get the general idea. Here is a photograph of the border design
I so can see this Wholecloth, down to the actual colour...maybe a bit frilly for some but I really like this. The only thing I might have to work on is to make this a bit more stitching friendly...as it is now, the border consists of individual motifs...not sure about that. Also just noticed that I probably should match the size of the centre motif and the border design, so a little bit more fine tuning needs to happen here around sizes and fitting it neatly into the border which will be easy with EQ7 as I can make it any size I want (alternatively might have to look at reducing the centre motif).

But wow, see what one little stencil idea (and motif) can add up to...and this was just one ad hoc idea late at night of how to use the Cindy Needham's Ultimate Shape. I have barely scratched the surface!


Karin

Sunday, 24 July 2016

FAL 2016 Third Quarter - First Finish!


2016 FAL

Well, here we are...my first and only finish for the Finish Along Third Quarter! I have been working on this for a while during the second quarter and obviously could not make it to the Second Quarter deadline, so here is my long overdue finish of the Mandala quilt I have been working on.

You can find the list of my Third Quarter goals HERE

Our Guild is running a Mandala Challenge  for the 2016 Festival of Quilts. The quilt must be circular with a diameter of between 50 - 60cm. Any quilting technique is allowed! If you want to find out about the design process and how I used Cindy Needham's Ultimate Circular Stencil to draw this design, please go to the Mandala Challenge post.

I was a tad conflicted a couple of weeks ago, thinking that I had made the wrong thread choice as it is not contrasting enough. Was incredibly discouraged but thought that I better finish this off. Looking at it now, I quite like it...I am particularly impressed with how evenly round I ended up, given the challenge this provided with drawing up a perfect circle at this size.

Mandala Challenge finishing up at 55cm in diameter

Close up of the fantastic blue Aurifil colour (#2725)
Detail:

Mandala measures 55cm in diameter
Cotton fabric (Moda Solids) and Legacy cotton batting
Stitched with Aurifil 50/2 thread (Brass, Medium Red, Light Wedgewood, #6728); all the colours are from the Shannon Brinkley Dryad Thread box
Cindy Needham's Ultimate Stencil used to draft this design; Ultimate Background stencils used to fill the outer petal as well as the outer rim of the Mandala.

Very happy with the end result. Now onto the next project!

Linking up to Eleven Garden Quilts for the Finish Along 2016 Quarter 3 Link Up

Karin

Thursday, 16 June 2016

The Ultimate FMQ Challenge - Summer 2016

I should call this 'See what You Made Me Do!'. It started with Cindy Needham's Craftsy Class 'Machine Quilting Wholecloth Quilts'. Absolutely loved this class and undertook to do a Wholecloth with the stencil provided in the class. Getting annoyed with all my good intentions and constantly dragging my feet I finally started this earlier in the year. Changed the center stencil a bit to make it my own and also used a darker background colour just to be different:)

I ordered Cindy's Ultimate Stencil Collection over Christmas and decided to combine an exploration of the grids with the Wholecloth. This was not a particularly well planned out approach and the little Wholecloth just grew and grew...in the end I had some space left on the sides and threw in a feather border which I then hyperquilted (see also Patsy Thomson's website)

The end result is rather insane
Grid Sampler 35inx35in
Texture galore

Some of this worked and some of it did not...was not too fussed as this was declared a practice project early in the piece. Here are the stencils that I used
1/2in square grid, Diamond (baby size), Twisted grid (Mama size) & Twisted Clam grid (Mama size)
With 20 stencils (Six designs in 3 different sizes) to choose from there was plenty of choice...

Cathedral Windows

How cool is this filler? - Diamond grid filled with lines

Twisted clams filled with alternating lines
Fail - Twisted grid stitched into oblivion
The compaction I had from stitching out these grids was pretty unreal...hence the pebbles around the feathers...that was super intense and definitely something I want to avoid in the future. Initially I was going to flatten it with lines but then realised that this would not work as I had the lines in the Diamond grid directly next to it. Yep, planning was not that great!
I absolutely loved stitching this out...even the crazy diamond filler! Just took my time and seemed to find more and more things that I could do. Thoroughly enjoyable.
Cindy is absolutely right in saying 'The only ones you ever need!' about her Ultimate Stencil collection. I have used the Ultimate Stencil collection on various projects since then...marking 1/2in dots in a sashing to guide my FMQ design, using the Lines stencil for marking a Baby blocks quilt and developing a Mandala design with her Circle stencil. Just brilliant!

Linking up to Quiltshopgal's Ultimate FMQ Challenge - Summer 2016

Karin

Friday, 6 May 2016

Mandala Challenge

Our Guild is running a Mandala Challenge  for the 2016 Festival of Quilts. The quilt must be circular with a diameter of between 50 - 60cm. Any quilting technique is allowed!

Well, how hard could it be to design a Mandala for FMQ?  So I started to consult the internet for ideas and also looked a lots of those popular colouring books and soon was completely overwhelmed with ideas to the point of not being able to get anything much on paper. In the end, I went back to basics...what would I like to do? I had a basic design in my head that had to be in the center, so I started there...

The first attempt was promising, but fell short of any ideas on how to finish it off. Also felt that it needed to be more intricate and creative...
Well, that created another month of utter confusion and inactivity. However, in the end I went back to the original idea and expanded on that and finally finished the design.

Final design...ready for tracing onto fabric
This was incredibly challenging! Not only did you need some sort of idea for design, but you also had to think ahead of how would that play out quilted in terms of areas being flattened or raised. Also, easy enough to do multiple designs in a row when drawing a Mandala, but again, how would that look quilted going from one design to the next. Many a times, I spend more time thinking about this than drawing.
The drawing itself was also tricky as you want symmetry. I used a number of tools for this, starting of with Cindy Needham's Ultimate Circular Stencil. As the stencil is 12.5in, I had to extend it outwards to make it the required size. Now here was the first hurdle...how to make a circle of that size! In the end I used a string attached to a pencil and carefully made my way around it, holding it firmly in place at the exact center.

A few of the other tools I used
June Tailor's petal and heart shapes in 6 sizes...shapes brilliantly aligned themselves into the Ultimate Stencil which has 0.5in markings and allowed me to create the center motif with some precision. Similarly, the bottom of the heart shape gave me that lovely outer ring of petals.


Apart from that I used round and oval templates that we had lying around the house for various things within my Mandala and also used the Anita Shackleford 'Infinite Feather Template' to draw the outside feathers. Looking at the picture now, I feel that they could have been bigger and more lavish (like in the first freehand attempt), however I had run out of room and there was no way  I was going to change this design again. Maybe next time...this feather border will be a bit understated. If anybody asks, then it was meant to be like that:)


I am very curious how this will look stitched out...still not sure whether to use different coloured thread in sections. Again, this seems simple, but if I am going to fill sections or maybe even in-line some feathers, then I will need to backtrack over stitches and doing this with different colours would look messy. The trick would be to think this through and have the stitching you need to backtrack on in the same colour as the filler. Will ponder more on this...

Karin

Sunday, 1 May 2016

WIP: Wholecloth - Grid work

Well, I don't think I am going to get much done for the June FAL 2016. Had a long list of things, but the Wholecloth is taking a long time. That is the problem with FMQ...you don't seem to be able to produce a lot of quilts if you are immersed in this level of detail. Always struggle with that...however, I have a plan for the next two month which should see me finish this project and the Mandala Mini quilt that I had planned.

Anyway...finally got to the stage of filling the grids...was really looking forward to this.

Stitched out the Cathedral Window design. Love this design...so relaxing!
Stitched this over a couple of nights using Aurifil 50/2 (#2000) thread. Really like the texture this has produced.

Next I tackled the diamonds. Here I am using a repetitive line design and a bit of a loop to get from one spot to the next.
You would think that this is enough to drive you around the bend, however I did not mind it too much as there was a fair bit of variation, i.e. the lines change direction in every triangle. Bit of concentration needed for that one and by no means all perfect. Lots of wonky lines and 'close enough is good enough' which I am really happy about...I think I am finally at a point where I can just let that go... (to an extent, of course!). If you are ever looking for a design that really flattens the surrounds, this is certainly a good one for that.

Looking at the whole piece I am realising that I had not thought the grid work through that well
I now have the tight and flattening design in the right corner next to the twisted clams grid. If I now do more repetitive lines in the Twisted Clams grid, I will have the whole bottom part really tight and flat. In comparison, on top in the left corner I have the Cathedral Window which looks relatively open...then there is the Twisted Grid in the top right corner...not really sure what to fill that with...
Decisions, decisions!

Anyway, on with the show...I have got so much more to fill!


Karin

Saturday, 23 April 2016

WIP: Wholecloth - Texture, texture...texture

I am so disorganised! I was stitching away on the center of the wholecloth when I realised that I really should put in my feather border before I have any more compaction. My planning is again really ad hoc.

The texture this is producing is really lovely.
Sprayed it again today to remove some of the marking. Given this piece was heavily marked overall, I have the blue markings re-appear in spots. This definitely needs a good wash when finished (which could be many moons away!)
So I started on the feather border and you would think that I learn as I go along...the marking was again a major issue around the corner treatment. I do get impatient, mark it, then correct the sloppiness with more marking to the point of unrecognizable lines...only to 'wing' it in the end. What is that?...I used a gently meandering stencil for the feathers which I have used before and I think I had some problem with that last time...because the stencil is not how I would stitch feathers in terms of angle and curvature, I could not get the flow right for me, so in the end stitched one side out first and then the other. Would have actually been better to put my own feathers in there...that would have been easier (could have even used Cindy Needham's Twisted Grid stencil for that!). Then I decided to echo the feather border which took ages to complete...only went around once and may still go around a second time. This project is getting more time consuming by the minute! I probably will also in-line the feathers with the grey thread to balance out the grey that will surround the central motif.

The center is almost complete
Put pebbles in the center and discovered that I am not that good at Pebbles...I went around each twice which actually looks quite untidy when you look close up. Initially I was going to microstipple the central flower but after doing one petal discovered that that does not work that well (i.e the motif starts to disappear), so I took it out again...I reckon I will leave the center as puffy as that. More planning around this would have been good...I reckon the center would have looked nice with a bit of trapunto in there...
The grid was overstitched with a cathedral windows design...absolutely love doing this. In fact, I blame Cindy Needham for my newly found obsession with grids...I remember not liking doing grids at all when I started quilting, but now I really enjoy doing them for the surprises that you get in the texture when filling them with different designs.

Started yesterday evening (finally!) on the triangle/diamond grid.
Bit hard to see...basically using a repetitive line design in the hexagon shape using the little loop design to travel from one to the next. This idea comes from Charlotte Warr Anderson's book 'One Line at a Time'...she called this the Hex Doodle Weave. Her lines are different... more open and just a bit of a loose doodle to get to the next triangle, however I liked the idea and stitched the more tighter repetitive lines. Was initially a bit apprehensive about the tedious nature of those lines, however found that I quite enjoyed doing it as you need a fair amount of concentration as the direction changes in every triangle. The flattening effect of this design is out of this world and I can't wait to see what that looks like finished.

In fact, I am getting more and more curious about this project as it keeps changing and evolving by the minute with me adding and extending bitses and pieces as I go along...at this rate this will not be finished for a very long time!

Linking up to
A Quilted Passion

Karin

Wednesday, 6 April 2016

WIP: Wholecloth - Gridwork

I have been working away on my Wholecloth from Cindy Needham's Craftsy class 'Machine Quilting Wholecloth Quilts'.

This has been somewhat of an adventure with certain new revelations, i.e. I am a very messy marker and I also tend to mark/stitch first - think later. Several mishaps happened with the marking which meant I had to dampen some areas to get rid of some lines and yes, of course, that wiped some of my other lines...the whole thing looks fairly messy. However, I am doing this project just for fun and to further try out Cindy's  Ultimate Background Stencil Collection that I purchased for Christmas.

I did baste the way Cindy suggested by stitching a loose grid over the whole area and that worked great, however I will have to remember to stitch that in a different colour. As I was quilting along at times, I took some of the basting stitches out in order not to stitch over them and later discovered that I had also hacked into some of my gridlines by accident, hence had to re-stitch several lines!

Anyway, today I want to illustrate how easy it is to get something wrong. I was wanting to put a 1/2in grid into the central flower shape and marked this out nicely before basting. I thought I had paid attention to marking this grid on a 45 degree angle, however discovered a few days ago that I did exactly the opposite...I aligned the grid on the horizontal lines...

I even stitched this out before noticing...looking at it, I thought...wait a minute, this does not look right. Yep, sure enough...nice and horizontal. I think Cindy remarked in her class that this just does not look that good and looking at this, I could really see the difference this makes...
Lucky for me this was a small and defined area, so I went over my blue lines with the purple Air Erasable marker to put the grid on a 45 degree angle
Have a look at the difference
Looks much better.

At the moment I am working hard on being able to give this a once over spray with water...however I can only do that if all the major elements are stitched down. I did extend this Wholecloth and added a feather border...haha!...only to realise after basting that I had put my stencil the other way around which did not work that great with the corner motif.  So again I will use my Air Erasable marker and go over that to mark the spine in the right way, stitch it out and then finally spray this thing to get rid of the bulk of the blue markings as the general mess of the blue (and purple) lines is very distracting.

Remains to be seen how this will turn out

Linking up to Let's Bee Social over at Lorna's blog Sew Fresh Quilts.

Karin

Monday, 28 March 2016

Quiltshopgal's Bee Creative Fundraiser - Mandala Doodle Along

This month has been Quiltshopgal's Bee Creative #StitchAlong, #FMQAlong, #DoodleAlong and Charity Fundraiser to benefit the Cystic Fibrosis Foundation. You can stitch along, doodle along, paint along, freemotionquilt along...the possibilities are endless. The only requirement is that it has to have a Mandala theme to it.

To help raise funds for  Cystic Fibrosis the option was there to purchase a set of Mandala templates from Maureen Russell of Beautiful Embroidery Designs. This also gave you the opportunity to be entered in the raffle.

I am working on a Mandala design anyway, so this was a great opportunity as well as benefiting a good cause. Our local Quilt Guild has thrown out a challenge to create a Mandala quilt of about 50 -60cm with any quilting technique allowed.
So, I did purchase Justin's Magical Mandalas from Beautiful Embroidery Designs, however did not use them as yet, as I had started doing my own Mandala design using Cindy Needham's Ultimate Stencil.

The stencil is 12.5in and I think Cindy is now selling it with a transparency to go with it so you can draw your designs on it and just wipe it off. I have a smaller paper master template that I could draw on but given that my Mandala had to be bigger that did not work for me that well. In the end I had to draw it out at the size that I wanted it, about 20in. For this I had to extend the stencil. I dreaded this a bit, but as it turned out this was very easy to do and works well. I use paper from Ikea for drawing...it is nice and thick and comes in a big roll. I drew the stencil onto the paper and then extended the lines out to the desired width. As I did not want to get my brand new stencil dirty I used the blue marker to draw it which was easy to do as the marker pen fits right into the slots...this worked also well for me as the blue lines were not so distracting as I started to draw. When using the paper template I found that I sometimes just get overwhelmed with all the lines. I think everybody has to find their own way of what works best for them with these stencils and the more you use them the easier it gets. They are unbelievably useful and I was actually quite amazed at how easy it was to draw my design.

This is my Mandala design...rough doodle of what it may look like. Started off very disciplined in the beginning, but lost focus in the end and just doodled...
As you can see not totally worked out as yet...I have to find a template for the outer shape to make it consistent and pull it out a bit (at a consistent size!) but the overall theme is there. Maybe a few more lines that set individual sections off and I will also try to make the central flower slightly smaller, I think. 
Actually not that simple to make a design for freemotionquilting...while you are drawing it you also have to consider what areas do you want to recede and what areas do you want to stand out and what that might look like in relation to other elements. I was also thinking that I could use different colours to stitch, but we'll see...as you can see I have started to fill in some areas with some stippling and very rudimentary grids...I think that will work really well. A little bit more work required but definitely stuck on the design.

Linking up to Quiltshopgal's Bee Creative Linky Party to show of my WIP. I hope that other bloggers will consider donating a small amount of money to the Cystic Fibrosis Foundation by purchasing the downloadable Mandala collection. Nice resource to have and endless opportunity to fill them in with FMQ designs as demonstrated by Wendy Sheppard this week.


Karin

Thursday, 28 January 2016

Trying My New Toys

While basting my baby quilt the other day, I got my wall hanging ready for basting as well, trying my new Ultimate Background Stencils from Cindy Needham.
Ultimate Background Stencil Collection
Marked part of the Japanese panel that I acquired at the last quilt show with the Twisted Grid (Papa size) stencil.
Twisted Grid
Had watched Cindy Needham's YouTube videos and placed the Twisted Grid vertically (the stencil has a horizontal and vertical alignment line) which gave me this great sense of movement which will look fantastic for the sky part of that wall hanging. Not sure whether I should have maybe used the smaller size...there was just so much choice! The marking was done with a thick blue water soluble marker and went like a dream. How did I ever do without these stencils...what a time saver! As this is just a little practice piece, I was a bit sloppy with alignment at times, however this was easy to correct and ultimately will not show. I am now debating whether to stitch this freehand or with the walking foot. Also not sure whether I am going to fill it or not...quite like it like that.
For the rest of the panel I used the Mama sized clam shells...and maybe I will throw in some Bamboo stencil. As I will be stitching with black thread on a black background this will just be texture. This should be fun!

While I was playing around with the stencils, I realised that these stencils could have a multitude of uses, not just background, i.e. my Triple Line stencil could easily be used for my Tumbling blocks quilt to fill in the individual blocks...very useful indeed.

Now back to the basting for me...


Karin

Sunday, 3 January 2016

Excitement Plus

If you followed thequiltyarn on instagram you would have seen my Christmas present to myself that arrived just a few days before Christmas...

Well, when the package arrived (must say, the US postal service is amazing) I wrapped up the package in Christmas paper and put in under the tree to be unwrapped on Christmas day even though I was busting to open it. This was a lot of fun...

Here it is...Cindy Needham's Stencil collection (have a look on her web site if you have not seen them before)
The Ultimate Stencil (circle and square)
Ultimate Background Stencils
 There are 20 stencils all told, six of which come in three different sizes

Papa, Mama and Baby size
Now just have to work out how to store them...I could hang them but my sewing room gets full sun in the afternoon and I do not always remember to close the curtains and have nearly buckled one of my mats just lying on the ground (we are talking about 40 degrees plus here). If I want to hang them I will need new hooks on the wall that does not get the sun. Anyway, at the moment I am keeping them in the package they came in...very sturdy and flat.

I think I will start trying out a few stencils on the panel that I acquired at the last quilt show.

I could put the twisted grid in the top part (or maybe use several at once?) and use the medium sized clam shells in the black part... so many choices!

There are a number of  short You Tube videos on Cindy's web site where she demonstrates the use of them and also shows how she quilts some of her more involved fillers. Very informative!

What a great time saver this will be. Very happy with my purchase.


And here for a Christmas present that I did not buy myself
How cute is this owl?
I saw this at the last quilt show and absolutely loved it, even though it appears to only make this one shape...while you can use it to make the owl, you can also use it to make different types of animals like a pig, a racoon, a frog and several others. Too cute! I will start with the owl, I think...perfect for baby quilts.

Anyway I am back to my Baby blocks quilt...

Karin

Popular Posts