Showing posts with label FMQ background filler. Show all posts

Friday, 10 June 2022

Background Filler Project

I m back onto my background filler project after a few weeks of a bit of a break. Felt somewhat overwhelmed with the enormity of the project and lost some steam to keep going. So I did a few other projects to take my mind off mainly working on some listings for my Etsy shop but also 'playing' around on EQ8 with some new patterns (fantastic program...was able to manipulate a pre-existing layout into the custom size that I wanted, changed it a bit and ended up with at least 5 different versions of possible quilts - there is another blog post waiting to happen). Will finally include an applique design that my daughter drew when she was really young. 

In addition and to stall further I looked at social media, specifically Pinterest and started to clean up my account a bit, organized my boards and in general had a bit of a look what had accumulated over the last 10 years. Well, stumbled across their Idea Pins and got inspired to give that a try...so did some videos (which I generally find really hard), read about Idea pins and watched a few YouTube videos and finally managed to put some reasonable videos together to try that out. Did that on my phone which worked really well. The topic was not super exciting -  'Basting a Quilt on a Sitdown Longarm' but that was what I was doing at that moment. Must say, that came out really nice and worked a treat for me. Might do that again as I like it better than Instagram Stories or reels.

Finally though I re-looked at my background filler 'monster'. We had a bit of sunshine yesterday so I took some photos.


 Close up of the fern area that I really like


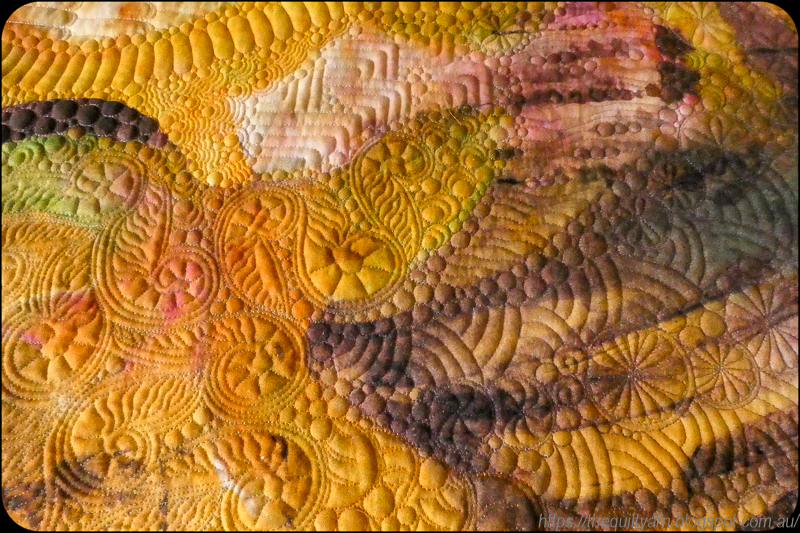
Those darker areas gave me a lot of trouble with the Invisafil thread. Being that fine at 100wt I had real trouble seeing where I was going. If you look at the darker area I had to do the pebbled area first leaving a channel to then fill in the rainbows. That was incredibly challenging on the old eyes.

...and then I finally continued and finished off that side...not too bad...

Almost there...continued a bit further on the right but will take that out today as I am not happy with it. The key on this thing seems to be pre-planning. If I am unsure what design to use, it is best to stop and think that through carefully rather than charging ahead.

So, hopefully I will make it to the end of this over the coming week!

Karin

Tuesday, 4 August 2020

Lana Lemur Continued - Almost Half Way

As explained in my last post, I am trying out Claudia Pfeil's method of filling up a background as demonstrated in her DVD 'Claudia's (P)Fillers'. Essentially this is a mix and match approach starting with some bigger circles strewn across the quilt and then freemotion quilting from one to the other using different designs. The idea is to create sufficient contrast between the designs to make the whole thing visually pleasing.

Easier said than done!

I started out with the following designs, combining straight lines with stacking shells and pebbles

Felt that it needed something more and decided to mix in a meandering box design to create contrast to those round organic looking designs. Also wanted to loosen it up a bit as I do not want the whole quilt too tightly quilted.

That looked alright however I was not entirely happy with my boxy meander. I did, for a bit of extra fun, try that box design with a ruler in another section...basically just to see how annoying this would be. Never really considered doing this with a ruler and always thought that this would be incredibly tedious.

Wow, to my surprise that went like a treat. All I had to do was to flick the ruler around my box...I did not meticulously align the ruler, just eyeballed its straightness because I was sure that visually, the eye would view its straightness and assume that the lines were all properly aligned at the correct angle. In addition, I used the Capri stitch regulator for this exercise which made it look even more formal. This was exactly the contrast I was after. It looks straighter, more formal and mixes in well with the surrounding lines.


If you compare the two pictures above you can see the difference (yes, I un-did my organic box meander). While the more organic, freehand method is fine when it stands alone as an overall design, for this exercise I really wanted a sharp, crisp contrast to the curves and circles. Really happy with how this is turning out.

I almost finished all the circles for about half the quilt. Quilting the straight lines in sections 'eats' up a fair amount of space and the filling tends to become more manageable that way. Running out of ideas on what to put in the circles and will have to recycle a few designs.

The Capri 18 is behaving like a dream...no tension issues (I am using Aurifil Mako 50/2 on top and Deco bob in the bobbin) and the stitch regulator is my best friend for all those straight lines.

I am joining Cheeky Cognoscenti for her very first Long Arm Learning Linky Party.Check it out! The linky party will run weekly and is open every Tuesday through to Friday.  
Karin


Monday, 16 March 2015

FMQ Teaser

That's all I have been doing...FMQ

First time I have tried this background filler from Patsy Thompson...plumification plus. Looks a bit crinkled as I had just washed the piece. Don't know about you, but nowadays I rarely just practice  on practice pieces. Don't seem to put the effort in when I just stitch on a practice piece, so now I go onto the real thing straight away and hope for the best. That way I ensure that I am giving it a really good workout. The 2015 FMQ challenge over at Quiltshopgal is particularly good for this...making a pillow with FMQ designs is just a big enough task to get a real feel for a design but small enough to actually get it done. This design was interesting...initially could not quite get the feel or rhythm to it, then got it and then lost it somewhat again...was left with a bit of an awkward empty space in the end that I could not get to anymore. However, the design is very forgiving, so I just filled that bit in after...not noticeable at all.

Should have my pillow finished some time this week...yah!

Karin

Popular Posts