Well, after a lot of to and fro, decided to do an edge to edge design over it. You have to wonder though because that meant a lot more work, but somehow that is exactly what I felt like. Something more interesting that would keep me amused for a few days.
I love edge to edge designs and if I had a longarm on a frame I would probably do this all the time. The range and variety of designs that you can get is just amazing and they do look really good. For this little quilt I bought a new design from Urban Elementz called Cloud Nine -Petite by Patricia E. Ritter...easy peasy, just pay up and then you can download the design to print on your home printer. The only thing you really have to worry about doing it on a sitdown machine is to choose a fairly simple design, so that removing the paper does not become too much of a hassle.
I have done edge to edge designs on a sitdown longarm before...fairly work intensive as you have to trace the design to be put on the quilt and then quilt over it being left with removing the paper. I use Golden Threads paper for this which makes that part fairly easy, however it is still a lot of work doing it row by row. I trace the design on the paper using a blue water soluble pen as I do not want any unwanted marks on the quilt from a pencil or similar.
Starting off...there is the row of the Cloud Nine design

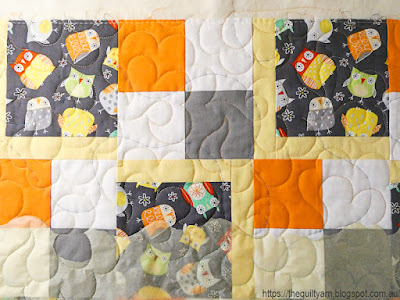
This photo was taken after the first few rows...you still can see remnants of the yellow Golden Threads paper (the blue meander thread is my basting - I do baste all my quilts before quilting). I do take out the paper as I go, however leave the majority of the last row for alignment of the next row. This quilt made alignment a bit easy because of the seams which I could check against every now and then to keep the rows as straight as possible. I could have saved myself some time in just tracing one row and then stitching through layers of paper with no thread in the machine to create multiple copies, however I prefer to trace the rows. That way I get used to the thread path which makes the quilting easier. You probably wonder how I attach the paper to the quilt...some people spraybaste the paper onto the quilt, which means you have to wash your quilt upon completion. I found a better solution for myself. I use inexpensive sticky glue dots...they stick to the paper well and hold it in place. They come off the fabric easily (when you remove the paper they stick to the paper) without leaving any residue behind. I do attach the upper side of the paper with pins, however that is the only spot that I use pins, because it is very easy to overlook pins when overlapping the rows which means you could inadvertently stitch over a pin (yep, learned the hard way).
This did not take that long at all. I did 8.5 rows in total and am seriously happy with how this turned out. Love the design which just flowed well and was very easy to stitch out. Made even better with the Bernina Q20 stitch regulator which gave me some beautifully uniform stitches and very nice points. In fact, quilting a row was done in a couple of minutes as I could go reasonably fast, not having to worry about stitch length or anything.
Next photo is a bit dark and the design looks a bit busy this way. I used a shaded orange Aurifil 50/2wt thread with hues of orange, orange-yellow and a lighter colour. It blends in just beautifully and all you see is the texture of the design.
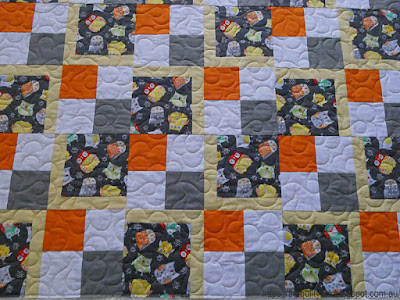


Thrilled with how this turned out. Really like this design, so easy to stitch out and gives the most beautiful texture.
Karin


Your quilt turned out great! Have you ever tried a colored pounce pad? It would have had to have been marked on your back (since you had a nice allover yellow). I was just in a class where she used a pounce and stitched through the golden threads paper without threading the machine, and then used the pounce. It worked very well. I have a blue pounce and I think it may come in other color options as well. Just a thought!
ReplyDeleteHi Karin, thanks so much for sharing your FMQ process. It really worked out well. I'll have to look into the Golden Threads paper - if it's easier to remove than tracing paper, it would be great. I've done a few edge to edge designs but I just find something that I can simplify and then just FMQ it. It's never as even but does the trick. Your quilt is very lovely. Thanks so much for linking up to Free Motion Mavericks. Take care.
ReplyDeleteWow, your quilting looks great! Thank you for sharing your process.
ReplyDelete