Showing posts with label Aurifil Mako 50/2 thread. Show all posts

Friday, 21 April 2017

More on the Clarity Ruler foot

So, I am seriously 'playing' with the new Clarity Ruler foot by Accent in Design. I am in the midst of stitching out my wholecloth, having changed the choice of fabric at least 3 times. In the end I settled on some lovely shot cotton in a blueish/yellow colour which allowed me to use my favourite blue Aurifil colour (#2975)
Clarity Ruler foot
I posted a few photos on Instagram after I had stitched out my motifs. Mental note to self: next time when you design a motif, make sure it can be stitched out without breaking thread...this was a bit of a hassle, to say the least. While a bit apprehensive, I decided to stitch the surrounding lines with the new ruler foot...after all, what did I get it for!

The foot is just a dream...there was no fiddling, just attach it, set your machine to springfeet freemotion mode, shift your needle to the +1 position and off you go. A little bit of fine tuning in terms of getting it to the right position height wise, but that was it. I tried different waddings on this  sample...in the end I decided to use one layer of cotton and a thin wool batting on top of it to give it more definition.
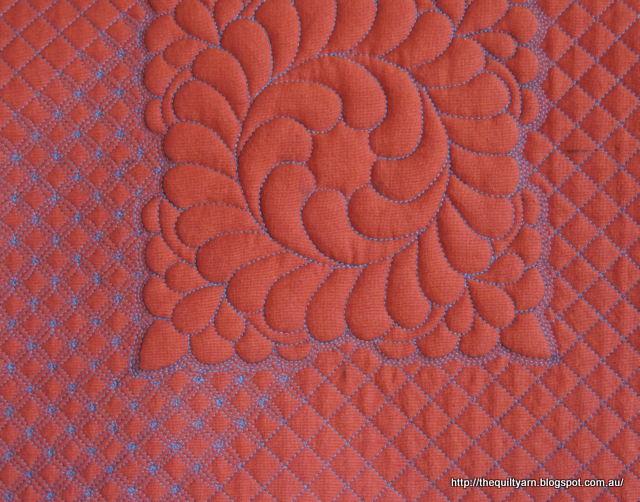
All set, off I went to stitch my surrounding lines...only problem was that my marked on lines (the second big square in the project), while straight, were distorted in the corners, hence did not give me a perfect square. This was not due to the quilting but must have occurred when marking the fabric...just sloppy marking as usual. This caused me several headaches...the rulers that I was using were no longer than 6in, hence this left a lot of room for additional error in terms of them slightly shifting while I went along. I cannot tell you how many times I re-stitched those lines! In the end, after several unsuccessful attempts it occurred to me that I needed a bigger ruler that went down the length of my line if I had to have any chance at getting it to come out square. In addition, I found that those little stable tape blobs for those rulers did not do the trick in terms of holding your ruler in place.

So, I used my normal ruler (yep, gasp!). After inspection, I determined that my normal ruler was really only a smidgen higher than the Westalee rulers...as I was not going to do anything else but stitch a straight line, I thought that this would be alright...next thing I tackled the movement. The stable tape that is sold through Westalee is adhesive on one side so that you can stick it on your ruler, but apart from that is exactly what I have in my kitchen draws from keeping the cutlery from sliding all over. So, this is what I did...I cut a piece the length of the ruler and put it on my quilt...the stuff is pretty sticky even without the adhesive. I then placed my ruler onto it, adjusting the way I placed it until I was sure everything was aligned and straight (which in itself was a nightmare).
This is what this looked like. Clumsy...time consuming...yes, absolutely! But I was getting desperate, as there was no way to re-mark the lines on the quilted piece and the only way to achieve a square was with a ruler. I spent most of my time aligning, the stitching was no issue...the foot produces a very straight and tidy stitch (not one skipped stitch!). In the end, I got there and was able to stitch the 1/4in echo with a bit more ease once I had the first line down.
This was such a relief. Then I tackled the next section. In my initial enthusiasm I had decided to do an orange peel design using the Westalee clamshell template to speed up the process. After the lines I was dreading this a bit, but stuck with it as there is no other way to learn than to do it! Well, first issue was that my piece was shrinking from the quilting, hence my nicely worked out measurements of how many clamshells I would fit into that section obviously no longer worked out exactly. Oh, wow, you have to laugh...so, fudging was the name of the game! This was an interesting experience...ruler in one hand, sticky material on the quilt, going snail pace with the stitching, I went around the border. As you are stitching on the outside of a curve, I had to really concentrate not to stitch away from the template while at the same time observing the markings of the center of the template and where the clamshells meet. To my huge surprise, the fudging was easy...I made myself a mark on each high point of the clamshell and then shifted the template ever so slightly to reduce its width on a few selected ones and this worked out fine. In fact, it looks really good

You just cannot achieve that level of evenness in the curves by doing this freehand. I forgot to take a photo of the completed orange peel design...obviously I went around it another time in the reverse which produced the design and this turned out to be super easy by aligning the stitched clamshells to the template. So, overall the clamshell experience was much easier than the lines.

Will show you a photo of the progress the next time because no doubt there is going to be another major issue to be tackled...I have got more lines coming up and I am not sure how straight they are...we shall see.


Karin

Thursday, 17 November 2016

Another Finish

Finished my Drifting Leaves Quilt, however will not be linking it up in the FAL 2016 as I forgot to mention it on my goal list for this quarter. Never mind, I know it's the second finish.

I must say this quilt is one of the most beautiful projects I have done in a while. To clarify, this is not my pattern...I won the fabric and some Auriful thread earlier in the year through the Aurifil blog (Auribuzz). Initially I had planned to make a little Owl quilt from this, but when the packet arrived I realised that I did get a Snack Pack which consists of 2 1/2in strips. The fabric was just so beautiful and I really did not want to cut them up...so, in the end I did the quilt that was displayed on the back of the packet which was Shannon Brinkley's 'Drifting Leaves' Quilt. This quilt truly displayed the fabric in the most favourable way and I always had wanted to just make a strip quilt.

And here it is
Drifting Leaves - approx. 49in x 62in
I enjoyed making this quilt and used it to try a few different things on it, i.e. using a number of different decorative stitches to attach the leaves. I have posted about this HERE

Also, I laboured over how to quilt this. I really like the wavy lines that are used for some of the modern quilts, however for this quilt doing wavy lines horizontally did not suit. Doing wavy lines the length of the quilt freehand would be possible however I doubted that I would be able to maintain them somewhat straight and consistent over the length of the quilt doing them on a DSM. There were very few reference points (other than where I pieced two strips together) and some of the leaves were slightly tilted which would have surely send me down the wrong path.

In the end I decided to use my machine...I selected one of the wavy decorative stitches and stretched it out to maximum width, shortening the stitch length at the same time and put it into the machine's memory for continued use. I then made a bit of a plan on how to tackle the quilting


First I put a basting stitch right through the center both vertically and horizontally (I was using wool batting and even though I had it pin basted, I did feel it needed some extra securing). I then used masking tape to give me a straight line down the middle and another strip of masking tape some 8in away. I only stitched approx. 8in at a time, then stopped and did the next 8in following the numbers at the top. I also turned the quilt with every wavy line, going up and down which was a bit cumbersome, but ensured that I had no dragging of the lines. I was very curious (as in petrified) as to what this would look like...initially also a bit unsure what exactly I would follow once I had stitched the first line. When I started at the second line, it all made sense...I rode my sewing foot along the hills of the wavy line, sometimes just gliding along it and other times shifting it a bit to get some variation. This worked like a dream. As I was approaching the 8in masking tape, I could clearly see whether I was straight or a bit off and could make slight corrections. Overall this kept me very straight...in terms of variation and wonkiness, we are only talking about half an inch here and there.

Work in progress
Not that you can see it very well, but here is the first finished 8in, ready to take the tape off and go for the opposite side
Close up of the lines...I used two different colours...just because! Loved the texture that was emerging
And so I went along doing line after line. In retrospect, I could have structured this a bit differently and left some empty space that I could have filled in with some tree bark FMQ...that idea came about half way through the quilt! That would have worked really well as I would have had the lines for guidance.
The texture is gorgeous...just right for this quilt. At some stage I thought this might get too stiff because of the dense quilting, but it turned out great and it really suits the quilt.

What thread do you asked....Aurifil 50/2 wt, of course! This certainly eats up a lot of thread but you will be amazed...this is all I used for this quilt.
So economical, it's amazing!

Linking up to Let's Bee Social over at Lorna's Sew Fresh Quilts and also to the Needle and Thread Thursday Linky Party over at My Quilt Infatuation

Karin

Wednesday, 2 November 2016

Drifting Leaves Quilt

I am working on my Drifting Leaves quilt. This is from the fabric that I won in the Auribuzz Blog Hop. The fabric is by Shannon Brinkley from her Dryad collection. It is absolutely beautiful and in the end I decided to follow her Drifting Leaves pattern which simply sews all the strips together.

For the leaves I ordered some of the Multicolour Print...gorgeous, gorgeous, gorgeous. Had trouble cutting into this, but managed to cut out my 17 leaves.
I am using this as a bit of a practice or re-acquaintance for some of the decorative stitches on the machine. I have another applique project in mind where I do want to use a variety of stitches. So I trialed  several different stitches to secure the leaves onto the fabric. Definitely was very rusty in doing this...some examples:
Filled circles as edge
Blanket stitch
...and close up of the uneven satin type stitch. I liked this one best as you cannot see any hiccups that will invariably happen
Uneven type satin stitch
Used various other options from the choice of stitches, some worked better than others. This time I used my Aurifil thread to do the applique which worked great and looks great as the colours coordinate nicely.
Quilt is now ready for basting
Found some nice dark blue dotty fabric in my never ending stash (the stuff I have got in there is unbelievable!) and put the binding together today.
Linking up to Lorna's Let's Bee Social over at Sew Fresh Quilts

Karin

Sunday, 19 June 2016

How clever is this!

Are you subscribing to the Aurifil blog (https://auribuzz.wordpress.com) ?

Have a look...apart from having super giveaways and segments on top designers they also have some great informative posts about various topics at times.

I came across a post recently, written by guest Aggy Burczyk called 'Thread Matters: Binding with a touch' in where Aggy uses her decorative stitches of her machine (Bernina) to beautify the binding.

Just had to try this...

See that faint white line...Aggy uses a distance of 5/8in to place her decorative stitch. On the Pfaff 4.2 and with the size of the decorative stitch I used 3/8in as a mark to align my sewing foot against. Also chose a very 'light' stitch as I was not sure how this would turn out ...in the photo above, this is the side of the binding that will be on top of the quilt. When attaching the binding you will turn your binding strip around to attach the binding with the wrong side up. This is important for the direction of the stitch...when stitching this, I chose the mirror function to turn my stitch around so when I folded the binding over it was the right way around.

I used Aurifil 50/2 both in the top and bottom  in my favourite blue colour.

And this is what it looks like when it is attached
How cool is that!

Must admit, I got very enthused when I was trying this and did not read the blog post to the end...haha, only to realise that I was not going to be able to close the binding in the normal way. In the end I just sewed the endings together as this quilt is fairly bulky with lots of puff, so that little bit of extra bulk will not be noticeable. Aggy does provide two different ways of working out the closure of the binding...very interesting.

Lots of possibilities!


Karin

Wednesday, 1 June 2016

Mandala

So I finally started on my Mandala.

Bought some Bella Solids fabric and ended up with the same colour that I usually choose... a sort of burnt orange. Took me ages to select, there are just too many choices. Whether this was the best choice to make for this project remains to be seen. I marked the fabric using my light box and the trusted blue water soluble marker. Was not as bad as I thought and I even managed to not mess it up too much...except for the grid. For the live of me, can never get the orientation  of the grid right first time around, so need to re-mark this when I get to it.

My thread choices seemed great. Used the new Aurifil thread from the Shannon Brinkley Dryad box. Chose a nice watermelon colour (#5002) as my base and added some accent colours (#2975 and #6728). For the center I chose a brilliant blue (#2725). Not sure about the result as yet...at the moment I am thinking that I should have selected stronger colours, but we shall see...bit hard to tell as you go along.
Funny (not) thing happened when I started stitching this...the machine did not behave itself and it felt as if I was having two left feet. The speed was doing something funny, i.e. I did not seem to be able to get into any sort of rhythm. I kept looking at the stitches and everything seemed fine. The back also seemed fine except after a while I kept noticing a few 'fuzzy' stitches. Weird! The other thing I noticed was that I was absolutely not getting any body in the quilting...even weirder as I was using the same cotton batting that I had used for my other Wholecloth. Thinking that it had to do with me somehow I continued and put the inner frame down...
When it was time to change the needle, I realised what happened...I had taken the wrong needle and was stitching with a 60/8 needle. Duh! Now looking a bit closer at the stitches in the back I could see what the machine was doing...given the needle was a tad too small for the 50/2 thread it did 'nick' the thread every now and then while forming the loop on the back creating this somewhat fuzzy appearance. Overall though, I had done really well considering that I  had stitched this with the wrong needle.
The perfectionist in me (of course) needed to fix this, so today I re-stitched the inner frame and yes, with the right needle I now had the right amount of structure or puff in the piece. So obviously the whole tension was not right with the smaller needle even though it looked perfectly alright from the front.
Anyway, so this is what I have been up to...
My white Wholecloth is nearly finished...taking a bit of a break from it...looking very pretty draped over the table
When these two are finished I really need to clean up my sewing room...it is a complete mess.

Linking up to Let's Bee Social over at Lorna's blog.

Karin

Monday, 27 July 2015

July 2015 FMQ Challenge

For this month Quiltshopgal presented Paula Reid as the expert FMQ and I chose to complete Option1 for this challenge.

I decided to try myself again at Trapunto, something I have played a bit with in the past but have not quite got the hang of it. I enlarged the stencil provided just a little bit, traced it on the fabric and also marked my grid with my new June Taylor grid marker (easy as). 

Then I went around the outline with water soluble thread having backed it with a fluffy wool batting that I had left over from something.
After carefully cutting away the excess batting behind the wreath (no holes, yah!) I basted the quilt top as per normal, using cotton batting. So far, so good...I decided to use my all time favourite thread, Aurifil 50/2 Mako.
Aurifil 50/2 #1126
This is by far the most fantastic colour I have ever come across...it reminds me of a blue flower (Kornblumen?). It comes from Sheena Norquay's Autumn collection and was the perfect choice for this pillow. Even though I do not usually FMQ with a darker thread, I just had to use this.

The wreath came out a treat...nicely raised and prominent. I went around it twice to make it really pop out, then went ahead and stitched out the grid. This took a long time...you would think that I had enough of grids after all these pillow challenges, but I think I am a bit addicted to them by now. Find it quite therapeutic to just sit there following the lines. Again chose the cathedral window design.
It was quite cold here in Australia over the last few weeks...and I mean, really cold...so this took double the time as I could not sew in the evening. Try doing FMQ with very cold hands...just does not work, so I had to wait for my day off and the weekend.

Got there in the end


Close up

Trapunto Wreath


Linking up to the July Linky Party over at Quiltshopgal.

Karin

Wednesday, 18 February 2015

February 2015 FMQ Challenge


Finished my pillow!
As for January, the FMQ challenge over at QuiltShopgal had 3 options to choose from. This months' expert is Leah Day whom I cannot praise enough for getting FMQ out there with her blog The Freemotion Quilting Project. When Leah ran her 2012 FMQ Quilt Along, I participated for the year and I must say that I learnt more than I ever did in any workshop that I attended. She is a very talented woman (obviously) and also a very good teacher.

For this challenge I chose Option 3 as I had purchased Leah's Craftsy class 'Freemotion Quilting a Sampler' some time following 2012. If you have not tried the Craftsy class experience I can highly recommend it...I did not do the sampler (Free BOM class on Craftsy) but I do tend to go back to this class quite often to just refresh my memory on a particular design and to learn new ones. The great thing is that you can go back to it over and over again...it's really like having an interactive reference book that you can consult any time. Great resource.

Was a bit stumped for ideas and felt too lazy to piece a block so had a look at block #11 of that Craftsy class as Darlene had suggested and decided to stitch that one out...actually my whole purpose for this pillow was to use a very exuberant orange Aurifil thread (#1154) and mix it with the most fantastic blue-grey Aurifil thread (#1126) that came as part of Sheena Norquay's thread collection. This was the perfect opportunity.

First did a sketch as always...if I cannot draw the plumes properly in one area I also will not be able to stitch them properly, so I make sure it flows for me. I did mark my fabric but will often deviate from the lines, however the marking helps me not to loose direction. This was a bit tricky in parts with the curvatures and some plumes were in danger of being too long and drawn out and that became evident when I was drawing it. Leah had alerted to this in her Craftsy class which was great as I would have run into trouble if I had just stitched this out completely freehand.
Progress was a bit slow...I took my time, enjoying stitching with this beautiful thread even though the orange did not come out quite as bright as I had hoped. Also, while I followed Leah's example, I mixed in a bit of Patsy Thompson's hyperquilting (yep, a bit addicted to that ever since I watched her DVDs) and Angela Walter's nifty wiggly line filler. Thoroughly enjoyable. Noticed that I was quite out of practice stitching straight lines....Then onto the Paisley...had not done this for years. Never have been very good at Paisley for some reason as I tend to get confused on which side of the shape I will end up on and generally have some gaps. In Leah's Craftsy class she was suggesting to just fill this in with some Pebbles...ingenious...why did I not think of that before! So, at some stage I started to just do Pebbles and had to remind myself to not opt out and continue with the Paisley.

Then came the pillow...had watched Leah's Butterfly pillow video and got a bit enthused about doing the buttons on the back. For the life of me could not work out the required measurements for my pillow size (16in) and searched and finally found a tutorial which really spelt it out for me over at Sew Sweetness. While that pillow did not have the accent fabric strip on the back, it helped me with the measurements and it also had a binding around the pillow which I liked. In the end I literally combined the two instructions and muddled my way through it. My Pfaff has an automatic button hole function which was great to use (after consulting the manual!)...worked like a dream. Given the floral design on the pillow I did not try Leah's spiral design but just meandered over it to as I felt that suited the overall look a bit better.
Work in Progress
Wiggly Lines

Paisley with lots of Pebbles
The finished pillow
16in finished pillow with accent binding
Back of pillow

For all the Pfaff followers, here are the settings that I used with Aurifil Mako 50/2 thread.
Feather: New Open-Toe Freemotion Spring foot on the spring foot freemotion mode with tension 3.8 on a slow setting.
Wiggly Lines and Paisley: Dynamic Spring foot 6D on the Dynamic springfoot freemotion mode using the modified Pfaff ankle for better visibility, again with a tension of 3.8 on a medium speed.
Meander: Closed Sensormatic foot in the sensormatic freemotion mode on a higher speed, with a slightly lower tension of 3.6.

Now it's time to link up and check out some FMQ Goodness over at QuiltShopgal.


Karin

Popular Posts