Showing posts with label QuiltShopGal 2015 FMQ challenge. Show all posts

Friday, 3 June 2016

Can this girl shop!

I have been very lucky lately...won a Fat Quarter shop voucher ($25) from Quiltshopgal's 2015 FMQ Challenge. Got the coupon code a few weeks back and have been going through the shop many times over, given that the postage was obviously not included in the voucher.
Have not bought anything from the Fat Quarter shop before as postage to Australia is obviously a bit prohibitive, but reading through their shipping and postage information I was thrilled to find that I could get away with $13.00 postage if I kept my order under $20. Excellent!

Have a look what I got
Meadowbloom by April Rosenthal, both a Charm pack and a Mini Charm pack...thinking of a very simple little quilt...white background, with Charm squares and Four Patch blocks...the fabric is super pretty! Then I got the Aurifil colour that I was missing and could not get over here in the shops and...

Bali Snaps...well, they had one of their Flash sales on the morning I ordered and that went out for $0.46, so I added it, staying just under $20 ...one can never have too much fabric!

Super impressed, paid a grand total of $7.62.

THANK YOU Fat Quarter Shop and Quiltshopgal! I had the greatest fun


Karin

Wednesday, 23 December 2015

December 2015 FMQ Challenge

Here comes the last pillow for the year for the 2015 FMQ challenge over at Quiltshopgal. What a year it has been...I did a total of 11 pillow, missing out on September. Not a bad result. I will do a bit of a collage towards the end of this year.

The expert for this month was Wendy Sheppard from Ivory Spring. I chose Option #6 using Wendy's Thread Talk series on her blog as my starting point.

For the front, I used Thread Talk #57 the Roundabout Wreath, starting off with a lot of drawings before I got the hang of it.
As usual, there was some drama when I was marking it...for some reason I had marked the motif with my white chalk marker rather than the water soluble blue marker pen that I usually use. And a good thing it was...half way through pinning, I pricked myself with one of the pins and bled all over it...could not believe it. As it was rather hot over here, it literally dried before my eyes and just water did not get it out. The blood had dripped smack bang in one of the plumes! In the end I used vinegar which did do the trick, but left me with very faint white lines. Had I used the blue marker this would have been a right old mess!

Wreath completed, on to the filler
 For the filler I used Patsy Thompson's method of plumifying the background. Love doing this and again felt that this background filler is extraordinarily forgiving which is always a good thing on a solid background
There are a great many odd shapes and arrangements in this but you would not notice as it is the texture that stands out rather than the individual shapes...I pretty much did my own thing, so much so, I watched that section of her class again and realised that I was not really following the instructions...so mine is a bit of a combination of two fillers she demonstrated.

Here is the pillow (and that is the real colour!)
Front of the pillow
For the back I used Wendy's trademark design, the Jester's Hat (Thread Talk #34)
Back of the pillow
Luckily I had done this before, so it went quickly. Not quite as easy as it looks and a bit hard to keep consistent on a solid background...but absolutely lovely to look at.

Lastly, I used Aurifil 50/2 thread for the background thinking that it would just blend in. For some reason, this colour has an enormous presence and if you look at the front of the pillow it somewhat overtakes the wreath which was done in a yellow tone...go figure!

Linking up to the 2015 FMQ Challenge at Quiltshopgal.

Karin

Sunday, 29 November 2015

November 2015 FMQ Challenge

Managed to finish my pillow on time.

Quiltshopgal's November challenge featured Sarah Vedeler as the expert freemotion quilter. I chose option 4, finally using Sarah's Accuquilt Go 'heather feather #1 cutting die. Now this took me a very long time. I do not do a lot of applique and had to re-acquaint myself with my machine (see post about the tapering function HERE). Also underestimated the time it took to satin stitch around each shape. This literally had to be done at snail pace to get the curves nice and round. I think I started about the middle of November so was starting to feel the pressure.

When it came to the FMQ, I chose to use one of Patsy Thompson's fillers, plumifying around the shapes. I had seen it before in several of her pieces and had tried it a couple of times on little practice pieces. I recently purchased Patsy Thompon's 'Ultimate Freemotion Feathers' on Craftsy...just could not help myself, even though I have her whole Feather DVD collection. Just love her classes and was not disappointed with this one either...always something new to learn. Anyway, in that class she demonstrates the background filler and several variations of it, so I thought I give that a go.
Plumification galore
Bit hard to see on the white backgound but I did struggle a bit with keeping a consistent scale as I was going around the shapes. Like Patsy did say though, it is a very useful filler and lends itself well to filling every available space. This was a great exercise as it is different to fill out an empty little practice space compared to going around various applique shapes. I pretty much did my own thing...you really have to let go of the perceived rules for any FMQ design and find your own rhythm and way.

The back turned out heaps better
Background filler on the back...getting better
Much more consistent and relaxed and considering the space I had to fill it actually went relatively quickly.
Close up

The pillow looks great
Front of the pillow
       
Back of the pillow
And another one for good measure...the latest pillow with some of the other challenge pillows in the backgound.
Completed all but one of the challenges...another one to go. Almost sad to see this challenge end. I must say, I did learn so much over the year.

Linking up to Quiltshopgal's November 2015 FMQ challenge.

Karin

Wednesday, 14 October 2015

Progress Report

Working away on my pillow for the October FMQ Challenge hosted by Quiltshopgal. This month expert is Lori Kennedy from The Inbox Jaunt.

I have her Craftsy class 'Divide and Conquer" and decided to follow this and make a sampler of the different designs. Almost finished the front
Done some gridwork (not completed yet), paper clip design (which I loved), a heart design, the square flower, some pearls, more flowers, loops, ric rac and today the fabulous flower design. Well, the fabulous flower design on the bottom did not work out that well. Trying to follow someone else' drawing is always hard and I did practice this one on paper for a while, but somehow I could not get the flower shape right. The design is stitched in several passes and apart from the last flower on the right my wonky shapes are oddly consistent (looks actually like a chuck's head), so it seems that I just do not get it somehow. In the end I had to microstipple the fullness out of  the surrounding area and you can see that it is trying to puff through in parts.

Never mind, this has been good fun...we can't be great at everything! Not sure yet what I am going to do on the back, maybe an overall flower design...we'll see.

Linking up to Let's Bee Social over at Sew Fresh Quilts
 
Until next time

Karin

Friday, 21 August 2015

August 2015 FMQ Challenge

Finished with a week to spare!

This month' expert was Angela Walters and I chose two options. For the front of the pillow I used some of the concepts discussed in her Craftsy class 'Machine Quilting: Small Changes, Big Variety'.
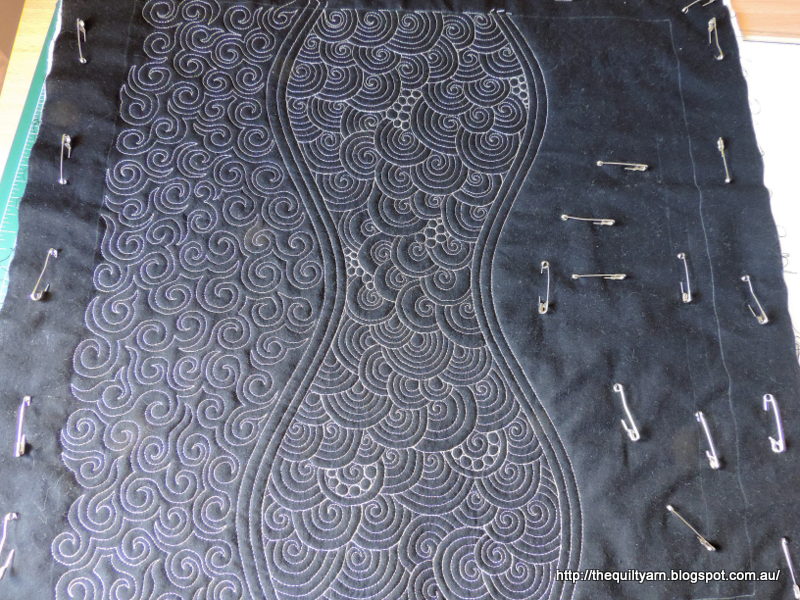
I concentrated on lesson 2 of the class  exploring the swirl in some detail...
This turned out quite striking...I love stitching with light thread on a dark background. Somehow my stitches turn out heaps better that way. If you want to read about the process of getting this done, please see my Post 'Progress on Pillow' below. I used 50wt Aurifil thread (#2000-Light Sandstone) with a 70/10 Sharp needle for the quilting.

The back of the pillow falls into Option 2...I could say that I chose this, however I more or less stumbled into this. Looking at the Angela Walter's book 'Shape by Shape', I remembered that apple core shape that I acquired doing one of Kim Bradley's classes some years ago. Using this, I then filled the alternate shapes with more of the swirls, given that I was having a bit of a swirl theme going on. I think that this would also look quite effective if you put a small stipple in there.
Also discovered something extraordinarily useful for getting rid of the white chalklines from my pencil...the top of the Machingers gloves, where it is more closely knitted for the wrist. Just using that part and lightly going over the lines, they disappeared with ease. Who would have thought!

Linking up to 2015 FMQ Challenge at Quiltshopgal. Make sure you have a bit of a look around...there is some fantastic freemotion quilting going on.

Karin

Sunday, 16 August 2015

FMQ Away

Working on my pillow for the 2015 FMQ Challenge at QuiltShopGal

Choose black calico to do my FMQ on...I like stitching with light thread on dark fabric. However, I noticed that I am a bit out of practice...some of my stitching is positively wonky, Never mind, it's the effect we are going for.
Had trouble with the swirls, just did not flow properly...but anyway, it did get done and now I only have the right side to do. Planning on some of Angela Walters flower filler, interpersed with some feathery bigger shapes. We shall see.

Until next time

Karin

Monday, 27 July 2015

July 2015 FMQ Challenge

For this month Quiltshopgal presented Paula Reid as the expert FMQ and I chose to complete Option1 for this challenge.

I decided to try myself again at Trapunto, something I have played a bit with in the past but have not quite got the hang of it. I enlarged the stencil provided just a little bit, traced it on the fabric and also marked my grid with my new June Taylor grid marker (easy as). 

Then I went around the outline with water soluble thread having backed it with a fluffy wool batting that I had left over from something.
After carefully cutting away the excess batting behind the wreath (no holes, yah!) I basted the quilt top as per normal, using cotton batting. So far, so good...I decided to use my all time favourite thread, Aurifil 50/2 Mako.
Aurifil 50/2 #1126
This is by far the most fantastic colour I have ever come across...it reminds me of a blue flower (Kornblumen?). It comes from Sheena Norquay's Autumn collection and was the perfect choice for this pillow. Even though I do not usually FMQ with a darker thread, I just had to use this.

The wreath came out a treat...nicely raised and prominent. I went around it twice to make it really pop out, then went ahead and stitched out the grid. This took a long time...you would think that I had enough of grids after all these pillow challenges, but I think I am a bit addicted to them by now. Find it quite therapeutic to just sit there following the lines. Again chose the cathedral window design.
It was quite cold here in Australia over the last few weeks...and I mean, really cold...so this took double the time as I could not sew in the evening. Try doing FMQ with very cold hands...just does not work, so I had to wait for my day off and the weekend.

Got there in the end


Close up

Trapunto Wreath


Linking up to the July Linky Party over at Quiltshopgal.

Karin

Sunday, 10 May 2015

May 2015 FMQ Challenge

This is a very long post...I reckon I need to split up process and product a bit in the future.

The expert this month is Cindy Needham. Again, I was able to make use of the Craftsy classes that I have purchased in the last two months. I have both of Cindy Needham's classes and have watched them with interest over the last few months. I am yet to make  the Wholecloth quilt...got as far as enlarging the design and taping it altogether.

One of the things that struck me when I was first watching the classes was Cindy's exploration of ready-made stencils and what you can do with them. Actually I was blown away with some of the quilts that she had produced using two very simple stencils, just alternating them. So, for this challenge I used this idea and had a look around for a suitable stencil as I did not just want to repeat what she had done with the Double Wedding Ring stencils.

I recently got the Score of Four stencil from Full Line Stencils and decided to use the ugly duckling on the far right in the top row.

Was not sure whether it would work repeating this design over a larger area, but thought it would be fun to try out. The stencil comes to 5" placed on point and of course, I chose the more fiddly approach, putting it on point. Actually not a lot of planning went into this, it was more like...let's just see where this will take us.


I did not use white chalk to mark this as I could hardly see it on the beige fabric and also did decide against the blue chalk as the blue chalk marks do not come out easily (did a trial on some calico and the blue marks literally needed washing and scrubbing to come out...will not be using the blue chalk again). In the end I traced the design using a light box.

Stitched out repeated design placing stencil on point
After stitching out the first few, I decided to make it into a tile design rather than spreading it over the entire top. Had to erase some of my other blue markings carefully which looked messy, but I needed to make room for the next idea of putting grids on the sides. Ever since the first pillow I have become rather fond of grids (rather odd as I used to really not like them at all).

Got carried away and stitched out all four sides with a 1/2in grid which, in itself, looked great.
But can you see what is happening? I now had the blobs of unquilted area really come to the foreground. Yep, did not consider this at all...after some indecision, ended up stitching them down with just a simple cross through them. This made the whole picture look much more uniform.
Much better...after this, I tried some of the grid designs that Cindy teaches in her class "Design It, Quilt It".

And here it is...the finished product
Finished pillow
For some reason this did not photograph that well...very rainy, low light day today!
My favourite - 1/2in cathedral window grid

Double grid

Checkerboard grid

Combination grid (not part of Cindy's class, just gave that a go)
The back - oversized cathedral window grid

Linking up to the May 2015 Freemotion quilting Challenge over at Quiltshopgal. Thank you Darlene for hosting this and thank you, Cindy, for those wonderful classes.

 Karin

Wednesday, 18 March 2015

March 2015 FMQ Challenge

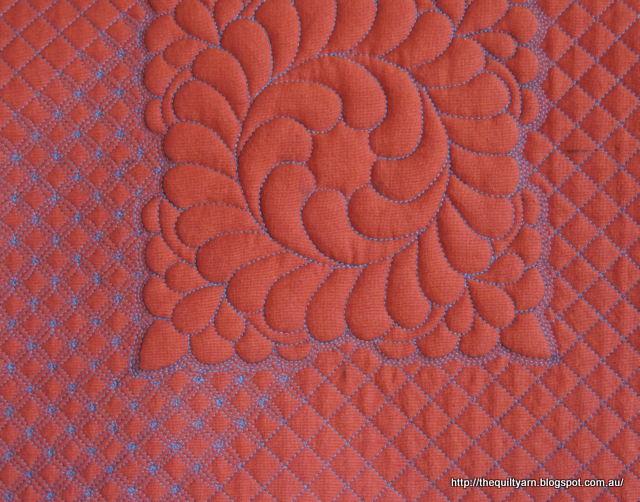
Finished my pillow for the FMQ Challenge run over at Quiltshopgal. This months' expert is Patsy Thompson and I think I fall under Option 3. I did check out Patsy's blog re her pillow samples and basically this month I am just going to be a bit of a copy cat. For me it is very important that this challenge is about learning new things and seeing Patsy's trapunto and background filler I thought it was time that I gave this a go. See my previous blog post FMQ Fun about the process of getting the trapunto design onto the square and stitching it out incorporating the hyperquilting that Patsy is so well known for. As mentioned previously I did get Patsy's DVD series on feathers some time ago and cannot recommend it highly enough...I learned so much from that and also got somewhat addicted to the hyperquilting.

Anyway, here is my completed pillow, done again using the orange shot cotton with Aurifil 50/2 thread. You cannot really see the in-lining very well in this picture but it is there, done in yellow thread. The interesting thing is that I did not consider the middle section that much and once trapuntoed, realized that without in-lining in the middle this puffed out more than the surrounding feathers...maybe I should have put some in-lining in there as well...not sure.

Close up of the wreath taken outside in the sun showing the trapunto effect...very prominent indeed. I used Wool batting to do the trapunto because this is what I had. I think Polyester would have been nicer as this turned out a little bit firmer than expected as there was a lot of puff in there.
Love the background filler as it adds a lot of texture to the overall piece without being overpowering and is very forgiving to stitch out. Probably need a bit more practice to get used to the way I stitch this...got a bit of a rhythm going but frequently lost it again being a bit undecided where to go next but I think with a bit more practice this should become second nature.

Bit of an added feature...had this Fat Quarter forever and finally found a good use for it using it as a back for the pillow.
Also tried my luck on using a zipper closure again...word of warning...open your zipper before sewing the whole lot together! What a hassle, took me forever to pry this open to turn the pillow out.

Linking up to the March FMQ Challenge held by Darlene over at Quiltshopgal.

Also popping over to  Sew Fresh Quilts for Let's Bee Social to spread the word.

Karin

Monday, 16 March 2015

FMQ Teaser

That's all I have been doing...FMQ

First time I have tried this background filler from Patsy Thompson...plumification plus. Looks a bit crinkled as I had just washed the piece. Don't know about you, but nowadays I rarely just practice  on practice pieces. Don't seem to put the effort in when I just stitch on a practice piece, so now I go onto the real thing straight away and hope for the best. That way I ensure that I am giving it a really good workout. The 2015 FMQ challenge over at Quiltshopgal is particularly good for this...making a pillow with FMQ designs is just a big enough task to get a real feel for a design but small enough to actually get it done. This design was interesting...initially could not quite get the feel or rhythm to it, then got it and then lost it somewhat again...was left with a bit of an awkward empty space in the end that I could not get to anymore. However, the design is very forgiving, so I just filled that bit in after...not noticeable at all.

Should have my pillow finished some time this week...yah!

Karin

Wednesday, 11 March 2015

FMQ Fun

I have been working on the March FMQ Challenge hosted by Quiltshopgal. This months' expert is Patsy Thompson. I thought that I might post about my progress otherwise my link up post is just going to get too long at the end of the month.

I am an avid follower of Patsy Thompson and have talked about her DVDs previously. I acquired the feather series some time ago and have been hooked ever since, particularly on the hyperquilting. In trying to work out what to sew, I went on Patsy's blog and instantly was inspired to try her pillow design. It featured a beautiful trapunto wreath. Now here was a challenge...I have not done a lot of trapunto and thought this was a good opportunity to give it another crack. So basically I am just a bit of a copycat this month in terms of design.
Basically used what I had on hand and traced the design on my square. Had I considered this a bit more, I would have left out the middle section of the wreath...more on that later

Stitched out design

Batting and thin interfacing behind the wreath
In-lining
I placed some wafer-thin interfacing behind the batting as just stitching through the batting was a bit tricky tension-wise...the interfacing fixed this. Trimmed the batting very carefully, basted it and got to work on outlining the wreath with invisible thread, following Patsy's instruction on her blog. All good, except that I now noticed that the inside plumes were puffing out like no tomorrow. This made sense, given that I had not done any in-lining in there...yep, something to think about beforehand.

As you may have noticed, I changed the pearls to a lighter colour...the red ones I had done before were just really sloppy. Tried to be quick and just sewn them in there, even though I knew they would look better if I did half circles first and then complete them on the second run...so I did them properly second time around. The outlining of the plumes was interesting...used invisible thread as Patsy had done and realized that I would have to jump sections if I did not want to backtrack on the invisible thread. Bit of a hassle and my jumping turned out a bit untidy on the back and the fat plumes in the middle were a bit of a challenge! But the beast got tamed and it looks sort of alright.
Learned another thing doing this...my outer circle from which the in-lining was done looks quite untidy (if you look closely) and I realized that I should have stitched slightly off the sewn circle...I think that might look better. Overall though a decent trapunto effort, judging by my previous attempts.
Anyway, finished this today with some echo lines around the circle and then tackled the corners. Used the walking foot for that and then tried something I had not done before...used one of my decorative stitches to put the row of pearls in. The Pfaff machine has a basic circle and with some minor adjustment I was able to make it a bit rounder and smaller to fit exactly into my 1/4in space. The machine backtracks over the circle, so it is quite a heavy stitch and FMQ circles do look a bit better, however just for the texture, this was perfect...finished this in no time at all and now can get back to FMQ the rest.


Linking up to Connie's Freemotion by the River, even though it's Wednesday today however have not linked up anywhere for a while and there is a bit of a Giveaway going on as well as lots to see.

Karin

Wednesday, 18 February 2015

February 2015 FMQ Challenge


Finished my pillow!
As for January, the FMQ challenge over at QuiltShopgal had 3 options to choose from. This months' expert is Leah Day whom I cannot praise enough for getting FMQ out there with her blog The Freemotion Quilting Project. When Leah ran her 2012 FMQ Quilt Along, I participated for the year and I must say that I learnt more than I ever did in any workshop that I attended. She is a very talented woman (obviously) and also a very good teacher.

For this challenge I chose Option 3 as I had purchased Leah's Craftsy class 'Freemotion Quilting a Sampler' some time following 2012. If you have not tried the Craftsy class experience I can highly recommend it...I did not do the sampler (Free BOM class on Craftsy) but I do tend to go back to this class quite often to just refresh my memory on a particular design and to learn new ones. The great thing is that you can go back to it over and over again...it's really like having an interactive reference book that you can consult any time. Great resource.

Was a bit stumped for ideas and felt too lazy to piece a block so had a look at block #11 of that Craftsy class as Darlene had suggested and decided to stitch that one out...actually my whole purpose for this pillow was to use a very exuberant orange Aurifil thread (#1154) and mix it with the most fantastic blue-grey Aurifil thread (#1126) that came as part of Sheena Norquay's thread collection. This was the perfect opportunity.

First did a sketch as always...if I cannot draw the plumes properly in one area I also will not be able to stitch them properly, so I make sure it flows for me. I did mark my fabric but will often deviate from the lines, however the marking helps me not to loose direction. This was a bit tricky in parts with the curvatures and some plumes were in danger of being too long and drawn out and that became evident when I was drawing it. Leah had alerted to this in her Craftsy class which was great as I would have run into trouble if I had just stitched this out completely freehand.
Progress was a bit slow...I took my time, enjoying stitching with this beautiful thread even though the orange did not come out quite as bright as I had hoped. Also, while I followed Leah's example, I mixed in a bit of Patsy Thompson's hyperquilting (yep, a bit addicted to that ever since I watched her DVDs) and Angela Walter's nifty wiggly line filler. Thoroughly enjoyable. Noticed that I was quite out of practice stitching straight lines....Then onto the Paisley...had not done this for years. Never have been very good at Paisley for some reason as I tend to get confused on which side of the shape I will end up on and generally have some gaps. In Leah's Craftsy class she was suggesting to just fill this in with some Pebbles...ingenious...why did I not think of that before! So, at some stage I started to just do Pebbles and had to remind myself to not opt out and continue with the Paisley.

Then came the pillow...had watched Leah's Butterfly pillow video and got a bit enthused about doing the buttons on the back. For the life of me could not work out the required measurements for my pillow size (16in) and searched and finally found a tutorial which really spelt it out for me over at Sew Sweetness. While that pillow did not have the accent fabric strip on the back, it helped me with the measurements and it also had a binding around the pillow which I liked. In the end I literally combined the two instructions and muddled my way through it. My Pfaff has an automatic button hole function which was great to use (after consulting the manual!)...worked like a dream. Given the floral design on the pillow I did not try Leah's spiral design but just meandered over it to as I felt that suited the overall look a bit better.
Work in Progress
Wiggly Lines

Paisley with lots of Pebbles
The finished pillow
16in finished pillow with accent binding
Back of pillow

For all the Pfaff followers, here are the settings that I used with Aurifil Mako 50/2 thread.
Feather: New Open-Toe Freemotion Spring foot on the spring foot freemotion mode with tension 3.8 on a slow setting.
Wiggly Lines and Paisley: Dynamic Spring foot 6D on the Dynamic springfoot freemotion mode using the modified Pfaff ankle for better visibility, again with a tension of 3.8 on a medium speed.
Meander: Closed Sensormatic foot in the sensormatic freemotion mode on a higher speed, with a slightly lower tension of 3.6.

Now it's time to link up and check out some FMQ Goodness over at QuiltShopgal.


Karin

Popular Posts