Showing posts with label FMQ Friday. Show all posts

Saturday, 3 August 2013

FMQ Friday

Short Update...not much progress since last week.

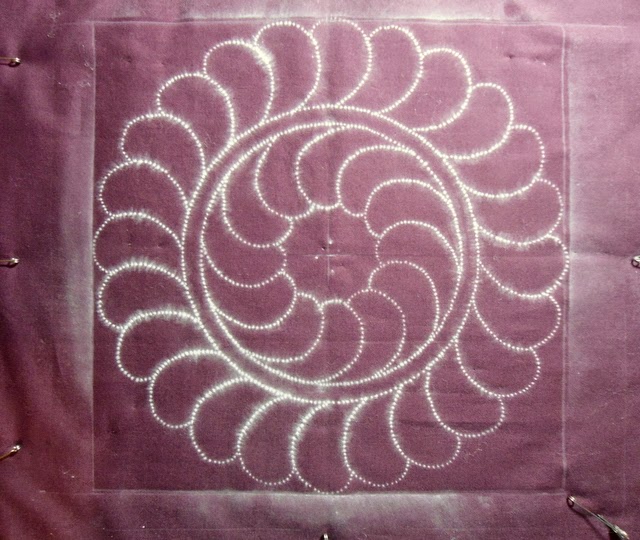
However, the feather frame is finished ...yah! Each feather took me about 3/4 hrs and I only managed 1 - 2 per day.

Now I only have to work out what to fill the space in between with. Will have to take a bit of a break as I will have to get to the city to purchase a thread that blends in unless I decide to use white....still a bit undecided what exactly I want this to look like. I got so carried away with my feather design that I did not consider filler designs. I could of course stipple this down...bit bored with that though.

 
Started just doodling with the machine...have not done this for ages...


Wow, quite an assortment of weird and wonderful shapes...I liked the spikey design but for the life of me could not get away from quilting it all in a row. I had seen this somewhere on the internet and in the picture it was definitely a filler design filling up an entire area...definitely not quilted in rows.

 Quite like this filler. Seen it on some of Patsy Thompson's projects and quite like the look of it.

However, I tended to get lost in it...did not come that naturally to me...definitely one to practice as I think this is a very useful filler as it lends itself to fill out all sorts of spaces.

Might have to check out Leah Day's 365 + designs to see what else I can find.


Linking up to FMQ Friday over at the Freemotion Quilting Project with Leah Day.

Until next time

Karin

Saturday, 27 July 2013

Less May Be More

This is how far I got with my in-lining of the plume shapes


Initially I was going to also outline the plume shapes on the outside as I had done with the feather wreath. However, after I started it and looked at it, I just felt that this was too much...somehow it distracted rather than enhanced the look, so I did not continue with it.

Looking at it now, I think it definitely needs a filler, but given how slow the in-lining is progressing,  this is still a while off. I don't want to rush this along, but take my time and hopefully get it right and enjoy the process.

Linking up to FMQ Friday at the Freemotion Quilting Project.


Karin

Friday, 19 July 2013

Feather Frame done

Quite pleased with the finished frame. The design is loosely based on a motif that I found at Forest Quilting by Patrice Trnka Adams (2007). The original design is called the Memories Motif.


Mine turned out a bit different obviously as I  re-drew the design to fit my quilt adjusting the curve as well as the size and shape of the individual plumes. I find it easier to do my own plume shapes than follow a given design as everyone has their own way of drawing (and stitching) feathers. By drawing them myself (and doing about 10 different versions of them) I arrived at a design that had the plume shapes that I am used to and I noticed that when I was stitching them that I followed the same way of stitching them every single time as this was also the way I had drawn them. This made the job a lot easier. The only other challenge was the size of the plumes...some of them were a bit larger than what I usually do and needed some added concentration to not veer off every now and than which is very noticeable on the dark solid fabric.


I will now embellish the feathers with some hyperquilting to make the frame a bit more visible. This should be good fun.

Wondering and would welcome some feedback on whether to stipple the puffy bit in the middle and on the sides down to make the feathers pop out. Had not really considered this before but looking at it now, I think it might need it. Will do the hyperquilting first and then re-look at that.

Linking up to FMQ Friday at the Freemotion Quilting Project with Leah Day

Karin

Saturday, 13 July 2013

Perfectionist...Not me!

Continued working on my feather arrangement. I had in mind to put a frame around the feather wreath. Obviously I over-estimated my skill level. When I drew the frame in with my flexible curve ruler, I came to the realisation that there was no way that I was going to get a match on either side, in fact I had not even figured out what exactly I wanted this to look like...did I want more free flowing feather, different sizes, different shapes or did I want a more uniform arrangement...and how big?

Inititally I tried to lightly draw some feathers in but soon realised that I would not be able to re-create that on the other side, not freehand anyway. Out came the paper...pity, I should have photographed the many attempts that I produced on paper yesterday. This was quite hilarious as I got to a point of perfectionist delirium, I reckon...not uncommon for me so I had to take a break to get back to reality.

After a bit of a break I made some decisions first, i.e. I went for a more uniform approach and also decided on a proximate height and size, then did my drawing...and presto, that worked.

After this I did what I had done the other day (see the post HERE for how I marked the feather wreath) and drew the design on my Golden thread paper and stitched through it with a bigger needle on my unthreaded machine. Then I used the Quilt Pounce and lightly transferred the design onto the quilt.

Very pleased with the result. The first photo is a bit touched up...the colour  does not photograph well


Half of the corner arrangement

Matching Middle Section
While I could have tried to do this freehand there is no way I would have achieved this level of mirroring and given that this is going to frame the wreath all around I think it is important to look more uniform than not.

Also, next time I might try to spray baste my quilt. The pins are continually in the way and for the marking of course I had to take whole sections out...not ideal. My batting is NuWool Batting, an Australian product...a bit of loft, but very nice and soft, easy to work with and no bearding!

Anyway, six more to go...

Linking up to FMQ Friday over at the Freemotion Quilting Project.

Karin

Sunday, 7 July 2013

Can't Help Myself - Another Project

Started another project as I was missing FMQ. This rate I am not going to get a a pieced quilt done any time soon.

As I have been posting before in March of this year , I am still watching my Patsy Thompson DVDs and learning heaps. I cannot recommend those DVDs highly enough. Check out Patsy Thompson's website for tons of inspiration. Actually just looking at her blog now...creating a feathered frame for her quilt block (a wreath). This is actually what I am thinking of doing, although I am not so sure I can pull this off as there is a fair bit of mirroring involved.

While I have been playing and trying out different things, I thought that I might as well do a simple wall-hanging similar to some of the ones I have seen on those DVDs. I absolutely love the repetitive rhythm of feather quilting and having a couple of borders will allow for some wavy feather arrangement. Picked out my favourite solid, a type of maroon colour and just did a simple inner border in a greyish colour and presto, I had a blank canvas. Initially I was going to use my trusted Golden Threads Quilting Paper again to stitch out the design (i.e. stitching over the paper), however decided to do the marking a bit differently this time (mainly because the motif was over 10" and I thought that this might become a bit tricky with the paper trying to get that to sit neatly in the middle of my square.

So, I traced the design onto the Golden Threads Paper and then stitched over the paper (with a bigger needle) following the lines without a thread in the machine. Here is a close up of the perforated paper. This is fairly neat as you can also use this to make multiple copies of the same motif...just make yourself a stack of squares, pin them together with your drawn motif on top of them and stitch through all of them at the same time.

Paper Stencil

Anyway, I then positioned my motif in the middle of the quilt top (bumpy side up) and used my Quilt Pounce. You are supposed to just gently glide the Quilt Pounce over the whole stencil.

 
As you can see I overdid the chalk component a little bit...I reckon just going over it once would have been sufficient and definitely no patting the Quilt Pounce (mine was too saturated). Nevertheless I was impressed with this and stitched out my motif . This worked very well. I was not overly concerned re the chalk...had used it before and knew that this would just disappear with a bit of steam.

Stitched out Motif
Oh, glorious fun...doesn't this just beckon for some jazzing up! I am planning to do some hyperquilting in the outside plumes and to also try myself at putting something in the spine. I am using Aurifil 50/2 as always...I love that thread and so does my machine...in terms of colours I am limited to what I have at the moment. Probably will use a type of gold colour and some musty pink.

Linking up to FMQ Friday with Leah Day at the Freemotion Quilting Project

Until next time

Karin

Saturday, 18 May 2013

WIP: Colour Adventure - Second Border

Progress...

Half of the border...Loved stitching this with the light thread. My stitching works out so much better this way.

Funny enough though, this is not exactly how I had visualised this border. I wanted something a bit more organic and playful, i.e. a less organised feather arrangement. It seems that I cannot be less consistent....I stitch close to the pre-drawn line and don't seem to venture out too much, hence doing a lot of backstitching to travel along the previous feather. I think this is for fear of stuffing it up and also becoming really inconsistent in shape and size. Sticking close to the previous plume shape produces this very even, elegant looking feather arrangement.

How funny is this...I think I will have to practice being a bit more free-flowing and less consistent to produce something a bit less organised.

In the end I stopped trying and continued with my more consistent approach (no point trying to force it...I think it will come with time and more practice). It does look nice and I am happy with my progress with the feathers so far. In terms of marking...yah, minimal... the way I like it. All I did was  draw the gentle curve in with my new flexible curve ruler (absolutely fantastic gadget) and off I went. I did draw in the first few feathers lightly to get me going on the right track, and again in the corner to keep this as consistent as I can, given that it is going to meet the feather from the other side. Also, every time, I felt I was getting off track, I just simply lightly drew a few plume shapes in and that seemed to get the brain back on track. The only other marking was half an inch on the outside of the border so as to not run the plume shapes into the seam allowance and to allow for a bit of breathing space all around. This sort of "assisted" method of freeform feathers works extremely well for me.

I might dress this up with some hyperquilting (see Patsy Thompson designs for some info on hyperquilting...just amazing!) inside the plumes. That could take some of the formality out...just not sure what thread colour to use for that.

Until next time, linking up to FMQ at the Freemotion Quilting Project where Leah talks about practice is never a waste of time. How true...if I think about how I laboured over my choices with the quilting on this one, her account on choosing designs was a bit of an eye opener...

Karin

Friday, 10 May 2013

Same old WIP

Working away on my Colour Adventure quilt. I am now at the first border (hopefully this is not getting too boring for people - same old quilt week after week).


Again quilting with blend-in thread...I noticed with this design that I had some white little dots showing up as I was using white in the bobbin. Probably showed up more on this design than on the others before as this design has more variation in speed once you get going.

My tension is definitely right and normally I do not worry about a few white dots here and there. However this was definitely starting to distract me as I was trying to concentrate on the design. I am finding that in general, any fluff or loose threads etc...influence how well I stitch...obviously I am easily distracted.


After a while I remembered the "Magic Bobbin Washers" in my draw. I originally bought these some years ago for my previous machine to help with tension issues.  I do not usually use them in my current machine as I rarely have tension issues these days...nevertheless I put one of them into the bobbin case for stability to see whether it would help with the pesky white dots...and yes, definitely made a difference. Still have the occasional one, but not to the same extent as before (4-5 stitches in a row, depending on direction stitched). Instantly my stitching got better, as I did not have that distraction and could concentrate on getting the design going.


Definitely stitching with light thread on that black second  border. While the blend-in designs look good, I really prefer the light thread on the dark fabric. Can't help myself. Just like the look of it and also find it easier to stitch on dark fabric.

Not sure what feathers to stitch in the outer border...might have to look at it for a while.

Linking up to FMQ Friday over at the Freemotion Quilting Project.

Karin

Saturday, 4 May 2013

Microstippling

Finished the major quilting in my quilt and am doing the surrounding areas. Decided to microstipple in the black surround with black thread...what craziness!!

Had to put all the lights on in the room plus use my OTT-Light...in the end I had to lay down the OTT- Light behind the foot shining directly onto the area to see where I was going (and even then it was a bit of a challenge).


Probably hard to see in photos but turned out quite alright...flattened it nicely and like always - not a line crossed (I wish).

Having major problems also with the bearding on this quilt. I am using a bamboo batting that I had left over. I distinctly remember thinking about the bearding when I was doing another project (which was a light project and did not impact that much) but obviously had forgotten about this when it came to this quilt. THIS IS IT...I am not using bamboo batting again. While the batting is nice and soft and easy to quilt, the bearding is actually quite bad and is distracting when FMQ, particularly in the black areas...quite a hassle to clean that up before you can even start quilting. Not looking forward to the outer boarder which is all black and at the moment looks like fluff all over.

Well, on with the show...once I have finished this I am thinking of doing more feather work in the borders.

Heading over to FMQ Friday at the Freemotion Quilting Project with Leah Day.

Karin

Saturday, 27 April 2013

WIP: Colour Adventure...Saga Continues

If you missed it, I posted about the saga of the Colour Adventure quilt earlier in the week (see the post Here)

I did ponder over my FMQ for a while...in the end I decided that the design was the wrong scale as well as quilted with the wrong colour. While it was beautiful in itself the design was competing with just about everything around it. This did not fit with the vision that I had for his quilt. For a moment there I also thought about going back to my initial idea of quilting concentric circles, however thought I better give myself a day or so to just look at it.

Anyway, I ended up sticking with the swirls design. Just had too much fun stitching them. However, I changed the thread and choose colours that just blend in. Also reduced the scale as this was meant to act as a filler and not an overall design.

I am now using Rasant, a matte Polyester thread as I was able to get most colours in that...for the multi colored sections surrounding the centre I used a taupe thread...I had read that this blends in well, so I thought I give that a go.  Had to look up 'taupe' in the dictionary as I was not even sure what colour that was. While I do not like the colour much, I must say it does blend in extraordinarily well.

This is how far I got...
Taupe thread for surrounding areas - blends in like magic


Red area next to star - now taking a backseat with smaller scale swirl and red thread

On left larger scale design still to be changed

Love the back
The quilting now blends in and just gives me the texture I wanted and the star is back to being definitely the centre of attention...just how I envisaged this. This quilt is so bold and colorful, the quilting really needs to take a backseat, otherwise it is just too much for the eyes to take in and you loose what you want people  to look at. As much as I prefer stitching with a light-coloured thread on dark fabric, it is just not appropriate for this quilt.

Would have been good if I had thought this through a bit earlier. Mind you, also discovered a new little trick to get rid of the stitching marks. Used the steam from the iron and just lightly hovered over the area without actually touching the fabric. The steam going through fluffs up the batting again and the majority of those little stitching holes disappear...good as new, was quite impressed.

Linking up to Leah Day's  FMQ Friday on the Freemotion Quilting Project.


Karin

Sunday, 21 April 2013

WIP: Colour Adventure Progress

Here is a quick update on the Colour Adventure quilt. Managed to finally baste this quilt and got going on the motif for the star.


I used the bamboo batting that I had lying around...forgot that I had a major issue with bearding last time. Bit of a hassle...also think that more puffy batting would have been a bit better to make the quilting stand out more.

Currently pondering what thread to use on the surrounding areas...I have a greenish thread that I think will blend in. I am planning on some swirls or similar in the surrounding areas...

Belated link up to FMQ Friday on the FMQ Project

Karin

Saturday, 16 March 2013

FMQ Friday - Loops and More Loops

Finished quilting the baby quilt with my loop design


Bit hard to see, here is the back


I had a fair bit of bearding going on while doing the quilting. I used bamboo batting and while I think they have improved on it (it did quilt beautifully), this was a bit annoying.  In case you have not come across this... I used this nifty roller that we got from Ikea to clean up the fluff. All it is is a roll of sticky tape.  You run it over the surface and when all the sticky tape is taken up with fluff you just peel off that layer to reveal a new sticky layer. Ingenious ...we got this initially to get rid of the cat hair on our clothes...you can buy the refills in packets of six, I think...really cheap.


Another issue I thought I share...I had spoken about the pesky basting pins and that they often leave black marks if you leave them in too long. Well, given that this is a light background I took care to sort through my basting pins when I was putting it together, making sure I only used the newer ones...Well, another black mark where the pin held the fabric...(not really too bad, I had worse). This was happening literally in front of my eyes as I was quilting it and was the reason that I hurried this along a bit.
 
 
It occurred to me last night what this is all about...it was fairly hot over here when I was doing the quilting. Temperatures were in the high 30s and we were running the air conditioner just about non-stop. We have evaporative cooling and so with time, I reckon the humidity builds up to such an extent that the basting pins are literally rusting in front of your eyes! Need to make a mental note only to quilt dark stuff in summer. I wonder whether this would also happen with the use of Pinmoors and the regular pins...


Photo of the finished quilt coming up shortly.

Linking up to Leah Day's Freemotion Quilting Friday

Karin

Popular Posts