Showing posts with label Let's Do Some Ruler Work Linky Party. Show all posts

Tuesday, 5 May 2020

Let's Do Some Ruler Work #10

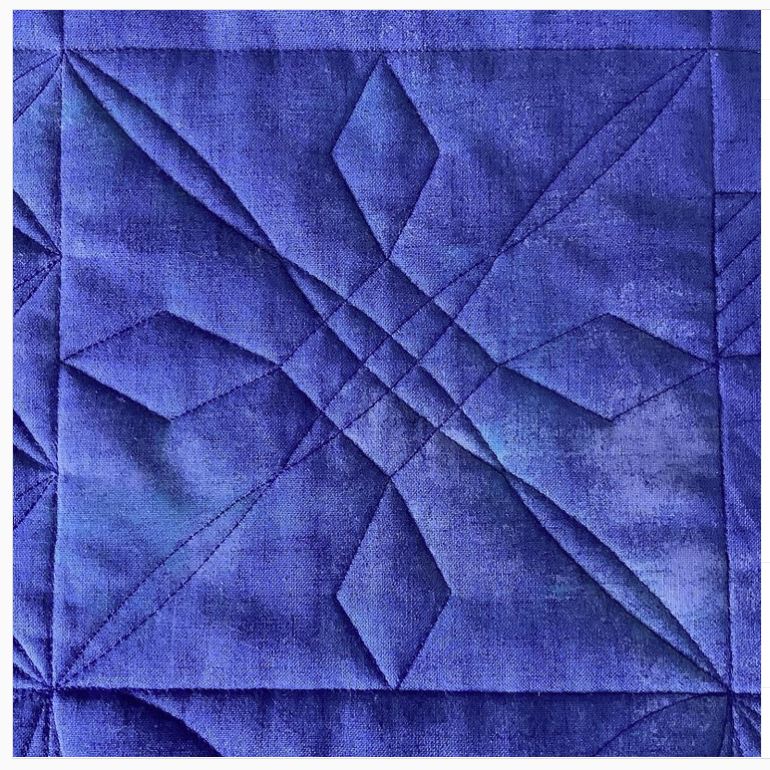
I finished my little experiment with the Multi Clamshell ruler (see also previous post). 

I thought that I could enlarge the spiral with the echo feet...actually I could not as the Multi Clamshell ruler has a little nudge to stop the foot. With the echo foot, that meant of course that I was out of alignment, so had to re-think this whole thing. Still decided to go ahead and spent some time on working out the spacing of the spirals using the various lines of the ruler to align to the many seams to keep my rows straight. 

Here it is

Easy baby quilt

Not my best work but a fun experiment to pull off. In retrospect I think this looks a bit too orderly, even though I nested the spirals in the second row. As I was constrained by the seams in terms of using this for alignment, I think it would look a bit better if the rows were closer together. Also, in looking at the finished project it would have been good if I had made the spirals of the second row go the other way to get away from this very ordered appearance. But, having said all that, I am still very happy to have tried this out and think this could look quite good on a smaller baby quilt with the changes mentioned. In terms of quilting this was very easy to do and best of all, quite quick.
Still have to put the binding on and will put up a picture of the finished quilt, hopefully a bit brighter ( the weather has been just grey in grey with lots of rain over here - no matter how hard I tried at different times of the day, the photos just would not come out any lighter)

Time for the Linky...obviously the Linky Party has not taken off as I had hoped. I thank the few that have participated over the last few months, just having a few link ups has been good fun. I think it is the timing actually, coupled with me being a rather smallish blog that has made this a bit difficult. There is so much going on in cyber space at the moment and even I struggle to keep up. I think I have about 20 something videos saved on FB alone...all really interesting things to watch and to try...it is almost overwhelming. I would assume that I am not alone in this and think that this has contributed to its modest take up. Would be interesting to hear what you think...for now, I will keep going for this month, but obviously if it remains like that, then I will call it a day (which is perfectly fine, I have learnt heaps from this and finally got to make a blog button!)

If you currently working on a project using rulers or have one from a past post please link up here

You are invited to the Inlinkz link party!

Click here to enter

Karin

Tuesday, 7 April 2020

Let's Do Some Ruler Work Linky Party #6

Well, here we are again...I have decided to run the linky every week as it is easier to remember both for participants as well as myself!


Last week we had Terry from On Going Projects participate with some very intense quilting on her Tea Room Quilt.

This really inspired me! I don't know about you, but I have been slightly overwhelmed with what's going on in the world at the moment and surfing the internet has also become somewhat stressful. There is so much going on in the cyber space at the moment...QALs, videos, more posts to look at and explore...I have had problems disengaging and started to spent an enormous amount of time just flicking around the pages or watching videos, becoming completely unproductive.
On top of that I am in whinge mode about not having my Handiquilter machine etc, etc...

So, Terri's post was just so good. I thought...stop the whinging and time wasting and get going back again on your DSM! It's been a while...I learned to ruler quilt on the Sweet 16, so this was going to be interesting. I had made a table runner out of orphan blocks from a Disappearing Four Patch quilt I made some years ago...perfect project to practice some ruler quilting on.
So, out came the curves of which I have got many
HQ 2-1/4 Slice and Arc Ruler
Lisa Calle's ProEcho Rulers
HQ Curved Crosshatch Ruler
Of all those, I prefer the Pro Echo Rulers. For some reason they work better for me than any of the other arc rulers. While I do use the others, I more often than not turn back to the Pro Echo rulers. Something about the lines on them seems to make it easier for me to align, however this might just be me.

I decided to start with some echoed arcs in the coloured prints, but then also did arcs in the white squares...just needed to have that symmetry. I used the Pro Echo 6 and the little Pro Echo 3 (which is also great for travelling in the ditch on the straight edge).
I filled the center part with Ribbon Candy with my Ruler foot on which was a bit more challenging, but I could not be stuffed changing the foot over every single time, so that is going to have some hiccups in there, but I am going for the texture in that section, so it will not matter too much. Also filled the white arced section with some swirls just for a bit of variety.
All a bit busy, but that is what I felt like and it will keep me busy for a while.

What about you...what are you working on?

You are invited to the Inlinkz link party!
Click here to enter


Karin

Tuesday, 3 March 2020

Let's Do Some Ruler Work #3

How quickly does time go...must apologise as I forgot to post last Tuesday. No idea how this happened. We have arrived at Ruler Linky Party #3. Please consider participating to get this linky party off the ground and I will ensure that I keep to my fortnights. Also notified my followers re the wrong date 😲...apologies for that also! The next Ruler Linky Party is now on the 17 March!

Must say my timing for the linky might not have been the best as I am actually without my Sweet 16 at the moment, so I had to familiarise myself again with my DSM which in itself has been interesting. I started ruler quilting in all seriousness on the Sweet 16, so going back onto the DSM has been a challenge. Having said that though, it is all do-able and works just as fine. I dare say it takes a bit longer as you have to spend a lot of time checking the alignment because of the limited visibility...definitely have been spoiled with the Sweet16! While I have got some quilts ready to be quilted, I decided to wait for the new machine to arrive, so for the moment I am just playing around with rulers on the DSM (and doing an extraordinary amount of piecing).

I had a gift voucher recently for the Fatquartershop and discovered that they carry some longarm rulers, so I carefully went through and decided to get one of the earlier HQ rulers that I had been eyeing out here in Australia, the Multi Clamshell Ruler
 I spend a long time thinking about what rulers to get as there is just such an overwhelming variety on the market and they are in general so seductive. As I have participated in a number of Ruler of the Month Clubs (run by Handiquilter...No 6 is coming up soon!), I have got quite a collection, so any addition has to be carefully weighed up. This is a ruler that I specifically bought for allover patterns and sashings and borders. I was a bit surprised at its size...it just about covers my whole hand and on the DSM that added an additional challenge for some reason (I think it distracted me when trying to align it properly), however after a few designs I got used to that.
Here is what I trialed
The ruler has 1 1/2, 2, 3 and 4in clamshells. For those of you who have the Versa tool, it is important to note that the Versa tool has the 4in clamshell shape, however lacks the centering line going vertically down the ruler. Easy fix, I did draw that on the ruler when I was doing an overall clamshell design with the Versa tool. So, if you only ever want to use that size the Versa tool is just fine. However I wanted the smaller sizes for sashings and borders to give me some options. Again, you could use half circles to do just the same, if you got them, however I like the ruler stopping me just at the place where I am supposed to be. As you can see above the smaller sizes make quick and easy sashing designs, most notably the orange peel design and the interlocking clamshell design. I did come up with that funny leaf design on top of the clamshell...actually really liked that but not sure where and when I would use that, however it would fill up a border very nicely and is fun to do. My grid design above is something I want to do on a bigger scale over one of the quilt tops...here I just did it with the 1 1/2in clamshell to get the placement right. Love the look of that.

Also, on a side note, my DSM (Pfaff) initially kept shredding the thread...I put a titanium topstitch needle in and the problem disappeared. I had forgotten about this little hint. For some reason it works better with those needles and the shredding stopped.

Let's have a look at what you have been working on...
You are invited to the Inlinkz link party!
Click here to enter

Karin

Tuesday, 11 February 2020

Let's Do Some Ruler Work #2

Welcome to the Ruler Linky Party #2

I would like to thank the quilters that linked up a fortnight ago. We had Rosemary from The Knitting Quilter showing us how some simple repetitive designs can lift your quilt to the next level
No photo description available.
And then there was Susan from Quilt Fabrication providing a fantastic tutorial on Chicken Wire Quilting which I bookmarked.
Chicken Wire Quilting tutorial
Also participating was @camapleleaf on Instagram who is participating in Natalia Bonner's 'Let's Stitch a Block a Day'
I have been aware of Natalia's QAL and have been loosely following it, but not stitching the designs out or always watching the tutorials so it was great to go through @camapleleafs account to see the designs stitched out...if you have time, go and have a look, beautifully stitched out!

Anyway, I have been re-acquainting myself with my Pfaff Quilt Expression 4.2 in terms of ruler quilting. My HQ Sweet 16 is sold and I am patiently waiting for the new Capri machine. It's been about 2.5 yrs since I last quilted with rulers on a domestic machine, so I will share a little bit about what I use and how I set my machine up. First and foremost, you need a level surface. I can sink my machine into the cupboard so that it is level with the table which is extremely helpful and I also  use a Supreme Slider to ensure I can move my fabric around with ease.
You need a ruler foot...I use the Clarity Ruler foot from Accents In Design. I previously wrote about this foot HERE...I prefer it to other feet on the market, but this is just my personal preference. I believe that there is now a Pfaff Ruler foot on the market but since I had the HQ Sweet 16 I obviously did not purchase that. Here is what my ruler foot looks like
The foot attaches with ease once you take the shank off and all that needs to be done is centering the needle and adjusting the height of the foot
Love this foot...gave me absolutely no trouble and the stitches were fine. 
So I stitched out 2 of Natalia's designs today...a bit wobbly as I am not used to stitching with rulers on the domestic machine anymore but overall quite good
The left was today's 'Spin' block - Day 255 and the right is my all-time favourite block that I used in one of my quilts. So easy to do and so effective. 

What have you been working on?

You are invited to the Inlinkz link party!
Click here to enter

Karin

Tuesday, 28 January 2020

Let's Do Some Rulerwork #1

For the first of our Ruler Linky Party I would like to draw your attention to a class I was made aware of by Quiltshopgal some time before Christmas. It's Patsy Thompson's 'Beginning Free Motion Quilting with Rulers' offered through the Missouri Star Quilt Company. As the title suggests it is a class for beginners, however as it was relatively inexpensive and I absolutely love Patsy Thompson's teaching style I jumped on the opportunity. I figured that there are always hints and tips that I can pick up from watching her videos.
The class covers basic stuff about ruler quilting including information about measuring/marking, ruler feet, how to stitch with a ruler and alignment, and some information about rulers. In the class Patsy is making a basic table runner using a straight line design, arcs and curves. I was particularly interested in the marking of the designs and producing accurate channels, so I followed along making a slight variation of this table runner.

So I did some straight line design, curve design and arched swags. I used my Pro Echo 7 and 12 for the curves and arcs. Should have probably chosen some more contrasting fabric and thread as this was very hard to photograph.

...and then I did some filling in to just practice different designs
Gone a bit overboard practicing some crosshatching with the Pro Echo12 ruler (still find that very challenging) and also some more piano keys with the HQ Line Grid ruler. And...as you can see...stuffed the curves up a bit by filling them with a darker thread which makes the filler design stand out more than the curves. Live and learn (I think Patsy did mention this, but I was just so bored with the coordinating thread). What did I learn?
- measuring your border (for each design) down to 1/8in was absolutely essential
- marking your center lines correctly (and, if need be, correcting them slightly after your first pass) is important to have all the points align on the same line (easier said than done!)
- alignment of your ruler to hit that little tick mark each time is crucial
- picked up a neat little hint on judging the alignment when doing arcs, using this little tool (which I had floating around in my sewing box)...just holding the little 1/4in notch against your ruler to double-check that you are actually 1/4in away from your tick mark...this was very helpful when wanting to be precise.
Great class!

Now its your turn to share what you have been making with rulers.


You are invited to the Inlinkz link party!
Click here to enter

Karin

Tuesday, 14 January 2020

Let's Do Some Ruler Work Linky Party Coming Soon

Exciting news.

I am going to run a ruler-quilting linky party.

I love linky parties and have been thinking for a while to set one up. Ruler quilting is the obvious subject for me
Part of the collection (slightly embarrassing!)...I still got a few more put away in another box!

Given the amount of new rulers coming out all the time it made sense to me to focus in on that, as I am certainly addicted to it and I am pretty sure that I am not alone in that. Quilters seem to be collectors and like with many things, sometimes we buy these items and then don't use them. I am hoping that a linky party might encourage people to get out their rulers and give it a go and hopefully get some inspiration on what can be achieved with some very simple designs.

For example, my recent baby quilt
Not much ruler work really, but it certainly made this quilt pop.

...or the Bird quilt

...that went from  a fairly simple block to quite spectacular.

The linky party will begin on Tuesday 28th January and run for a week. At this stage I am thinking of hosting this on a fortnightly basis.

The rules will be basic...join in if you are using rulers on your DSM or longarm, make sure to visit other blogs and leave some comments and enjoy the inspiration. I will set up a page closer to the date.

Please grab the button (which took me over a week to get right 😅) and spread the word. Hope to see you at the party!

grab button for The Quilt Yarn
<div class="the-quilt-yarn-button" style="width: 150px; margin: 0 auto;"> <a href="https://thequiltyarn.blogspot.com/" rel="nofollow"> <img src="https://blogger.googleusercontent.com/img/b/R29vZ2xl/AVvXsEhhqb6oi6jN-C1MIyiuX242MvGZcDKsikvIApRviJR5Rg71lYKFP99U7oyMiKfuWvNuJgauJxIQVpRu56aepCVQnWn4bXCHvz6pakIvs7EPOb1CGWtzzQJDW4CSEh5qgnMQOJ0qQpDUuaM/s1600/Ruler+Party+Button3.png" alt="The Quilt Yarn" width="150" height="150" /> </a> </div>


Karin

Popular Posts