I had a good look at the linky party stats and have decided to close it. It just is not gaining traction, irrespective of whether I advertise it or not. On average it has about 50-100 views on the blog and a high number of people who look at it through instagram, which is great but it does not translate into action. So, maybe I was wrong and the topic is just too specific for people to participate...not sure about that. Could also be that there is just too much going on in cyber space and people are busy with other things. Who knows.
I did want to thank people who have participated over the last few months. It's been an absolute pleasure to read the posts and look at their ruler work. I have really enjoyed this and been inspired by the posts. I am still glad that I have tried this as I have learned a fair bit in the process and would be very comfortable to run a linky again. Maybe inspiration strikes again and I can come up with a more general theme...
Well, back to talking about rulers though. I have had Bethanne Nemesh' Lily Line rulers for about a year by now. Was very excited when I got them, had watched some videos on how to use them, but when I tried to use them it was not that easy. Bethanne makes it look very easy but somehow that did not translate to me. So, they ended up in the drawer for a while.
 |
| Lily Line Ruler 1 & 2 |
Bethanne has been running live videos on FB for the last couple of weeks and while I missed the live sessions I started to watch them (you can find them HERE) on her blog. It finally clicked what I had been doing wrong in terms of using them...I think I was mixing up making marks to align the ruler, i.e. making marks on the quilt and then inconsistently shifting for the 1/4in offset, not marking the ruler correctly etc. While I had seen her use them in her videos before, I think when I used them I got really confused and usually ended up with slightly non-symmetrical shapes. Over the last few days I have been watching the FB videos intently and also gave the last session a bit of a whirl, carefully setting up my marks exactly the way she described it in the videos and 'bingo', it worked like a dream. The videos are excellent not just for learning on how to use those rulers but also on where you might want to use them and how you go about doing this. Really enjoying them. Bethanne is of course a total pro (I had the pleasure of doing a class with her a few years back on feather quilting) and it will take me a long while to get comfortable with the use of these rulers, let alone producing anything remotely as intricate as she does, however I hate to buy things and then not using it. Used correctly, these rulers can save you a lot of time.
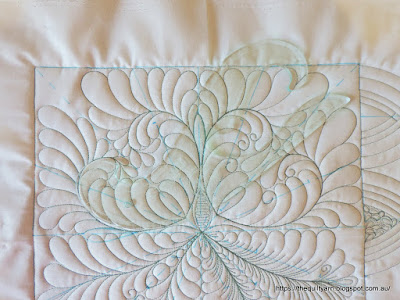
Here is my sample
 |
| The Sample |
 |
| Approx. Alignment of Ruler |
Don't look too closely at the quilting...this was to test whether I could achieve symmetry freehand, just using a few dots to align the ruler. The top part (the two hearts) was following her example of a block motif that would be repeated over the four quadrants. This came out great, I would just have to do the feathers a bit more carefully...a lovely design for a block. I think all it took was two little dots on the quilt and one mark on the ruler. The two shapes underneath was me trying to use a different part of the ruler, starting from the center out. Interestingly, as soon as I tried to 'wing' it a bit (the left bottom shape), I mucked up the alignment and the feathers were noticeably longer on one side. I did the same shape again, this time going back to making marks on the quilt and ruler and aligning the ruler with the precision hole on one line and it turned out perfect. Lesson learned!
So, I made a bit of a pledge to myself to continue to practice with them, trying out different shapes and parts of the rulers that I could use in my wholecloth quilts. Next to practice is Amish Feather curls in borders...love the look of them. Must say, also eyeing out Lily Line 3 now 😏
Karin


I am so sad that you decided to end your ruler work linky, Karin! Even though I didn't have something new to post every time the linky rolled around, it was helping to keep me motivated and focused on practicing and learning. I don't know if I would have pulled out that Quilter's Groove ProLine 2 ruler to give it another try (which I ended up LOVING!!) if I had not been able to tell myself, "Go for it -- even if it doesn't work out, it will make for a good Ruler Work Linky Post!" :-(. Well, thank you for giving it a go for as long as you did, and I'm glad I found your blog. You inspire me, and I'll be sticking around, regardless of whether you're hosting a link party or not!
ReplyDelete