Showing posts with label Lily Line Rulers. Show all posts

Thursday, 25 February 2021

Doodlemania

It's been a while since I just doodled away on my machine.

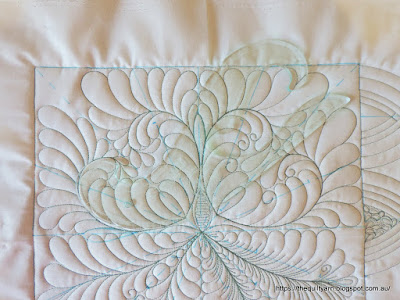
Really felt like just quilting today...got out some rulers and just kept going and as you can see it got very messy.
Started off very structured. The centre is done with the HQ Petal Pusher ruler which gives you that lovely floral motif. I then played with Bethanne Nemesh' Lily Line#3 ruler. Lots of nice curves and lots of possibilities to place them. I do need more practice with those rulers to be able to use them more comfortably and make the best use out of them.
Started off with an upside down heart shape which looked great, so I repeated that on each cross hair which meant that I 'lost' the shape somehow. Also became obvious that I was too sloppy, as the resulting shapes were not equal. All good practice. I knew exactly where I had gone wrong...did not mark how far I wanted my shape to extend, just winged it which obviously did not work that well. Filled all that in and then started on a border.

The feather border is part of Cindy Needham's Border Stencil pack. Am thinking of using this for an upcoming wholecloth and thought I might just stitch that out to see what that feels like. This was the middle size, I believe, and stitched out very nicely. Will just have to decide how long I want my feathers to extend to achieve a more even look. Also noticed that the corners were particularly tight...I think Cindy Needham places her feathers under each other...not sure whether I like that. The corner certainly needs more work.

After that I just doodled along as I could hear the bobbin was nearing its end, so I kept going until I ran out. Was interested to see whether my bobbin tension would hold...last week we had about 38 degrees over here and our air conditioner had broken down. It was just really hot in the house. Doing a bit of quilting I noticed that my tension was incredibly finicky and it looked like it was not holding for the entire bobbin. Thinking that it had to do with the winding of the bobbin I trialed different speeds of winding the bobbin but it remained rather fiddly. Today, no issue at all...the bobbin tension remained decent to the very last stitch. So maybe it was the heat after all, who knows...certainly did not do anything different  today. Still using the same top and bobbin thread.

Linking up to Freemotion Mavericks 'Quilting & Learning-What a Combo'
Karin

Saturday, 11 July 2020

Little Doilie Project Finished

This was a lot of fun to do...it’s the first time I tried this and must say, I really enjoyed this. Got the doilie from the local Op shop for a dollar and placed it in place with spraybasting. Not quite round, but close enough.
I ran out of ideas for the delicate border of the doilie, so left that alone. If I had stitched that down I think it would have turned out too flat. Could not resist though and hyperquilted a little bit in the feathers, then decided that that was enough.
If you have read my previous posts, I used Bethanne Nemesh’ Lily Line ruler 3 for the frame around the doilie. The frame turned a bit into an overall background fill, but I like it. The ruler was an incredible time saver and the design was easy to execute (once I had decided on which parts of the ruler I was going to use). Fantastic tool!

Had a few issues with my tension for the pebbles on the new Capri. Lots of flatlining and cursing. I used Aurifil 50/2 for the quilting and similar to the Sweet 16, the thread behaved quite fiddly. I recently purchased the horizontal spool holder and ended up putting the almost empty spool on that, this time threading the thread straight down rather than looping the thread around the thread guide (as you are
supposed to do)...and to my utter surprise, no more tension issues! Have long suspected that the fiddliness of the aurifil thread has to do with the thread path rather than the tension setting. Will do some more testing around this...tried it the other day with a different colour thread, but with the spool on the ‘normal’ thread mast, again threading the thread straight down the thread guide and again had much better tension. Go figure...

Karin

Wednesday, 1 July 2020

New Lily Line Ruler

The Lily Line 3 Ruler arrived yesterday. This is the third ruler in Bethanne Nemesh Lily Line series. There is another but that one looked a bit big to me so I held back.


Today I sat down and tried this one out for the first time. I had watched Bethanne Nemesh' FB videos (you can find them on her blog) about her rulers and was keen to put some of that into practice. This ruler is for smaller designs. From watching her video again the largest fits into a 6in border.

First I did one of my favourite designs in a 6in block (with the puffhead that is used for about 5in borders)
You can see that I struggled starting on the right upper quadrant. Bethanne makes it always looks so easy! So that was a bit of a fail in terms of moving the ruler over to get a bit of a channel happening. The next one underneath got too fat, however for the next two on the left I got it exactly right, i.e. at specific points about 1/4in away. This looks great! Writing about it now, I cannot remember how I exactly shifted the ruler to achieve this...will have to do it again and make myself a note. 
In terms of marking, I used the center and aligned the ruler 1/4in away from it and then placed the ruler with one of its precision holes directly on the diagonal line. For good measure I also placed a dot on the fabric exactly where the ruler sat, then measured it (7/8in) and placed the same dot in each quadrant. This is actually very cool and once you master this it is a very easy way to put a motif in an empty block. Without ruler I would have to trace this on.
Next I attempted the Amish Curl Feathers...let's just say, I managed. 
My pretend border was 4 1/2in and I used the medium puffhead for this one. I had made spaces in my border, approximately 5in apart, however had not really thought through how I would utilise this. My feather curl did not fill the space, so I just kept going which made it very confusing. Looking at it now, I also think that this curl is slightly too big for this space. I should have maybe made the curl smaller which would have given me more room around it. In any case, while stitching I got very confused as to how big I wanted my feathers and how long they should extend into the surrounding space. Not bad though for a first attempt. Definitely will need more practice on this and get a feel for how I like this to look. Again, the ruler was effortless...I aligned the precision hole on the center line which made it easy to repeat. Next time though, I also need to measure the distance from precision hole to curl (I think...might have to watch the video again to get my head straight on this). This is how this was aligned to stitch out the curls
As you can maybe see, I made heaps of marks with a black Sharpie on the ruler while I did my little exercises. Here is the ruler after...the marks come off with isopropyl alcohol...not a trace. However, I only mark the ruler on the top, not the bottom where the lines are etched in, as you could stain the etchings.
Well, this was fun...I am planning to do this again after watching parts of the video again today as there were a few things that I missed and I also want to try a few other things with this little beauty.

Karin

Saturday, 13 June 2020

Lily Line Rulers

I recently decided to practice more with these rulers. I have been watching Bethanne Nemesh' Facebook videos (you can find them on her blog White Arbor Quilting) on how to use the rulers. While I had them for over a year, I must say, they were sitting in the 'too hard' draw...I was forever getting muddled up and could not get my head around how to utilise these two rulers. Watching the videos has been great and it finally clicked where I had been going wrong. So, I am following along and practising some of the designs that Bethanne demonstrated in those videos. Last week I did some block designs and this week I tackled border designs.

Here is my sample
The first row is what Bethanne discussed in her video, i.e. how to make the shape with the top feather in place using the LilyLine ruler 1. That worked really well for me, except for making a 1/4in echo. For the life of me I cannot get that exactly right. The problem is that you have to make the echo on the inside which means just shifting the ruler over and trying to get an accurate 1/4in line. Definitely will need more practice on that.
The second row is me trying out something for a wholecloth I am working on with the exact space that I have to fill. Not sure whether I like it...I think I need a tighter curve for that space. Nevertheless making the curve with the ruler worked well.
This is what my ruler started to look like
I am now following Bethanne's method of marking the ruler religiously. Even if I think that I will remember what line I used on the ruler, I will now draw it on, because as soon as I turn the ruler, I have forgotten! With those marks on the ruler (they come off with isopropyl alcohol) and additional dots on the quilt you cannot really go wrong (other than the ruler shifting, of course).
Row 3 is my preferred shape. This time I was going to put the echo on the outside using the stitched line to align the ruler. However, my section of the ruler that I used was not long enough to allow this to happen, so I had to echo on the inside again. Again, I struggled, although the middle one was looking quite good. A little bit better aligned and it would have been right. Row 4 then I did a flatter curve and the last row is the end of the Lily Line 2 ruler making 2 1/2in shapes in a smaller border.

Lily Line 2 is the fat ruler on the right with that funny S curve at the end. 


This was good fun...next on the agenda are some feather curls in a border and trying out some frames around motifs.

Karin

Tuesday, 2 June 2020

Let's Do Some Ruler Work Linky Party Canned

Hi all

I had a good look at the linky party stats and have decided to close it. It just is not gaining traction, irrespective of whether I advertise it or not. On average it has about 50-100 views on the blog and a high number of people who look at it through instagram, which is great but it does not translate into action. So, maybe I was wrong and the topic is just too specific for people to participate...not sure about that. Could also be that there is just too much going on in cyber space and people are busy with other things. Who knows.

I did want to thank people who have participated over the last few months. It's been an absolute pleasure to read the posts and look at their ruler work. I have really enjoyed this and been inspired by the posts. I am still glad that I have tried this as I have learned a fair bit in the process and would be very comfortable to run a linky again. Maybe inspiration strikes again and I can come up with a more general theme...

Well, back to talking about rulers though. I have had Bethanne Nemesh' Lily Line rulers for about a year by now. Was very excited when I got them, had watched some videos on how to use them, but when I tried to use them it was not that easy. Bethanne makes it look very easy but somehow that did not translate to me. So, they ended up in the drawer for a while.
Lily Line Ruler 1 & 2

Bethanne has been running live videos on FB for the last couple of weeks and while I missed the live sessions I started to watch them (you can find them HERE) on her blog. It finally clicked what I had been doing wrong in terms of using them...I think I was mixing up making marks to align the ruler, i.e. making marks on the quilt and then inconsistently shifting for the 1/4in offset, not marking the ruler correctly etc. While I had seen her use them in her videos before, I think when I used them I got really confused and usually ended up with slightly non-symmetrical shapes. Over the last few days I have been watching the FB videos intently and also gave the last session a bit of a whirl, carefully setting up my marks exactly the way she described it in the videos and 'bingo', it worked like a dream. The videos are excellent not just for learning on how to use those rulers but also on where you might want to use them and how you go about doing this. Really enjoying them. Bethanne is of course a total pro (I had the pleasure of doing a class with her a few years back on feather quilting) and it will take me a long while to get comfortable with the use of these rulers, let alone producing anything remotely as intricate as she does, however I hate to buy things and then not using it. Used correctly, these rulers can save you a lot of time.

Here is my sample
The Sample

Approx. Alignment of Ruler

Don't look too closely at the quilting...this was to test whether I could achieve symmetry freehand, just using a few dots to align the ruler. The top part (the two hearts) was following her example of a block motif that would be repeated over the four quadrants. This came out great, I would just have to do the feathers a bit more carefully...a lovely design for a block. I think all it took was two little dots on the quilt and one mark on the ruler. The two shapes underneath was me trying to use a different part of the ruler, starting from the center out. Interestingly, as soon as I tried to 'wing' it a bit (the left bottom shape), I mucked up the alignment and the feathers were noticeably longer on one side. I did the same shape again, this time going back to making marks on the quilt and ruler and aligning the ruler with the precision hole on one line and it turned out perfect. Lesson learned!
 
So, I made a bit of a pledge to myself to continue to practice with them, trying out different shapes and parts of the rulers that I could use in my wholecloth quilts. Next to practice is Amish Feather curls in borders...love the look of them. Must say, also eyeing out Lily Line 3 now 😏

Karin

Popular Posts