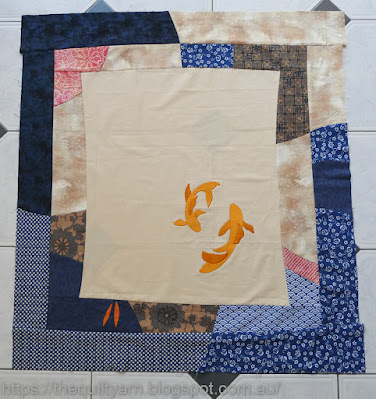
I finished my Koi wall hanging quilt top. Had to wait for some new applique foundation paper to arrive before I could continue. I had some Dupioni silk from my kit left and decided to make a second fish. This was somewhat nerve wrecking as there was not a lot of room for error. I had all these very small fins to make and turn the silk over so I was very careful not to stuff up as there was only just enough silk to make this one fish. Went very slowly and deliberate trying not to stress and it worked out fine.
Looks really nice, very pleased with it. The Breaking Boundaries class will start this weekend...should be great!
Also continued on my Nemeshing piece. As this is a lot of pebbles I did this over a couple of weeks, doing a little bit every now and then. It is hard to finish something when you know it has not turned out exactly how you had imagined it, however I thought it would be good to finish this, so I would have a visual reminder of where I went wrong.
I am calling this...'Pebbles with a Hint of Nemeshing'...as many of my smaller swirls have disappeared through the pebbling. Just did not make them fat enough and also thought that the double batting that I used was not the best idea. Live and learn! Will do some more feather practice in the blue border to finish this off.Then I started another Baby Panel quilt. Discovered that I have done this panel before but when I bought it obviously did not remember this. Had to laugh, as the whole time I was thinking that I really liked this little panel...no wonder, bought it before because I liked it then! The Panel is called 'Jungle Fever' designed by Rebecca Jones for Clothworks Fabrics.
Did my favourite design over it again the other day...clamshells with the HQ Multi Clamshell Ruler. Love doing this on baby panels/quilts.
I do not mark the entire quilt top to do this. What I usually do is mark the first 2 rows, in this case two lines across the width of the quilt top 2in apart. The largest clamshell of the HQ Multi Clamshell tool is 2in x 4in, I then quilt the first row and mark a little tick half way on top of each clamshell. Then comes the second row, making sure I hit that little tick mark as I go along. After that I do not mark the horizontal lines anymore as my first two rows should have laid the foundation for being pretty much straight. I do however, continue to make little tick marks on top of each clamshell as I go along to just double-check that my clamshell are centred correctly. As you go over an entire quilt there are inaccuracies that creep in which I think is unavoidable. A slight shift in the ruler can make your clamshell slightly smaller or a bit of sliding and you are a bit off centre. I do make small adjustments as I go along like lengthening or shorten some clamshells however do have an eye on whether they are remaining straight and centred on each other. It is always a bit of a surprise to come to a space in the quilt, like a seam or similar where you then can see how accurate you have been. In a panel though there is not much you can go by and the real test came right at the end with this quilt top when I hit the first border. You can see that the top of my clams (the added lines in there is my basting) are approximately half an inch away from the first border. Not every single one was exactly the same but overall this was looking pretty good. There is no way that you are going to perceive little inconsistencies when looking at the finished quilt. Happy with that...this will be a cute little quilt for my Etsy shop.Now onto the binding and then I will concentrate on the Breaking Boundaries class.
Karin


Beautiful projects. Thanks for the tip of marking the center of your clamshells to help with alignment. I love that panel too! Really adorable baby quilt.
ReplyDelete