Showing posts with label Handiquilter Capri. Show all posts

Tuesday, 15 September 2020

More 9 Patch Ruler Work

Block 3 and 4 of Natalia Bonner's 9 Patchalong
This one was a beauty...continuous line design, always looks great. Of course, mine was not entirely continuous as I got confused. I am certainly learning a lot in terms of thinking through your stitching path before you actually have a go. I made myself a little folder on the Ipad with these blocks and an accompanying stitching diagram, because no doubt, next time I look at it, I will have forgotten how it goes. 
My accuracy is definitely improving and I am finding the ruler work increasingly easier. The stitch regulator on the Capri is a big help as I can focus in on the stitching without having to worry about the stitch length. 

The next block was interesting
Lots of straight lines and again some concentration was needed to follow that stitching path to make it a continuous design. Easy to execute and looks also good when only stitched in one direction.

Today then I tackled the border. Followed Natalia's suggestion of stitching a loopy design above the scallops, however then encased this with a wiggly design (Natalia cut her border off past the loopy design which I did not want to do). I used the HQ Wiggle Wave ruler for this exercise
This ruler is fast becoming my favourite wave ruler. 

The ruler makes it very easy to fit your waves into the border. All I did was measure my border and determined how many repeats I will fit into the border. On the long side I was out by half the repeat. If you look on the ruler, half of the length would have ended me up on a high point in the corner which I did not want, as I started on a low point. In order to end on a low point and make the corners look the same, I then needed to reduce my waves by 3/4in across the length of the border. I normally struggle with this when drawing out a border, but with this ruler I find it is quite easy as long as you keep track of what you are doing. So, as I am stitching along the wave and stop in the valley or a  high point, I shift the ruler by about 1/4in to elongate the curve, 3 times before the center and 3 times after the center. Without fail this works a treat and I arrived smack bang at a low point in the corner, making my corners appear identical. The only marking I did was an approximate position of the repeats so I knew I was on track as I was stitching along. I could, of course, have chosen a different starting point for the corner, however I thought it was safer to start at the beginning of the repeat as I get easily confused with these things. Maybe next time I try a differently shaped corner by starting on a high point or somewhere in between.
 Anyway, more ruler work coming up in the border. I am thinking of going around it one more time with a piano key design...not sure yet what width though or maybe a pinstripe arrangement. We'll see.

Thoroughly enjoying this quilt along.

Karin

Friday, 4 September 2020

9 Patchalong with Natalia Bonner - Block 1 & 2

The 9 Patchalong with Natalia Bonner has started with two blocks this week.

Block 1

Simple curves, love the look and often use this for my baby quilts.  Quilted with the Pro Echo 7 ruler in one continuous pass.

Block 2

This block was hilarious. I was watching the video and following the stitch path, however 2 sec. later I forgotten which way to go. Had to watch and re-watch 2 squares at a time to follow that. Only got the logic of the stitch path for the last 3 squares using the Pro Echo 8 ruler (felt better as it is longer). I knew I was challenged by spatial things but I had no idea it was that bad. Anyway, again stitched in one path. Really like this, looks great on the solids. My focus on accuracy is working fine, spending a moment to get my alignment right and taking my time. Also trialling my new stitch regulator which is behaving very nicely...really like stitching with it, just need to develop a bit of a better rhythm for that.
Also made a start on filling in some of the sashing today. Great fun...with this I am practising shifting my straight ruler along as I am quilting out those straight lines. 
As you can see the vertical sashing is filled in only every alternate diamond, but in the horizontal sashing Natalia did every single shape. Followed this, although I like every single shape stitched out better as it gives that lovely texture. Will be a good visual when looking for designs.

I am really enjoying this and am currently playing with the idea of participating in Natalia’s ‘Let’s Stitch a Year of Stars’ which is to start in January 2021. Again she is using a panel which you can purchase, however that is not an option for me here given the enormous postage costs. So I would have to piece that sampler...not sure about that as I am not that much into piecing and the blocks look tedious. On the other hand, we are still months away and I am always up for a project that is a bit more involved. Will ponder on this for a while.
Linking up to Cheeky Cognoscenti for her Longarm Learning Party#6
Karin

Wednesday, 26 August 2020

9 Patchalong With Natalia Bonner

Where is the time going...

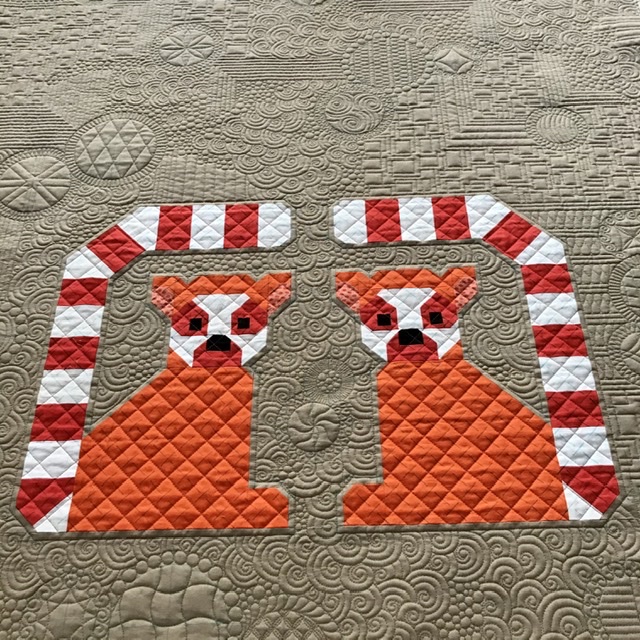
I finished my Lana Lemur quilt and now am working on a nine patch quilt for Natalia Bonner's 9 Patchalong. This is going to start on 1st September  with Natalia showcasing new designs using her rulers every Tuesday and Thursday on YouTube. There is a FB group you can join to showcase your work and have a look what others are doing (already there are a few variations on this quilt top).

I am stitching along with a friend to further hone in on my ruler quilting skills. I think so far I have done about three ruler practice quilts, trying out different rulers and techniques. Find this very useful in terms of just focusing in on accuracy and how to hold a ruler for best results. 

So, I managed to get that quilt top together and am currently stitching in the ditch with a straight ruler.
I am using clear Monofilament thread in the top and a prewound in the bobbin. The Capri is behaving nicely and I am practising using the stitch regulator for this task. Must say it really makes a difference in how this looks on the back of the quilt. Quite impressed with that...looks so much neater compared to when I do this task in Manual mode.
I am looking forward to this stitchalong. Natalia's designs are always very straightforward, but quite clever in the way she uses them to dress up blocks in a quilt. While I do not have her rulers, I think I have enough rulers to match what she is doing on the quilt, basically using a straight and a few curved rulers. Already Natalia has posted designs for the sashings and the borders which I do quite like, particularly the scalloped border design. Looking forward to this.

Linking up to Cheeky Cognoscenti for her weekly Long Arm Learning Linky Party.

Karin

Saturday, 22 August 2020

Finished The Quilting

Yay!!!!!!
Was not as bad as I imagined and only took a couple of days of concentrated effort.

Now I only have to get rid of some of the blue marker lines and then it’s onto the binding...and the next quilt🤪

Karin

Tuesday, 4 August 2020

Lana Lemur Continued - Almost Half Way

As explained in my last post, I am trying out Claudia Pfeil's method of filling up a background as demonstrated in her DVD 'Claudia's (P)Fillers'. Essentially this is a mix and match approach starting with some bigger circles strewn across the quilt and then freemotion quilting from one to the other using different designs. The idea is to create sufficient contrast between the designs to make the whole thing visually pleasing.

Easier said than done!

I started out with the following designs, combining straight lines with stacking shells and pebbles

Felt that it needed something more and decided to mix in a meandering box design to create contrast to those round organic looking designs. Also wanted to loosen it up a bit as I do not want the whole quilt too tightly quilted.

That looked alright however I was not entirely happy with my boxy meander. I did, for a bit of extra fun, try that box design with a ruler in another section...basically just to see how annoying this would be. Never really considered doing this with a ruler and always thought that this would be incredibly tedious.

Wow, to my surprise that went like a treat. All I had to do was to flick the ruler around my box...I did not meticulously align the ruler, just eyeballed its straightness because I was sure that visually, the eye would view its straightness and assume that the lines were all properly aligned at the correct angle. In addition, I used the Capri stitch regulator for this exercise which made it look even more formal. This was exactly the contrast I was after. It looks straighter, more formal and mixes in well with the surrounding lines.


If you compare the two pictures above you can see the difference (yes, I un-did my organic box meander). While the more organic, freehand method is fine when it stands alone as an overall design, for this exercise I really wanted a sharp, crisp contrast to the curves and circles. Really happy with how this is turning out.

I almost finished all the circles for about half the quilt. Quilting the straight lines in sections 'eats' up a fair amount of space and the filling tends to become more manageable that way. Running out of ideas on what to put in the circles and will have to recycle a few designs.

The Capri 18 is behaving like a dream...no tension issues (I am using Aurifil Mako 50/2 on top and Deco bob in the bobbin) and the stitch regulator is my best friend for all those straight lines.

I am joining Cheeky Cognoscenti for her very first Long Arm Learning Linky Party.Check it out! The linky party will run weekly and is open every Tuesday through to Friday.  
Karin


Saturday, 11 July 2020

Little Doilie Project Finished

This was a lot of fun to do...it’s the first time I tried this and must say, I really enjoyed this. Got the doilie from the local Op shop for a dollar and placed it in place with spraybasting. Not quite round, but close enough.
I ran out of ideas for the delicate border of the doilie, so left that alone. If I had stitched that down I think it would have turned out too flat. Could not resist though and hyperquilted a little bit in the feathers, then decided that that was enough.
If you have read my previous posts, I used Bethanne Nemesh’ Lily Line ruler 3 for the frame around the doilie. The frame turned a bit into an overall background fill, but I like it. The ruler was an incredible time saver and the design was easy to execute (once I had decided on which parts of the ruler I was going to use). Fantastic tool!

Had a few issues with my tension for the pebbles on the new Capri. Lots of flatlining and cursing. I used Aurifil 50/2 for the quilting and similar to the Sweet 16, the thread behaved quite fiddly. I recently purchased the horizontal spool holder and ended up putting the almost empty spool on that, this time threading the thread straight down rather than looping the thread around the thread guide (as you are
supposed to do)...and to my utter surprise, no more tension issues! Have long suspected that the fiddliness of the aurifil thread has to do with the thread path rather than the tension setting. Will do some more testing around this...tried it the other day with a different colour thread, but with the spool on the ‘normal’ thread mast, again threading the thread straight down the thread guide and again had much better tension. Go figure...

Karin

Thursday, 11 June 2020

Heartfelt Wholecloth

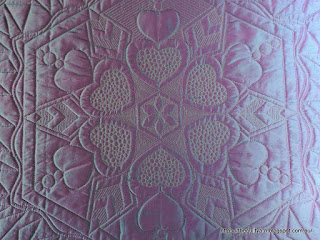
The Heartfelt Wholecloth designed by Kelly Ashton for the Handiquilter Ruler of the Month Club 5 is finished!
Turned out really nice even though I am missing one of the borders as my piece of silk was just not big enough. The quilt comes out at 41in x42in, just a bit smaller than its original.
However, I have some chalk marks left in the silk which I could not erase...just will not come out, in fact I think I made it worse by rubbing them, so I am thinking that I have to wash this beast. Not ideal, but seeing that this was a bit of an experiment on how I would go with the silk, I may as well do it. Wish me luck! 
I have taken heaps of pictures today in preparation for this maybe not working out so great. At least I have some photos then of what this looked like. Would I do it again on silk...hmm, maybe not. Stitching on the silk was a pleasure, but the marking is a real problem as you do need the registration lines. In this wholecloth I had to have lines in each of the corners of the hexagon and they had to stay throughout the stitching of the design as all subsequent sections from the center out are based on those lines. I did those lines with the Quilters Choice Chalk pencil as I knew they would not disappear with handling the wholecloth. In between I also used the Bohin Chalk pencil and the Sewline ceramic pencil, both of which disapeared with handling (which is good, but not useful for the registration lines). In retrospect I think I should have used something like the Frixon pen for those important lines...that would have just lifted with heat and the dark fabric would have not shown the residue, I think. Well, as much as I love the look of silk, this has been really tricky, but at least I know now what I can use and what to avoid.

Linking up to Midweek Makers over at Quilt Fabrication.

Karin

Saturday, 6 June 2020

Heartfelt Wholecloth Progress

Nearing the end of my Heartfelt Wholecloth quilt. This quilt was designed by Kelly Ashton and can be found on the Handiquilter website under the Ruler of the Month Club information.

Only the four corners left
This has been an extraordinary intense workout of all 6 rulers of the Ruler of the Month Club 5 and was an excellent opportunity to get further acquainted with the Capri 18. There are a number of things that I tried on this wholecloth making use of some of the new features, i.e.

- stitch regulation: I used stitch regulation for the the frames of this wholecloth. Making longer straight lines has by now become quite easy to do and I used the Precision mode for this task. As I have become more comfortable with the stitch regulation, I did also use it in some of the smaller designs as well (like all those tiny 1/8in lines, the Flying Geese shapes and the diamonds)). As this was mainly for practice, I did some designs starting off in stitch regulation, however then went back to Manual when this was easier. For example, for some strange reason I found doing the smallish ribbon candy in the last border quite comfortable in Cruise mode on a particular setting where I felt that the machine and I were in sync, however when I tried to do the smaller swirls this did no longer apply. While I could stitch the swirls in Cruise mode, it felt jerky and somewhat uncoordinated. In this instance I went back to Manual, as this was just easier and looked better. A lot more practice needed for stitching some of the smaller designs, although I am equally as happy to just stitch them out using Manual mode . It really is a matter of finding out what feels comfortable for you at what setting and fine tuning this a bit.
- Play/Pause button: I love this feature and have used this on this wholecloth when doing microstippling and pebbling. It allowed me to just concentrate on the movement of my hands, focusing in on the design without starting to slow down or speed up, just keeping the sewing speed at a nice steady speed. Very handy for that sort of work.

Very happy with how things are progressing and looking forward to the next wholecloth. 

Karin

Sunday, 24 May 2020

Heartfelt Wholecloth Progress

Working steadily away on the Heartfelt Wholecloth, a project that came out of the Handiquilter Ruler of the Month Club 5.

After finishing the frame and doing the grids I was ready to fill in the center
Center filled in with pebbles and some freehand straight line work
Did some more straight lines around the hearts which was easy enough. Now came the hard part...lots of tiny lines with the HQ Matchstick Ruler (1/8in) all around the odd shaped Flying Geese. That looked like a real hassle and involved an extraordinary amount of travelling along previously stitched lines. When I started off I did single lines, travelling back over wherever I landed. I soon discovered that this was not the way to go about this as I sometimes had to travel along the Flying Geese, sometimes at the bottom and sometimes on the top wavy line which prevented me from working out a way to systematically stitch this out. In the end I decided to double-stitch the lines (which for me is literally unheard off), i.e. down and up again, travelling only on the upper wavy line to the next spot, leaving some areas uncovered. Came back to these uncovered areas on the second path, travelling on the lower wavy line. This probably does not make a lot of sense, but suffice to say, this was a hassle and a half and took a while to complete.
I finally completed that part and am happy to report that the world did not come to an end because of the double-stitched lines, in fact I can hardly see it. The whole piece is looking more and more like the real thing
After this I filled in the last lot of spaces with some more circles and now I only have to do some piano keys in the wavy sections (on the right above) and then 'only' need to do some background fillers to complete the wholecloth.

Its looking lovely...not entirely correct in some places but the psychedelic silk is making up for that.
I must say that this is the way to go with the Ruler of the Month Clubs, i.e. stitching out a project to go with those particular rulers. I have used every one of the rulers intensely plus a few others (circles and straight line rulers) and it does help you to really become familiar with the rulers in terms of holding them, whether you need more or less grip in places and using multiple parts of the same ruler. Really enjoying this (when I am not cursing about those tiny lines) and learning a lot.

Not that I want to advertise, but there is a Ruler of the Month Club 6 out which also has a project attached to it. That one looks way simpler...I think it is a great way to get your confidence up with rulers. I am not doing the Ruler of the Month Club 6 as I really have enough rulers for the time being. Famous last words...already wondering whether there will be a number 7.

Karin

Tuesday, 19 May 2020

Let's Do Some Ruler Work #12

Last week, Rosemary from The Knitting Quilter linked up with some straight line quilting in a border
Image may contain: 1 person

How good does this look. Always like straight lines...so effective!

I have been working away on my Heartfelt Wholecloth. Certainly is giving me a major workout with all the rulers of the Handiquilter Ruler of the Month Club 5. The only thing I do not like about this is that there are lots of starts and stops and unlike the longarmers, I bury my threads, so this is a bit of work. Completed the frame some time last week. Had to let go of one of the additional borders as my silk piece was not big enough. This does not really stand out as it is well structured with several borders, so one less does not matter at all.
Heartfelt Wholecloth frame (approx. 44in)
Then started on the filling of all of those little and not so little spaces. Today I was working on grids and promptly got that wrong
The left is correct, the right has the ruler the wrong way around on the second path, i.e. following the curve in the opposing way. I was ever so careful to get this right and initially could not work out what happened other then that it looked somewhat weird. The correct grid is stitched on the diagonal following the curves of the arc. I used the new Curved Crosshatching Ruler for that and once I worked it all out, this was no problem at all. 
So, this is where I am up, still lots to do
 Time to link up what you have been working on with rulers.


You are invited to the Inlinkz link party!

Click here to enter
Karin

Tuesday, 12 May 2020

Let's Do Some Ruler Work #11

I have this piece of silk that I was saving for something, not sure what, so it has been sitting around in my stash for some years by now. The problem with silk for me is the marking, still not entirely sure what people use, however I finally put it to good use, stitching out the Heartfelt Wholecloth Quilt  designed by Kelly Ashton using all the rulers of the Handiquilter Ruler of the Month Club 5 (as this meant minimal marking). No better way to get used to some of these rulers then to use them in an actual project. I ended up marking the silk with a fine chalk pencil, thinking that this was going to come off with some heat...not sure how I got mixed up but that is actually not the case, so I am going to have these lines in there. Hopefully they will be quilted over or rub off with time. If worst comes to worst, I will have to wash this thing when it is finished.

So I made a start with the Double Heart Ruler and promptly had to do it again as my hearts kept overlapping which I did not like. Found the ruler quite challenging actually as it is just that little bit chunky. Also was using the stitch regulator for some practice which added some difficulty, however I got there in the end. The silk itself is very forgiving which surprised me a bit. Really enjoying stitching on silk (using Aurifil 50/2 thread in a coordinating colour).
So far, so good, except there were no measurements in the instructions, so I felt that I was doing this a bit blind. I was supposed to stitch another hexagon around the center going from circle to circle and initially my hexagon was going to end up somewhat misshapen. Had to improvise a bit and make it fit to  come out with an accurate hexagon shape.
This has taken most of the day. Managed to get the hexagon around the center and then tackled the wavy line. You can see above some of the rulers used so far (from left to right: Half Carat Diamond Ruler, Double Heart Ruler and the Wavy Line Ruler). I was dreading the wavy line a bit because I already knew it would not fit neatly into my space. I usually draw out my wholecloth quilts so that I can work out how things fit into spaces as I am not really good at just winging it. Must say this was an excellent exercise for me and I finally 'got it', i.e. how to assess in a roundabout way how this was going to fit and then, while going along, ever so slightly shifting the ruler over to make up that 1/4in that I needed to keep the corners approximately the same. Then I echoed around it which was surprisingly easy, although I went at absolute snail pace to get that right.
A close up of my handiwork
Not exact by any means but workable. Really enjoying the challenge. 
Here is another photo of the psychodelic silk. It shimmers all sorts of colours..this probably comes closest to what it actually looks like.

Now it is time for the Linky. Would be great to see what other people are working on with rulers. If you are currently working on something that involves rulers or have an old post, please consider sharing. 

You are invited to the Inlinkz link party!

Click here to enter
Karin

Sunday, 10 May 2020

Finishing A Quilt On The HQ Capri18

I am so happy and relieved that the new machine arrived. I had not realized how much I was used to having the capability of these machines to make my life easier in terms of finishing off a quilt. 

I thought I do a little post about how I go about finishing a quilt

I usually pin-baste my quilts which takes an enormous amount of time as I have to take it easy otherwise I do in my back! Once that is done, depending on what I have in mind for the quilt, I baste my quilt with the basting function. Now this new model has more basting options than the Sweet 16.  It's got 5 different settings in the 'manual basting mode', i.e. the machine does a stitch every 0.5 sec, 0.75 secs, 1.0 secs, 1.5 secs and 2.0 secs. On top of that, there are 4 different basting stitch options in the regulated mode, i.e 0.5in, 1in, 2in and 4in baste. I used the non-regulated basting option at 0.5 secs, i.e. the machine does a stitch every 0.5 secs. Very smooth on this machine. I think I probably would use the regulated mode if I was to look at basting a grid, but for this little quilt I just meander basted all over it to be able to take the pins out (as I was going to use a ruler and the pins would have been forever in the way presenting a bit of a hazard if you are not careful).

This is what that looks like...did not even bother with the pins, just noodled around them as I had good visibility...once done, I take them all out again and  am almost ready to quilt.


0.5sec Basting Stitch
Lastly, I secure the edges of the quilt also using the 0.5 sec basting stitch, but this time using the help of the trusted Versa tool to keep it nice and straight, stitching about 1/8in from the edge. For some reason I prefer the Versa tool for this job above all others...maybe because it is a bit wider, hence easy to hold and it keeps the edge of the quilt very flat while I go around the perimeter of the quilt. Handiquilter has brought out a square foot last year which could be used for this as well, but I must say I do prefer doing this with the ruler.


Then I obviously go ahead and quilt the quilt, in this case I tried out the Multi Clamshell ruler to stitch some spirals across the quilt as outlined in previous posts. Once done with this I also attached the binding on this machine, again using the Versa tool. Obviously this is a smaller lap sized quilt and I had no problem with the bulk of the quilt as I have the extension flaps on either side. This works really well for me and bonus I can use the ruler to make the stitching stop exactly 1/4in from the edge of the quilt with that little notch at the end of the straight part of the Versa tool, something which always ends up a bit sloppy when I am doing this on the DSM.

Seems a bit long-winded but having to do some of this on the DSM the last few months really showed me how much I had become used to the convenience of these machines. It is making the job so much easier and quicker!

Karin

Thursday, 30 April 2020

Thread Play On The Capri

Have been quietly playing with my new machine the Handiquilter Capri 18. Very happy with how she is performing, so the other day I spent the entire day trialing different thread combinations.  I did struggle with the colourful and shiny Polyester threads on my Sweet 16 and wanted to see how I go on this machine. I am glad that I have had those 2 years with the Sweet 16 before I got this machine...I am approaching this obviously much calmer and with a lot more knowledge than when I first started with the Sweet 16.

Trialed Fantastico from Superior threads. Initially used Bottom Line in the bobbin (self wound) and set the Towa value to about 180 (using a table that is provided by Superior threads). That was ok but I had a fair amount of pokies which just did not want to budge (I was using Soft and Bright Polyester batting which was probably not helping). Also, variegated thread can be a bit tricky in general. Changed over to Aurifil 50/2 thread in the bobbin. Set the bobbin tension to about 230...that is the amount of bobbin tension that I seem to like. I do set my bobbin using the 'standing the bobbin up in your hand' method but I do also check with the Towa what value it is. I find that very handy as it gives me a starting point for the bobbin tension. Stitching along was fine, but I still had some pokies on the back.
Switched to the orange variegated King Tut, also with Aurifil 50/2 thread in the bobbin. First time I ever tried this thread for freemotionquilting. Liked it better than the shiny Polyester thread for some reason. Reduced the bobbin tension to see whether I could get rid of those pokies on the back and finally at a Towa value of about 190 the pokies disappeared largely

Tried the Fantastico thread also with reduced Aurifil bobbin tension...heaps better and hardly any pokies.

Also did a fair amount of mucking around with the stitch regulator...as I am not attending our local group I cannot really ask anybody on how to use this properly, so I just played with different speed settings and literally went by what was feeling ok, i.e. movement was even and not jerky and the machine was literally just cruising along with me. Found that for an overall design like this meander I needed to set the Cruise speed fairly high to get that nice rhythm going. Worked really well and looks great.
Also did some more research on the Towa gadget in general and thread weights etc. Very productive day...I think I am beginning to understand this much better.

Karin

Monday, 20 April 2020

The Handiquilter Capri

Finally arrived and set up in her spot (actually had to clean up before we even could set up...it's been so long that the whole area was incredibly messy)
Look at this space! I did order both extensions this time, as last time I only had one for a while, however purchased the second one for the Sweet 16 last year. It is so much easier with two extensions. The machine is longer by 2in, hence, the table is bigger and they also added additional width to the extensions, making this very comfortable indeed. The table is 36in x 32in and the extensions are another 18in wide each. It's huge! The new table is very slick, so you do not need an overlay. Bit worried about scratches though, particularly with the rulers if you were to lay them down with the Handigrip side on the table. So I stuck my Supreme Slider to the table on the left because that is where my rulers usually end up. While I am used to always flipping them around when I put them down, I thought, better safe than sorry.

Apart from being bigger, these are the exciting new features
- stitch regulation (optical sensors inside the table insert); both Cruise and Precision are available
- light in the bobbin area, very handy indeed (you can also access the bobbin area from the top by sliding the insert out slightly)
- improved lighting on the top, in fact, it is super bright
- stitching speed increased to 2200 stitches per minute (not so relevant for me as I still stitch very slowly)
- new table set up...you can lift the machine up to standing height
- USB port for updates and additional USB port on the other side that could be used to connect the new laser light for example.
- more basting options (very excited about this...I love the basting function in general)

Before I got into stitching I covered my stitch plate...maybe a bit funny, but I was really used to the overlay of the Sweet 16 and the solid feel around the needle plate area. All of a sudden with this machine I could feel the cutout of the insert table. So, I had an old and crusty Supreme Slider and cut out some holes for the sensors and placed this over the needle plate area. Not as solid as the overlay but visually it does the trick for me and the quilt does not rub against the sides of the cut out of the table.
The first thing I noticed with this machine was that it is much quieter in Manual mode than my Sweet 16 was.  As I am used to the machine by now, Manual was just like it was before...just lovely, particularly as I had not had a machine for a while. I then switched over to Regulated...what a hoot! Definitely louder! At first I thought there was something wrong. I switched it onto Cruise first, where the needle walks at a pre-determined speed when you depress the foot pedal. Somehow my brain took a minute to realise that I actually have to move the fabric. It was the weirdest feeling. It was predictably very jerky and uncomfortable, as if I was working against the machine. Precision mode was even weirder...you press the foot control down and nothing happens until you move the fabric. Again I felt that there was a fair bit of resistance for the machine to get going. The machine has a start/stop button, so I used that which helped a lot as I could just concentrate for a moment on moving the fabric with my hands and get a feel for the speed. This is going to take a moment to get used to.
The next day then I sat down and did some concentrated exploration of the Regulated mode.
I used Cruise for some of the ruler work and must say...I love this! My stitching looks so much better with that. Tried all sorts of rulers and found that I was beginning to get very comfortable with that mode. Precision will take a bit longer, I reckon, but has its place in ruler work as you would not have the 'jogging' stitches in between, but for now I could only use that for straight lines from point to point. I also did some feathers in Cruise...not perfect, but heaps better than the day before. Tried other smaller designs in Cruise, but found this difficult at this stage, as I don't seem to have found my rhythm with that as yet. Not bothered though, as it will come with more practice. Definitely a lot of fun and the stitch regulation certainly delivers.

One happy quilter over here !

Karin

Wednesday, 11 December 2019

Exciting News

Image of the HQ Capri machine beauty shot


Have you seen Handiquilter's new machine, the Capri?

It was introduced at the Houston Quilt Market and will come to Australia in the New Year.

I am super excited about this as it has got stitch regulation build into the table and a few other modifications to make life a bit easier (like more lights, light in the bobbin area, machine is slightly longer). You can see the stitch regulation in action in this You Tube video by Handiquilter.

This was actually really weird timing as I had just researched stitch regulation with the competition and had wondered whether Handiquilter would bring out a machine that would be an equivalent. About two weeks later I started seeing it on FB.

So, I pre-ordered the new machine and will be selling my machine. I did have a very long think about this and thought that this new machine is the best option for me. During my time over the last two years at my local Handiquilter group I have learnt a fair bit about longarm machines and often wondered whether I should go down the path of a machine on a frame. When the Amara came out I fell in love with that machine. WHAT A TOY! However thinking about this again, I came to the conclusion that a sitdown machine is the best option for me because
- I do not actually produce that many quilts...my passion is wholecloth quilting, the type where you spend a good 2 month on one little section. In terms of quilts, I cannot see myself piecing those enormous King size quilts. Beautiful to look at but not for me.
- I have no experience in quilting on a frame. Possibly could learn it but reluctant to then quilt all my projects on a frame. Would be ideal to have a sitdown machine and a machine on a frame 😆 to just play a bit.
- I think I actually prefer to quilt on a stationary machine using my hands to guide the fabric.
- cost and space is obviously a factor with sitdown machines being much more affordable.

I feel that the new Capri offers me the best of both worlds, being able to continue to quilt on a stationary machine while at the same time having the option of using stitch regulation. This will be very handy...
I have had my Sweet 16 for 2 years by now and obviously have become used to it and with continued use have become faster in my quilting. Stitch regulation will be great to keep consistency up to scratch. Also with rulers I think it is very handy. I have a habit of doing tiny, tiny stitches as soon as I am concentrating on hitting a particular point. Again stitch regulation should make that theoretically easier. We shall see. I am fully expecting that stitch regulation will initially completely throw me, however as with anything, it will be a matter of getting used to it. Should be very interesting.

Now it is just a matter of waiting for this machine to arrive in Australia.

Karin

Popular Posts