Tuesday, 15 May 2012

WIP#2

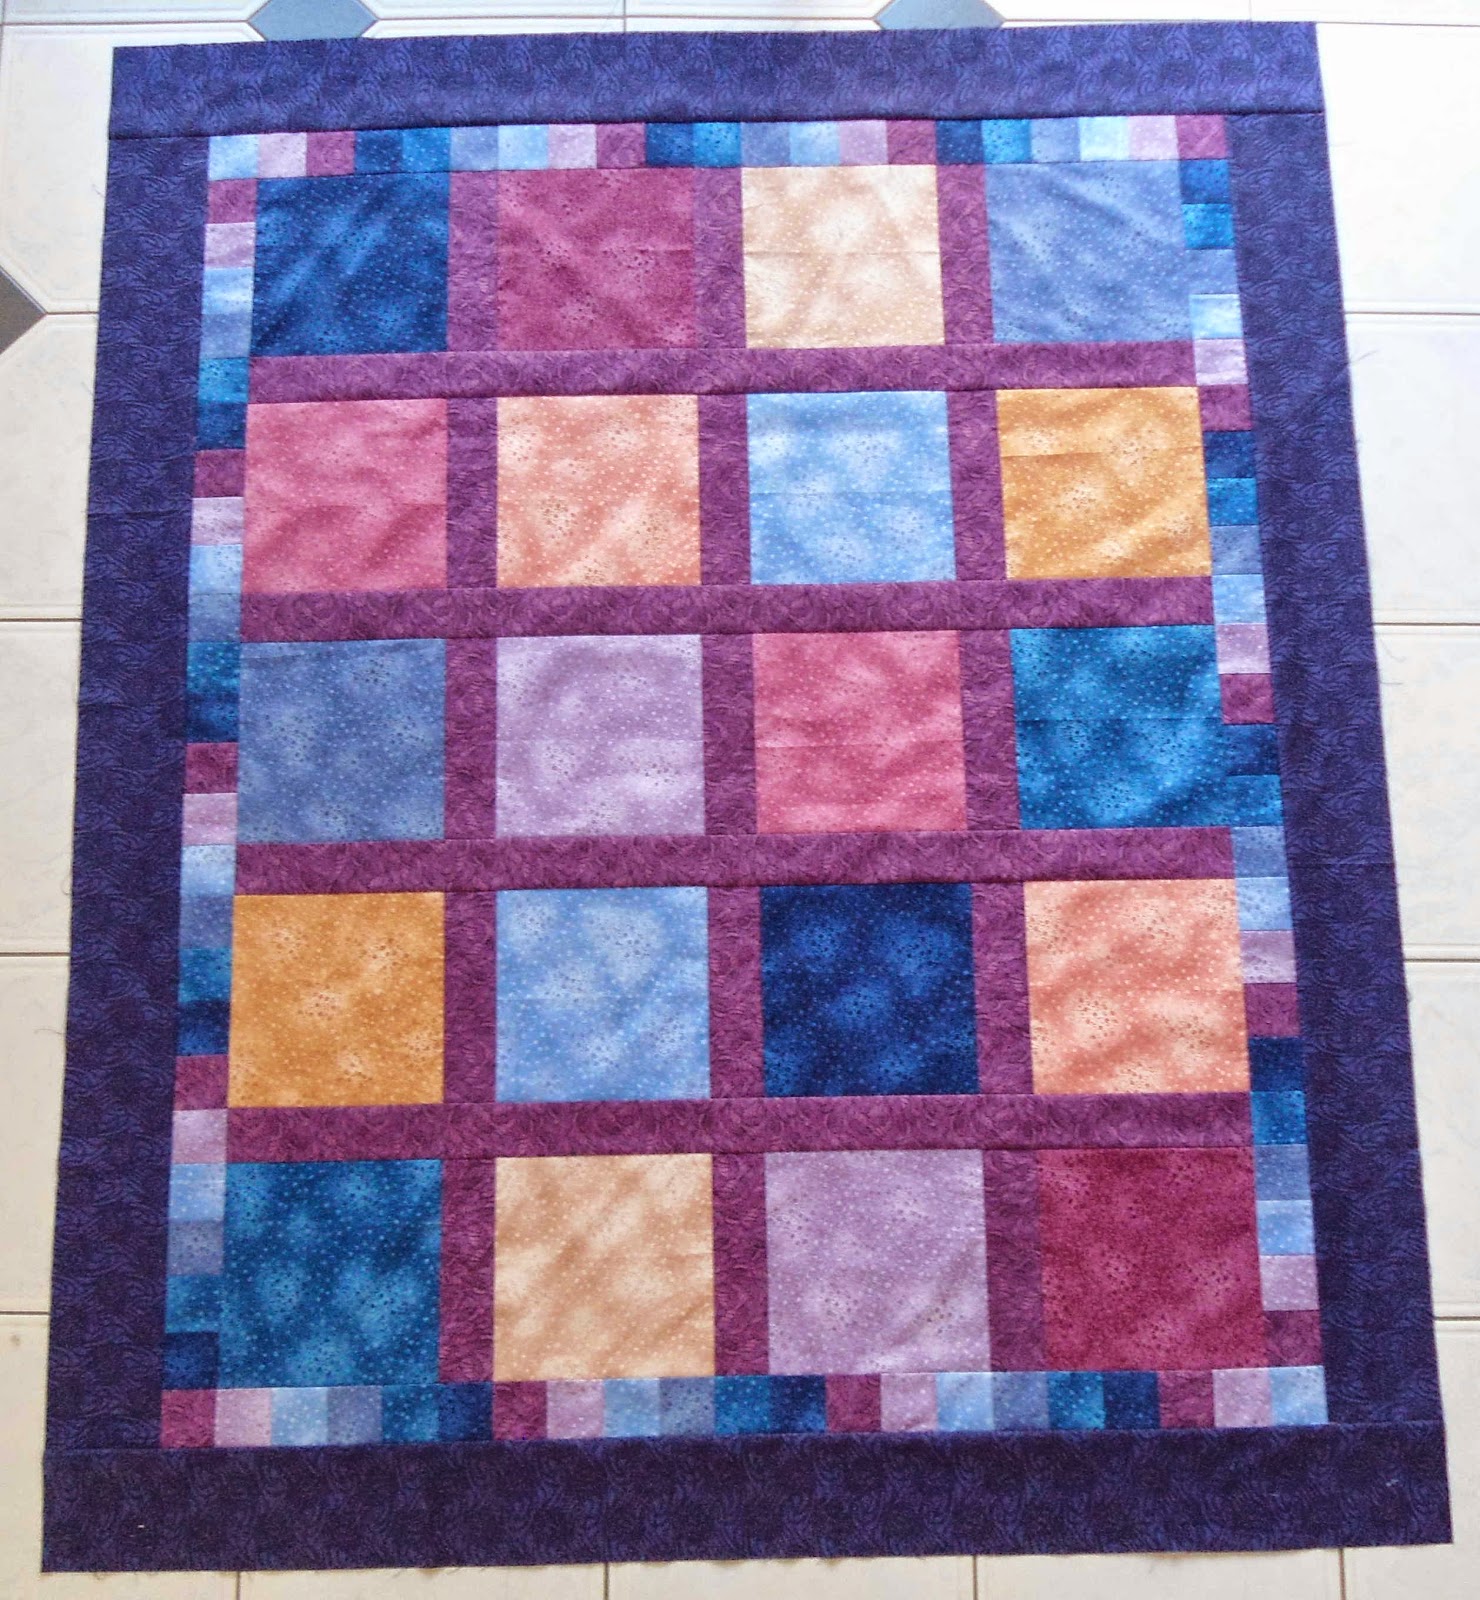
Finished my practice quilt top that I will use for Leah Day's Quilt Along Wednesdays. Actually quite like the simplicity of this. Not sure about the inner pieced border though, a bit on the busy side...mind you, used up most of those Fat Quarters so I am quite pleased with myself.  Now I only have to find some backing (out of my stash, of course) and then do some stitching-in-the ditch along the sashing and I am done...

Bought some Polyester batting as I quite liked the way that quilted when I tried this on the little wholecloth quilt. Have not decided on thread yet...

Looking forward to filling this up with all sorts of FMQ designs. Once the squares are filled up, I still can play around in the sashing and borders. The outer border is 4 inches, this should be enough for a simple continuous border design...this should be fun.


Apart from this I have been working on my 'Arrangement of Small Pieces' project, however I am already looking around for other things to do (I get easily bored) and will probably continue on a table runner that I started a while back. This will be the second time that I am doing this table runner (gave it away as a present to a friend)...really liked the intensity of the colours, enjoyed doing it and love working with templates. Also lends itself for some microstippling and motifs in the background.

This is (close to) what it will look like...


Until next time

Karin

Tuesday, 8 May 2012

WIP

Looking at all the other blogs I almost feel a bit slack...not much to show for this week even though I have been consistently working on things. I have spend a considerable amount of time on cutting fabric for my ' Arrangement of Small Pieces Project'...as the name suggests the pieces are rather smallish and I decided to cut them en mass, so that I then can chain-piece units together. I spend about 4 hours cutting last Friday and managed to prepare about 6 blocks ready for sewing. This is not going very fast at all, but accuracy is a must for this block and I just have to keep at it.

My other project for this month is putting together a practice quilt for Leah Day's Quilt Along Wednesdays  . While this may sound a bit crazy I figured that a bit of pain now will make life so much easier later on. By the time we start up again in June I will have 20 square blocks to practice on which theoretically should see me through to the end of the year (give and take a few weeks). This way I can just pull this out for the practice each week and not loose momentum on my other projects,  and it will also give me a visual display of this year's learning.

This is my progress so far. I am very pleased with this as it gives me an excuse to work with almost solid fabric which I love, and it simultaneously tackles the alarming accumulation of fabric in my stash...not that it really made a huge dent but it is a start. The outside border will be dark blue which will be perfect to stitch a fancy border design on once it is all done. So, overall, I am looking forward to this.
Auditioning inner border -had to improvise as I ran out of sashing

Once  this quilt is basted, I will be able to concentrate on finishing my current project and also continue on the list of projects that I have set for myself for this year. This includes the little wholecloth quilt we made in Quilt Along #11 -13...I really would like to make this again.

No doubt I will get side tracked throughout the year... I enrolled in a one off workshop on FMQ with  Australian long arm quilter and artist Kim Bradley in August at my local sewing shop. I am super excited about this as the practice piece that we are going to do looks just gorgeous with a huge feather design with different backgrounds (and stitched with metallic thread)...all very intricate. There might be another quilt in the making.

Anyway, back to work


Karin

Wednesday, 2 May 2012

Quilt Along #16

I was quite happy when Leah Day announced we are having a break during the month of May. Things have been hectic for me at work and most of last week I was sick, so I generally lost a bit of direction.

On the weekend I finally sat down and went through my stash...that was a bit of an overwhelming experience. There are a lot of potential projects in there, one more enticing than the other. While going through I came across a packet of some 20 fat quarters (blenders in all sorts of colours). I got this some years ago when I renewed my subscription to one of the quilting magazines. No idea what I was saving them for. I now decided to use them for the continuation of our Quilt Alongs with Leah Day...initially I thought I would prepare some squares, practice new designs on them and then sew them together using the QAYG method, however I have now decided to actually make a quilt top similar to Leah Day's Batik quilt...mine will just be a smaller version of  blender squares with some sashing and a border, so all I have to do for the Quilt Alongs is to get that out and practice the design on it. While the QAYG method is a good option, knowing myself it will sit there for another couple of years. This way I should have a quilt top finished by the end of the Quilt Alongs.

I have now started my 'An Arrangement of Small Pieces' project. Here are the first three blocks...decided after all to stick to one colour per block.

An Arrangement of Small Pieces

The blocks come together quickly and I will be able to chain-piece 3 - 4 at a time, so this now looks all very manageable and should be reasonably quick (already have another design in mind which I am quite excited about).

Then tried some Zippling...I did not think that I would like the design that much as I have tried something similar before and my brain just could not handle the straight lines. Well, this time it went very smoothly. While I did not have particular shapes in mind, I just zig-zagged along and it turned out quite well and I actually found it easier to interlock than the Sharp Stippling. Fun design to play with.

Zippling
Until next time


Karin

Wednesday, 25 April 2012

Quilt along #15 - Sharp Stippling

I am participating in Leah Day's Quilt Along Wednesdays and after some months of stippling we are off to try some different designs. This week we are looking at Sharp Stippling.

Watched the video and off I went:


Started just doing a row of flame like shapes (about 1/2" scale) and kept going in rows....hmm...not quite as easy as I thought. I could not go much beyond doing rows of the shape. The interlocking of the design somewhat eluded me. I then tried to do it on a smaller scale really concentrating on trying to add some complexity and variation:


My stitching became smaller and smaller...I think that this is about 1/4" scale. Very wobbly in terms of consistency of stitching and the variation in the shape was still a bit 'hit and miss'. I liked the way that this did not seem to matter much in the overall look of the design. The areas don't seem to have to be consistent to look good. Stitching it, I felt that I could not get the 'rhythm' of this design. I needed some sort of image to think about while doing it, similarly to stippling which I originally learned thinking very hard about Mickey Mouse ears. If I just think of flames I seem to produce consistent rows of flames...so I included some 'bird' shapes:

This worked a bit better for me...less concentration and more mental images. I went back to a scale of about 1/2" and think that this looks quite respectable. I have got a few larger unquilted areas in it when I could not decide what shape I was going to pursue, but overall the texture is lovely. Quite a nice design but I don't think I could stitch it any bigger than the 1/2" scale.

Questions:

- how do I get the rhythm of a design? I do doodle the design before I actually stitch it, but that often does not give me the 'flow' or 'rhythm' of it because as soon as I hesitate while sewing I usually loose the general direction in which I am heading. (Maybe I am going too fast in general or it simply needs more practice)
- I am thinking of doing all these practice samples on solid fabric (of which I got stacks) and then later on stitching them together using the Quilt-as-you-go method. Would I just mark myself a square on my fabric and just stitch within that or stitch all over my sample and cut it to size later (wouldn't that become undone then?) when attaching the sashing?
Now off to do some quilting
Karin

Tuesday, 24 April 2012

Construction of 'An Arrangement of Small Pieces' block or Tools of the Trade

I finally started on my 'Arrangement of Small Pieces' block.

Just looking at one of the four triangles that make up the 9" finished block, the EQ 7 program provided the following instructions:
  • the 2 smaller triangles can be cut from two 4 1/4" squares cut on both diagonals to yield 4 small triangles per colourway
  • the two parallelograms to each side of the small triangle are 2" x 3 3/4".
  • the middle trapezoid shaped strip is 2" x 7 1/4"
There had to be an easier way to approach this. I bought a fairly inexpensive ruler last year...the Companion Angle (10" size) by Darlene Zimmermann. This can be used to cut 1" to 10" quarter square triangles. Triangles are cut with the longest edge on the straight grain. You align your (in this case) 2" strip on the solid line where it says 2" with the little arrow down and cut your triangle shape which in this case will give you a triangle that will finish up at 3".


Initially I thought I would construct this block by strip-piecing the triangle unit together, i.e. constructing a Flying Geese Unit with longer flaps on the side and just joining 2 more strips to the unit, then use the Companion Angle to cut the triangle unit to the right size. While this worked when I tried it out, it produced some inaccuracies, so the matching of points was a bit hit and miss. While I don't mind a bit of inaccuracy here and there, I did not fancy having each of the quarter units let alone the blocks not align properly. This would not only be unsightly but also become an issue for the actual quilting of the quilt later on apart from also being a hassle to piece together. I am not one of those quilters who likes to spend hours on one block. Given that I will make probably 30 or more  of those blocks they do have to come together neatly and with ease so that I actually can enjoy making them.

So, I decided to use the Companion Angle to cut out my units individually


I then used one of the corners of a Marti Michell template (that had the right angle ) to trim the corners to make  alignment of the pieces easier. You could just eyeball that but that never works out really well for me. You can find the link to Marti Michell's website HERE if you are unfamiliar with the concept. I just saw that you can actually buy a little corner trimmer...
I use Marti Michell's templates in the construction of my favourite star, the 54 -40 or Fight star and cannot praise them enough. I think they are the best thing since sliced bread.


Anyway, this worked a treat (I only cut part of the corner away as I am not fitting Marti Michell template pieces together) and gave me a very straight unit (sorry, colourway changed as I was working along)


Next step was to align the trapezoid shaped strip above


See how the trimming of the corners make the piece fit perfectly


The next part is easy. I folded the top white triangle in half and put a grease along the long side and also marked the middle of the completed unit


and here is the completed quarter unit. Looking good so far!


I finger pressed my seams as I went along (in one quarter unit all the seams were pressed up and in the next one I pressed all seams down) as the unit has bias edges all along the short sides and is therefore quite unstable. After joining the quarter blocks in two's, I then joined the two halves together abutting the seams and joining the intersections. It all fitted together very nicely and I had (almost) no issues with the joining up of the units.

Here is what the completed block looks like. I managed to get it pretty much right at 9 1/2" (in some spots I am a bit shy of this but that is pretty much normal for me). Block sits nice and flat after I pressed it with the iron and with a bit more practice should come together quickly. Once completed the block is stable as all the edges are on the straight of grain.


Now, you have to like the stark geometric shapes to get excited by this...probably not everybody's cup of tea, but I am thrilled.

Consider the possibilities!


Alternate colourway and set on point...I think this looks awesome. Discovered this by accident the other day. Late at night, playing around...usually brings out my best ideas and I have not even yet played around much with colours and tones. Will explore this a bit more...there is another quilt in the making. But, I stand firm, I am making my first lot out of Thirties fabric.


This little unassuming block has heaps of potential.

Until next time

Karin


Monday, 23 April 2012

My New Sewing Table

Well, I finally done it...bit the bullet (or more to the point, the purse) and bought a proper sewing table from Horn Sewing furniture. The whole caboodle...table plus extension table (came as a freebie because of Mother 's Day promotion) and also a chair (still waiting for it).

My husband has spent most of Saturday to put it all together. I bought the Outback MkII...


Bit of a saga...it comes with an insert which turned out to be the wrong size (why is this always happening to us?), so I will have to go back to the shop today to change that. Also, the table has now ended up in the spare room, smack bang as you walk into the room...originally I was going to put it in the family room thinking that I could fold it up after each sewing session into this inconspicuous little cupboard. While it does fold up (the sides swing in and the back folds down) the extension table is attached to it like this:


It fills in the gap on the left hand corner and is attached with hinges. When the cupboard is folded up it just sits as an extension on the left side. Once it was put together though I realised that in order to open the cupboard for just normal sewing the extension would have to swing in its place in the back, hence you may as well open the whole thing right up which then make it very big (1160mm depth).  So, the family room was out and it had to go in the spare room where all my quilting things live anyway...as there also is a bed in the room it makes it all a bit squeezy, on the other hand, the sewing set up is brilliant (and this will ultimately become my sewing room in the future, I think). As the extension table was a freebie we have been thinking to maybe just take it off and run with the original idea of having it sit in the family room and only fold out the back flap as I need it...however, now that I have seen the solid space it actually can give me in the back, I am not so sure what is the better option here.

Isn't it funny how hard it is to change your mindset at times. Looking at the cat, she seems to think...whatever!...in this photo.

Abby
Until next time

Karin

Sunday, 22 April 2012

An Arrangement of Small Pieces

Earlier in the year I spoke about my project for the year...a quilt made with a block called "An Arrangement of Small Pieces". I found this block on my favourite web site  Antique Geometric Quilt Designs and somehow got fixated on it (and I mean fixated - not quite sure why but I really like its name and the idea that a quilt actually is an arrangement of small pieces). However, then the setting up of the blog, moving house and life in general got in the way and I did not make any progress on it whatsoever. The last few days I was trying to again explore the origins of the block a bit further however this has proven difficult. It is included in Maggie Malone's 5500 Quilt Block Designs Book (2003) and I believe it got published originally in the Kansas City Star publication (by Nancy Cabot?). I thought that I had once come across it on the web, however could not find it anymore anywhere. In Maggie Malone's book it is given as a Nine Patch block and on the Antique Geometric  Quilt Design web site it is presented as a 6 X 6 grid.

First of all, I drafted the block in my trusted EQ7 program using the 6 x 6 grid. Initially I had it as a 12" block, however then later scaled it down.

An Arrangement of Small Pieces
This is what it looks like. I then explored how best to sew this. I did do a practice sample earlier in the year but now that I am getting closer to actually starting on this, feel that I need to re-visit this. This could be foundation pieced quite easily however I do not fancy foundation piecing an entire quilt...also that would mean (unless my thinking is not quite straight) that the seams of each triangle would be facing up which would cause an issue when putting it all together in terms of lining up the intersections. So, at the moment I am thinking that I am going to piece this having the seams of the triangles alternating, so that it fits together neatly when completing the block.

The whole block would finish at 9" square which is a size that I like working with. In terms of fabric I tried all sorts of things but kept coming back to Thirties fabric. Not that I really like Thirties fabric (my preference is country and reproduction fabrics) but for some reason this block seems to need it. Initially I tried to audition what I had and thought I could complement it with other bits and pieces, however I finally had to concede that this was not going to work - my idea is to do a variation of this block which would involve either having a srappy type look or go for the more restrained scrappy type look which then incidentally gives you a nice secondary pattern.


Restrained Scrappy-type look
Scrappy-type look


So, undecided at this point, and also still looking at ways to simplify the contruction of this block. Anyway, I ended up buying a Moda Jelly roll (30's Playtime, Chloe's Closet) Not cheap, but gives me a lot of fabric to play with and ultimately cheaper than continuously adding to the 'bitses' that I have (and then never quite having enough).
Well, only one thing left to do...I actually have to do a bit of a practice run to see whether I can piece this accurately enough. Also have to continue working on my Craftsy BOM...still working on the February block!

Until next time

Karin

Popular Posts