Tuesday, 28 May 2013

WIP: Colour Adventure Almost finished

Well, the main quilting is done. Can't believe how long this takes. I like the way it turned out, warts and all...


 Trying to photograph the back...it is astounding how this animal comes out from resting to sit on quilts just when you are ready to take a photograph.
Here is the back ...might hang it up this way. Love it.
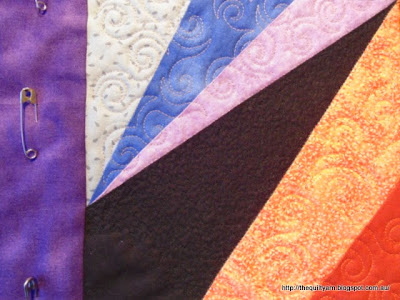
 I was considering jazzing it up a bit with some unobtrusive hyperquilting. This could be fun or a complete disaster. So I quilted inside the plumes in the second border with the purple thread used in the inner border. Given that this is such a colourful quilt I did not want to overload this...I was hoping that the purple in-lining might just take some of the stark light thread a few notches down.


As you can see you can hardly see the in-lining (such is the power of light thread). A higher weight thread would have been better, I think. Well, never mind...maybe next time. This is just for me and the in-lining is part of practising the plume shape. I cannot recommend in-lining your plume shapes enough because there is simply no better way to do the same shape over and over again. When this is finished I will have done the plume shape and the movement, rhythm and speed that goes with it about 800 times.

Initially I thought about quilting inside the plumes of the yellow star, but I am having second thoughts here as you would only really see the hyperquilting...now that might look a bit odd on the light background.

Oh, decisions, decisions...

Linking up to Anything Goes Linky Party at Stitch by Stitch


Karin

Tuesday, 21 May 2013

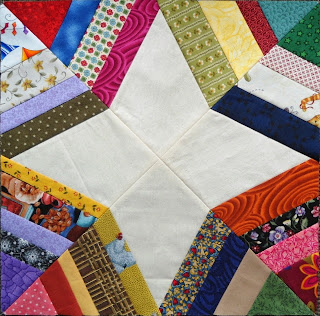
WIP: Spider web Quilt

Love it...


If I do 30 blocks the quilt will be about 61" x 73"...ha, ha, only about 26 blocks to go!

I love scrappy quilts. Not sure what it is about them, whether it is the riot of colour or the actual fact that you are using leftovers, hence literally creating new fabric and at the same time having a bit of a memento of all the different fabrics used over the last few years. I am using calico for the star...I am aiming for this quilt to have that old fashioned look and feel of 'making do with what you 've got' about it.

Huge design possibilities here...You could use just one consistent colour for the first strip to accentuate the star shape while keeping the scrappy look for the rest of the spider web. Also, you could make your strips uneven, i.e. sewing them at different angles to the first strip. You could change the star by halving each star section and having a different colour in there....

Lots of fun to do and very relaxing...

Karin

Monday, 20 May 2013

WIP break: Running out of steam

Need a break...this is how far I got with the second border

Almost there, but really feel the need to do something else for a while. this is not a fast process...


Decided to do a few Spider web blocks instead. You know that other WIP that I started at the beginning of the year (and we are almost half way through!)...hilarious, had to look up my own tutorial to refresh my memory on how to do them. They are fun to make and I have got so many scraps, in fact my scrap container is positively overflowing.


Linking up to Anything Goes Linky Party at Stitch by Stitch

Karin

Saturday, 18 May 2013

WIP: Colour Adventure - Second Border

Progress...

Half of the border...Loved stitching this with the light thread. My stitching works out so much better this way.

Funny enough though, this is not exactly how I had visualised this border. I wanted something a bit more organic and playful, i.e. a less organised feather arrangement. It seems that I cannot be less consistent....I stitch close to the pre-drawn line and don't seem to venture out too much, hence doing a lot of backstitching to travel along the previous feather. I think this is for fear of stuffing it up and also becoming really inconsistent in shape and size. Sticking close to the previous plume shape produces this very even, elegant looking feather arrangement.

How funny is this...I think I will have to practice being a bit more free-flowing and less consistent to produce something a bit less organised.

In the end I stopped trying and continued with my more consistent approach (no point trying to force it...I think it will come with time and more practice). It does look nice and I am happy with my progress with the feathers so far. In terms of marking...yah, minimal... the way I like it. All I did was  draw the gentle curve in with my new flexible curve ruler (absolutely fantastic gadget) and off I went. I did draw in the first few feathers lightly to get me going on the right track, and again in the corner to keep this as consistent as I can, given that it is going to meet the feather from the other side. Also, every time, I felt I was getting off track, I just simply lightly drew a few plume shapes in and that seemed to get the brain back on track. The only other marking was half an inch on the outside of the border so as to not run the plume shapes into the seam allowance and to allow for a bit of breathing space all around. This sort of "assisted" method of freeform feathers works extremely well for me.

I might dress this up with some hyperquilting (see Patsy Thompson designs for some info on hyperquilting...just amazing!) inside the plumes. That could take some of the formality out...just not sure what thread colour to use for that.

Until next time, linking up to FMQ at the Freemotion Quilting Project where Leah talks about practice is never a waste of time. How true...if I think about how I laboured over my choices with the quilting on this one, her account on choosing designs was a bit of an eye opener...

Karin

Monday, 13 May 2013

Cheryl's Quilt- some progress

Well, took the quilt home and got some unpicking done...actually unpicked the whole lot as I got curious about what I would find. In case you missed this, I talked about the disaster around Cheryl's quilt HERE. She had it quilted by a longarm quilter and it was truly terrible, so we decided to take it all off and re-do it.

Quilt before binding came off
You can already see in the photo above that there is a problem with the borders...as you can see the body of the quilt is actually crinkling in the borders. In fact there is too much quilt...the whole thing produced a bit of a 1/2 inch fold on all sides...

So, off with the binding...


After binding was removed
Much better, but I think I was right ...the borders are not attached properly and the whole thing is wavy. Also, some suspicious fullness in the right upper part of the quilt, so my guess is, there is already a problem with the inner border.


The back
Now the back was interesting. I thought I could do some repair work around the seams, however that is only going to be possible along the major seams (I think).  The other thing I noticed is that Cheryl used at least stitch length 3- 4 to sew the seams. Just in case there are new quilters who read this...you need to use stitch length 2 - 2.5 to sew the seams. Anything bigger then that is too loose and makes your whole quilt more fragile...initially I thought I might give this a rinse through however after seeing that, that is not going to be an option...

Washed the back instead and hung the batting outside to have some wind blowing through to fluff it up  a bit again.

Bit undecided now...I am thinking that the 2 borders need to come off. I measured it and there is some variation around the whole quilt (by as much as 1/2 inch and a little bit more here and there). I think we might be ok with the first pieced border...the centre, including the first pieced border, comes to about 55 1/2 inches all around. Once I take the other two off I could square the quilt top off and re-attach the other borders...I need this to be lying flat in order to stitch along the ditch around the major seams, otherwise this would become a nightmare to do (as it obviously did for the longarm quilter). Alternatively one could stipple over the whole lot and be done with it. While it would come out ok, the whole quilt would be crooked and I am risking major puckers all over the place as the top is bigger than the borders that surround it.

Ironed it a bit and trialled using some starch to get rid of the sewing marks...yep, that works fine and will help to stabilise the whole thing.

People probably think I am a bit crazy for doing this , but this is somebody's work and it would have taken some time to put together. The fabric is gorgeous and would not have been cheap. The design is beautiful and the whole quilt looks very nice even though some of the seams are not matching up. I am a seasoned quilter...it does not take much for me to take of the borders and re-attach them a bit better (and no, it still will not come out perfect). I do think we should value some of our earlier attempts at quilting. I still got my very first quilt which looks absolutely hideous, but I still remember feeling thrilled to bits that I actually managed to put it together. With that in mind, I decided to tackle this...not exactly sure re the quilting. I will wait and see how this will turn out first.

Linking up to Anything Goes Linky Party at Stitch by Stitch

Karin

Friday, 10 May 2013

Same old WIP

Working away on my Colour Adventure quilt. I am now at the first border (hopefully this is not getting too boring for people - same old quilt week after week).


Again quilting with blend-in thread...I noticed with this design that I had some white little dots showing up as I was using white in the bobbin. Probably showed up more on this design than on the others before as this design has more variation in speed once you get going.

My tension is definitely right and normally I do not worry about a few white dots here and there. However this was definitely starting to distract me as I was trying to concentrate on the design. I am finding that in general, any fluff or loose threads etc...influence how well I stitch...obviously I am easily distracted.


After a while I remembered the "Magic Bobbin Washers" in my draw. I originally bought these some years ago for my previous machine to help with tension issues.  I do not usually use them in my current machine as I rarely have tension issues these days...nevertheless I put one of them into the bobbin case for stability to see whether it would help with the pesky white dots...and yes, definitely made a difference. Still have the occasional one, but not to the same extent as before (4-5 stitches in a row, depending on direction stitched). Instantly my stitching got better, as I did not have that distraction and could concentrate on getting the design going.


Definitely stitching with light thread on that black second  border. While the blend-in designs look good, I really prefer the light thread on the dark fabric. Can't help myself. Just like the look of it and also find it easier to stitch on dark fabric.

Not sure what feathers to stitch in the outer border...might have to look at it for a while.

Linking up to FMQ Friday over at the Freemotion Quilting Project.

Karin

Tuesday, 7 May 2013

Claiming my blog on bloglovin

<a href="http://www.bloglovin.com/blog/5198333/?claim=fbyuszesje2">Follow my blog with Bloglovin</a>

Karin

Look what happened

Hmm...while I was sewing along (doing the microstippling),  a piece of my foot just fell off. That's right, it just fell right in front of me on my quilting...took me a few seconds  to register that this was part of my foot. Not really sure how that happened, all I can think of is that the little plastic piece got somehow weakened over time and the continued use gave it the rest.

How bizarre is that?

Anyway, went to the local sewing shop and another surprise...they just replaced it for free. How nice is that! Was not really expecting this...great service! I am so impressed.


Apart from this, nothing new to report over here, other than that I am working away on this quilt with my new springloaded foot. Tried the sensormatic FMQ foot for a moment when the other one gave up its ghost, but just did not feel that I had the same amount of control over my quilting. I am really used to this particular foot.


Karin

Sunday, 5 May 2013

Microstippling Completed

I finished the microstippling!

Hilarious...I love the back of this quilt almost better than the front.


Looking forward to the next part...more feathers.

Karin

Saturday, 4 May 2013

Microstippling

Finished the major quilting in my quilt and am doing the surrounding areas. Decided to microstipple in the black surround with black thread...what craziness!!

Had to put all the lights on in the room plus use my OTT-Light...in the end I had to lay down the OTT- Light behind the foot shining directly onto the area to see where I was going (and even then it was a bit of a challenge).


Probably hard to see in photos but turned out quite alright...flattened it nicely and like always - not a line crossed (I wish).

Having major problems also with the bearding on this quilt. I am using a bamboo batting that I had left over. I distinctly remember thinking about the bearding when I was doing another project (which was a light project and did not impact that much) but obviously had forgotten about this when it came to this quilt. THIS IS IT...I am not using bamboo batting again. While the batting is nice and soft and easy to quilt, the bearding is actually quite bad and is distracting when FMQ, particularly in the black areas...quite a hassle to clean that up before you can even start quilting. Not looking forward to the outer boarder which is all black and at the moment looks like fluff all over.

Well, on with the show...once I have finished this I am thinking of doing more feather work in the borders.

Heading over to FMQ Friday at the Freemotion Quilting Project with Leah Day.

Karin

Wednesday, 1 May 2013

WIP: Colour Adventure Project

It's been a while that I linked up to WIP Wednesday over at Freshly Pieced. So here is how far I got along on the quilt that I called 'The Colour Adventure'...a hugely bright and bold quilt that was a bit of an experiment in colour placement. Got a bit very bright for my liking and is a bit out of my comfort range but I am in the process of finishing it off (I think I started this some time in January...ended up getting side tracked a fair bit starting several other WIPs).


Linking up to WIP Wednesday at Freshly Pieced.

Karin

Popular Posts