Showing posts with label FAL2016. Show all posts

Wednesday, 22 June 2016

FAL 2016 Second Quarter - Second finish!

Can't believe it...managed to finish off another project for the FAL 2016

2016 FAL

You can find my original goal list for the second quarter HERE


Now this quilt is an old UFO...to be exact this is from 2012 when I participated in Leah Day's weekly FMQ challenge for the entire year.
Quilt Details:
Dimensions: 49in x 58 1/2in
Materials: Cotton fabric; Polyester wadding
Polyester thread used for FMQ designs
28 different FMQ designs which can be found on Leah Day's website


I was new to blogging and thought that this was just what I needed to consolidate my emerging FMQ skills. We were given weekly designs to stitch out and linked up every Wednesday to show off how we went and to ask questions. This was a lot of fun and I did learn so much from this QAL. Looking at the weekly stitching tasks I decided after a few months or so to throw a quilt together to stitch my designs on. I think some quilters at the time did their samples as a Quilt-As-You-Go project, however for me it made more sense to have a quilt ready that I just could pull out from week to week to stitch my designs on.

I had some 20 tone-on-tone fat quarters just perfect for the quilt and just chucked this together with a coordinating sashing and a border and...voila, I was ready to go every week! This was an enormous time saver for me and also a neat and tidy option for all those designs. I literally covered the entire quilt with FMQ designs...when I had run out of space in the squares, I moved my designs into the sashing and finally also covered the whole border with those wiggly lines (forgot now what that design was called). I was impressed when it was finished...however, somehow this ended up rolled up in the cupboard. All it needed was a binding...no idea why I did not complete this. Needless to say, I did not have any coordinating fabric left and had to purchase some binding fabric for this to finish it off.
How pretty is the Matrix design in the bottom left corner

This was the nicest thing to finish off. As I was sewing the binding on, I admired my somewhat wonky handiwork from years ago...I literally could feel the transition that I must have made at that point...from being overly perfectionist and fearful to stuff up a quilt to just allowing myself to go for it and stitch your heart out. I used white thread (Polyester because Leah is a bit of a rebel) for the most part and it often involved backtracking along the ditch...definitely did not hit the ditch consistently and have all these white little mishaps all over the place. I could see the hesitation at times in the design, but I could also see the absolute joy in the stitching to be free from this ridiculous fear of stuffing things up.

I beautified my binding a bit for this quilt (see previous post) with some decorative stitching just for something a bit different and this was the perfect opportunity to give that a try. That turned out fantastic and I am really happy with the end result...the quilt looks great...interesting...a bit crazy...and definitely less than perfect, but there is something really satisfying about having finished this quilt.
Linking up to Let's Bee Social over at Sewfreshquilts

and also

Linking up to the FAL2016 - Second Quarter Linky Party over at She Can Quilt

Karin

Wednesday, 15 June 2016

2016 FAL Second Quarter - First Finish!


2016 FAL

You can find my goal list for this quarter HERE

Bit of an ambitious list this quarter and very little chance of completing all of those projects. However, I am thrilled that I am making progress. The list definitely helps as I nearly got side tracked again into starting something new when new fabric arrived through the post!
 
And here we have my first finish!
Wholecloth Grid Sampler
Insane Wholecloth measuring 35in x 35in.
Entirely freemotionq-quilted using Aurifil 50/2 (#2000) thread
Little fun fact: I used an entire spool of thread, so that makes it 1300m of thread in this project! (actually probably more as I used a slightly different colour in the bobbin)

I am very proud of this little beauty and I must say that I enjoyed every little stitch of this, as insane as it looks. The quilt design stems from Cindy Needham's Craftsy class 'Machine Quilting Wholecloth Quilts' using the center stencil design provided in that class. I varied it a bit and used the project as a practice piece for various grids. Needless to say, stitching out the grids took forever!

I will be blogging more on the this project in the next few days as I am using this to participate in Quiltshopgal's Ultimate FMQ Challenge - Summer 2016 when the link is up. If you own Cindy Needham's Ultimate Stencil collection, consider participating in this fun event. Have a look - kicks off today with a Linky Party, then a Sketch/Doodle Linky Party on the 15 July and a Virtual Quilt Show on 15 August. As always, a great way to promote FMQ...can't wait to see some FMQ goodness!

Linking up to she can quilt for the FAL Q2 Linky Party

Karin

Sunday, 28 February 2016

Third Finish for the FAL2016

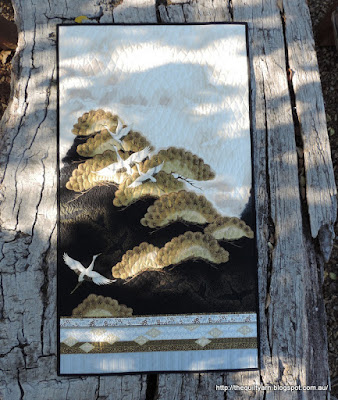
Finished my Japanese Panel (Robert Kaufmann - Imperial Collection). The panel itself is beautiful and I used it to play around with my new Ultimate Background Stencils from Cindy Needham.

In terms of process this seemed pretty simple, just mark it, quilt it! The stencils of course made this very easy and quick to do...what I did not count on was the effect of the grid quilting on the rest of the panel. As I was quilting along, I realised that the trees started to puff out and needed some attention. So, what started out as a pretty straightforward task turned into much more intensive quilting...I went into each tree and loosely followed the clams that were already in there which took a bit of time. Also realised that the cranes needed outlining which I ended up doing with a gold thread...again, nothing major, just all took a bit longer than expected. The other thing that turned out a major hassle was quilting with a black thread on a black background...impossible to see properly even with very good lighting!

Must say that I was bored with this panel...it seemed to stifle my need to freemotion quilt...somehow I found it too prescriptive to follow the contours of the picture...in the end I had a section left in the middle which I freemotion quilted with a design from Leah Day's blog... 'Sharp Stippling'...well, it was supposed to be Sharp Stippling...not sure I got that right. Never mind, looks good anyway and on the black background it translates to just texture.

Took the completed piece which will become a wall hanging (still need to attach a sleeve) for a bit of a photo shoot this afternoon. Found a really nice spot in the neighbourhood reserve with an old wooden picnic table...perfect for photographing quilts! And bonus...involves a bit of a walk to get there, so exercising ticked off at the same time.
Cranes In Flight 23in x 41in
 Another shot where you can see the quilting a bit better
All quilting done on my Pfaff Quilt Expression 4.2 using Aurifil 50/2 thread in various colours
I used three different types of grids in the panel
- the Twisted grid placed in a vertical orientation
- the Clam Shell grid and
- the Three Lines grid on the bottom

Apart from that there is some Sharp Stippling in the middle and some pebbles in some smaller areas on both sides. All in all I think that this all works well together.
I really do like the Three Lines grid on the bottom...so simple, but so effective. This will be so useful for borders. It gives this really definite texture.

So this is my third and final goal for the FAL2016 with a month to spare. My original goal list can be found HERE.

2016 Finish-A-Long

Linking up to Eleven Garden Quilts for the 2016 FAL Quarter One Link up

Obviously have not got my timing right in terms of what I can achieve however wanted to go easy and not make it not attainable...I had said in my first write up that I would start tracing my Wholecloth project onto fabric if there was time left over, so this will be my next task. I am actually quite chuffed with my progress...if it was not for the FAL2016, this would have definitely not been completed by now.

Karin

Wednesday, 17 February 2016

WIP: Cranes in Flight

Well, things don't always work out the way you wanted...spent some time unpicking this week.

This is my third project for the FAL2016. I acquired this panel at the last quilt show and thought it would make a nice wall hanging.

Tried my new Ultimate Background stencils from Cindy Needham that I got for Christmas. For the sky part of the wall hanging I used the Twisted Grid (Papa size) placed on the vertical which gave me a nice amount of movement.
This turned out really nice, although I am still debating whether I should have used one size down (Mama size). I could have stitched this out with the walking foot, however after doing one line with the walking foot, I decided that this was too much hassle  in terms of stopping and starting and shifting your project slightly...so I freemotion quilted this, getting some very intense practice in stitching a steady line. However, I did enjoy this and it looks fabulous.

While I had secured some of the other parts of the project already by simply stitching around it, I had not secured it properly towards the bottom. Don't know what happened...maybe too eager to try out my grids...anyway, I did a whole section of clam shells only to find that I had pushed some puff upwards and the clam shells towards the top were too puffy and almost leading to pleads...

So today, I re-stitched that section after having secured the bottom with some quilted lines...problem fixed, however I must say, stitching them out in black on a black background was a bit crazy...I had major problems seeing where I was going at times and some of my clams turned out a tad wonky (not that you can see that at all)
I must say, I thought that I would enjoy this Panel more than I actually do...while I enjoy trying out the grids, I do not enjoy following the design and find it quite restricting and a little bit boring. Never mind, now that I have started this, it will be done. I did enjoy putting in some clams into the trees (are they trees?)...I loosely followed the printed design, but there was enough room for a bit of creativity and it did give those trees much more depths.

I might try one more grid on the side but the rest will be some background quilting, I think...much more enjoyable.

Linking up to Let's Bee Social over at Lorna's Sew Fresh Quilts


Karin

Wednesday, 10 February 2016

Second Finish for the FAL2016

This took a while, but here it is...the completed Tumbling Blocks baby quilt
This is my second finish for the FAL 2016

Details of the quilt:

Size: 41in x 53in
Fabric: Main fabric is an Ann Kelle design (Urban Zoologie) for Robert Kaufmann fabrics
Threads used: Gutermann for construction and straight line quilting; Invisible Monofilament thread for SID; Aurifil 50/2 for other FMQ designs
Finish: straight line quilting across the cubes with loop design in the feature fabric; continuous heart design in the inner border and more loops in the outer border.
Binding: Left over strips of fabric used which gives the whole quilt a bit of a lift

Particularly proud of:  Y-seam construction

Backing: found the perfect colour match


This is the second finish for the FAL 2016. My original goal list appeared HERE.

2016 Finish-A-Long

Linking up to Eleven Garden Quilts for the FAL2016 Quarter One Link-up.

Also linked up to Let's Bee Social over at Sew Fresh Quilts.

Onto the next project!

Karin

Monday, 25 January 2016

First Finish for the Finish Along 2016

Bit of multi-tasking going on. While working on my other quilt, I cut the binding for this one and finished it off.

My first finish for the FAL2016
Whole Cloth inspired by Patsy Thomson 34.5inx34.5in
Love the back of this quilt
The FAL certainly gave me renewed energy to finish things off. Even attached a sleeve and hung it up. I found this beauty amongst the Christmas decorations in the cupboard. I remembered that I had not been happy with something and had put it away. Looking at it now, I struggled to find exactly what was wrong with it...

When attaching the binding, I remembered...apart from some design and technical issues, this quilt was bearding like there was no tomorrow. Not entirely sure why...maybe the backing was too low in quality...not really sure. Overall though, a really nice effort. I started this late 2013 and finished the quilt top in the beginning of 2014 when I had gone through all of Patsy Thomson's Freemotion Quilting Fun with Feathers DVD's, applying the things that I had learnt and trying out some pretty specky in-lining of the feathers. I then microstippled the surrounds. Can you believe it! I think I chose microstippling as I was not really confident to do anything else at that stage. Now I would put some gridwork in the background, I think. This really shows the continuous learning that occurs with FMQ.

Very happy with the outcome.

This is the first finish for the FAL2016. My original goal list is HERE

2016 FAL

Linking up to Eleven Garden Quilts for the 2016 FAL Quarter Link-up

Back to the baby quilt...

Karin

Wednesday, 20 January 2016

Quilt Top Finished

My  baby quilt top is finished...this is the first of the quilts I nominated for the FAL 2016 to complete by the end of March.
Finished quilt top measuring approx. 52inx44in
I was thinking that the end result, while lovely, certainly does not correspond to the effort that goes into constructing one of these using the Y-seam technique. On the whole, it took me about 4 weeks to make my way through the Y-seams. I did find making the individual tumbling blocks easy and also managed putting the blocks into individual rows fairly quickly. The fiddly bit is really putting the rows together. If you want to have a bit of a look how I did construct this, please see my tutorials about Y-seams Part 1 and Part 2.

I am already thinking about the next one
Have this cute 'bug' fabric (bought several years ago) that I matched up with some simple tone-on-tone fabric. I think I might try out the strip piecing method for that one and see how I like the end result, i.e. will that seam across the top diamond really bother me that much? We'll see...

Not sure yet how I am going to quilt my Hippo quilt...whether allover design or just echoing around the diamonds and a bit of a loopy design in the borders.

Well, next job will be the basting which I really hate, so I am going to leave that for the weekend when it is hopefully a bit cooler.

Have not been over to Lorna's for some time (check out her Ugly Christmas Sweater QAL), so I am linking up to Let's Bee Social #108

Happy Quilting!

Karin

Popular Posts