Showing posts with label Patsy Thompson. Show all posts

Sunday, 7 July 2013

Can't Help Myself - Another Project

Started another project as I was missing FMQ. This rate I am not going to get a a pieced quilt done any time soon.

As I have been posting before in March of this year , I am still watching my Patsy Thompson DVDs and learning heaps. I cannot recommend those DVDs highly enough. Check out Patsy Thompson's website for tons of inspiration. Actually just looking at her blog now...creating a feathered frame for her quilt block (a wreath). This is actually what I am thinking of doing, although I am not so sure I can pull this off as there is a fair bit of mirroring involved.

While I have been playing and trying out different things, I thought that I might as well do a simple wall-hanging similar to some of the ones I have seen on those DVDs. I absolutely love the repetitive rhythm of feather quilting and having a couple of borders will allow for some wavy feather arrangement. Picked out my favourite solid, a type of maroon colour and just did a simple inner border in a greyish colour and presto, I had a blank canvas. Initially I was going to use my trusted Golden Threads Quilting Paper again to stitch out the design (i.e. stitching over the paper), however decided to do the marking a bit differently this time (mainly because the motif was over 10" and I thought that this might become a bit tricky with the paper trying to get that to sit neatly in the middle of my square.

So, I traced the design onto the Golden Threads Paper and then stitched over the paper (with a bigger needle) following the lines without a thread in the machine. Here is a close up of the perforated paper. This is fairly neat as you can also use this to make multiple copies of the same motif...just make yourself a stack of squares, pin them together with your drawn motif on top of them and stitch through all of them at the same time.

Paper Stencil

Anyway, I then positioned my motif in the middle of the quilt top (bumpy side up) and used my Quilt Pounce. You are supposed to just gently glide the Quilt Pounce over the whole stencil.
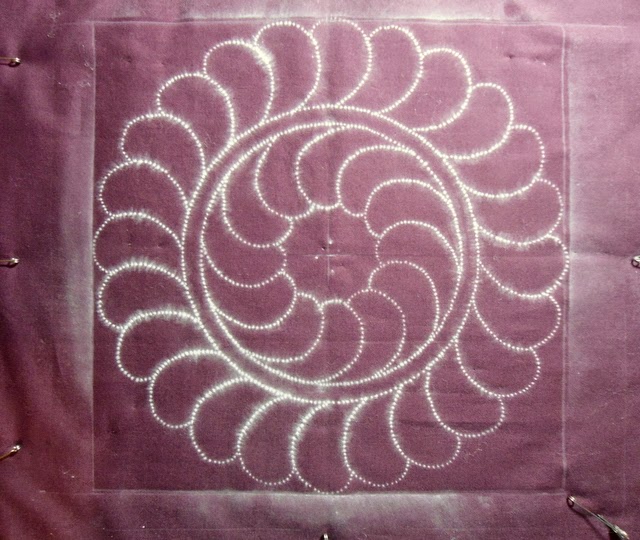
 
As you can see I overdid the chalk component a little bit...I reckon just going over it once would have been sufficient and definitely no patting the Quilt Pounce (mine was too saturated). Nevertheless I was impressed with this and stitched out my motif . This worked very well. I was not overly concerned re the chalk...had used it before and knew that this would just disappear with a bit of steam.

Stitched out Motif
Oh, glorious fun...doesn't this just beckon for some jazzing up! I am planning to do some hyperquilting in the outside plumes and to also try myself at putting something in the spine. I am using Aurifil 50/2 as always...I love that thread and so does my machine...in terms of colours I am limited to what I have at the moment. Probably will use a type of gold colour and some musty pink.

Linking up to FMQ Friday with Leah Day at the Freemotion Quilting Project

Until next time

Karin

Tuesday, 26 March 2013

Feather Borders

I am continuing my practice of various feather designs...

Several other things have fallen by the wayside...need to still complete the write up of the pattern of my baby quilt, do the binding on my table runner, write up a new pattern that I have ready to go, continue on....and so it goes. Also have run behind in the Blockbase Sew Along due to illness when block  #10 was due and just have not had the time to pick it up again.

FMQ requires practice, practice and more practice...you read and hear this a lot. What does that actually mean and how do you go about this? I was thinking this weekend that it is more than that, i.e. it is purposeful practice that will eventually help you to master this skill. When pondering about this I thought back to how this more purposeful practice started for me. About 2 years ago I was visiting the local quilt show and again standing in front of one of those truly amazing works of art...a FMQ wholecloth quilt of enormous proportions...all done on the domestic sewing machine. I could do some basic FMQ at that stage...some stippling, some loop and leaf designs, but that was it. While admiring this I began to think that yes, this is possible and no, I did not need a more fancy machine or the seductive Handi Quilter machine Sweet Sixteen (that I soooo would love to have).

The problem for me was that I would spent up to 6 months on creating a quilt (alas, I also have to work in my spare time) and when it came to the quilting I would revert back to what was comfortable, i.e. the stippling or similarly simple designs. Any attempt to do something different required more skill than I had at that time and even if I practiced a different design, after 6 months  I did not have the flow or rhythm to see that through. Usually I ended up pretty discouraged going back to what I knew would work. It occurred to me that I needed to take the whole idea of practice to a new level. It required more than just a bit of practice here and there or even attending the occasional workshop...it needed to be the purposeful building of your repertoire of designs and capabilities.

Initially I was going to set myself tasks to complete to guide my practice, but luck had it and I saw Leah Day's FMQ Along Wednesdays on the Freemotion Quilting Project which was run for the entire year on a weekly basis. I participated almost every week and within 2-3 months saw the difference...no more tension issues, far less hesitation...the improvement was actually quite amazing. I could just sit down at the machine and go...

Also started my feather practice last year....very tentative to start with but eventually got there. This year I am focussing on feathers...for this purpose I got some of Patsy Thompson's Feather DVDs which I am currently going through. I find  that DVDs and videos work well for me as I can go back and re-watch particularly tricky parts (have a look around the internet, there are heaps of free YouTube videos available).

Well, I continued on my border practice piece....this got a bit involved as I did end up practising the mirrored feather wave I had stitched the other day. I was just too curious of how I would go with trying to mirror the plumes on either part of the centre...probably should have continued with something a bit simpler.


My stitching and the shapes turned out a bit wonky as I could not concentrate on too many things at once. The mirroring of the plumes worked fine as I had worked out beforehand an approximate way to go about it, i.e. start smaller, than getting bigger and then going smaller again to go around the curve. As I am working in a border the outer edge provided a guide of how far to swing out, so this was all good. Funny thing though...the brain made the same 'mistake' each time I went around the outer curve. The mirroring in the centre was a bit trickier...I thought I had done this quite well, but when I went around to fill them, realised that only two of them actually match...so if I was to do this again, I would have to pay a bit more attention to this, but overall... first attempt...I am impressed. To get around the trickiness of the centre I would lightly mark them in next time, I think.


The second border is a nice one...I am thinking about using this for my quilt...it has that simple elegance about it and was quite fast to stitch all around. Also did the loopy border for those more narrow borders...find this very challenging, although looks alright in the picture.

This was a lot of fun to stitch...I think it's time to go onto the quilt.

Linking up to Anything Goes Linky Party at Stitch by Stitch and

WIP Wednesday at Freshly Pieced to show that I am actually finishing some of my many WIPs.

Karin

Monday, 18 March 2013

More Feathers

Yep, this is shaping up to be the year of the Feather for me...

I have been spoilt with some feather DVDs from Patsy Thompson for my birthday recently. Have to say they are very good and I am getting a lot out of it. Only a quilter can sit there listening to the rattling of the sewing machine on a DVD and be completely mesmerized...much to the amusement of the rest of the family.

Here are a few samples I made...

Warm-up
 Warm-up was interesting. Just went for it without much thinking...some of my plumes got a bit too large. Probably pays to think that through a bit beforehand.


Next sample I gave it my best shot and thought about how I wanted the plumes to look like beforehand. This worked well...actually did not try to achieve a consistent look but concentrated on getting around the corner in an orderly way. Not that easy judging the size of the plumes while you are stitching them, probably could have gone a bit bigger on some on them. Also wonder how I would go with staying consistent if I did this across half of a border, and then placing a mirror image on the other half of the border. I guess there is only one way of finding out...
 
Yes, and I think I have been bitten by Patsy Thompson's need to fill her plumes with hyperquilting. Tried one of her examples of just stitching some lines into them (did not look that exciting initially) and was amazed with how this transformed the look of the feather. I love this effect. I used Polyester thread to stitch this feather and the orange thread on top of the white just about jumps out at you. Yes, definitely hooked.


Very happy with this....I am getting more confident in the quilting of feathers having done two feather borders recently, each using a different method of quilting the feathers. The freeform feather above has a playfulness about it that I like and probably hard to believe,  I find this almost more difficult to stitch than the ones were I needed to backtrack. All comes down to practice, I suppose.

Why am I doing this??? ....I want to be able to use this on my Colour Adventure quilt in the outer border and as previously mentioned I prefer to do as little marking as possible (yep, I will practice for hours just to avoid this). Nothing too fancy, just a nice free flowing feather arrangement around  the border. I am planning to put another feather arrangement in the yellow star in the middle (that one will be definitely marked), some filler in the coloured section....and beyond, I am not sure yet. Bit of a loose plan so far.


Looking at the picture now after several weeks, I am thinking that I should have made the black border larger....maybe that's it...there was always something that was not quite right with this. Will ponder on this for a while...this quilt has taken me way out of my comfort zone. It is too bright, too many colours and I am not sure how this will all work out.

Linking up to Anything Goes Quilt & Sew over at Stitch by Stitch and Let's Get Acquainted Link by Plum and June Hosted by Busy Bee Quilts

Karin

Saturday, 15 December 2012

So Inspired/ Confront your Fears

I am so addicted to FMQ.

I would like to share something with you I have been working on over the last week or so. I have been following the Freemotion Quilting Challenge over at SewCalGal this year, visiting the tutorials every month and trying a few things here and there. Time wise I was unable to take up the challenge on a regular basis and given that I had also just started blogging, it all felt a bit overwhelming. Mind you just following along I picked up a few tips here and there...the tutorials were all very inspiring and I learned something from each and every one.

Then this month came along with the Patsy Thompson's tutorial...one look and I was hooked. And when I say hooked, I mean it. Her tutorial is about FMQ in borders, something that I have struggled with for a long time, reverting back to the same old designs I do most of the time because I know I can do them. I often get annoyed about this as I rarely try something different and when I do it is always a drama, requiring major marking or extraordinary math skills. I usually stand in front of my borders absolutely clueless and end up opting out of a more challenging design because I have convinced myself that I cannot do it.

I read through the challenge and decided to give this a go, even though I will not be participating obviously in the last month...but I thought I will do this just for me to confront some of those fears around borders. And what a challenge it was...tiny 1/2inch borders to start with. Would have never occurred to me to FMQ in such a small space, let alone do a design in it that I am not used to. I was so tense with concentration that my hands hurt after the first border...had to laugh at that and made a mental note telling myself that this was just practice and really did not matter how it turned out.

Took it easy after that, taking some time in doing the borders and also watched the video that Patsy Thompson included in her tutorial...very informative. A few future purchases (DVDs) coming up for me, I think. Have a look at her website Patsy Thompson Designs. Lots of very interesting things on there.

Anyway, here is my little project

SewCalGal Freemotion Quilting Challenge - Patsy Thompson tutorial

Not quite finished...have one more border to go and might practice a few more feathers in there as I am a bit wobbly with that in terms of making up my mind about what method of stitching I am using, i.e. backtracking along the length of the feather or over the top.  How beautiful is this! And I used the ugly brown fabric thinking this would just be practice...funny how things sometimes just work out.

The motif in the middle is done freehand, with having lightly marked the square with horizontal, vertical and diagonal registration lines and then just allowing the shapes to develop. I was very happy with the outcome and amazed how my FMQ skills have developed over the year. With that confidence I tackled the borders. None of this is perfect...far from it, but it looks really pretty and the flaws will only be noticed by seriously looking for them. The wavy feather border tested my drawing skills, however once I had the waves on there it was relatively easy to follow this. Absolutely love the effect of this.

A big thank you to SewCalGal for hosting these tutorials over the year and also Patsy Thompson for this excellent tutorial.


Karin

Popular Posts