Monday, 28 March 2016

Quiltshopgal's Bee Creative Fundraiser - Mandala Doodle Along

This month has been Quiltshopgal's Bee Creative #StitchAlong, #FMQAlong, #DoodleAlong and Charity Fundraiser to benefit the Cystic Fibrosis Foundation. You can stitch along, doodle along, paint along, freemotionquilt along...the possibilities are endless. The only requirement is that it has to have a Mandala theme to it.

To help raise funds for  Cystic Fibrosis the option was there to purchase a set of Mandala templates from Maureen Russell of Beautiful Embroidery Designs. This also gave you the opportunity to be entered in the raffle.

I am working on a Mandala design anyway, so this was a great opportunity as well as benefiting a good cause. Our local Quilt Guild has thrown out a challenge to create a Mandala quilt of about 50 -60cm with any quilting technique allowed.
So, I did purchase Justin's Magical Mandalas from Beautiful Embroidery Designs, however did not use them as yet, as I had started doing my own Mandala design using Cindy Needham's Ultimate Stencil.

The stencil is 12.5in and I think Cindy is now selling it with a transparency to go with it so you can draw your designs on it and just wipe it off. I have a smaller paper master template that I could draw on but given that my Mandala had to be bigger that did not work for me that well. In the end I had to draw it out at the size that I wanted it, about 20in. For this I had to extend the stencil. I dreaded this a bit, but as it turned out this was very easy to do and works well. I use paper from Ikea for drawing...it is nice and thick and comes in a big roll. I drew the stencil onto the paper and then extended the lines out to the desired width. As I did not want to get my brand new stencil dirty I used the blue marker to draw it which was easy to do as the marker pen fits right into the slots...this worked also well for me as the blue lines were not so distracting as I started to draw. When using the paper template I found that I sometimes just get overwhelmed with all the lines. I think everybody has to find their own way of what works best for them with these stencils and the more you use them the easier it gets. They are unbelievably useful and I was actually quite amazed at how easy it was to draw my design.

This is my Mandala design...rough doodle of what it may look like. Started off very disciplined in the beginning, but lost focus in the end and just doodled...
As you can see not totally worked out as yet...I have to find a template for the outer shape to make it consistent and pull it out a bit (at a consistent size!) but the overall theme is there. Maybe a few more lines that set individual sections off and I will also try to make the central flower slightly smaller, I think. 
Actually not that simple to make a design for freemotionquilting...while you are drawing it you also have to consider what areas do you want to recede and what areas do you want to stand out and what that might look like in relation to other elements. I was also thinking that I could use different colours to stitch, but we'll see...as you can see I have started to fill in some areas with some stippling and very rudimentary grids...I think that will work really well. A little bit more work required but definitely stuck on the design.

Linking up to Quiltshopgal's Bee Creative Linky Party to show of my WIP. I hope that other bloggers will consider donating a small amount of money to the Cystic Fibrosis Foundation by purchasing the downloadable Mandala collection. Nice resource to have and endless opportunity to fill them in with FMQ designs as demonstrated by Wendy Sheppard this week.


Karin

Tuesday, 22 March 2016

Some things take time

I have been noticeably absent from blogland in recent times. No particular reason, other than that I have been busy in general and have not had the peace and quiet to do anything too complicated.

Haha...and what I have been playing with has taken me three attempts to get down on fabric...and I am talking about tracing a simple stencil!! How hard can this be. I am finally getting around to doing this little project from Cindy Needham's class 'Wholecloth Quilts'. Highly recommended...very informative class and Cindy is a brilliant teacher. So I am following the steps in constructing a wholecloth...enlarged the stencil and got ready to trace it.

As the stencil left some options to either trace or not I thought I would make decisions about this as I went...too funny! First time around, I ended up tracing the whole thing (which measures about 19in), only to decide that I did not like the way it looked. As I was using a blue water soluble marker, no problem, I just rinsed it again.

Next time around, I decided that I wanted a particular section in the stencil, then changed my mind, then messed it up again and then drew different ideas all over the cloth. I should have taken a photo of that...a most liberating exercise. Another wash of the fabric. This time I had a bit of a think and decided that I liked the stencil as it was in the first place and went with that, only changing the middle section a bit.
A little bit messy as I am also using it for grid practice and one of the grids was too big so I ever so carefully wet it and redid the grid which left a fair bit of blue marker pen all over the place. But this is it...it is marked and ready to go. I am going to go slowly on this and follow Cindy's advice from the class about the basting and quilting the main sections first. Looking forward to this, even though it is only a bit of a practice piece...actually any excuse will do to just sit down and do a bit of FMQ.

Also re-discovered my Sensormatic FMQ mode on the machine. Brilliant to quickly try out a design as the foot just clips on, so you don't have to muck around with set up too much. Need to use this more often...                                                  


Apart from this I am spending some time coming up with my own Mandala design for a smaller Wholecloth...but this is so far in its infancy stages...

So lots of ideas, lots of mucking around and very little to show for it.


Karin

Wednesday, 9 March 2016

WIP: A Thousand Pyramids

Struggling to get going on anything much today...have my must do/should do list and struggled to focus in on anything. So I did some more chain-piecing of my WIP: A Thousand Pyramids.

As this project has absolutely no planning to it, I went on EQ7 to look at some approximate sizes. I am a bit undecided on how big I should make this quilt. For the time being I am aiming for a large single bed size. Spent several hours then, mucking around with one of my other quilts on EQ7, trying to decide what design to quilt over it!

This is how far I got today
Does not look like much but the amount of units I already have is getting slightly overwhelming. I am sewing them together in units of 4, alternating dark and light tones. As you can see there is a dark triangle in the middle that obviously has a darker value than I thought. I worked out today that I will need 18 units across and approximately 10.5 rows down...some 180 units of 4 triangles and then some more triangles to fill in the sides.

I have about 70 units so far...long way to go! As you can see I am just winging it, alternating making lighter and darker units without any real plan to it...I think I might start to sew the units together into rows to make this more manageable as I go along.

Apart from that I was going to mark my Wholecloth today, but now have run out of time...I continue to get side tracked with different projects and ideas. For example, our guild has put out a challenge to produce Mandalas by July so I have been looking into this...frustrating plus...for the life of me, I cannot draw them properly and going on the Internet is a nightmare as there are millions of ideas. Decided today that I will continue on my Wholecloth as originally planned and not participate in anything else I see. As for the Mandala...will re-visit this and start with a wreath and build some borders around it. As I am going to FMQ the Mandala I will have to keep it simple and pay attention to the open areas, I think...need to play around a little bit more with that.

Very frustrating day...probably does not help that it is humid and sticky in this neck of the woods.

Linking up to Let's Bee Social over at Lorna's blog


Karin

Sunday, 28 February 2016

Third Finish for the FAL2016

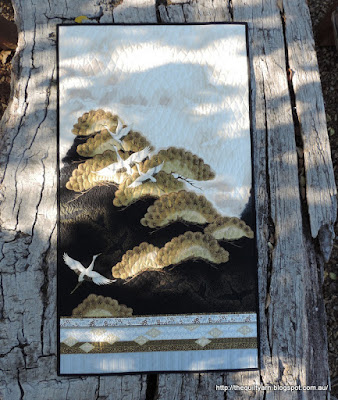
Finished my Japanese Panel (Robert Kaufmann - Imperial Collection). The panel itself is beautiful and I used it to play around with my new Ultimate Background Stencils from Cindy Needham.

In terms of process this seemed pretty simple, just mark it, quilt it! The stencils of course made this very easy and quick to do...what I did not count on was the effect of the grid quilting on the rest of the panel. As I was quilting along, I realised that the trees started to puff out and needed some attention. So, what started out as a pretty straightforward task turned into much more intensive quilting...I went into each tree and loosely followed the clams that were already in there which took a bit of time. Also realised that the cranes needed outlining which I ended up doing with a gold thread...again, nothing major, just all took a bit longer than expected. The other thing that turned out a major hassle was quilting with a black thread on a black background...impossible to see properly even with very good lighting!

Must say that I was bored with this panel...it seemed to stifle my need to freemotion quilt...somehow I found it too prescriptive to follow the contours of the picture...in the end I had a section left in the middle which I freemotion quilted with a design from Leah Day's blog... 'Sharp Stippling'...well, it was supposed to be Sharp Stippling...not sure I got that right. Never mind, looks good anyway and on the black background it translates to just texture.

Took the completed piece which will become a wall hanging (still need to attach a sleeve) for a bit of a photo shoot this afternoon. Found a really nice spot in the neighbourhood reserve with an old wooden picnic table...perfect for photographing quilts! And bonus...involves a bit of a walk to get there, so exercising ticked off at the same time.
Cranes In Flight 23in x 41in
 Another shot where you can see the quilting a bit better
All quilting done on my Pfaff Quilt Expression 4.2 using Aurifil 50/2 thread in various colours
I used three different types of grids in the panel
- the Twisted grid placed in a vertical orientation
- the Clam Shell grid and
- the Three Lines grid on the bottom

Apart from that there is some Sharp Stippling in the middle and some pebbles in some smaller areas on both sides. All in all I think that this all works well together.
I really do like the Three Lines grid on the bottom...so simple, but so effective. This will be so useful for borders. It gives this really definite texture.

So this is my third and final goal for the FAL2016 with a month to spare. My original goal list can be found HERE.

2016 Finish-A-Long

Linking up to Eleven Garden Quilts for the 2016 FAL Quarter One Link up

Obviously have not got my timing right in terms of what I can achieve however wanted to go easy and not make it not attainable...I had said in my first write up that I would start tracing my Wholecloth project onto fabric if there was time left over, so this will be my next task. I am actually quite chuffed with my progress...if it was not for the FAL2016, this would have definitely not been completed by now.

Karin

Wednesday, 17 February 2016

WIP: Cranes in Flight

Well, things don't always work out the way you wanted...spent some time unpicking this week.

This is my third project for the FAL2016. I acquired this panel at the last quilt show and thought it would make a nice wall hanging.

Tried my new Ultimate Background stencils from Cindy Needham that I got for Christmas. For the sky part of the wall hanging I used the Twisted Grid (Papa size) placed on the vertical which gave me a nice amount of movement.
This turned out really nice, although I am still debating whether I should have used one size down (Mama size). I could have stitched this out with the walking foot, however after doing one line with the walking foot, I decided that this was too much hassle  in terms of stopping and starting and shifting your project slightly...so I freemotion quilted this, getting some very intense practice in stitching a steady line. However, I did enjoy this and it looks fabulous.

While I had secured some of the other parts of the project already by simply stitching around it, I had not secured it properly towards the bottom. Don't know what happened...maybe too eager to try out my grids...anyway, I did a whole section of clam shells only to find that I had pushed some puff upwards and the clam shells towards the top were too puffy and almost leading to pleads...

So today, I re-stitched that section after having secured the bottom with some quilted lines...problem fixed, however I must say, stitching them out in black on a black background was a bit crazy...I had major problems seeing where I was going at times and some of my clams turned out a tad wonky (not that you can see that at all)
I must say, I thought that I would enjoy this Panel more than I actually do...while I enjoy trying out the grids, I do not enjoy following the design and find it quite restricting and a little bit boring. Never mind, now that I have started this, it will be done. I did enjoy putting in some clams into the trees (are they trees?)...I loosely followed the printed design, but there was enough room for a bit of creativity and it did give those trees much more depths.

I might try one more grid on the side but the rest will be some background quilting, I think...much more enjoyable.

Linking up to Let's Bee Social over at Lorna's Sew Fresh Quilts


Karin

Wednesday, 10 February 2016

Second Finish for the FAL2016

This took a while, but here it is...the completed Tumbling Blocks baby quilt
This is my second finish for the FAL 2016

Details of the quilt:

Size: 41in x 53in
Fabric: Main fabric is an Ann Kelle design (Urban Zoologie) for Robert Kaufmann fabrics
Threads used: Gutermann for construction and straight line quilting; Invisible Monofilament thread for SID; Aurifil 50/2 for other FMQ designs
Finish: straight line quilting across the cubes with loop design in the feature fabric; continuous heart design in the inner border and more loops in the outer border.
Binding: Left over strips of fabric used which gives the whole quilt a bit of a lift

Particularly proud of:  Y-seam construction

Backing: found the perfect colour match


This is the second finish for the FAL 2016. My original goal list appeared HERE.

2016 Finish-A-Long

Linking up to Eleven Garden Quilts for the FAL2016 Quarter One Link-up.

Also linked up to Let's Bee Social over at Sew Fresh Quilts.

Onto the next project!

Karin

Thursday, 4 February 2016

WIP: Baby Quilt

Quick update on the Tumbling Block baby quilt...finally finished the tedious SID and got on to the fun part...the actual quilting of the quilt.

Did some simple straight line quilting over the cubes. Used Cindy Needham's Ultimate Stencils (the 3/4in grid to mark my lines...so quick and easy! Then I quilted a simple loopy design over the hippos to de-emphasize the formality of the lines.
All in all, very nice, but a lot of work...forgot how much work it is to quilt an entire quilt just having done mostly pillows last year for the FMQ Challenge. This took forever!

I then decided to quilt a loopy heart design in the inner border. This is a design I am not that comfortable with and the best way to overcome this is to do an entire border
That turned out really nice and if you let go of perfectionism is an uncomplicated, fast design to use in a border.

The whole thing turned out a bit crinkly due to the quilting but I am hoping that this will ease a bit once it is all done. I like baby quilts to be quilted fairly heavily due to them having to be washed on a regular basis.

Linking up to WIP Wednesday at Freshly Pieced...just read that Amy will take a 2 months break and is thinking of finishing off her weekly linky. Fair enough too as she has run it for 5 years and the work that goes into a linky is just enormous. So, 'thank you' Amy for all the work that you put in in running this weekly linky.

Also linking up belatedly to Let's Bee Social #110...was quilting for most of the day yesterday and did not want to loose momentum...

Karin

Popular Posts