Wednesday, 27 February 2019

Moving Onto The Wholecloth

I am on a roll...finished off my Ruler Practice Quilt! My Pfaff machine was in for a Spa treatment and so I had nothing else to do.

I was really feeling like some FMQ, but did not feel like just doodling and ended up pulling out another UFO.
Had not looked at this for some time and really felt like some stitching, so I began to continue on that. This has ended up as an UFO as there are some design issues in there which seemed just too huge to continue with it. On the other hand, looking at it now I thought that this was a pity...it's a decent piece of fabric (Kona Solids) and a fair amount of stitching. It would look amazing finished, I think, even with all those 'mistakes'. Anyway, really felt in the mood for it and just continued stitching...
Did a little bit every day as you have to concentrate quite a bit on this one and made some progress. Will need to do some unstitching in some areas and also just come across another problem...my corner motif needs to be altered! What a hassle. If this ever gets finished this will be an amazing feast in improvisation!
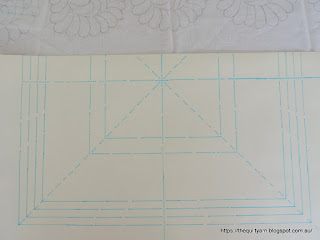
Also started the design process of my other project, another wholecloth, that I drew up in Cindy Needham's class last year using a lot of her wonderful stencils that she had brought along.
It's nice but does need some work.
Started off with Cindy Needham's Ultimate Stencils. Normally you would use the transparencies that Cindy has provided for her stencils to draw up your design roughly. I usually start with drawing on paper, using the blue washable markers. Somehow I got used to that as I did not originally have the transparencies and I must say, this helps me to think the process through in every minute detail. As I am drawing I take note of the measurements and how my designs are going to fit into the spaces that I created as well as looking at how the quilting would show up, i.e. which area will 'puff out' and which one will recede. 
And here comes the somewhat intense part...I will do the same drawing over and over again, until I am happy with it and I am sure that everything fits.
This is number 2
...and so it goes on. Already have a number 3 going, but forgot to photograph it, but I think you get the idea. The above drawing was used to trial different sizes and different arrangements. Also have Cindy's Border Stencils and played around with that as well. While I am drawing this I get a sense of were problematic areas arise as 'if I cannot draw it with ease, I cannot stitch it either' and that gives me the hint that I need to do a bit more work on that. Undecided also about the size of the middle section...maybe make it a tad bigger? Before I had the Sweet 16 I did stitch everything freehand from my drawing. Now things are getting a bit more complicated as I have got rulers, so my design needs to be matched to particular rulers if I am going to make use of the rulers.
If you are interested in the wholecloth design process, I did write a number of posts about it last year, starting HERE.

Getting back to drawing...this could take a while!

Karin

Wednesday, 20 February 2019

Handiquilter Ruler of The Month Club 3 -

We received the last two rulers of the Ruler of the Month Club 3 in the beginning of February.

The 3in Square Template
The Star Flower Template
I finally got around playing a little bit around with these rulers while finishing off my Ruler Practice quilt. First tried the Square template to just outline my charm square.
Obviously did not do an exact job of aligning this properly as my squares were lacking in accuracy, but you get the general idea. Did another one and embellished this with one of Lisa Calle's Pro Echo curves. Very easy to use.
Then I went and tried this enormous flower ruler...had no idea it would be so big, so fitted half of that in a corner.
Very cool, however I am not sure when I am going to use this...maybe as an allover design randomly placed on a quilt?
Also tried some clam shells with this. Was easy to hold, of course, as it is so big...definitely don't need a clam shell ruler as I have got rulers with half circles I can use all over the place.
...and then I just started playing around with other rulers to fill in the rest of the squares.

Different sizes Pro Echo Rulers again
 Small Scallop ruler with some lines
Incidentally, I discovered that the 1/4in Line Grid ruler has a 1/8in line in there, so I did a 3/8in grid. Quite like that size grid.
Lastly, I tried Lisa Calle's 3in Pro Echo ruler as I will need that for my next wholecloth.
Mis-aligned on the bottom petal, but overall really easy to work with...just needs a bit more concentration on my part.

And this is the end of my Ruler Practice Quilt! I don't think I will do another one as I feel quite comfortable with rulers by now. Also, happy to say that I did not join up for the Ruler of the Month Club 4 as I definitely have enough rulers. Already have a few that I will  only ever use now and then, so really do not need more of that. Mind you, the whole ruler business is so seductive! Have you seen the rulers that Bethanny Nemesh brought out? They look absolutely fabulous...had to be really firm with myself not to jump at that. Particularly like her French Curve rulers, but unless I have a design in mind, I will refrain from getting them. Famous last words 😁

Karin

Tuesday, 19 February 2019

1/4in Piano Keys

I am having some fun with my Practice Ruler Quilt. After my recent exercise with the microstippling (see post HERE), I decided to put 1/4in piano keys in the border, using the 1/4in HQ Line Grid ruler.
I like the Line Grid rulers (also have the 1/2in one) as they are easy to hold and align with ease. Not sure whether you can see it, but for this exercise I took the Handigrips off at the bottom as they stick to the wadding and that becomes very distracting when sliding along. I have put the Handigrip pieces to the side and will simply re-attach them when I am finished with this. 
I am still using white in the bobbin and dark maroon thread on the top and as I had said in my earlier post I knew that I had the tension right as it stitched out nicely without pokies.
Looks absolutely stunning. You probably wonder why am I doing this...I do stitch a lot of wholecloth quilts and in the planning for a wholecloth the stitching out of these piano keys requires a few considerations. I have stitched out my border design in a dusty pink colour, so I cannot travel along the pink line with the dark thread. In order to do this neatly I had to stitch the piano keys the way longarmers do, i.e. go up and then down again, travel along the bottom and then up and down again. So I started doing that...problem is that it does look somewhat untidy as you are not likely to hit the same hole every time when returning.
You can see in the picture above, that when it came to the corner I had nice even stitches as they were only single lines as I turned the corner. Started concentrating a bit on this and noticed that I stopped every time I came to the top, then started again to go down. Now, I have got the Big Foot pedal which builds up speed to the level of speed that you have set on your machine, so I was very unlikely to match that rhythm and as I found out, most of time I did not. I then decided to let go off the stopping and did the lines with consistent speed up and down without stopping. That was heaps better but as you can see in the above picture, a bit hit and miss. I had a lot of fun doing this, I must say...also practiced going back on the line in the same hole. Yep, could do that carefully and the lines would look more tidy overall, but for this quilt I am not going to worry about it. However, for a wholecloth quilt that possibly goes into a show, I would have to consider my choice of thread and the way I am stitching these lines very carefully. In addition, it would take a huge amount of time to carefully go back on every line trying for that tidy appearance. I think in designing I would prefer to use the same colour so that you can have single stitched lines where you travel on your previous stitching. That, I think would look better.
Really enjoying this quilt, just thinking through some issues and trying different ways of tackling things. I am doing a wholecloth next, so already am starting to think through some design choices. The machine has been very cooperative and given me no trouble whatsoever. I feel we have overcome our initial adjustment issues and now it's a matter of doing a bit more experimenting with the speed to find the levels that I am comfortable with for different design. Very happy!

Karin

Sunday, 17 February 2019

2019 Finish-A-Long - Third Finish

My third finish of the first quarter of the 2019 Finish-A-Long. The very citrus looking baby quilt.

You can find my list of proposed finishes for the 2019 Finish-A-Long in this post
Please visit Leanne's blog She Can Quilt for more information on the Finish-A-Long. You will find  detail on how this link up works and also find the list of bloggers who are hosting this great event. The Link up for the First Quarter Finishes is on April 10th.

I used Anne Kelle's Mini Cats fabric from the Urban Zoologie range for Robert Kaufmann for this quilt. The quilt measures 36 1/2 x 42 1/2in and is one of a set of quilts that I made for the arrival of twins. You can see the colourway of the other one in this post.

For the quilting I used a simple allover continuous line pattern that I stitched out with Lisa Calle's Pro Echo 8 ruler. Simple, but very effective I think. I used my trusted Aurifil 50/2 thread for the ditch work and for the continuous lines I used a 40/3 Aurifil thread in the top. Even though it was a bit rushed, came out very nice. Now we are just waiting for those babies.

Karin

Wednesday, 13 February 2019

Let's Do Some Microstippling

Felt particularly calm today and thought that I would explore the microstippling 'pokies' issue. Ever since I have had the new machine, I have been slightly out of sink with the microstippling as the machine has a completely different rhythm than the domestic sewing machine and I struggled to find the right speed and movement. While I could manage I obviously have come across the 'pokies' on the top or bottom issue, particularly with different threads on top and bottom.

Used my Practice Ruler Quilt for some experimenting as that quilt will probably end up as a cat mat. I needed to use something real where I had room to just go for it. Used a maroon coloured Aurifil 50/2 on top and cream colour in the bottom, definitely a recipe for hours of fiddling. Yep, did a lot of fiddling with the tension, but once that was set, I refrained from fiddling any further and tried different things with the top thread, i.e. thread net,  feeding the thread through only 2 holes, 1 hole before it goes to the tension disk, bobbin genie etc. Reasoning was that the tension gave me a perfect stitch if I just quilted 'normal' lines...it was the change in direction every few seconds that seemed to be causing the issue.

The problem was that I had the top thread coming to the top, but only on certain movements...
Hard to see but believe me some sections looked absolutely horrific. Could not get a grip on that but realised after a while that this was not solely tension. Lowering the tension was not an option as I would have pokies galore on the backside. Determined, I took my thread through only 1 hole before the tension disk and then just went for it for a number of those triangle sections to see what was happening. Obsessional, I know, but I really wanted to understand what was happening.
After a while I found a speed I could manage really well, i.e. not too fast but not too slow either, being able to make nicely rounded shapes but then I noticed the above happening on the back of the quilt. Took me a moment to work out the reason, but in the end I figured that this happened with the lint that was accumulating in the machine. Had plenty of evidence of that...

I cannot believe how sensitive these machines are. Here I was for months on end trying to figure out why I could not get this right. After this realisation I briefly went around with the brush every time I stopped. This did not eliminate all lint, but helped a lot. Moral of the story...Aurifil might not be a good choice of bobbin thread on this occasion...in the future I will combine my Aurifil 50/2 top thread with a prewound Deco bob which is 60wt and has far less lint. After having done the whole border and managed to get a good rhythm going I felt that this is probably the solution...at least for the way that I do microstippling.
This is how my microstippling looked in the end...hardly any pokies and way more consistent than I started. Really got that rhythm going in the end.
And here is my border half way done. I am planning on doing a 1/4in grid on the other side. 

Karin

Monday, 11 February 2019

Almost Done!

Have been steadily working on my baby quilt.

This is the third time I am making this quilt, so it went together fairly quickly. See the other colour ways HERE and HERE. I quilted this quilt exactly like the previous one, given it is going to go to twins. 

First I stitched in the ditch...I used the HQ ditch ruler for this and I must say that this is getting easier as I force myself to do all the ditch quilting on the Sweet 16.
The ditch ruler can be used either side of the seam and I have used it both ways, however I think I prefer to lay it on the seam stitching along the ditch that way.
My ditching looked good and the only thing I might have to watch a bit is my stitch length. As I am concentrating my stitches tend to become smaller and smaller. For the stitch-in-the-ditch I used Aurifil 50/2 in both the bobbin and the top thread.
Then I started on the curves, using the Pro Echo 8 ruler  (on the left) from Lisa Calle.
I don't just like the ruler, I love that ruler. Aligns with ease and given that this was the second time I did the curves, was able to do them with some speed. 
Starting off with the curves...this time I did not break thread that often going diagonally across and back again, then travelling on the side to the next block. I used a white Aurifil 40/3 thread for this on the top with the Aurifil 50/2 in the bobbin. Went without a hitch.
Finished quilt top
Only got the binding left and I am done!

Linking up to Love Laugh Quilt for Monday Making.

Karin

Tuesday, 5 February 2019

Production Line Piecing

I am on to my next baby quilt. I already constructed one quilt, then found out the couple were expecting twins, so committed to do a second one in a different colour way. Well, I thought that I have got heaps of time...expected arrival is set for April! However, as I am hearing it, those babies are in a hurry...definitely is not going to be April. The expectant mum is currently in hospital being monitored. I reckon another few weeks and they are going to be arriving.

So I had to spring into action. Nothing better than a deadline. Thankfully, my little quilt lends itself perfectly to chain-piecing. I already had all the pieces cut out and ready to go...
Making a start just piecing the triangle units together
Sure enough...did not have enough of the white triangles and needed to cut out some more. While I was at it, I also cut out my binding with the Accuquilt Go 2 1/2in Strip Cutter. Such a handy die, and saves so much time.
Finished the binding off, as I was sewing the units together, feeling super productive.
Chain-piecing in action
Making all of the units in one hit
The first block...yah!
Today I finished putting the little quilt together

2 days of straight piecing! Also found Anne Kelle's Remix fabric at one of those 'end of bolt' sales...fits this quilt top absolutely perfectly


I will put this together tomorrow and hopefully start on the ditch quilting. Then I will do the same continuous line design I did for the 'boy' quilt with my Pro Echo 8 ruler. Looking forward to this.

Hopefully I will finish this off by next week, ready for the new arrivals.

Karin

Monday, 4 February 2019

Ruler Practice Quilt - Pro Echo Rulers

I have been splurging out over Xmas and ordered the small Pro Echo Curve set from Lisa Calle.
The set goes from 3in up to 7in which complements the 8 and 12in curves I already have.

Have I not got enough rulers? Yes, I have...but of all the different rulers that I have, I also am always looking for curves. So, I thought that I take the plunge and order the set. I particularly like the Lisa Calle rulers as they do work  better for me than any other curves that I have used. I completed a baby quilt recently with the 8in ruler. Read more here... This convinced me to get the set, as the alignment was just so effortless and the end result was so consistent.

I finally got around to just have a bit of a 'play' with the new set on my Practice Ruler Quilt. I do a fair bit of practising, as you may have noticed... I really think that it takes a while to get used to different rulers, i.e. how to align them, how to read the lines and how to best hold them. For me it works best if I practice on an actual quilt as I then have to deal with the bulk, how to best position the ruler and hold everything,  and work out which way to quilt, i.e. in front of needle or to the side. This all takes practice.

My initial trial was somewhat sloppy, but already so much better than with other curves.
5, 6, and 7in curve

3in curve

7in curve with 1/4in echo
7in curve grid
Very happy!

Karin

Sunday, 3 February 2019

2019 Finish-A-Long - Second Task Completed!

I am on a roll.

Completed my second task for the 2019 Finish-A-Long. You can find my list of goals for the first quarter of the Finish-A-long HERE

I managed to put my challenge quilt together, stitched-in-the-ditch around all the seams and completed the FMQ task for the month. Yah!

There were different colours to choose from but I chose grey for some reason. Loved to put the solids together, but have a lot of trouble seeing the black thread on the black fabric. Had to use my special light next to the machine to see where I was going. I am stitching with Aurifil 50/2 in both top and bobbin, simply because I have got lots (and I mean, lots) of Aurifil thread. Also using blending colours because that is what everyone is doing. My preference usually is contrasting colours...I naturally stitch better with contrasting colours, particularly white on black. For the bobbin thread I used black thread as I have got a dark grey backing. This worked obviously well for the black top thread and also worked really nicely for the slightly darker grey area. No pokies and well formed stitches. So I thought I was on a winner, however when it came to the light-grey thread my luck had run out...I had a few pokies of black coming through every now and then. Could have left it, but thought that this was really going to annoy me (this challenge goes for the whole year!),  so matched the light-grey with the same bobbin thread. I decided that I was not going to drive myself crazy with this and will now match each colour with the corresponding bobbin thread, so that my quilting will show also on the backing.
Was rather pleased with myself...for once did not blame the HQ Sweet 16 because I could clearly see what was happening. I get a few stitches with no pokies, then a few pokies, then good again. I actually think it has to do with the bobbin winder, i.e. some inconsistency in winding. I will try to maybe wind the bobbins a tad faster and/or also try to maybe put a thread net on the spool  to ensure consistent winding. We'll see...not really a huge issue as I usually match top and bobbin thread anyway.

Onto the next task...another baby quilt!

Karin

Popular Posts