Thursday, 11 April 2013

Quilters' Show and Tell

This week's theme is English Paper Piecing and my table runner from last year fits the bill (apologies to all who have already seen it).


Except for the border and binding, this table runner is entirely hand pieced using the English Paper Piecing method. The table runner measures 19.5"x 34". I must say, that this was one of the most therapeutic things I have ever done. There was no rushing this, just steady stitching at a very slow pace...I really enjoyed doing this and the end result was so worth it. If you want to re-visit the painstakingly slow progress of this table runner start here

Check out the entries over at the Quilting Gallery on Friday morning. (Voting starts on Friday and continues through to Monday morning).


Quilters’ Show and Tell


Karin

Monday, 8 April 2013

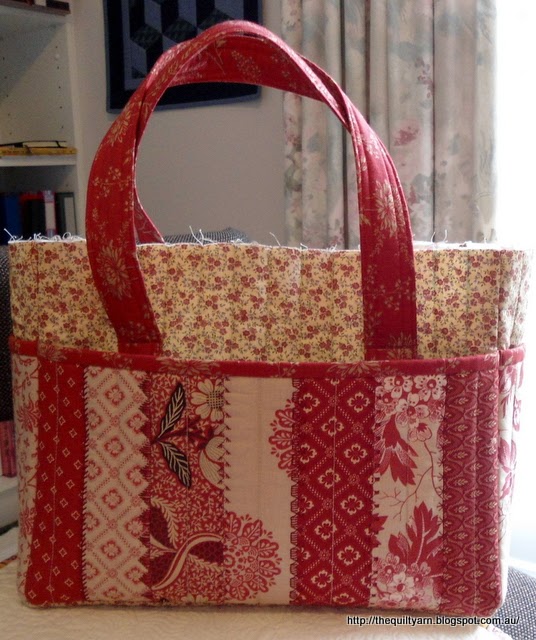
Finish: Pack N' Go Tote

I am finished!


A big thank you to Mhairi, mtnquiltr and also to Linda in Calif for their encouragement and good advice. It came at a time when I really felt like chucking it...all seemed a bit too hard and complicated. Had to leave it for a day or two just to get a bit of a grip. Followed Linda's advice and re-did the lining by 1/4 inch. In the absence of any clue seemed like a good idea and given that the lining appeared way too big I thought that that little bit smaller might just make the difference. Must admit, I was a bit nervous when I put it in...but yes, that did the trick. While still loose, it just fitted that little bit better.
 
After that I had a lot of fun making those little pocket closures and the fabric-covered buttons. Turned out really nice, I think.
 
Now back to the quilting...need to baste my Colour Adventure quilt and then I am looking forward to do some more feather quilting (also attending a whole day workshop on feathers on Friday...really excited about this)


Karin

Wednesday, 3 April 2013

WIP: Pack N' Go Tote - Progress Report

Did I describe this bag as "simple" before??

Well, all went well...I followed the pattern (taken from Fresh Fabric Treats with your favourite Moda Bakeshop designers) one section at a time and thought I was making very good progress. I did use fusible batting rather than the Warm and Natural batting that was used in the book but thought that this would not make too much of a difference.

My machine struggled with the thickness a bit, so if I was to do this again I probably stick to the Warm and Natural batting, but otherwise all good, until I got to the Assembly section. WHAT!!...inset seams??...how did I not see that before? I could not believe it. In my eagerness I obviously did not pay too much attention to the assembly side of things otherwise I might have backed out of this one. Well, I have pieced inset seams before...so, how hard could this be. With that I set out to assemble the bag...what a struggle! With the double layer of panels and batting this was like taming the beast...my first attempt was less than satisfactory with the corners not meeting properly at all and the seam itself somewhat crooked.

So, I undid all the stitching (yes, this took ages and was very frustrating) and started again, working deliberately slow and concentrated a bit better, with the occasional swear words accompanying the process. The corners came out better, not sure whether all the seams are totally straight, but this is brilliant compared to the first attempt. Then I discovered I had ripped into two of my quilting lines...(don't you love it)...so had to do some repair work.

So, tada...here it the body of the bag done


So far, so good. I am pleased with this...the panels which are pockets are all around and will be secured with a pocket closure and a button in the middle...(to be continued).

I did the lining yesterday and must say that after the struggle with the bulk of the bag the inset seams of the lining were an absolute breeze. Now my measurements were all more or less exact but when I put the lining in, it seemed to be too big. I measured everything again because I thought that I might have to re-do this as well, but my measurements were correct on both lining and bag...not quite sure what to do because even if I wanted to make it smaller, I have absolutely no idea how much smaller it should be, as it should fit as it is. Then why does this look miles too big? Maybe I should iron the bag gently to make everything a bit flatter?

Any bag-makers out there who could comment on linings and what that should look like? My lining is literally throwing folds in there, but when I pin it around the top of the bag it definitely fits as it should.

Anyway, that's been my challenge for the week and no matter what, this will actually be finished and at least from the outside, it will look great.

Linking up to WIP Wednesday at Freshly Pieced guest hosted by Natalie from Greenleaf Goods

Karin

Monday, 1 April 2013

A New Bag - Pack N' Go Tote

So, I am tackling bag-making once again. Found this really cute bag in a book I picked up over X-mas at a sale (Fresh Fabric Treats with your favourite Moda Bake Shop designers). No zippers, just a simple bag...

The bag in the book is made out of bright, modern fabrics, however I am using my Moda Jelly Roll - Chateau Rouge/French General for it. May turn out a bit too red, but who cares...as you can see I love red, particularly the more deeper tones.

This is how far I got...finished front and back pocket plus the sides, the rest should come together a bit more quickly.


Was actually nice to get re-acquainted with my machine. Forgot how many useful features I have got on there. The panels were not that easy to do. In the book they sew the strips directly onto the batting and then sew the decorative stitches over the seams. Now that did not work for me at all. I put the strips together first and then used some fusible batting and a stabilizer for the decorative stitches. I think I have got about 250 decorative stitches on the machine that I never use and most of my time was spent staring at all those stitches, unable to decide which ones to use. In the end I tried all sorts of stitches and some of them would have probably been better to leave out as they became fairly tight and there is some crinkling going on. However, I rarely use them and I thought that this was a good opportunity to just try and see how this works.


And here is one of the handles...absolutely love doing handles

 
Now I only have to do the body of the bag...not sure how that will go as I bought some small floral print in similar colours to go with it which may turn out to be a bit much on the eyes (Colour looks a bit different here...it does actually match a bit better in real life).
 
I find it really hard to visualise things so just have to go with my hunch that this will turn out alright. I will do the lining out of the same floral print with the red binding all around. Then it has got some pocket loop closures and some fabric covered buttons to go on there....
 
 
Let's see how this will turn out...if I like it then I might consider doing this in more modern bright fabrics.
 
 
Linking up to Plum and June's Let's Get Acquainted Link Up Held over at Taryn's from Pixel to Patchwork and (later on) Anything Goes - Quilt & Sew Linky Party held by Marelize at Stitch by Stitch

Karin

Tuesday, 26 March 2013

Feather Borders

I am continuing my practice of various feather designs...

Several other things have fallen by the wayside...need to still complete the write up of the pattern of my baby quilt, do the binding on my table runner, write up a new pattern that I have ready to go, continue on....and so it goes. Also have run behind in the Blockbase Sew Along due to illness when block  #10 was due and just have not had the time to pick it up again.

FMQ requires practice, practice and more practice...you read and hear this a lot. What does that actually mean and how do you go about this? I was thinking this weekend that it is more than that, i.e. it is purposeful practice that will eventually help you to master this skill. When pondering about this I thought back to how this more purposeful practice started for me. About 2 years ago I was visiting the local quilt show and again standing in front of one of those truly amazing works of art...a FMQ wholecloth quilt of enormous proportions...all done on the domestic sewing machine. I could do some basic FMQ at that stage...some stippling, some loop and leaf designs, but that was it. While admiring this I began to think that yes, this is possible and no, I did not need a more fancy machine or the seductive Handi Quilter machine Sweet Sixteen (that I soooo would love to have).

The problem for me was that I would spent up to 6 months on creating a quilt (alas, I also have to work in my spare time) and when it came to the quilting I would revert back to what was comfortable, i.e. the stippling or similarly simple designs. Any attempt to do something different required more skill than I had at that time and even if I practiced a different design, after 6 months  I did not have the flow or rhythm to see that through. Usually I ended up pretty discouraged going back to what I knew would work. It occurred to me that I needed to take the whole idea of practice to a new level. It required more than just a bit of practice here and there or even attending the occasional workshop...it needed to be the purposeful building of your repertoire of designs and capabilities.

Initially I was going to set myself tasks to complete to guide my practice, but luck had it and I saw Leah Day's FMQ Along Wednesdays on the Freemotion Quilting Project which was run for the entire year on a weekly basis. I participated almost every week and within 2-3 months saw the difference...no more tension issues, far less hesitation...the improvement was actually quite amazing. I could just sit down at the machine and go...

Also started my feather practice last year....very tentative to start with but eventually got there. This year I am focussing on feathers...for this purpose I got some of Patsy Thompson's Feather DVDs which I am currently going through. I find  that DVDs and videos work well for me as I can go back and re-watch particularly tricky parts (have a look around the internet, there are heaps of free YouTube videos available).

Well, I continued on my border practice piece....this got a bit involved as I did end up practising the mirrored feather wave I had stitched the other day. I was just too curious of how I would go with trying to mirror the plumes on either part of the centre...probably should have continued with something a bit simpler.


My stitching and the shapes turned out a bit wonky as I could not concentrate on too many things at once. The mirroring of the plumes worked fine as I had worked out beforehand an approximate way to go about it, i.e. start smaller, than getting bigger and then going smaller again to go around the curve. As I am working in a border the outer edge provided a guide of how far to swing out, so this was all good. Funny thing though...the brain made the same 'mistake' each time I went around the outer curve. The mirroring in the centre was a bit trickier...I thought I had done this quite well, but when I went around to fill them, realised that only two of them actually match...so if I was to do this again, I would have to pay a bit more attention to this, but overall... first attempt...I am impressed. To get around the trickiness of the centre I would lightly mark them in next time, I think.


The second border is a nice one...I am thinking about using this for my quilt...it has that simple elegance about it and was quite fast to stitch all around. Also did the loopy border for those more narrow borders...find this very challenging, although looks alright in the picture.

This was a lot of fun to stitch...I think it's time to go onto the quilt.

Linking up to Anything Goes Linky Party at Stitch by Stitch and

WIP Wednesday at Freshly Pieced to show that I am actually finishing some of my many WIPs.

Karin

Monday, 25 March 2013

New Fabric

Can you ever have too much fabric?

I got a new Jelly Roll (Moda - Chateau Rouge/French General)


This is for a specific project (see...I am getting better, no hoarding here). I am planning to make a bag. Surfing the net I see so many cool bags that people seem to just whip up and lately I have really felt the need to make something for just me. I found this nice bag in one of the books I recently bought...no zippers, but some pockets on the outside and in terms of difficulty level, it does look quite manageable. Just have to purchase some background fabric to go with it. The strips would form the front and side pockets....

Actually I saw a workshop at my local sewing shop the other day where they make a bag with  zippers on the inside and outside as well as on top for closing the bag...I am thinking of putting my name down because I have not much of an idea on how to do this and it would be a useful skill to have...will have to enquire about this.

Karin

Thursday, 21 March 2013

WIP #3: Baby Quilt finished

Finally...the baby quilt is finished. Bound, washed and blocked...all done


Came out very crinkly, but I like the feel of it. What a saga. Felt compelled to redo it as the zebra fabric was the wrong way around...while a bit of a hassle, I am glad I have done it, because I would have cringed every time I looked at it if I did not correct this.

Karin

Popular Posts