Sunday, 21 April 2013

WIP: Colour Adventure Progress

Here is a quick update on the Colour Adventure quilt. Managed to finally baste this quilt and got going on the motif for the star.


I used the bamboo batting that I had lying around...forgot that I had a major issue with bearding last time. Bit of a hassle...also think that more puffy batting would have been a bit better to make the quilting stand out more.

Currently pondering what thread to use on the surrounding areas...I have a greenish thread that I think will blend in. I am planning on some swirls or similar in the surrounding areas...

Belated link up to FMQ Friday on the FMQ Project

Karin

Monday, 15 April 2013

WIP Progress: Colour Adventure


Remember this beast...

 
Well, still not basted, but made some progress in thinking through a plan of attack. Initially I was going to mark a feather motif in the yellow star before basting. So I spent some time yesterday afternoon working on the motif.

 
That took a while to get it exactly how I wanted it to look. Yep, I am not one of those gifted people  who can just whip this up in a few minutes. In terms of marking it on to the fabric, I tried to trace it putting a light under my see-through extension table (don't have a light box)...that could work but was too fiddly in getting it to sit exactly where I wanted it to go. Hence, in the end, I decided to use my trusted Golden Thread Quilting paper, i.e. tracing it onto the paper first and then stitching through the paper...that gives me much better control of the placement of the motif. (Alternatively I could have used Don Linn's method of tracing it on tulle and transferring it on to the quilt  using the tulle). As this is the centre of the quilt I need this to look as even as I can possibly get it.

So, that meant I was now ready to baste this quilt...ha, ha...I did try out my motif instead to get a bit of a feel for it...

Here is the upper half the motif


Worked nicely once I had worked out the stitching sequence. This is getting very exciting...not sure re the thread yet, but I am thinking to use Aurifil 50/2 in a light beige thread...this should almost but not completely blend in.

I shall baste this tomorrow...(also thinking that I might invest in a can of basting spray soon to give that a go. I am hearing good things about it - but not tomorrow, as this will be just another excuse to delay it)

Linking up to Anything Goes Linky Party at Stitch by Stitch.

Karin

Saturday, 13 April 2013

Kim Bradley Workshop

Went to a great FMQ Workshop on Friday.

The workshop was run by Australian longarm quilter Kim Bradley (Kim Bradley Creations) who hails from Sydney and has featured at the Houston Quilt Show with her art piece, Feather Fantasy, a wall hanging enhanced with Derwent Inktense pencils (not sure I have seen that one but have come across her beautiful quilting on one of the local quilts and also seen some of her art work in the quilt shows over here). The workshop was held in what used to be a monastery, now being used for student accommodation, I believe.

Beautiful surroundings and gorgeous weather...the gardens were really nice. So peaceful...


This was a day long workshop. My local sewing shop which hosted the event organised this beautifully with morning tea, lunch and afternoon tea provided...just great. The day, of course, went very fast...

We were taken through quilting some simple but effective designs with our walking foot...something I do not do very often anymore at all....I actually found this quite difficult. We did some basic Clamshell designs in different sizes and also quilted the Apple Core design and used the walking foot to create some magical simple echo designs.

After that we tried some FMQ using a basic grid and literally just doodled over it trying out different shapes and designs. That was good fun and reminded me that it does not always have to be this complex and intense ...often simple, unassuming designs are really effective. Some women in the group further enhanced their samples with using the decorative stitches on their machines when using the walking foot (e.g. when quilting the clamshell design...that looked really good). Then went on to do some Victorian Feather quilting which was good fun (finished this in the evening). Amongst all this, lots of really interesting discussions about all things 'quilting'.

My efforts for the day


I love attending workshops...unfortunately not that many FMQ workshops are run in my area, so when they do come up, I make a point of going.

And yes, of course, I purchased something...a little Apple Core and Clamshell template. I could have used the Clamshell one the other month when I did my Japanese Table Runner. I bought the smaller size...which will be just right for an overall design for a table runner, I reckon.

Linking up to FMQ Friday at the Freemotion Quilting Project

Karin

Thursday, 11 April 2013

Quilters' Show and Tell

This week's theme is English Paper Piecing and my table runner from last year fits the bill (apologies to all who have already seen it).


Except for the border and binding, this table runner is entirely hand pieced using the English Paper Piecing method. The table runner measures 19.5"x 34". I must say, that this was one of the most therapeutic things I have ever done. There was no rushing this, just steady stitching at a very slow pace...I really enjoyed doing this and the end result was so worth it. If you want to re-visit the painstakingly slow progress of this table runner start here

Check out the entries over at the Quilting Gallery on Friday morning. (Voting starts on Friday and continues through to Monday morning).


Quilters’ Show and Tell


Karin

Monday, 8 April 2013

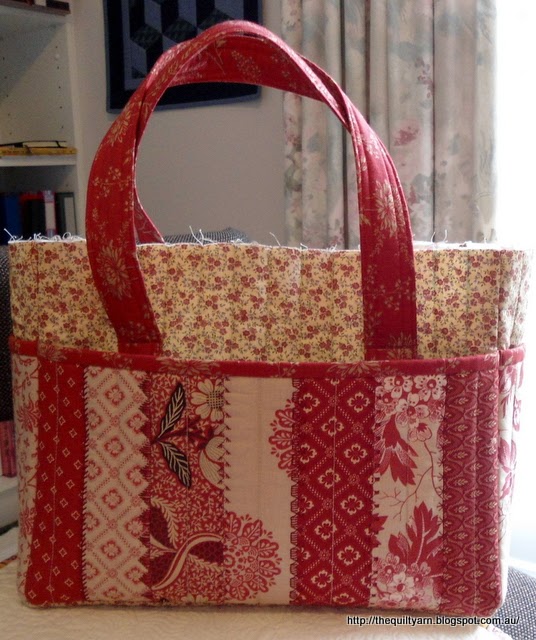
Finish: Pack N' Go Tote

I am finished!


A big thank you to Mhairi, mtnquiltr and also to Linda in Calif for their encouragement and good advice. It came at a time when I really felt like chucking it...all seemed a bit too hard and complicated. Had to leave it for a day or two just to get a bit of a grip. Followed Linda's advice and re-did the lining by 1/4 inch. In the absence of any clue seemed like a good idea and given that the lining appeared way too big I thought that that little bit smaller might just make the difference. Must admit, I was a bit nervous when I put it in...but yes, that did the trick. While still loose, it just fitted that little bit better.
 
After that I had a lot of fun making those little pocket closures and the fabric-covered buttons. Turned out really nice, I think.
 
Now back to the quilting...need to baste my Colour Adventure quilt and then I am looking forward to do some more feather quilting (also attending a whole day workshop on feathers on Friday...really excited about this)


Karin

Wednesday, 3 April 2013

WIP: Pack N' Go Tote - Progress Report

Did I describe this bag as "simple" before??

Well, all went well...I followed the pattern (taken from Fresh Fabric Treats with your favourite Moda Bakeshop designers) one section at a time and thought I was making very good progress. I did use fusible batting rather than the Warm and Natural batting that was used in the book but thought that this would not make too much of a difference.

My machine struggled with the thickness a bit, so if I was to do this again I probably stick to the Warm and Natural batting, but otherwise all good, until I got to the Assembly section. WHAT!!...inset seams??...how did I not see that before? I could not believe it. In my eagerness I obviously did not pay too much attention to the assembly side of things otherwise I might have backed out of this one. Well, I have pieced inset seams before...so, how hard could this be. With that I set out to assemble the bag...what a struggle! With the double layer of panels and batting this was like taming the beast...my first attempt was less than satisfactory with the corners not meeting properly at all and the seam itself somewhat crooked.

So, I undid all the stitching (yes, this took ages and was very frustrating) and started again, working deliberately slow and concentrated a bit better, with the occasional swear words accompanying the process. The corners came out better, not sure whether all the seams are totally straight, but this is brilliant compared to the first attempt. Then I discovered I had ripped into two of my quilting lines...(don't you love it)...so had to do some repair work.

So, tada...here it the body of the bag done


So far, so good. I am pleased with this...the panels which are pockets are all around and will be secured with a pocket closure and a button in the middle...(to be continued).

I did the lining yesterday and must say that after the struggle with the bulk of the bag the inset seams of the lining were an absolute breeze. Now my measurements were all more or less exact but when I put the lining in, it seemed to be too big. I measured everything again because I thought that I might have to re-do this as well, but my measurements were correct on both lining and bag...not quite sure what to do because even if I wanted to make it smaller, I have absolutely no idea how much smaller it should be, as it should fit as it is. Then why does this look miles too big? Maybe I should iron the bag gently to make everything a bit flatter?

Any bag-makers out there who could comment on linings and what that should look like? My lining is literally throwing folds in there, but when I pin it around the top of the bag it definitely fits as it should.

Anyway, that's been my challenge for the week and no matter what, this will actually be finished and at least from the outside, it will look great.

Linking up to WIP Wednesday at Freshly Pieced guest hosted by Natalie from Greenleaf Goods

Karin

Monday, 1 April 2013

A New Bag - Pack N' Go Tote

So, I am tackling bag-making once again. Found this really cute bag in a book I picked up over X-mas at a sale (Fresh Fabric Treats with your favourite Moda Bake Shop designers). No zippers, just a simple bag...

The bag in the book is made out of bright, modern fabrics, however I am using my Moda Jelly Roll - Chateau Rouge/French General for it. May turn out a bit too red, but who cares...as you can see I love red, particularly the more deeper tones.

This is how far I got...finished front and back pocket plus the sides, the rest should come together a bit more quickly.


Was actually nice to get re-acquainted with my machine. Forgot how many useful features I have got on there. The panels were not that easy to do. In the book they sew the strips directly onto the batting and then sew the decorative stitches over the seams. Now that did not work for me at all. I put the strips together first and then used some fusible batting and a stabilizer for the decorative stitches. I think I have got about 250 decorative stitches on the machine that I never use and most of my time was spent staring at all those stitches, unable to decide which ones to use. In the end I tried all sorts of stitches and some of them would have probably been better to leave out as they became fairly tight and there is some crinkling going on. However, I rarely use them and I thought that this was a good opportunity to just try and see how this works.


And here is one of the handles...absolutely love doing handles

 
Now I only have to do the body of the bag...not sure how that will go as I bought some small floral print in similar colours to go with it which may turn out to be a bit much on the eyes (Colour looks a bit different here...it does actually match a bit better in real life).
 
I find it really hard to visualise things so just have to go with my hunch that this will turn out alright. I will do the lining out of the same floral print with the red binding all around. Then it has got some pocket loop closures and some fabric covered buttons to go on there....
 
 
Let's see how this will turn out...if I like it then I might consider doing this in more modern bright fabrics.
 
 
Linking up to Plum and June's Let's Get Acquainted Link Up Held over at Taryn's from Pixel to Patchwork and (later on) Anything Goes - Quilt & Sew Linky Party held by Marelize at Stitch by Stitch

Karin

Popular Posts